Introduction
This document describes how to configure Remote Access VPN with LDAP AA on a Firepower Threat Defense (FTD) managed by a Firepower Management Center.
Prerequisites
Requirements
Cisco recommends that you have knowledge of these topics:
- Basic knowledge of Remote Access VPN (RA VPN) working.
- Understand navigation through the Firepower Management Center (FMC).
- Configuration of Lightweight Directory Access Protocol (LDAP) services on Microsoft Windows Server.
Components Used
The information in this document is based on these software versions:
- Cisco Firepower Management Center version 7.3.0
- Cisco Firepower Threat Defense version 7.3.0
- Microsoft Windows Server 2016, configured as LDAP server
The information in this document was created from the devices in a specific lab environment. All of the devices used in this document started with a cleared (default) configuration. If your network is live, ensure that you understand the potential impact of any command.
Background Information
This document describes the configuration of Remote Access VPN (RA VPN) with Lightweight Directory Access Protocol (LDAP) Authentication and Authorization on a Firepower Threat Defense (FTD) managed by a Firepower Management Center (FMC).
LDAP is an open, vendor-neutral, industry-standard application protocol to access and maintain distributed directory information services.
An LDAP attribute map equates attributes that exist in the Active Directory (AD) or LDAP server with Cisco attribute names. Then, when the AD or LDAP server returns authentication responses to the FTD device during a remote access VPN connection establishment, the FTD device can use the information to adjust how the AnyConnect client completes the connection.
RA VPN with LDAP authentication has been supported on the FMC since version 6.2.1 and LDAP authorization prior to FMC version 6.7.0 was advised via FlexConfig in order to configure LDAP Attribute Map and associate it with the Realm Server. This feature, with version 6.7.0, has now been integrated with the RA VPN configuration wizard on the FMC and does not require the use of FlexConfig anymore.
Note: This feature requires the FMC to be on version 6.7.0; whereas, the managed FTD can be on any version higher than 6.3.0.
License Requirements
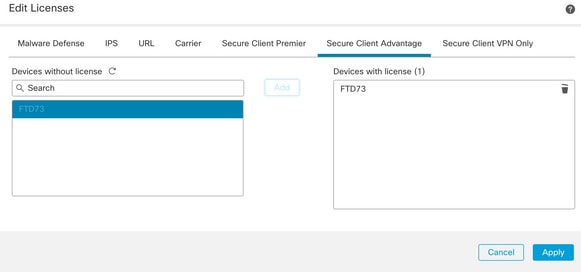
Requires AnyConnect Apex, AnyConnect Plus, or AnyConnect VPN Only license with export-controlled functionality enabled.
In order to check the license, navigate to System > Licenses > Smart Licenses.

Configuration Steps on FMC
REALM / LDAP Server Configuration
Note: The steps listed are only required if it is for configuration of a new REALM / LDAP server. If you have a pre-configured server, which could be used for authentication in RA VPN, then navigate to RA VPN Configuration.
Step 1. Navigate to System > Other Integrations > Realms, as shown in this image.

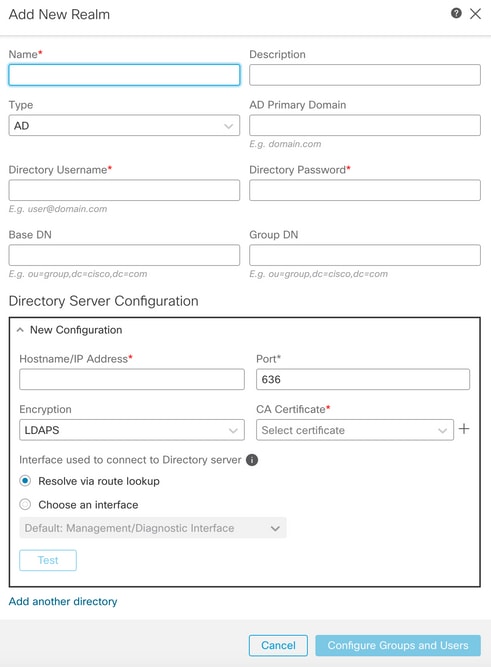
Step 2. As shown in the image, click Add a new realm.

Step 3. Provide the details of the AD server and directory. Click OK.
For the purpose of this demonstration:
Name: LDAP
Type: AD
AD Primary Domain: test.com
Directory Username: CN=Administrator,CN=Users,DC=test,DC=com
Directory Password: <Hidden>
Base DN: DC=test,DC=com
Group DN: DC=test,DC=com
Step 4. Click Save to save the realm/directory changes, as shown in this image.

Step 5. Toggle the State button to change the State of the server to Enabled, as shown in this image.

RA VPN Configuration
These steps are needed to configure the Group Policy, which is assigned to Authorized VPN users. If the Group Policy is already defined, move to Step 5.
Step 1. Navigate to Objects > Object Management.

Step 2: In the left pane, navigate to VPN > Group Policy.
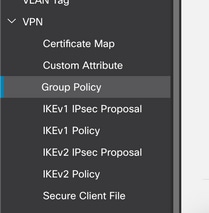
Step 3: Click Add Group Policy.

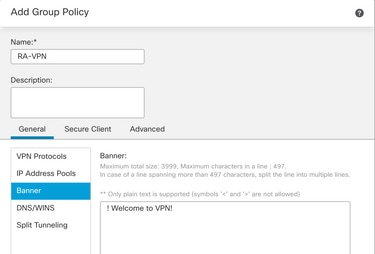
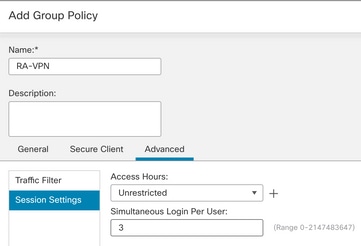
Step 4: Provide the Group Policy values.
For the purpose of this demonstration:
Name: RA-VPN
Banner: ! Welcome to VPN !
Simultaneous Login Per User: 3 (Default)
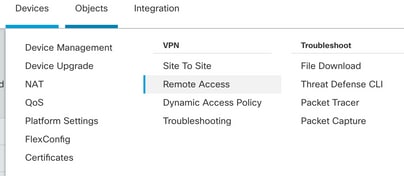
Step 5. Navigate to Devices > VPN > Remote Access.
Step 6. Click Add a new configuration.

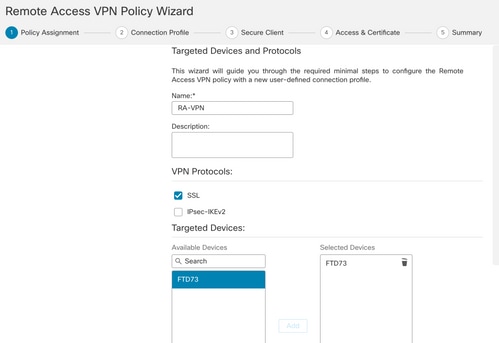
Step 7. Provide a Name for the RA VPN Policy. Choose VPN Protocols and choose Targeted Devices. Click Next.
For the purpose of this demonstration:
Name: RA-VPN
VPN Protocols: SSL
Targeted Devices: FTD
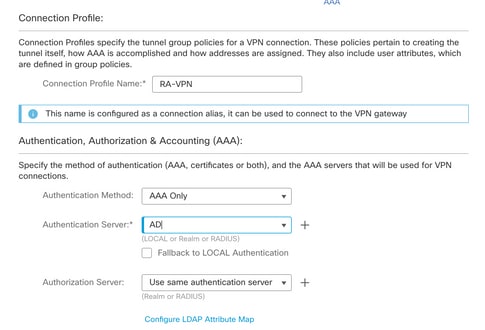
Step 8. For the Authentication Method, choose AAA Only. Choose the REALM / LDAP server for the Authentication Server. Click Configure LDAP Attribute Map (to configure LDAP Authorization).
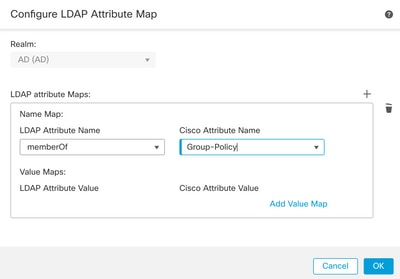
Step 9. Provide the LDAP Attribute Name and the Cisco Attribute Name. Click Add Value Map.
For the purpose of this demonstration:
LDAP Attribute Name: memberOfI
Cisco Attribute Name: Group-Policy
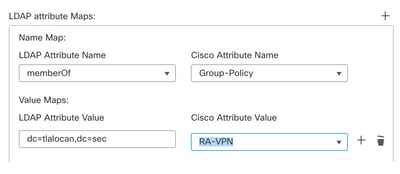
Step 10. Provide the LDAP Attribute Value and the Cisco Attribute Value. Click OK.
For the purpose of this demonstration:
LDAP Attribute Value: DC=tlalocan,DC=sec
Cisco Attribute Value: RA-VPN
Note: You can add more Value Maps as per the requirement.
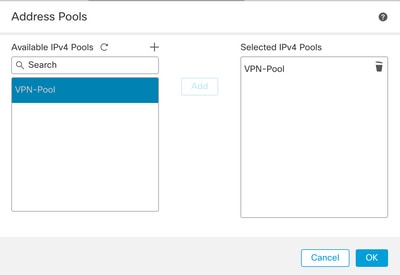
Step 11. Add the Address Pool for the local address assignment. Click OK.
Step 12. Provide the Connection Profile Name and the Group-Policy. Click Next.
For the purpose of this demonstration:
Connection Profile Name: RA-VPN
Authentication Method: AAA Only
Authentication Server: LDAP
IPv4 Address Pool: VPN-Pool
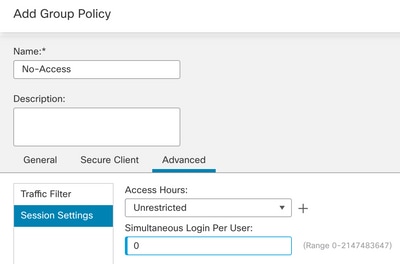
Group-Policy: No-Access
Note: The Authentication Method, Authentication Server, and the IPV4 Address Pool were configured in previous steps.
The No-Access group-policy has the Simultaneous Login Per User parameter set to 0 (To not allow users to be able to log in if they receive the default No-Access group-policy).
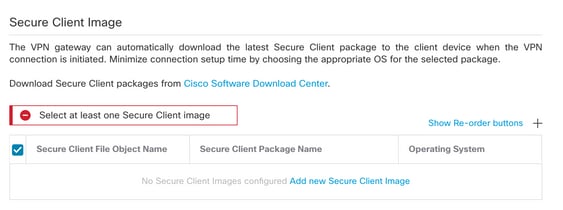
Step 13. Click Add new AnyConnect Image in order to add an AnyConnect Client Image to the FTD.
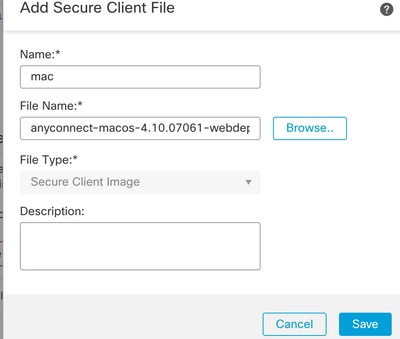
Step 14. Provide a Name for the image uploaded and browse from the local storage to upload the image. Click Save.
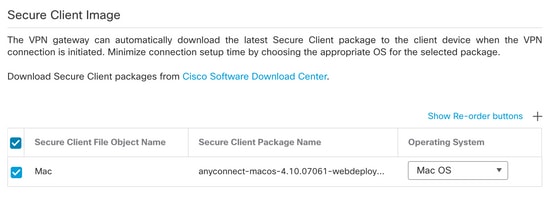
Step 15. Click the check box next to the image in order to enable it for use. Click Next.
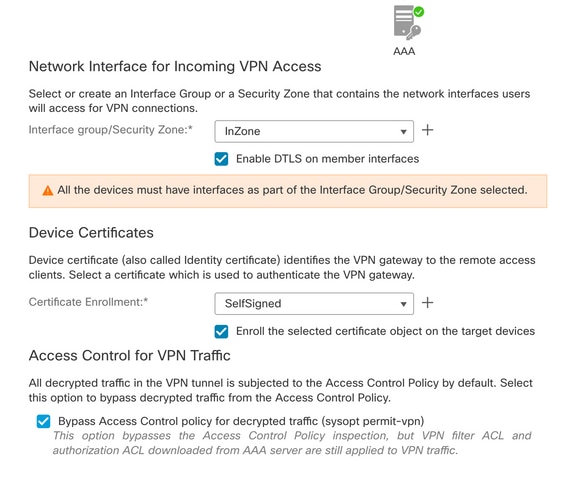
Step 16. Choose the Interface group/Security Zone and the Device Certificate. Click Next.
For the purpose of this demonstration:
Interface group/Security Zone: Out-Zone
Device Certificate: Self-Signed
Note: You can choose to enable the Bypass Access Control policy option in order to bypass any access control check for encyrpted (VPN) traffic (Disabled by default).
Step 17. View the summary of the RA VPN configuration. Click Finish to save, as shown in the image.
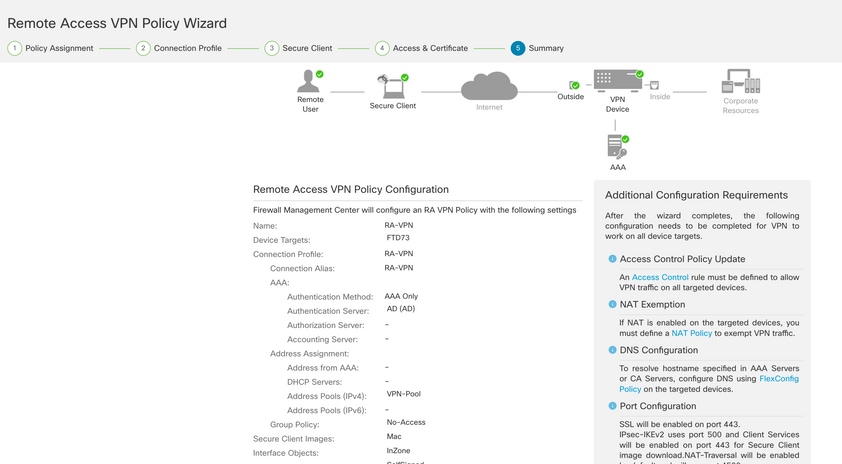
Step 18. Navigate to Deploy > Deployment. Choose the FTD to which the configuration needs to be deployed. Click Deploy.
The configuration is pushed to the FTD CLI after successful deployment:
!--- LDAP Server Configuration ---!

ldap attribute-map LDAP
 map-name memberOf Group-Policy
 map-value memberOf DC=tlalocan,DC=sec RA-VPN

aaa-server LDAP protocol ldap
 max-failed-attempts 4
 realm-id 2
aaa-server LDAP host 10.106.56.137
 server-port 389
 ldap-base-dn DC=tlalocan,DC=sec
 ldap-group-base-dn DC=tlalocan,DC=sec
 ldap-scope subtree
 ldap-naming-attribute sAMAccountName
 ldap-login-password *****
 ldap-login-dn CN=Administrator,CN=Users,DC=test,DC=com
 server-type microsoft
 ldap-attribute-map LDAP

!--- RA VPN Configuration ---!

webvpn
 enable Outside
 anyconnect image disk0:/csm/anyconnect-win-4.10.07061-webdeploy-k9.pkg 1 regex "Mac"
 anyconnect enable
 tunnel-group-list enable
 error-recovery disable

ssl trust-point Self-Signed

group-policy No-Access internal
group-policy No-Access attributes
 vpn-simultaneous-logins 0
 vpn-idle-timeout 30

 !--- Output Omitted ---!

 vpn-tunnel-protocol ssl-client
 split-tunnel-policy tunnelall
 ipv6-split-tunnel-policy tunnelall
 split-tunnel-network-list none

group-policy RA-VPN internal
group-policy RA-VPN attributes
 banner value ! Welcome to VPN !
 vpn-simultaneous-logins 3
 vpn-idle-timeout 30

 !--- Output Omitted ---!

 vpn-tunnel-protocol ssl-client
 split-tunnel-policy tunnelall
 ipv6-split-tunnel-policy tunnelall
 split-tunnel-network-list non

ip local pool VPN-Pool 10.72.1.1-10.72.1.150 mask 255.255.255.0

tunnel-group RA-VPN type remote-access
tunnel-group RA-VPN general-attributes
address-pool VPN-Pool
authentication-server-group LDAP
default-group-policy No-Access
tunnel-group RA-VPN webvpn-attributes
group-alias RA-VPN enable
Verify
On the AnyConect client, log in with Valid VPN User Group Credentials, and you get the correct group policy assigned by the LDAP Attribute Map:
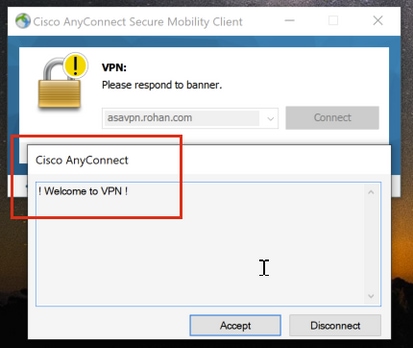
From the LDAP Debug Snippet (debug ldap 255) you can see there is a match on the LDAP Attribute Map:
Authentication successful for test to 10.106.56.137

memberOf: value = DC=tlalocan,DC=sec
        mapped to Group-Policy: value = RA-VPN
        mapped to LDAP-Class: value = RA-VPN
On the AnyConect client, log in with an Invalid VPN User Group Credential and you get the No-Access group policy.
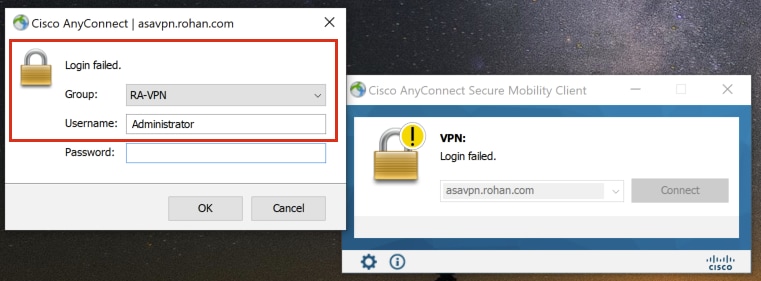
%FTD-6-113004: AAA user authentication Successful : server = 10.106.56.137 : user = Administrator
%FTD-6-113009: AAA retrieved default group policy (No-Access) for user = Administrator
%FTD-6-113013: AAA unable to complete the request Error : reason = Simultaneous logins exceeded for user : user = Administrator
From LDAP Debug Snippet (debug ldap 255), you can see there is no match on the LDAP Attribute Map:
Authentication successful for Administrator to 10.106.56.137

memberOf: value = CN=Group Policy Creator Owners,CN=Users,DC=tlalocan,DC=sec
        mapped to Group-Policy: value = CN=Group Policy Creator Owners,CN=Users,DC=tlalocan,DC=sec
        mapped to LDAP-Class: value = CN=Group Policy Creator Owners,CN=Users,DC=tlalocan,DC=sec
memberOf: value = CN=Domain Admins,CN=Users,DC=tlalocan,DC=sec
        mapped to Group-Policy: value = CN=Domain Admins,CN=Users,DC=tlalocan,DC=sec
        mapped to LDAP-Class: value = CN=Domain Admins,CN=Users,DC=tlalocan,DC=sec
memberOf: value = CN=Enterprise Admins,CN=Users,DC=tlalocan,DC=sec
        mapped to Group-Policy: value = CN=Enterprise Admins,CN=Users,DC=tlalocan,DC=sec
        mapped to LDAP-Class: value = CN=Enterprise Admins,CN=Users,DC=tlalocan,DC=sec
memberOf: value = CN=Schema Admins,CN=Users,DC=tlalocan,DC=sec
        mapped to Group-Policy: value = CN=Schema Admins,CN=Users,DC=tlalocan,DC=sec
        mapped to LDAP-Class: value = CN=Schema Admins,CN=Users,DC=tlalocan,DC=sec
memberOf: value = CN=IIS_IUSRS,CN=Builtin,DC=tlalocan,DC=sec
        mapped to Group-Policy: value = CN=IIS_IUSRS,CN=Builtin,DC=tlalocan,DC=sec
        mapped to LDAP-Class: value = CN=IIS_IUSRS,CN=Builtin,DC=tlalocan,DC=sec
memberOf: value = CN=Administrators,CN=Builtin,DC=tlalocan,DC=sec
        mapped to Group-Policy: value = CN=Administrators,CN=Builtin,DC=tlalocan,DC=sec
        mapped to LDAP-Class: value = CN=Administrators,CN=Builtin,DC=tlalocan,DC=sec


 Feedback