Add One More Node to the Resilient Packet Ring
Available Languages
Contents
Introduction
This document describes the procedure to add one or more nodes to the Resilient Packet Ring (RPR) on ML cards for Cisco ONS 15454.
Prerequisites
Requirements
Cisco recommends that you have knowledge of these topics:
-
Cisco ONS 15454
-
Cisco ONS 15454 ML-Series Ethernet Cards
-
Cisco IOS® Software
-
Bridging and IP Routing
Components Used
The information in this document is based on these software and hardware versions:
-
Cisco ONS 15454 that runs ONS Release 4.1.3.
-
ML (bundled as part of the ONS 4.1.3 release) that runs Cisco IOS Software Release 12.1(19) EO1.
Note: The configurations in this document are based on a Bridging over RPR solution.
The information in this document was created from the devices in a specific lab environment. All of the devices used in this document started with a cleared (default) configuration. If your network is live, make sure that you understand the potential impact of any command.
Conventions
Refer to Cisco Technical Tips Conventions for more information on document conventions.
Topology
Resilient Packet Ring (RPR) is a standard-based layer 2 architecture, optimized for bursty data traffic. The RPR enables ring-based architecture without the need for Ethernet Spanning Tree or the SONET/SDH protection scheme, and still provides sub-50 ms ring convergence time for Ethernet and IP services. RPR provides SONET type of protection without the need to reserve the bandwidth. RPR can work with or without SONET protection. RPR on ML cards introduces another point between the Packet Over SONET (POS) interfaces and Ethernet interfaces. A Shared Packet Ring (SPR) interface is a virtual interface that provides this link. For RPR, both POS ports act as members of the SPR interface. The SPR interface automatically performs protection wrapping.
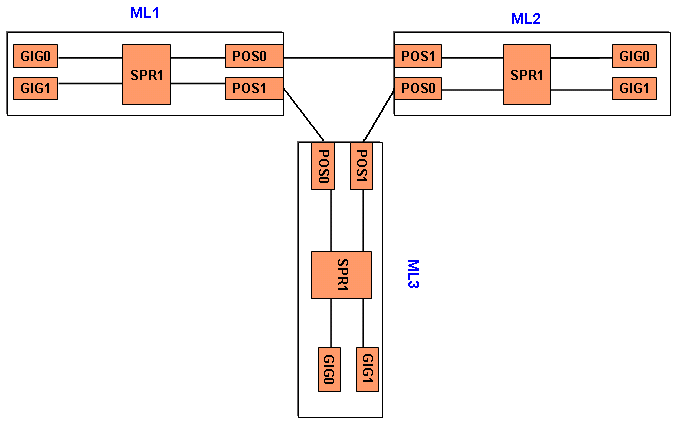
Figure 1 indicates two circuits between POS ports on ONS 15454 nodes over SONET. A single SPR1 interface on each ML card handles the RPR function.
Figure 1 – Two Node Resilient Packet Ring 
With the addition of a third node, there are three circuits among POS ports on 15454 nodes over SONET (see Figure 2).
Figure 2 – Three Node Resilient Packet Ring 
Add One More Node
Complete these steps in order to add one more node to the RPR:
-
Shut down the POS port on ML1 that faces the span where you want to add the new node. The port is POS 1 here:
ML1#configuration terminal
Enter configuration commands, one per line.  End with CNTL/Z.
ML1(config)#interface POS 1
ML1(config-if)#shutdown
ML1(config-if)#^Z
-
Shut down the POS port on ML2 that faces the span where you want to add the new node. The port is POS 0 in this case:
ML2#configuration terminal
Enter configuration commands, one per line.  End with CNTL/Z.
ML2(config)#interface POS 0
ML2(config-if)#shutdown
ML2(config-if)#^Z
-
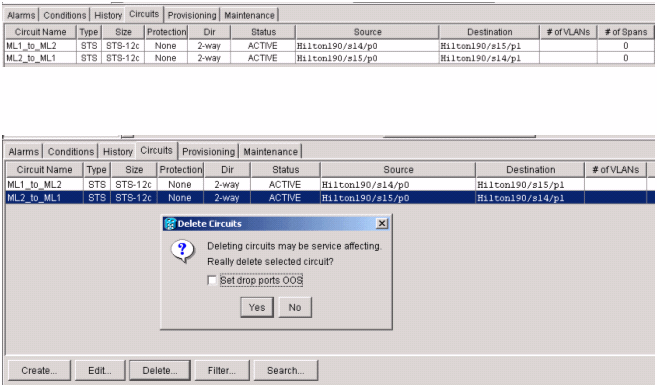
Delete the Synchronous Transport Signal (STS) path between the adjacent nodes for RPR (see Figure 3).
Figure 3 – Delete the STS Path
-
Verify whether Ethernet connectivity still exists on RPR (with test set, and routing tables of the customer).
-
Add the new node (assume that the node is already provisioned for target identifier (TID), IP address, SONET ports IS, SONET Data Communications Channel (SDCC) enabled, and so on).
-
Upload the ML configuration to the new node (ML 3). See the ML 3 configuration in the Final Configuration section.
-
Build two new circuits (and ensure that you select IS as the circuit state) from POS 0 of ML2 to POS 1 of ML3, and from POS 0 of ML3 to POS 1 of ML1 (see Figure 4). Check the audit log to see if the circuit goes in ADMIN_IS or ADMIN_OOS.
Figure 4 – Add Two New Circuits
-
Perform no shutdown on POS 1 port in ML 1 that faces the new node:
ML1#configuration terminal
Enter configuration commands, one per line.  End with CNTL/Z.
ML1(config)#interface POS 1
ML1(config-if)#no shutdown
ML1(config-if)#^Z
-
Perform no shutdown on POS 0 port in ML 2 that faces the new node:
ML2#configuration terminal
Enter configuration commands, one per line.  End with CNTL/Z.
ML2(config)#interface POS 0
ML2(config-if)#no shutdown
ML2(config-if)#^Z
-
Verify whether Ethernet connectivity still exists on RPR (with test set and routing tables of the customer)
-
Monitor Ethernet traffic for at least one hour after node insertion.
Final Configuration
This section provides the final configuration for ML 1, ML 2, and ML3.
ML 1
ML1#show run
Building configuration...

Current configuration : 1238 bytes
!
version 12.1
no service pad
service timestamps debug uptime
service timestamps log uptime
no service password-encryption
!
hostname ML1
!
enable password cisco
!
ip subnet-zero
!
!
bridge irb
!
!
interface SPR1
 no ip address
 no keepalive
 spr station-id 1
 bridge-group 1
 bridge-group 1 spanning-disabled
 hold-queue 150 in
!
interface FastEthernet0
 no ip address
 bridge-group 1
 bridge-group 1 spanning-disabled
!
interface FastEthernet1
 no ip address
 shutdown
!
interface FastEthernet2
 no ip address
 shutdown
!
interface FastEthernet3
 no ip address
 shutdown
!
interface FastEthernet4
 no ip address
 shutdown
!
interface FastEthernet5
 no ip address
 shutdown
!
interface FastEthernet6
 no ip address
 shutdown
!
interface FastEthernet7
 no ip address
 shutdown
!
interface FastEthernet8
 no ip address
 shutdown
!
interface FastEthernet9
 no ip address
 shutdown
!
interface FastEthernet10
 no ip address
 shutdown
!
interface FastEthernet11
 no ip address
 shutdown
!
interface POS0
 no ip address
 spr-intf-id 1
 crc 32
!
interface POS1
 no ip address
 spr-intf-id 1
 crc 32
!
ip classless
no ip http server
!
!
!
!
line con 0
 exec-timeout 5 5
 password ww
line vty 0 4
 exec-timeout 50 0
 password ww
 login
!
end
ML 2
ML2#show run
Building configuration...

Current configuration : 1238 bytes
!
version 12.1
no service pad
service timestamps debug uptime
service timestamps log uptime
no service password-encryption
!
hostname ML2
!
enable password CISCO15
!
ip subnet-zero
!
!
bridge irb
!
!
interface SPR1
 no ip address
 no keepalive
 spr station-id 2
 bridge-group 1
 bridge-group 1 spanning-disabled
 hold-queue 150 in
!
interface FastEthernet0
 no ip address
 bridge-group 1
 bridge-group 1 spanning-disabled
!
interface FastEthernet1
 no ip address
 shutdown
!
interface FastEthernet2
 no ip address
 shutdown
!
interface FastEthernet3
 no ip address
 shutdown
!
interface FastEthernet4
 no ip address
 shutdown
!
interface FastEthernet5
 no ip address
 shutdown
!
interface FastEthernet6
 no ip address
 shutdown
!
interface FastEthernet7
 no ip address
 shutdown
!
interface FastEthernet8
 no ip address
 shutdown
!
interface FastEthernet9
 no ip address
 shutdown
!
interface FastEthernet10
 no ip address
 shutdown
!
interface FastEthernet11
 no ip address
 shutdown
!
interface POS0
 no ip address
 spr-intf-id 1
 crc 32
!
interface POS1
 no ip address
 spr-intf-id 1
 crc 32
!
ip classless
no ip http server
!
!
!
!
line con 0
 exec-timeout 5 5
 password cisco
line vty 0 4
 exec-timeout 50 0
 password cisco
 login
!
end
ML 3
ML3#show run
Building configuration...

Current configuration : 1238 bytes
!
version 12.1
no service pad
service timestamps debug uptime
service timestamps log uptime
no service password-encryption
!
hostname ML3
!
enable password cisco
!
ip subnet-zero
!
!
bridge irb
!
!
interface SPR1
 no ip address
 no keepalive
 spr station-id 3
 bridge-group 1
 bridge-group 1 spanning-disabled
 hold-queue 150 in
!
interface FastEthernet0
 no ip address
 bridge-group 1
 bridge-group 1 spanning-disabled
!
interface FastEthernet1
 no ip address
 shutdown
!
interface FastEthernet2
 no ip address
 shutdown
!
interface FastEthernet3
 no ip address
 shutdown
!
interface FastEthernet4
 no ip address
 shutdown
!
interface FastEthernet5
 no ip address
 shutdown
!
interface FastEthernet6
 no ip address
 shutdown
!
interface FastEthernet7
 no ip address
 shutdown
!
interface FastEthernet8
 no ip address
 shutdown
!
interface FastEthernet9
 no ip address
 shutdown
!
interface FastEthernet10
 no ip address
 shutdown
!
interface FastEthernet11
 no ip address
 shutdown
!
interface POS0
 no ip address
 spr-intf-id 1
 crc 32
!
interface POS1
 no ip address
 spr-intf-id 1
 crc 32
!
ip classless
no ip http server
!
!
!
!
line con 0
 exec-timeout 5 5
 password cisco
line vty 0 4
 exec-timeout 50 0
 password cisco
 login
!
end
Related Information
Revision History
| Revision | Publish Date | Comments |
|---|---|---|
1.0 |
01-Dec-2005 |
Initial Release |
Contact Cisco
- Open a Support Case

- (Requires a Cisco Service Contract)


 Feedback