Introduction
This document describes the process to block/match in a cEdge with a localized policy and an Access Control List (ACL) .
Prerequisites
Requirements
Cisco recommends knowledge of these topics:
- Cisco Software-defined Wide Area Network (SD-WAN)
- Cisco vManage
- cEdge Command Line Interface (CLI)
Components Used
This document is based on these software and hardware versions:
- c8000v version 17.3.3
- vManage version 20.6.3
The information in this document was created from the devices in a specific lab environment. All of the devices used in this document started with a cleared (default) configuration. If your network is live, ensure that you understand the potential impact of any command.
Background
There are different scenarios which require a local method to block, permit, or match traffic. Each method controls access to the router or ensures that the packets arrive to the device and are processed.
cEdge routers provide the ability to configure a localized policy through either CLI or vManage to match traffic conditions and define an action.
These are some examples of localized policy characteristics:
Match Conditions:
- Differentiated Services Code Point (DSCP)
- Packet Length
- Protocol
- Source Data Prefix
- Source Port
- Destination Data Prefix
- Destination Port
Actions:
- Accept
- Additional: counter, DSCP, logs, nexthop, mirror list, class, policer
- Drop
Configure
Network Diagram
For this example, the intention is to block traffic from network 192.168.20.0/24 in cEdge2 on egress basis and permit ICMP from cEdge3 loopback interface.
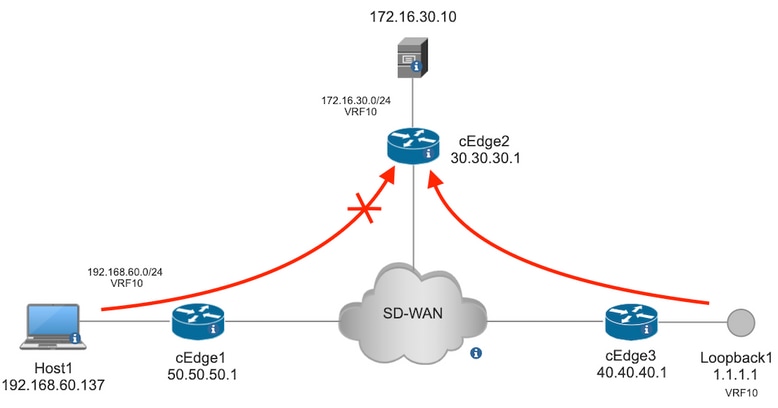
Ping verification from Host1 to Server in cEdge2.
[Host2 ~]$ ping -I eth1 -c 5 172.16.30.10
PING 172.16.30.10 (172.16.30.10) from 192.168.60.137 eth1: 56(84) bytes of data.
64 bytes from 172.16.30.10: icmp_seq=1 ttl=253 time=20.6 ms
64 bytes from 172.16.30.10: icmp_seq=2 ttl=253 time=20.5 ms
64 bytes from 172.16.30.10: icmp_seq=3 ttl=253 time=20.5 ms
64 bytes from 172.16.30.10: icmp_seq=4 ttl=253 time=20.5 ms
64 bytes from 172.16.30.10: icmp_seq=5 ttl=253 time=20.5 ms

--- 172.16.30.10 ping statistics ---
5 packets transmitted, 5 received, 0% packet loss, time 4006ms
rtt min/avg/max/mdev = 20.527/20.582/20.669/0.137 ms
Ping verification from cEdge3 to Server in cEdge2.
cEdge3# ping vrf 10 172.16.30.10 source loopback 1
Type escape sequence to abort.
Sending 5, 100-byte ICMP Echos to 172.16.30.10, timeout is 2 seconds:
Packet sent with a source address of 1.1.1.1
!!!!!
Success rate is 100 percent (5/5), round-trip min/avg/max = 72/73/76 ms
Preconditions:
- cEdge2 must have a device template attached.
- All cEdges must have control connections active.
- All cEdges must have Bidirectional Forwarding Detection (BFD) sessions active.
- All cEdes must have Overlay Management Protocol (OMP) routes to reach service VPN10 side networks.
Configurations
Step 1. Add the localized policy.
In Cisco vManage, navigate to Configuration > Policies > Localized Policy. Click Add Policy
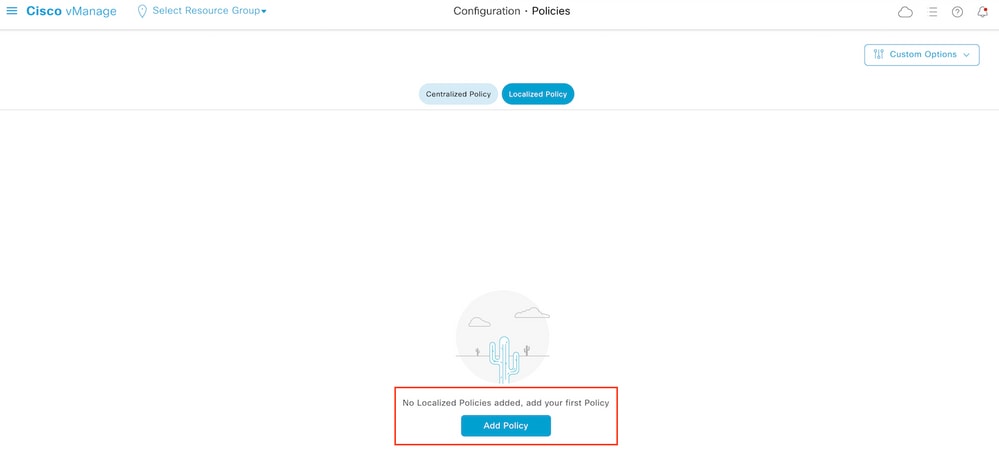
Step 2. Create groups of interest for the intended match.
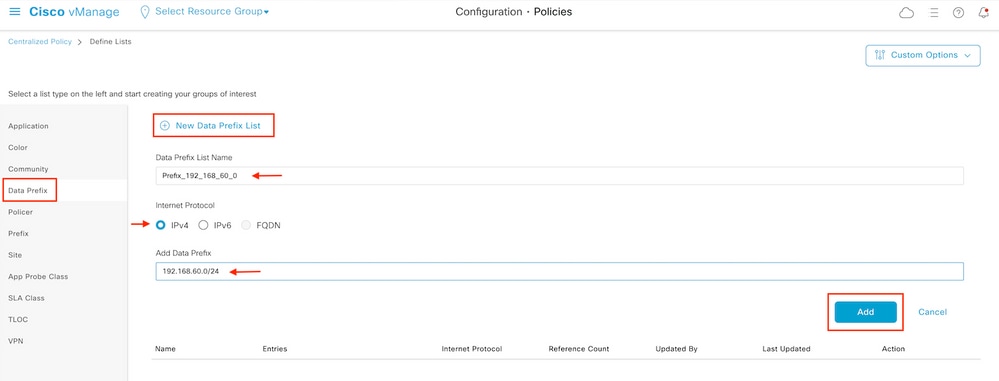
Click Data Prefix on the left menu and select New Data Prefix List.
Give a name to the match condition, define the Internet protocol, and add a data prefix.
Click Add and then Next until Configure Access Control List is displayed.
Step 3. Create the access list to apply the match condition.
Select Add IPv4 ACL Policy from the Add Access Control List Policy dropdown menu.
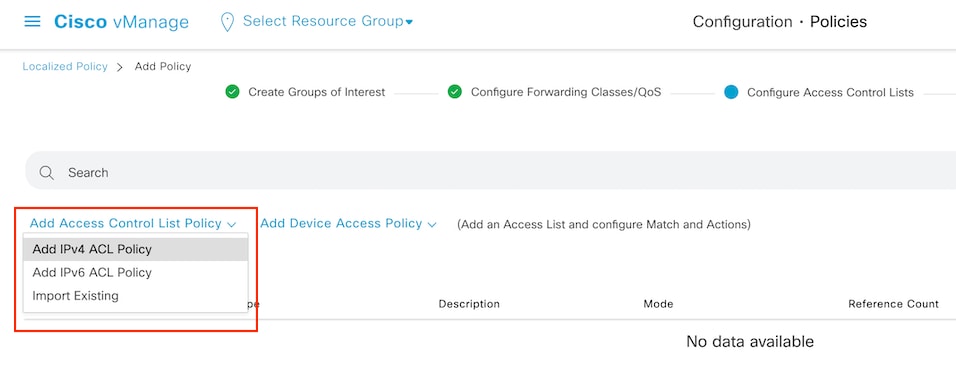
Note: This document is based on access control list policy and must be not confused with a device access policy. The device access policy acts in the control plan for local services such as Simple Network Management Protocol (SNMP) and Secure Socket Shell (SSH), only, whereas the access control list policy is flexible for different services and match conditions.
Step 4. Define the ACL sequence
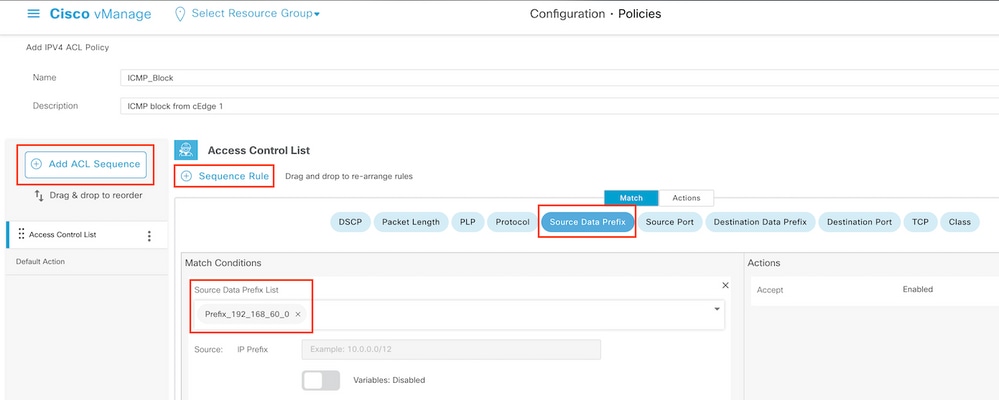
In the ACL configuration screen, name the ACL and provide a description. Click Add ACL Sequence and then Sequence Rule.
In match conditions menu, select Source Data Prefix and then choose the data prefix list from the Source Data Prefix List drop-down menu.
Step 5. Define the action for the sequence and name it
Navigate to Action select Drop, and click Save Match and Actions.
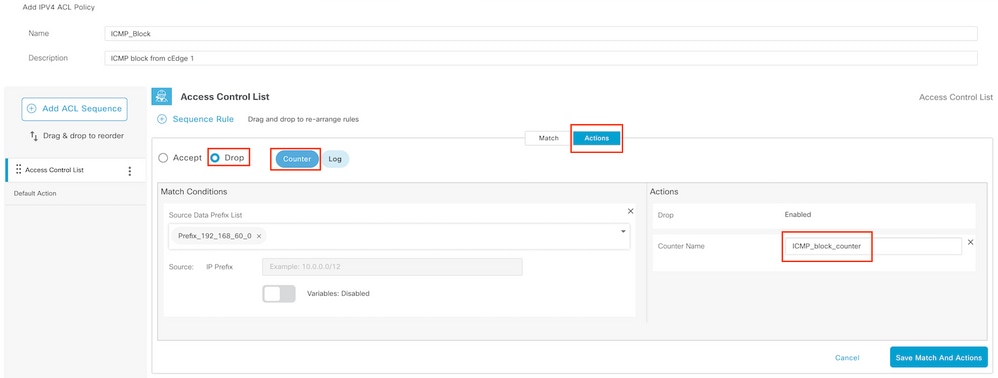
Note: This action is exclusively associated to the sequence itself, not the complete localized policy.

Step 6. In the left menu, select Default Action ,click Edit, and choose Accept.

Note: This default action is at the end of the localized policy. Do not use drop, otherwise, all traffic can be impacted and cause a network outage.
Click Save Access Control List Policy.

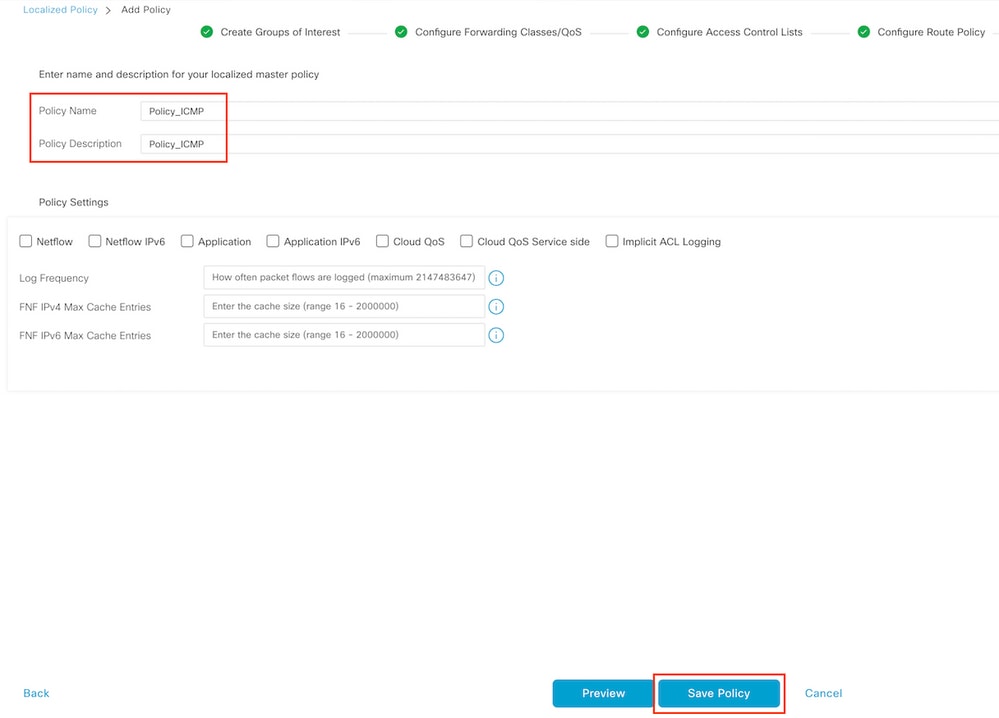
Step 7. Name the policy
Click Next until Policy Overview and name it. Leave the other values blank. Click Save Policy
To ensure the policy is correct, click Preview.

Verify the sequence and elements are correct in the policy.
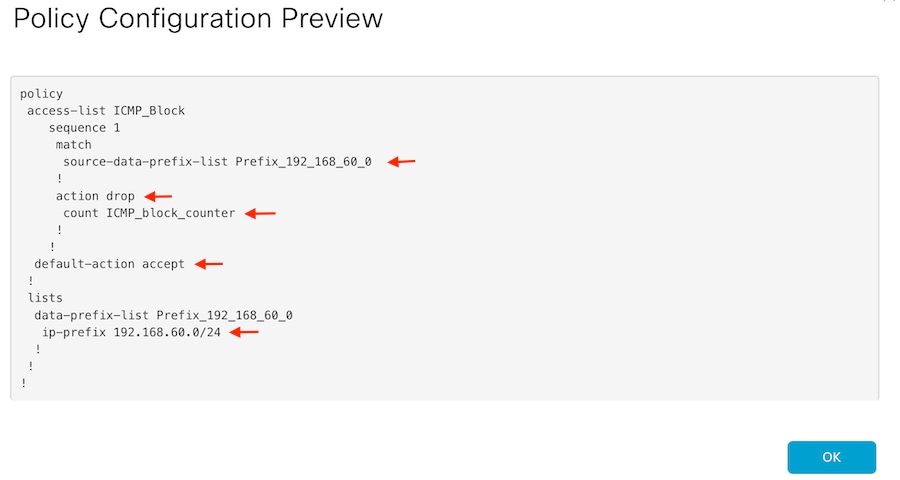
Copy the ACL name. It is required in a further step.
Step 8. Associate the localized policy with the device template.
Locate the device template attached to the router, click the three dots, and click Edit.

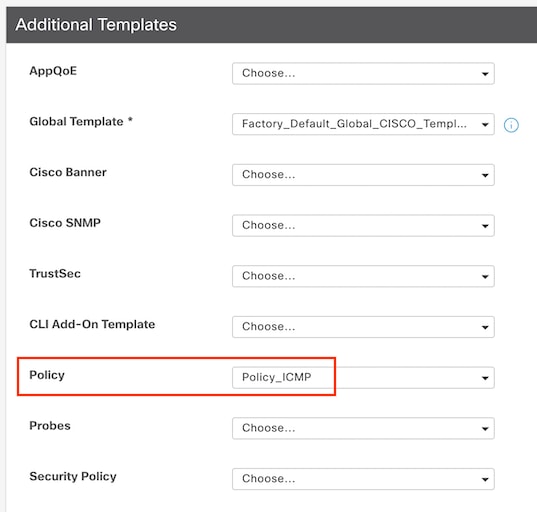
Select Additional Templates and add the localized policy to the policy field and click Update > Next > Configure Devices to push the configuration to the cEdge.

Note: At this point, the vManage builds the ACL based on the policy created and pushes the changes to the cEdge, although it is not associated to any interface. Therefore, it does not have any effect in the traffic flow.
Step 9. Identify the feature template of the interface where it is intended to apply the action to the traffic in the device template.
It is important to locate the feature template where the traffic needs to be blocked.
In this example, the GigabitEthernet3 interface belongs to Virtual Private Network 3 (Virtual Forwarding Network 3).
Navigate to service VPN section and click Edit to access the VPN templates.
In this example, the GigabitEthernet3 interface has c1000v-Base-VP10-IntGi3 feature template attached.

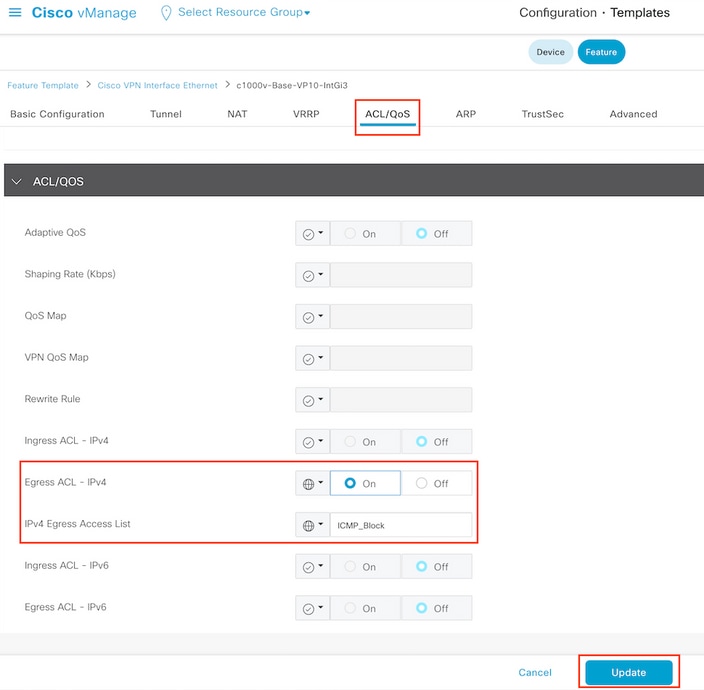
Step 10. Associate the ACL name with the interface.
Navigate to Configuration > Templates > Feature. Filter the templates and click Edit
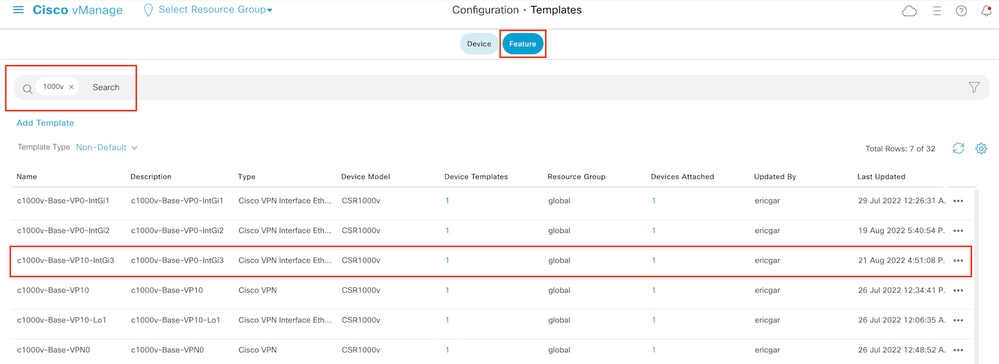
Click ACL/QoS and enable the direction for the traffic to block. Write the ACL name copied in step 7. Click Update and push the changes.
Note: This localized policy creation process also works for vEdges because the vManage policy structure is the same for both architectures. The different part is given by the device template that builds a configuration structure compatible with cEdge or vEdge.
Verify
Step 1. Verify the configurations correctly in the router
cEdge2# show sdwan running-config policy
policy
lists
  data-prefix-list Prefix_192_168_60_0     <<<<<<<<<
   ip-prefix 192.168.60.0/24      <<<<<<<<<
  !
!
access-list ICMP_Block
  sequence 1
   match
    source-data-prefix-list Prefix_192_168_60_0 <<<<<<<<<
   !
   action drop      <<<<<<<<<
    count ICMP_block_counter    <<<<<<<<<
   !
  !
  default-action accept     <<<<<<<<<
!
!
cEdge2# show sdwan running-config sdwan | section interface GigabitEthernet3
interface GigabitEthernet3
  access-list ICMP_Block out
Step 2. From Host1 that is in service network of cEdge1, send 5 ping messages to the server in cEdge2
[Host1 ~]$ ping -I eth1 -c 5 172.16.30.10
PING 172.16.30.10 (172.16.30.10) from 192.168.60.137 eth1: 56(84) bytes of data.
--- 172.16.30.10 ping statistics ---
5 packets transmitted, 0 received, 100% packet loss, time 4088ms
Note: For this example, host1 is a Linux machine. "-I" represents the interfaces where the ping leaves the router and "-c" represents the number of ping messages.
Step 3. From cEdge2, verify the ACL counters
cEdge2# show sdwan policy access-list-counters
NAME           COUNTER NAME    PACKETS BYTES
------------------------------------------------------------------------------
ICMP_Block ICMP_block_counter     5     610
default_action_count              0      0
The counter matched five (5) packets that came from network 192.168.60.0/24, as defined in the policy.
Step4. From cEdge3, send 4 ping messages to server 172.16.30.10
cEdge3# ping vrf 10 172.16.30.10 source loopback 1
Type escape sequence to abort.
Sending 5, 100-byte ICMP Echos to 172.16.30.10, timeout is 2 seconds:
Packet sent with a source address of 1.1.1.1
!!!!!
Success rate is 100 percent (5/5), round-trip min/avg/max = 72/76/88 ms
The packets passed through the router to the server because the network is different (in this case is 1.1.1.1/32) and there is no matching condition for it in the policy.
Step 5. Verify the ACL counters in cEdge2 again.
cEdge2# show sdwan policy access-list-counters
NAME           COUNTER NAME    PACKETS BYTES
------------------------------------------------------------------------------
ICMP_Block ICMP_block_counter     5     610
default_action_count              5     690
The counter of default_action_count incremented with the 5 packets sent by cEdge3.
To clear counters, run clear sdwan policy access-list command.
Commands for verification in vEdge
show running-config policy
show running-config
show policy access-list-counters
clear policy access-list
Troubleshoot
Error: Illegal reference to the ACL name in the interface
The policy that contains the ACL must be first attached to the device template. After that, the ACL name can be specified in the feature device template of the interface.

Related Information




 Feedback