Configure Day-Zero Cellular Gateway 522-E Deployment Guide
Available Languages
Download Options
Bias-Free Language
The documentation set for this product strives to use bias-free language. For the purposes of this documentation set, bias-free is defined as language that does not imply discrimination based on age, disability, gender, racial identity, ethnic identity, sexual orientation, socioeconomic status, and intersectionality. Exceptions may be present in the documentation due to language that is hardcoded in the user interfaces of the product software, language used based on RFP documentation, or language that is used by a referenced third-party product. Learn more about how Cisco is using Inclusive Language.
Contents
Introduction
This document describes the initial configuration and installation process for the Cellular Gateway 522-E.
Background Information
Any complex configuration procedure is beyond the scope of this publication. The CG522-E is a Plug and Play device, but the information provided allows ease of use. Here is a hyperlink for all the published CG522-E documentation.
Prerequisites
Requirements
Cisco recommends that you have basic knowledge of these topics:
- 5G Cellular Network Basics
- Cisco IOS® XE and Cisco IOS® CG
Components Used
CG522-E (v.17.04.01a)
CG522-E Modem EM9190 (v.SWIX55C_01.07.13.00)
WS-C3850-12X48U (v.03.07.04E)
The information in this document was created from the devices in a specific lab environment. All of the devices used in this document started with a cleared (default) configuration. If your network is live, ensure that you understand the potential impact of any command.
General Information of the CG522-E
The CG522 works as an NSA (Non-standalone) device. This means the 5G band is on the data plane and LTE on the control plane. As a result, traffic needs to be pushed in and out of the CG522 for the NSA device to aggregate from 4G bands to 5G bands.
Hardware Installation Procedure:
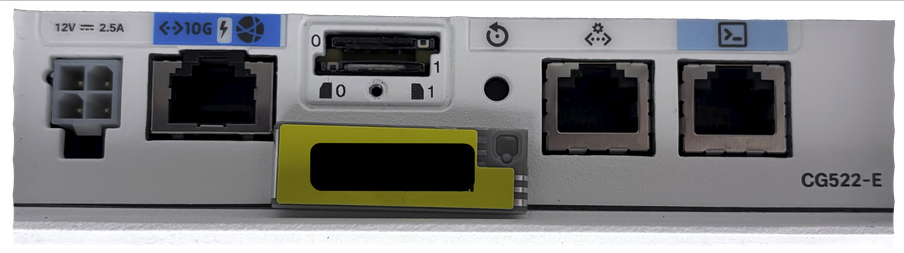
Side Panel of the Cisco Cellular Gateway 522-E
This figure shows the I/0 side panel of the CG522-E:
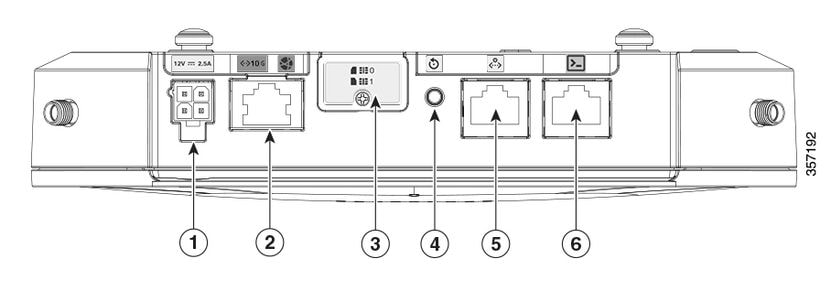
| 1 | PWR Socket |
| 2 | Gigabit Ethernet-WAN |
| 3 | Cover for dual sim slots (SIM 0 | SIM 1) |
| 4 | Reset button |
| 5 | Aux port |
| 6 | Console (RJ-45) |
Indication of Status LEDs on CG522-E
| ◉ | solid |
| ✺ | blinking |
| ○ | off |
Initial Bootup LEDs
| 4G | 5G | Function |
| ◉ | ○ |
|
| ✺ / ○ | ○ |
|
| ◉ | ○ |
|
| ✺ / ○ | ○ |
|
Nominal LEDs
| 4G | 5G | Function |
| ◉ | ○ |
|
| ✺ / ○ | ○ |
|
| ○ | ◉ |
|
| ○ | ✺ / ○ |
|
Marginal Condition LEDs
| 4G | 5G | Function |
| ◉ | ◉ | Low power mode |
| ✺ / ○ or ◉ | ✺ / ○ | Thermal mitigation mode activated, radio on with 4G signal |
| ✺ / ○ | ✺ / ○ or ◉ | Thermal mitigation mode activated, radio on with 5G signal |
| ✺ / ○ | ✺ / ○ | Thermal mitigation mode activated, radio off |
Installation of the SIM card(s)
Beside the ethernet port, the CG522-E has a cover for the SIM slots. The cover is held together by a Philips head screw. Carefully remove the screw to reveal the SIM slots.
The SIM size is only compatible with MICRO SIM (Height: 15 mm, Width: 12 mm, Thickness: 0.76mm).
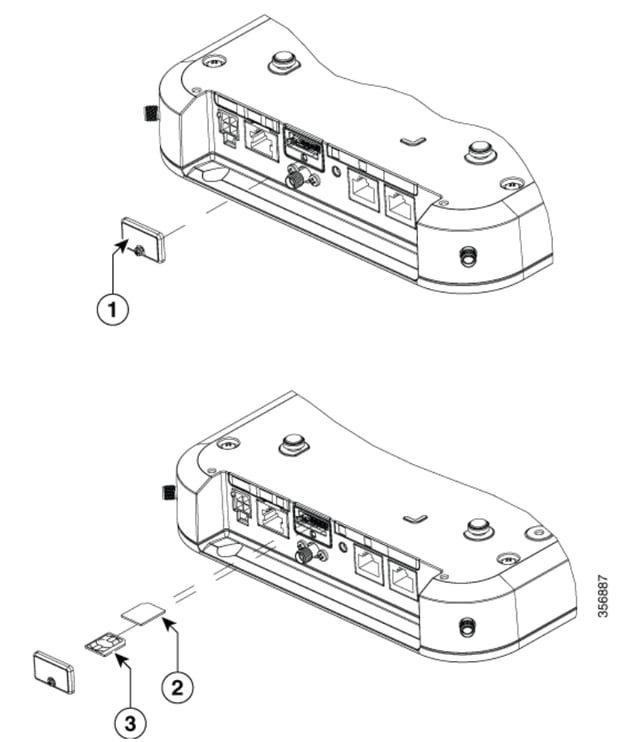
| 1 | SIM Cover |
| 2 | MICRO SIM Adapter |
| 3 | NANO SIM |

Note: Use a MICRO SIM card adapter for NANO SIM cards.
Installation of the indoor 5G Antenna
Occasionally, there is a need to install a 5G Antenna onto the CG522-E. The only supported indoor 5G Antenna is the 5G-ANTM-SMA-D (Multi-Band Swivel Mount Dipole antenna) (SMA). To insert the antenna, ensure there is no power to the CG522-E, take the SMA male connector end of the antenna, and twist the connector into the female connector on the CG522-E until moderately tight.
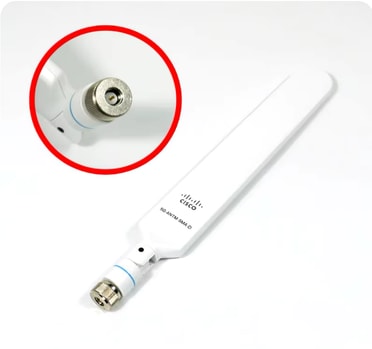
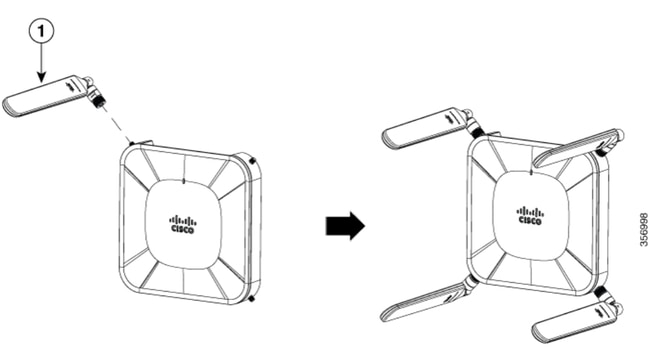
Note: The 5G-ANTM-SMA-D is intended for indoor use. The antenna is designed to connect to a dedicated antenna port on the device. No special tools are required to install the antenna.

Warning: Please utilize the 5G-ANTM-SMA-D installation guide for safety precautions and protocols to operate with lightning activity.
Power up the CG522-E
The CG522-E can be powered on from multiple methods, which include PoE+ and a 12V 2.5A power brick 4-pin connector.
To confirm the CG522-E is PoE compatible, look for the lightning symbol on the ethernet port.
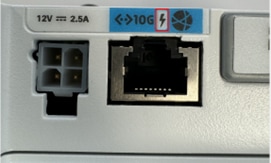
Note: The PoE+ cable must be no longer than 100 m. If a non-PoE CG522-E unit is replaced, the same one is received.

Tip: This is the hardware installation at the most basic level. For more information, utilize this hardware installation guide.
Software Installation Procedure:
Access the CG522-E via Console
The CG522-E can be accessed by console session. Parameters are:
- baud rate: 115200 bits/sec
- 8 data bits
- no parity
- 1 stop bit (8N1)
- no flow control necessary
- username: admin
- password: device serial number
Locate the device serial number by looking at the bottom of the unit. It also shows up within the bootup sequence. This message appears:
Device is using default day0 password: xxxxxxxxxxx Access the CG522-E via SSH
The CG522-E can be accessed by SSH via a Layer 2 Interface from a switch/router. Ensure that the interface is assigned an IP address within the 192.168.1.x subnet, as the CG522-E default interface IP address is set to 192.168.1.1.
On the uplink device (Switch/Router), configure these commands:
Switch# configure terminal
Switch(config)# interface <interface>
Switch(config-if)# no switchport
Switch(config-if)# ip address 192.168.1.2 255.255.255.0
Switch(config-if)# exit

Switch(config)# exit
Switch# ssh -l admin 192.168.1.1
Password:
On the CG522-E, intial parameters are:
- IP address: 192.168.1.1
- username: admin
- password: device serial number
Locate the device serial number by looking at the bottom of the unit. It also show up within the bootup sequence. This message appears on the console:
Device is using default day0 password: xxxxxxxxxxx Tip: You can SSH into an SVI of a switch then SSH into the CG522-E with this method, however an SVI is not enough to switch the CG522 and uplink device. You must include the L2 Interface within the uplink interface of the CG522-E.
Change the Password
Once there is console or SSH access, change the username and password of the CG522-E with these commands.
CellularGateway# configure terminal
CellularGateway(config)# aaa authentication users user admin change-password old-password
After implementing these commands, observe the prompts:
Value for 'old-password' (<string>): *********
Value for 'new-password' (<string>): ********
Value for 'confirm-password' (<string>): ********
How to view running configuration
Run this command to view the running configuration of the CG522-E:
CellularGateway# show running-configHow to Upgrade your CG522-E software
It is optimal to upgrade your CG522-E before use.
Use this procedure to upload and upgrade the software version of the CG522-E.
- Have a reachable TFTP server, copy the software image onto the server, and ensure permissions on the file are such that anonymous TFTP users are able to access the file.
For a comprehensive configuraiton guide to download and install software; click here.
First, confirm the version of the CG522-E:
CellularGateway# show version
Active image
Product name       = Cisco Cellular Gateway
Build version      = 17.04.01a.0.211.1608270185..Bengaluru
Software version   = 1.0.0
Build date         = 2023-08-08_23.41
Build path         = /san1/BUILD/workspace/CCO_c174_throttle_EIO/base/build_eio
Built by           = aut

Firmware info
Uboot version      = 2018.03-7.1.0-cwan-0.0.16
Uboot date         = 10/06/2020

Last reboot reason = SoftReset
Next, use this procedure:
CellularGateway# gw-action:request software upgrade
tftp://192.168.1.2/cg-ipservices-17.09.04.SPA.bin
System is about to download and install the selected software, Continue? [no,yes] yes
Software successfully upgrade

CellularGateway# gw-action:request system reboot
System is about to reload, Continue? [yes,no]Note: In this scenario, the Switch being utilized as a TFTP server. The link for the software page is in this hyperlink.
How to view and switch between image partitions:
CellularGateway# show gw-system:system partition
Primary Image
Partition    = image2
File name    = cg-ipservices-17.09.04.SPA.bin
Version      = 17.09.04.0.0.1691563291..Bengaluru
Build Date   = Wed Aug  9 06:41:31 2023
Install Date = Sun Jun  4 02:03:23 2000
Boot Status  = Boot Successful.

Backup Image
Partition    = image1
File name    = cg-ipservices.17.04.01a.SPA.bin
Version      = 17.04.01a.0.211.1608270185..Bengaluru
Build date   = Fri Dec 18 05:43:05 2020
Install Date = Fri Jun 22 11:13:59 2018
Boot Status  = Boot Successful.

CellularGateway# gw-action:request software activate <image1 | image2>
System is about to reload, Continue? [yes,no]
Check PID, Uptime, Memory, Flash size
This information provided is very useful for compatibility checks and troubleshooting. For a CG522-E troubleshooting guide, click this hyperlink.
CellularGateway# show gw-system:system status

SYSTEM INFO
Platform PID                   = CG522-E
Product Serial Number          = FGL2504LB7Y

System Up Time                 = up 15 days
Current Time                   = Thu Aug 24 22:37:22 UTC 2023
Current CPU Usage              = 5%

RAM
Total Memory in KBytes         = 993852
Memory Used in KBytes          = 557760
Memory Free in KBytes          = 436216

STORAGE
Disk type                      = Bootflash
Disk Size in KBytes            = 999320
Disk Used in KBytes            = 88944
Disk Available in KBytes       = 841564
Disk Used Percentage           = 10%

TEMPERATURE
Ambient temperature            = 53 deg C

Power source                   = AC
Check Hardware Information
The information provided here is very useful for compatibility checks and troubleshooting. For a CG522-E troubleshooting guide, click this hyperlink.
CellularGateway# show cellular 1 hardware
Modem Firmware Version = SWIX55C_01.07.13.00 000000 jenkins
Device Model ID = EM9190
International Mobile Subscriber Identity (IMSI) = xxxxxxxxxxxxxxx
International Mobile Equipment Identity (IMEI) = yyyyyyyyyyyyyyy
Integrated Circuit Card ID (ICCID) = zzzzzzzzzzzzzzzzzzzz
Mobile Subscriber Integrated Services Digital Network Number (MSISDN) = xxxxxxxxxxx
Factory Serial Number (FSN) = yyyyyyyyyyyyyy
Current Modem Temperature = 43 deg C
PRI SKU ID = zzzzzzz
PRI Version = 016.006_004
Carrier = GENERIC
OEM PRI Version = 001.002
Modem Status = MODEM_STATE_NETWORK_READY
Check Session Connection
This information allows you to determine which APN is attached, session status, and so on.
This is an example of a disconnected session status:
CellularGateway# show cellular 1 connection
Profile ID = 1
---------------------------
APN = broadband
Connectivity = Attach and Data
Session Status = Disconnected
Call end mode =
Session disconnect reason type = (0)
Session disconnect reason = (0)
Cellular Interface = 1/1
Backoff timer = NOT Running
Back off error count = 0
Back off timer index = 0
Back off timer array (in minutes) = 0 1 1 1 1 5 10 15 30 60
Period of Backoff = 0 minute(s)
This is an example of a connect session status:
CellularGateway# show cellular 1 connection
Profile ID = 1
---------------------------
APN = broadband
Connectivity = Attach and Data
Session Status = Connected
IPv4 Address = x.x.x.x
IPv4 Gateway Address = y.y.y.y
IPv4 Primary DNS = z.z.z.z
IPv4 Secondary DNS = x.x.x.x
Tx Packets = 6821, Rx Packets = 6
Tx Bytes = 1301756, Rx Bytes = 888
Tx Drops = 0, Rx Drops = 0
Tx Overflow Count = 0, Rx Overflow Count = 0
Check Radio Information
This information provided is useful for compatibility checks and troubleshooting. For a CG522-E troubleshooting guide, click this hyperlink.
CellularGateway# show cellular 1 radio
Radio Power Mode = online
Radio Access Technology(RAT) Selected = LTE
LTE Rx Channel Number(PCC) = 0
LTE Tx Channel Number(PCC) = 0
LTE Band = 66
LTE Bandwidth = 20 MHz
Current RSSI = -60 dBm
Current RSRP = -94 dBm
Current RSRQ = -14 dB
Current SNR = 2.8 dB
Physical Cell Id = 119
Network Change Event = activated LTE


CellularGateway# show cellular 1 radio-details
Carrier Aggregation Status = Disabled
LTE RX Channel Number(PCC) = xxx
LTE TX Channel Number(PCC) = yyy
LTE Band = 66
LTE Bandwidth = 20 MHz
PCC CA information:
-------------------
LTE band class = 66
E-UTRA absolute radio frequency channel number of the serving cell = 0
Bandwidth = 20 MHz
Physical Cell Id = 119
Current RSRP in 1/10 dBm as measured by L1 = -94 dBm
Current RSSI in 1/10 dBm as measured by L1 = -63 dBm
Current RSRQ in 1/10 dBm as measured by L1 = -12 dB
Measured SINR in dB = 3.8 dB
Tracking area code information for LTE = 31891


5G CC information:
------------------
Current ENDC RSRP in 1/10 dBm as measured by L1 = -101 dBm
Current ENDC RSRQ in 1/10 dBm as measured by L1 = -14 dB
Measured ENDC SINR in dB = 4 dB
5G CC information is an indication of the use of 5G. The selected band currently shows the utilization of LTE, but as an NSA device, the LTE band is selected due to no traffic in this particular simulation.
Check and Configure Cellular Access Point Name (APN)
The CG522-E usually is able to configure the APN automatically based off its SIM. This procedure is how to confirm an active APN profile. Sometimes, there is need to configure a static APN profile.
CellularGateway# show cellular 1 profile
PROFILE ID   APN        PDP TYPE   STATE     AUTHENTICATION  USERNAME  PASSWORD
---------------------------------------------------------------------------------
1            Broadband  IPv4       ACTIVE      none            -         -
2            ims        IPv4v6     INACTIVE    none            -         -
How to configure a custom APN:
CellularGateway# configure terminal
CellularGateway(config)# controller cellular 1
CellularGateway(config-cellular-1)# sim slot <# of sim slot in use>
CellularGateway(config-slot-0)# profile id <#> apn <APN name> pdn-type IPv4v6 authentication <authentication type> username <username> password <password>
CellularGateway(config-slot-0)# attach profile <#>
CellularGateway(config-slot-0)# commitTip: Some APNs do not require authentication; which means there is no need to define any authentication if not needed. EX: profile id <#> apn pdn-type IPv4v6 <-- this is a valid command.
How to remove an APN profile:
CellularGateway# config term
Entering configuration mode terminal
CellularGateway(config)# controller cellular 1
CellularGateway(config-cellular-1)# sim slot 1
CellularGateway(config-slot-1)# no attach-profile 1
CellularGateway(config-slot-1)# no profile id 1 apn broadband
CellularGateway(config-slot-1)# commitNote: No authentication is required for LTE.
Note: Verizon requires at least 2 profiles; an attach profile (usually vzwims or ims) and a data/default profile. AT&T only requires one profile as needed for data/default and attach profiles (broadband).
Configure Primary SIM slot and SIM failover commands
Run these commands to define the primary SIM slot and to utilize the SIM failover timer function. A manual failover would be to define the primary SIM slot again.
CellularGateway# config term
Entering configuration mode terminal
CellularGateway(config)# controller cellular 1
CellularGateway(config-cellular-1)# sim primary-slot <0/1>
CellularGateway(config-cellular-1)# commit
Commit complete.
CellularGateway(config-cellular-1)# end
CellularGateway# config term
Entering configuration mode terminal
CellularGateway(config)# controller cellular 1
CellularGateway(config-cellular-1)# sim max-retry 5
CellularGateway(config-cellular-1)# sim failovertimer 7
CellularGateway(config-cellular-1)# commit
Commit complete.
CellularGateway(config-cellular-1)# end
CellularGateway# Check and Configure CG522-E Modem Firmware
Use this procedure to upload and upgrade the firmware version of your CG522-E modem.
- Have a reachable TFTP server, copy the software image onto the server, and ensure permissions on the file are such that anonymous TFTP users are able to access the file.
- Create a subdirectory to hold the modem firmware.
- Confirm the correct firmware based off SIM carrier (viewable in the software page).
- Copy the firmware files (.cwe and .nvu) onto that directory.
For a comprehensive configuraiton guide to download and install firmware; click here.
Use the procedure below:
CellularGateway# gw-action:request file download tftp://192.168.1.2/EM9190_01.07.13.00.cwe create_dir <firmware folder name>
INFO: Created folder <firmware folder name>
INFO: Accessing file EM9190_01.07.13.00.cwe from tftp://192.168.1.2/EM9190_01.07.13.00.cwe
INFO: Please wait while the file is being downloaded to /flash/<firmware folder name>/EM9190_01.07.13.00.cwe
file received /flash/<firmware folder name>/EM9190_01.07.13.00.cwe size(Bytes): 88960399

CellularGateway# gw-action:request file download tftp://192.168.1.2/EM9190_01.07.13.00_GENERIC_016.006_004.nvu create_dir <firmware folder name>
INFO: <firmware folder name> Directory already exists
INFO: Accessing file EM9190_01.07.13.00_GENERIC_016.006_004.nvu from tftp://192.168.1.2/EM9190_01.07.13.00_GENERIC_016.006_004.nvu
INFO: Please wait while the file is being downloaded to /flash/<firmware folder name>/EM9190_01.07.13.00_GENERIC_016.006_004.nvu
file received /flash/<firmware folder name>/EM9190_01.07.13.00_GENERIC_016.006_004.nvu size(Bytes): 69051

CellularGateway# cellular 1 upgrade firmware <firmware folder name>
Commands to check the firmware status:
CellularGateway# show cellular 1 firmware
Firmware Activation Mode = AUTO
INDEX  CARRIER  FW VERSION       PRI VERSION  STATUS
------------------------------------------------------
1      GENERIC  01.07.13.00_GEN  016.006_004  ACTIVE

CellularGateway# show cellular 1 hardware
Modem Firmware Version = SWIX55C_01.07.13.00 000000 jenkins
Device Model ID = EM9190
International Mobile Subscriber Identity (IMSI) = xxxxxxxxxxxxxxx
International Mobile Equipment Identity (IMEI) = yyyyyyyyyyyyyyy
Integrated Circuit Card ID (ICCID) = zzzzzzzzzzzzzzzzzzzz
Mobile Subscriber Integrated Services Digital Network Number (MSISDN) = xxxxxxxxxxx
Factory Serial Number (FSN) = yyyyyyyyyyyyyy
Factory Serial Number (FSN) = 4H0355006001A1
Current Modem Temperature = 43 deg C
PRI SKU ID = 1104703
PRI Version = 016.006_004
Carrier = GENERIC
OEM PRI Version = 001.002
Modem Status = MODEM_STATE_NETWORK_READYNote: In this scenario, the network switch is utilized as a TFTP server. For the firmware page, here is the hyperlink.
How to reset the Modem
The modem reset does not wipe any configurations set. It works a reboot.
CellularGateway# cellular 1 modem-reset
cellular_modem_reset :
You can also utilize AT commands to reset the modem.
CellularGateway# cellular 1 modem-at-command
at!reset
Revision History
| Revision | Publish Date | Comments |
|---|---|---|
1.0 |
27-Jan-2025 |
Initial Release |
Contributed by Cisco Engineers
- Yaman ElsharydahTechnical Consulting Engineer
 Feedback
Contact Cisco
- Open a Support Case

- (Requires a Cisco Service Contract)