Introduction
This document describes how to collect tech-support files from the Network Functions Virtualization Infrastructure Software (NFVIS) and Enterprise Network Compute System (ENCS) through both GUI and CLI.
Tech-support files contain configuration information, logs and diagnostic data that will help TAC in troubleshooting and resolving a technical issue.
Requirements
There are no specific requirements for this document.
Components Used
The information in this document is based on Cisco Enterprise NFVIS 3.7.1 and later..
The information in this document was created from the devices in a specific lab environment. All of the devices used in this document started with a cleared (default) configuration. If your network is live, ensure that you understand the potential impact of any command.
NFVIS Tech-Support Bundle: WebUI Method
In the the NFVIS web interface, you can download the tech-support bundle log bundle as shown here:
Step 1. Log in to NFVIS and browse to Diagnostics (2) under Host (1) as shown in the image.
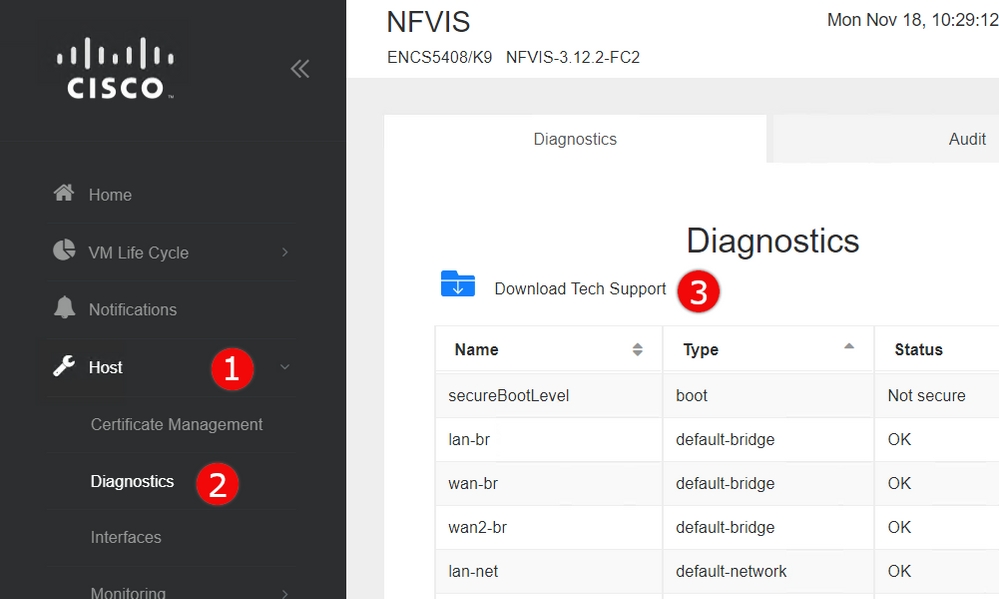
Step 2. Click on Download Tech Support (3) . After a few minutes of wait, a pop-up will appear to download the file. If this does not appear, make sure your web browser is set up to allow pop-ups from the NFVIS server you are connected to.
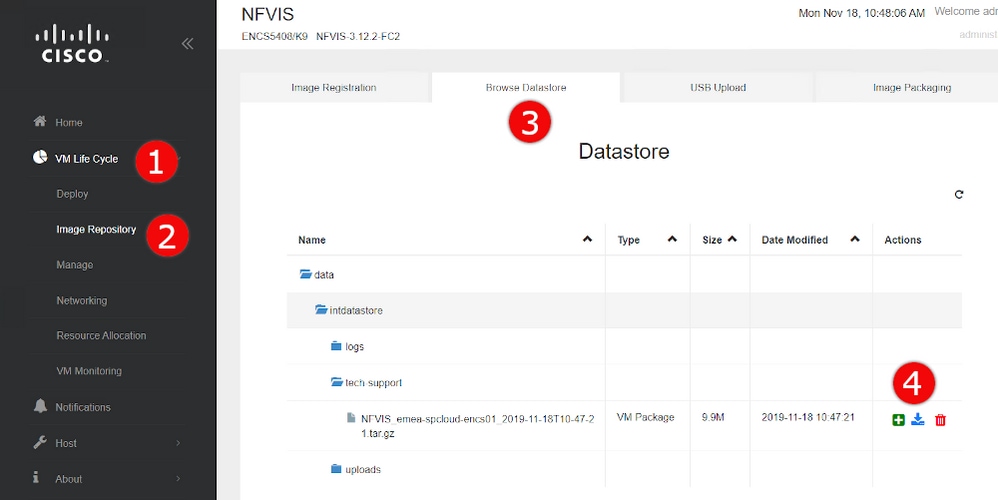
Download Previously Generated Tech-Support files: If you need to re-download a previously generated tech-support file, navigate to the Image Repository (2) page, located under the VM Lifecycle (1) and select Browse Datastore (3). You can find previously generated tech-supports under the tech-support sub-directory of intdatastore. Click on the blue arrow icon (4) in order to download the file as shown in the image.
NFVIS Tech-Support Bundle: CLI Method
From the NFVIS Command Line Interface (CLI), you can generate a tech-support bundle and transfer it either by uploading to an SCP server or copying to a USB drive. To access the CLI, connect to NFVIS via Secure shell (SSH) or the console.
Upload to SCP server
Use the following steps to generate a tech-support bundle and transfer it via SCP to a remote server:
|
Command or Action |
Purpose |
| Step 1 |
nfvis# tech-support |
Starts NFVIS tech-support collection
|
| Step 2 |
nfvis# show system file-list disk local path /data/intdatastore/tech-support |
This will return a list of all tech-support bundles. Be sure to identify the filename of the bundle created in the previous step, as it will be needed in the following steps.
|
| Step 3 |
nfvis# system file-copy source source-path destination target-path
|
(Optional)
Move file to another directory
| Tip |
With NFVIS versions prior to 3.9.1, secure copy can be performed only to/from the 'intdatastore:', 'extdatastore1:', 'extdatastore2:', 'usb:' and 'nfs:' path prefixes, none of which include the default path where tech-support bundles are stored, so you must manually copy the file to one of these paths in order to be able to SCP it in the next step.
In NFVIS 3.9.1 and later, a new path-prefix, 'techsupport:', was added for the path where tech-support bundles are stored, allowing secure copy to be peformed directly, so this additional step is not required.
|
|
Step 4
|
nfvis# scp <path prefix>:<filename> <remote user>@<remote host>:<path> |
Transfers the file to the remote SCP server, using the path and filename identified in the previous steps.
|
Note: You can also download the file from the NFVIS with Secure Copy Protocol (SCP) client. You need to allow incoming SCP connections to NFVIS first. For more details, see Cisco Enterprise Network Function Virtualization Infrastructure Software Configuration Guide.
This is an example of how to generate a tech-support bundle with NFVIS 3.9.1 or later and transfer it to an SCP server:
encs01# tech-support

encs01# show system file-list disk local path /data/intdatastore/tech-support
SI NO NAME PATH SIZE TYPE DATE MODIFIED
-------------------------------------------------------------------------------------------------------------------------------------
388 NFVIS_encs01_2018-12-28T08-32-47.tar.gz /data/intdatastore/tech-support 737K VM Package 2018-12-28 08:32:47

encs01# scp techsupport:NFVIS_encs01_2018-12-28T08-42-35.tar.gz root@192.168.0.1:/tmp
root@192.168.0.1's password:
NFVIS_encs01_2018-12-28T08-42-35.tar.gz
encs01#
Copy to USB Drive:
Use the steps in the following example to generate a tech-support bundle and copy it to a USB drive.
Note: The USB drive must be formatted with FAT32 of exFAT file system prior to being connected to NFVIS.
1. Mount the connected USB drive:
     BXB5406-NFVIS(config)# system usb-mount mount ACTIVE
     BXB5406-NFVIS(config)# commit
     Commit complete.
     BXB5406-NFVIS(config)# end

2. Generate the tech-support bundle with the “tech-support” command.
     BXB5406-NFVIS# tech-support

3. Get the name of the tech-support file:
     BXB5406-NFVIS# show system file-list disk local path /data/intdatastore/tech-support system file-list disk local 1
      name          NFVIS_BXB5406-NFVIS-401_2020-01-21T15-53-23.tar.gz
      path          /data/intdatastore/tech-support
      size          21K
      type          "VM Package"
      date-modified "2020-01-21 15:53:23"

4. Use the filename learned above to copy that file to the USB drive using the SCP command (note that here the 'scp' command used allows
   for making a simple local file copy by specifying a local source and destination, there is no actual scp transfer).
     BXB5406-NFVIS# scp techsupport:NFVIS_BXB5406-NFVIS_2020-01-21T15-53-23.tar.gz usb:usb3/BXB5406-NFVIS_2020-01-21T15-53-23.tar.gz

5. Confirm the tech-support file is now on the USB drive:
     BXB5406-NFVIS # show system file-list disk usb name
     SI NO  NAME
     -------------------------------------------------------
     1      Cisco_NFVIS_BRANCH_Upgrade-3.12.3-RC4.nfvispkg
     2      Logs-for-pahayes.zip
     3      NFVIS_BXB5406-NFVIS_2020-01-21T15-53-23.tar.gz

6. Un-mount the USB drive and remove it
     BXB5406-NFVIS (config)# no system usb-mount mount ACTIVE
     BXB5406-NFVIS (config)# commit
     Commit complete.
     BXB5406-NFVIS (config)# end
CIMC Tech-Support Bundle: WebUI Method
This method is applicable to Cisco UCS-E Series, UCS-C Series, Cisco Cloud Services Platform (CSP) and ENCS (except ENCS 5104).
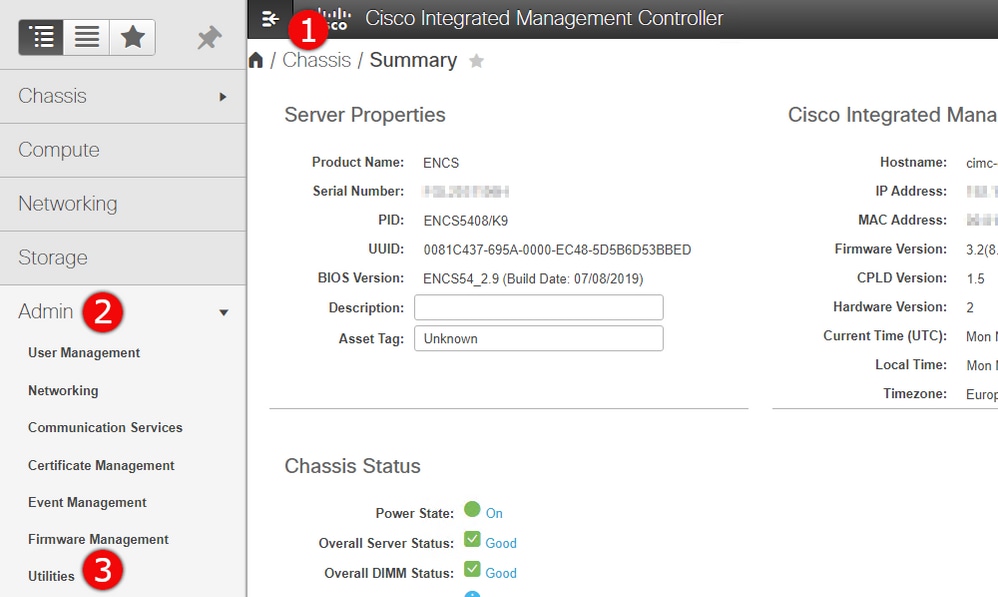
Step 1. Log in to CIMC, open left side menu (1) and browse to Utilities (3) under Admin (2).
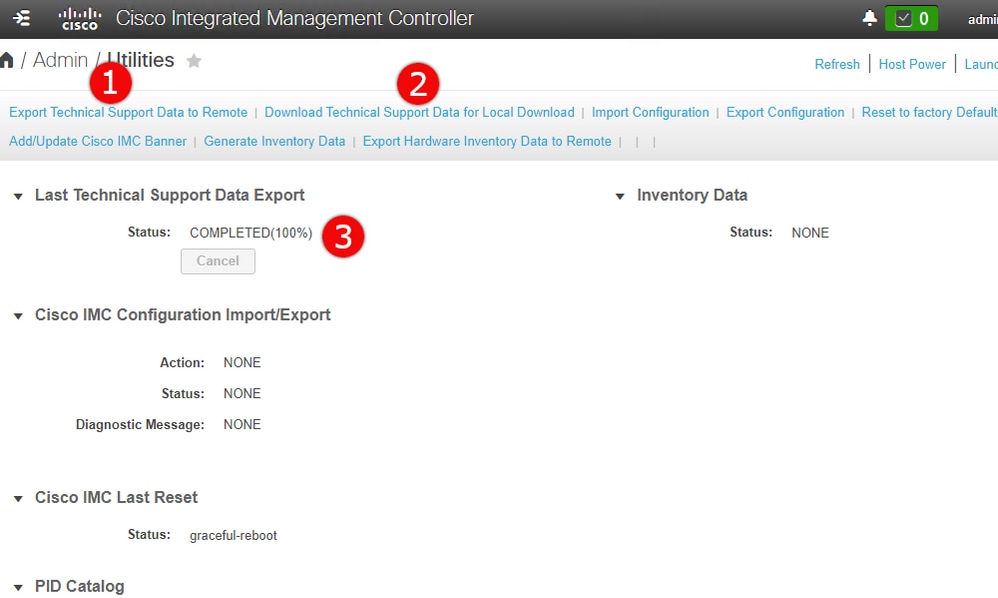
Step 2. Under Utilities, there are two options - Export Technical Support Data to remote (1) or Download Technical Support Data for Local download (2). It also shows the status of Last Technical Support Data Export (3). Click on Download Technical Support Data for Local Download (2) as shown in the image.
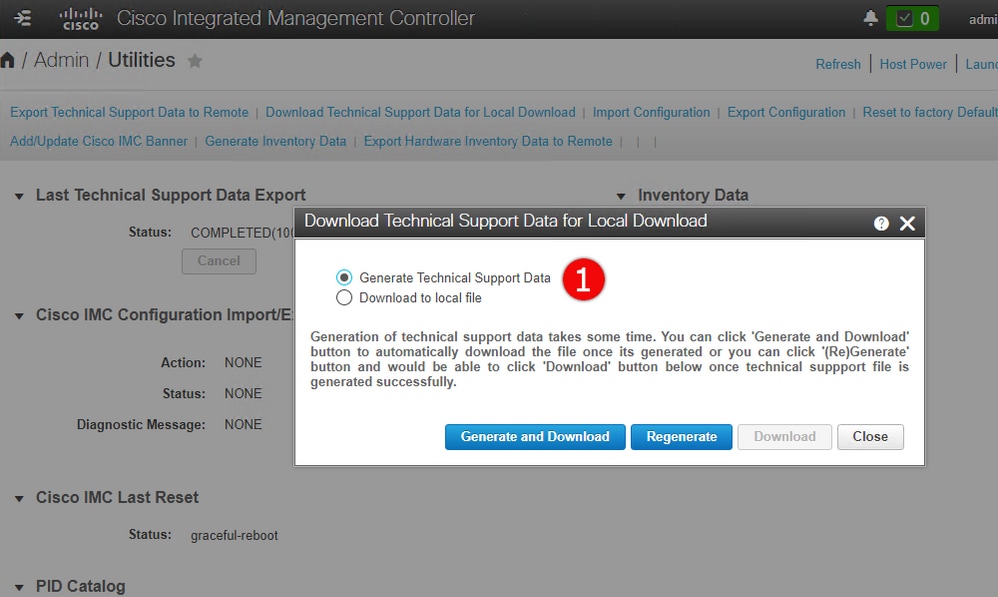
Step 3. In the pop-up message click on Generate and Download Technical Support Data (1). It will take a few minutes to generate tech-support bundle as shown in the image.
CIMC Tech-Support Bundle: CLI Method
This method is applicable to Cisco UCS-E Series, UCS-C Series, CSP and ENCS (except ENCS 5104).
In order to generate tech-support, connect to Cisco Integrated Management Controller (CIMC) with SSH client of your choice.
Note: To use this method you need to have a host in local network configured as TFTP/FTP/SFTP/SCP/HTTP server.
|
Command or Action |
Purpose |
| Step 1 |
Server# scope cimc |
Enters the CIMC command mode.
|
| Step 2 |
Server /cimc # scope tech-support |
Enters the tech-support command mode.
|
| Step 3 |
Server /cimc/tech-support # set remote-ip ip-address |
Specifies the IP address of the remote server on which the technical support data file should be stored.
|
| Step 4 |
Server /cimc/tech-support # set remote-path path/filename |
Specifies the file name in which the support data should be stored on the remote server. When you enter this name, include the relative path for the file from the top of the server tree to the desired location.
| Tip |
To have the system auto-generate the file name, enter the file name as default.tar.gz.
|
|
| Step 5 |
Server /cimc/tech-support # set remote-protocol protocol |
Specifies the protocol to connect to the remote server. It can be of the following types:
|
| Step 6 |
Server /cimc/tech-support # set remote-username name |
Specifies the user name on the remote server on which the technical support data file should be stored. This field does not apply if the protocol is TFTP or HTTP.
|
| Step 7 |
Server /cimc/tech-support # set remote-password password |
Specifies the password on the remote server on which the technical support data file should be stored. This field does not apply if the protocol is TFTP or HTTP.
|
| Step 8 |
Server /cimc/tech-support # commit |
Commits the transaction to the system configuration.
|
| Step 9 |
Server /cimc/tech-support # start |
Begins the transfer of the data file to the remote server.
|
| Step 10 |
Server /cimc/tech-support # show detail |
(Optional)
Displays the progress of the transfer of the data file to the remote server.
|
| Step 11 |
Server /cimc/tech-support # cancel |
(Optional)
Cancels the transfer of the data file to the remote server.
|
This example creates a technical support data file and transfers the file to an SCP server:
encs01 /cimc/tech-support # scope cimc
encs01 /cimc/tech-support # scope tech-support
encs01 /cimc/tech-support # set remote-ip 172.16.0.1
encs01 /cimc/tech-support *# set remote-path techsupport.tar.gz
encs01 /cimc/tech-support *# set remote-protocol scp
encs01 /cimc/tech-support *# set remote-username root
encs01 /cimc/tech-support *# set remote-password
Please enter remote-password:
Please confirm remote-password:
encs01 /cimc/tech-support *# commit
encs01 /cimc/tech-support #
encs01 /cimc/tech-support # start
Server (RSA) key fingerprint is 4b:b9:a5:14:d0:c3:64:14:54:00:b9:d7:aa:47:1d:6d
Do you wish to continue? [y/N]y
Tech Support upload started.

encs01 /cimc/tech-support # show detail

  Tech Support:
  Server Address: 172.16.0.1
  Path: techsupport.tar.gz
  Protocol: scp
  Username: root
  Password: ******
  Progress(%): 20
  Status: COLLECTING


 Feedback