Introduction
This document describes how to configure Radius- and TACACS-based user authentication and authorization for vEdge and controllers with ISE.
Prerequisites
Requirements
There are no specific requirements for this document.
Components Used
For the purpose of the demonstration, ISE version 2.6 is used. vEdge-cloud and controllers running 19.2.1
The information in this document was created from the devices in a specific lab environment. All of the devices used in this document started with a cleared (default) configuration. If your network is live, ensure that you understand the potential impact of any command.
Configure
The Viptela software provides three fixed user group names: basic, netadmin, and operator. You must assign the user to at least one group. The Default TACACS/Radius user is automatically placed in the basic group.
Radius-Based User Authentication and Authorization for vEdge and Controllers
Step 1. Create a Viptela radius dictionary for ISE. To do so, create a text file with the content:
# -*- text -*-
#
#  dictionary.viptela
#
#
# Version:      $Id$
#

VENDOR          Viptela                         41916

BEGIN-VENDOR    Viptela

ATTRIBUTE       Viptela-Group-Name              1    string
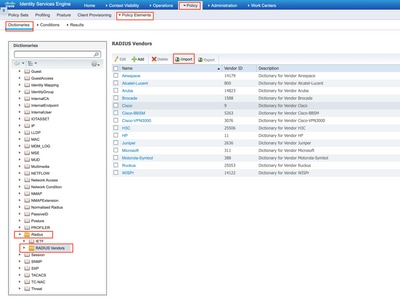
Step 2. Upload dictionary to ISE. For this, navigate to Policy > Policy Elements > Dictionaries. From the list of Dictionaries, navigate to Radius > Radius Vendors and then click Import as shown.
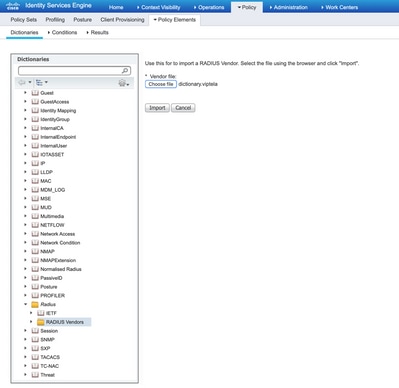
Upload the file you created on step 1.
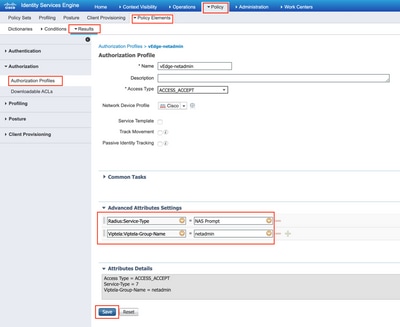
Step 3. Create an Authorization Profile. In this step, Radius authorization profile assigns, for example, netadmin privilege level to an authenticated user. For this, navigate to Policy > Policy Elements > Authorization Profiles and specify two advanced attributes as shown in the image.
Step 4. Depending on your actual setup, your Policy Set may look differently. For the purpose of the demonstration in this article, the Policy entry called Terminal Access is created as shown in the image.

Click > and the next screen appears as shown in the image.
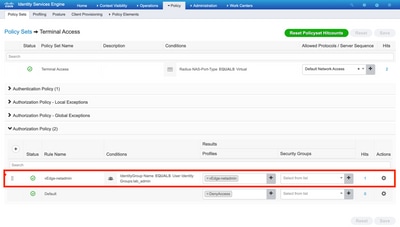
This policy matches based on user group lab_admin and assigns an authorization profile that was created in Step 3.
Step 5. Define NAS (vEdge router or controller) as shown in the image.
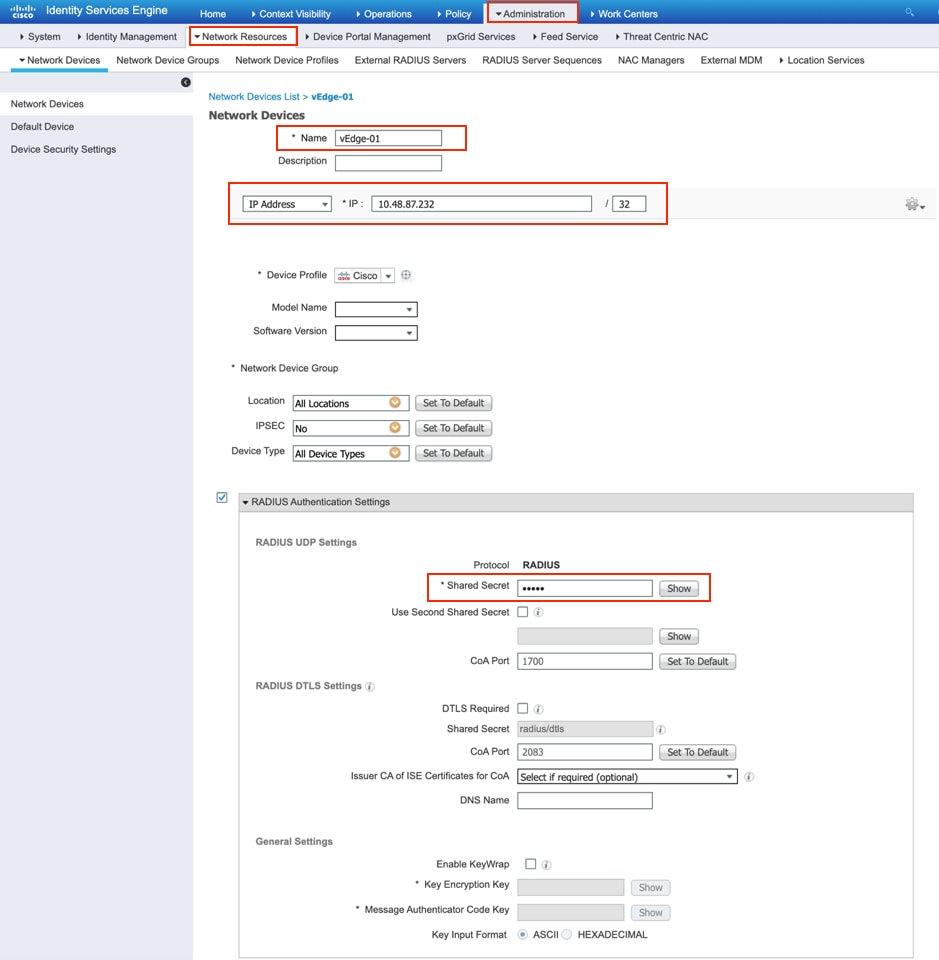
Step 6. Configure vEdge/Controller.
system
 aaa
  auth-order       radius local
  radius
  server 10.48.87.210
   vpn 512
   key cisco
  exit
 !
!
Step 7. Verification. Log in to vEdge and ensure netadmin group assigned to the remote user.
vEdgeCloud1# show users

                                                 AUTH
SESSION  USER      CONTEXT  FROM          PROTO  GROUP      LOGIN TIME
---------------------------------------------------------------------------------------
33472    ekhabaro  cli      10.149.4.155  ssh    netadmin   2020-03-09T18:39:40+00:00
TACACS-Based User Authentication and Authorization for vEdge and Controllers
Step 1. Create a TACACS profile. In this step, the TACACS profile created is assigned, for example, netadmin privilege level to an authenticated user.
- Select Mandatory from the Custom attribute section to add the attribute as:
|
Type
|
Name
|
Value
|
|
Mandatory
|
Viptela-Group-Name
|
netadmin
|
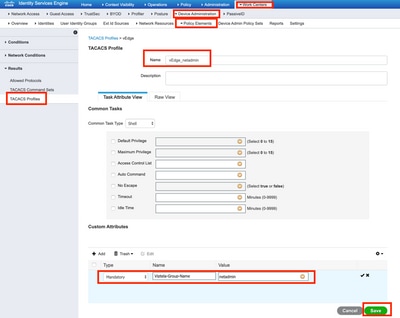
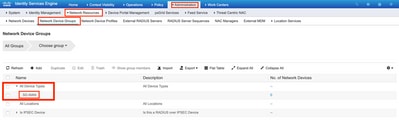
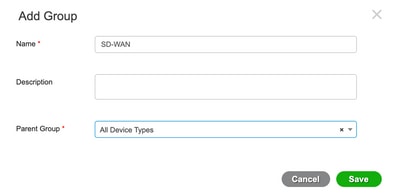
Step 2. Create a device group for SD-WAN.
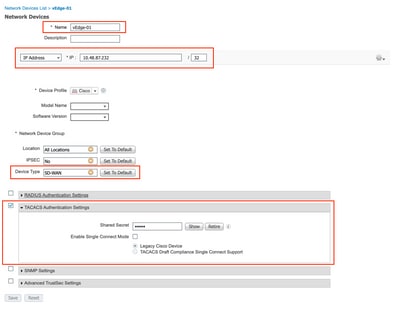
Step 3. Configure the device and assign it to the SD-WAN device group:
Step 4. Define Device Administration Policy.
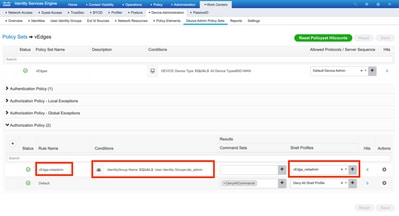
Depending on your actual setup, your Policy Set may look differently. For the purpose of the demonstration in this document, the Policy is created.

Click > and the next screen appears as shown in this image. This policy matches based on device type named SD-WAN and assigns the Shell profile that is created in step 1.
Step 5. Configure vEdge:
system
 aaa
  auth-order tacacs local
 !
 tacacs
  server 10.48.87.210
   vpn 512
   key cisco
  exit
 !
!
Step 6. Verification. Login to vEdge and ensure netadmin group assigned to remote user:
vEdgeCloud1# show users

                                                 AUTH
SESSION  USER      CONTEXT  FROM          PROTO  GROUP      LOGIN TIME
---------------------------------------------------------------------------------------
33472    ekhabaro  cli      10.149.4.155  ssh    netadmin   2020-03-09T18:39:40+00:00
Step 5. Configure vEdge:
Step 5. Configure vEdge:
Step 5. Configure vEdge:
Related Information


 Feedback