Introduction
This document describes how to execute SDWAN failover via a change in vrrp priority value which can be done through vManage GUI or CLI.
Prerequisites
The SDWAN Network high availability configuration must be done.
Requirements
Cisco recommends that you have knowledge of these topics:
- Understand SDWAN architecture & Meraki workflow
- Understand virtual router redundancy protocol (vrrp) concepts
Components Used
The information in this document is based on these software and hardware versions:
- Viptela vManage GUI
- Putty (CLI log in)
The information in this document was created from the devices in a specific lab environment. All of the devices used in this document started with a cleared (default) configuration. If your network is live, ensure that you understand the potential impact of any command.
Background Information
The failover can tell the site whether it has a high WAN availability in case the active router goes down.
Note: Here, the most preferable method is vManage GUI.
Configure
Steps for SDWAN Failover Through Vmanage Mode:
- Log in to the Viptela vManage dashboard.
- Choose Configuration and click Devices. Scroll to right and check the Mode (vManage or CLI).

3. Choose a particular device that you decided to make the lower priority (for example, vEdge 1). Scroll to the right end of the row, click the three-dot option and then choose change device values.

4. Scroll to the right end of the row again, click the three-dot option and choose Edit device template.

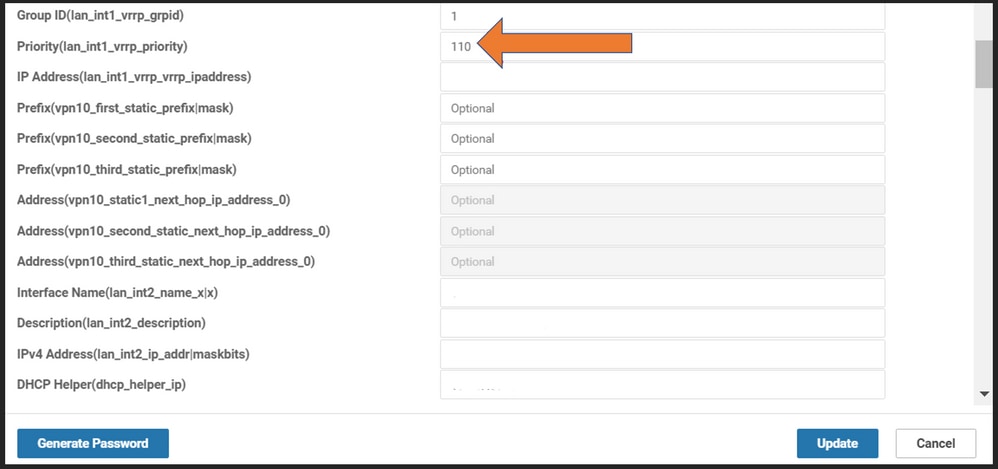
5. Change the vrrp priority from 110 for vEdge 1 to lower than the vEdge 2 Priority value (for example, vrrp priority as 90) that must be lower than the vEdge 2 priority value.
Note: You need to change all the IF values from 110 to 90.

6. Click update.
7. Once the process is done, the vEdge 1 main is moved back to the backup.
8. The vEdge 2 router is taken care of by the main role now.
Steps for SDWAN Failover Through CLI Mode:
- Log in to device CLI (Example: vEdge 1)
- Enter a Particular VPN (Example: VPN1)
- Enter a particular IF (Example: LAN IF)
- Change vrrp priority value that is lower than the vEdge 2 value (Example: you can set it as 90 because vEdge 2 already has default priority as 100).
Note: The CLI method is not preferable while you have GUI feasibility. If you want to do that, you must get approval first.
Verify
Use this section to confirm that your configuration works properly.
Changes Applied via GUI
- Navigate to Monitor, then choose networks
- Choose device name
- Choose Real-time option
- Type vrrp information

Changes Applied via CLI
VE1 # Show vrrp | tab
Troubleshoot
There is currently no specific troubleshoot information available for this configuration.


 Feedback