Introduction
This document describes a step-by-step guide on how to configure and verify QoS Forwarding on SD-WAN routers using VManage GUI.
Prerequisites
Requirements
Cisco recommends that you have knowledge of these topics:
- Cisco SD-WAN.
- Basic understanding of how Quality of Services works.
Components Used
This document is based on these software and hardware versions:
- Cisco Edge Router version 17.9.3
- vManage version 20.9.3
The information in this document was created from the devices in a specific lab environment. All of the devices used in this document started with a cleared (default) configuration. If your network is live, ensure that you understand the potential impact of any command.

Note: This guide assumes that the Cisco Edge Routers are onboard on the vManage and that they are under vManage mode.
Background
When no centralized data policy is configured on the Cisco SD-WAN Controller, all data traffic is transmitted from the local service-side network to the local router, and then to the remote router and the remote service-side network, with no alterations in its path.
When you want to modify the default packet forwarding flow, you design and provision QoS policy. To activate the policy, you apply it to specific interfaces in the overlay network in either the inbound or the outbound direction. The direction is with respect to the routers in the network. You can have policies for packets coming in on an interface or for packets going out of an interface.
Configure
Familiarize yourself with the QoS Deployment Workflow.
- Create localized policy:
- Creating Groups of Interest.
- class-map
- policier (optional)
- Configuring Forwarding Classes/QoS
- Create QoS Map Policy
- Create Qos schedulers
- Apply localized policy to device template.
- Apply QoS map and re-write policy (optional) to WAN interface feature template.
- Create Centralized Traffic Data QoS policy to classify traffic into proper queue.
To configure QoS, begin by creating Class Lists. Navigate to Configuration > Policies,select Localized Policy > Add Policy.
Within this window, select Class Map and click New Class List.
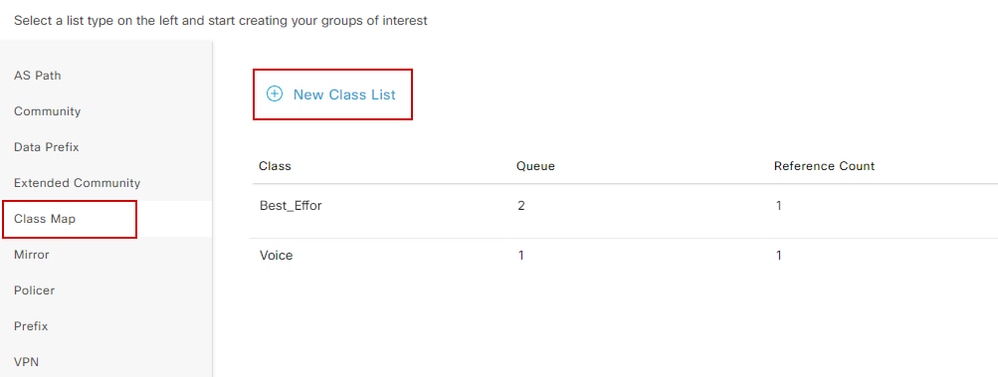 Creating Class Lists
Provide a name for your class, assign it to a queue number, and then click Save. Repeat the same steps to add more classes.
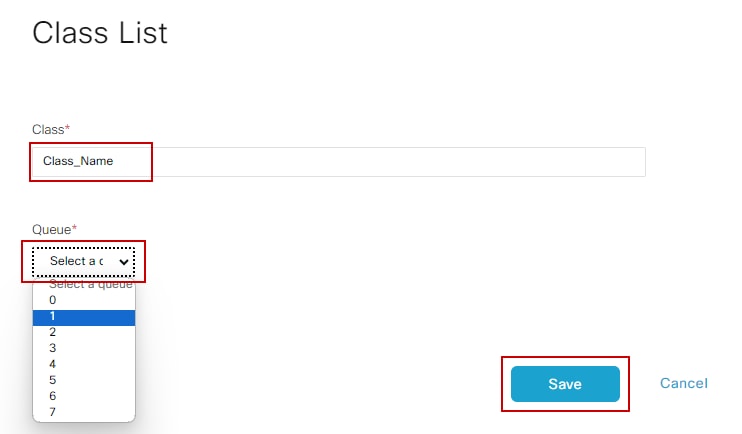 Saving Class List
After creating your class lists, click Next to proceed with the creation of QoS Map. In the Configure Forwarding Classes/QoS window, navigate to QoS Map > Add QoS Map > Create New.
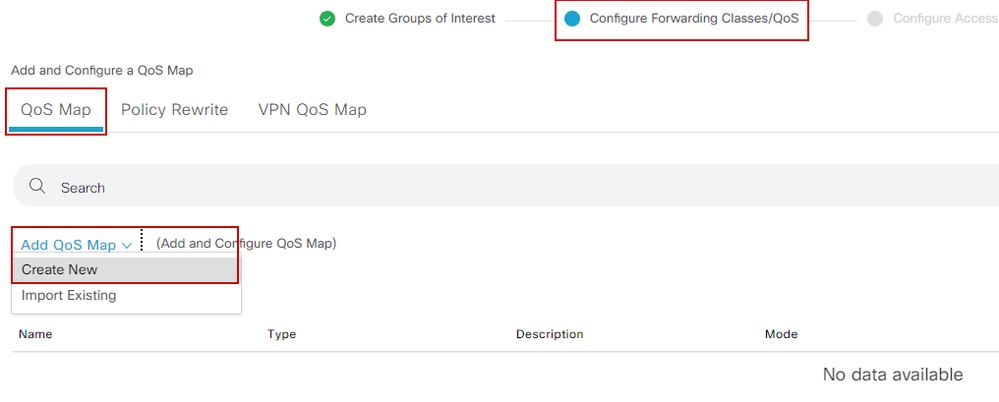 Creatin the QoS Map
Give a name and describe for the QoS Map, and create a Queue by clicking Add Queue.
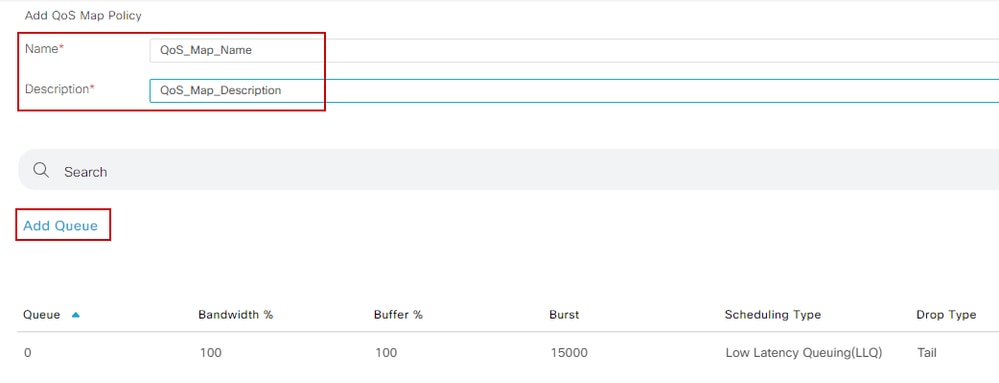 Creating Queues inside QoS Map
Within this window, select the queue number assigned during the class list creation, specify bandwidth and buffer percentage, and choose the drop type for this queue. Click Save Queue. Repeat the same steps for each class list that you need to create.
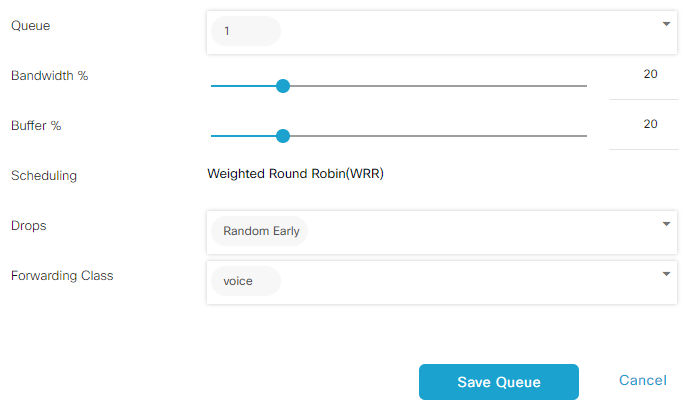 QoS schedular configuration
Once satisfied with the queue setup, click Save Policy and proceed by clicking Next until reaching the Policy Overview page. On this page, provide a name and description for our Local Policy, select options such as Netflow, Application, Cloud QoS, and then click Save Policy.
 Save the QoS Policy

Note: For low-latency queuing (LLQ) any class that is mapped to queue 0 must also be configured to use LLQ. Queues 1 to 7 are available for data traffic, and the default scheduling for these seven queues is weighted round-robin (WRR). When QoS is not configured for data traffic, queue 2 is the default queue.
So far, you have established QoS criteria but have not applied them. To do so, attach the local policy to our device template by navigating to Configuration > Template > Device Template, locate our template, on three dots select "Edit." Inside the device template, access Additional Templates.
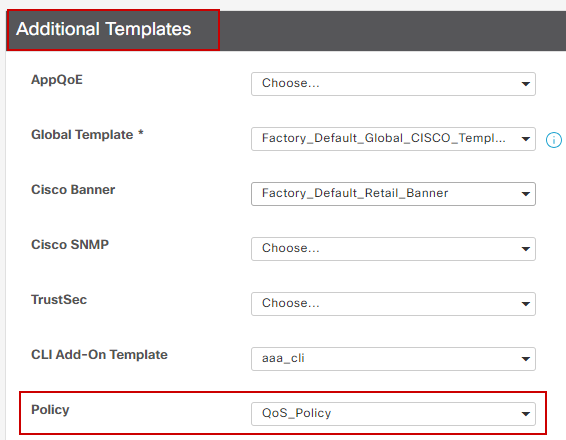 Assign QoS Policy on Device Template
Please note, if this is a live template, complete the standard process to push the changes to the device.
The next step involves applying the QoS-Map and Shaping Rate on the WAN interface by navigating to Configuration > Template > Feature Template. Locate your interface template,on three dots select Edit, and then proceed to configure Shaping Rate and QoS Map under ACL/QoS. Click Update when finished.
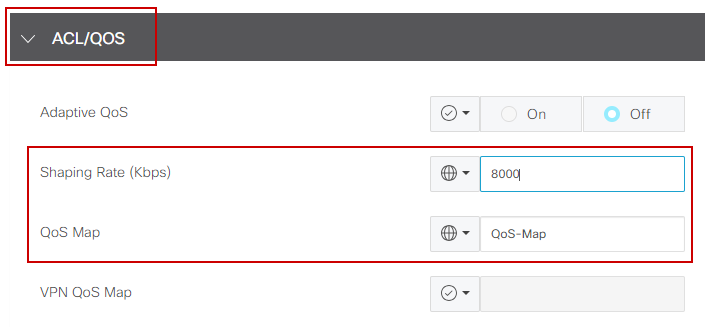 QoS Policy and Shapping on Interface
Now that you have successfully created the QoS settings, the next step involves creating a Data Policy to appropriately classify our traffic into Forwarding Classes. To achieve this, click on Configuration > Policies > Centralized Policy > Find our Main Policy, on three dots select Edit, then access Traffic Rules > Traffic Data > Add Policy > Create New.
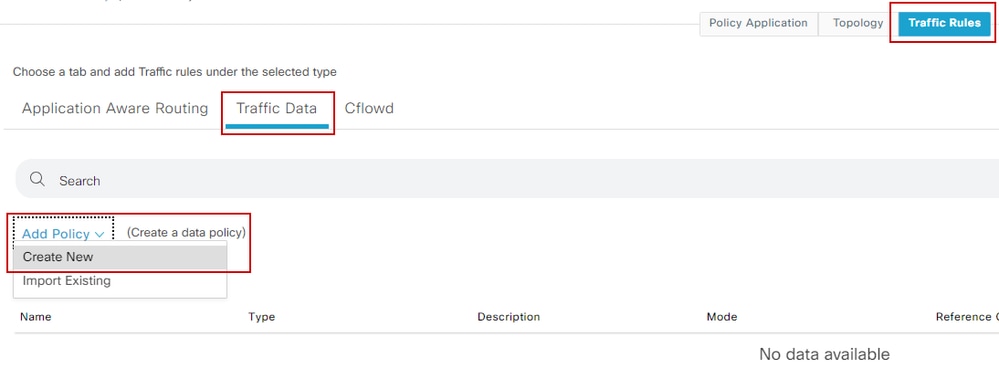 Creating QoS Data Policy
In the Sequence type, ensure QoS is selected.
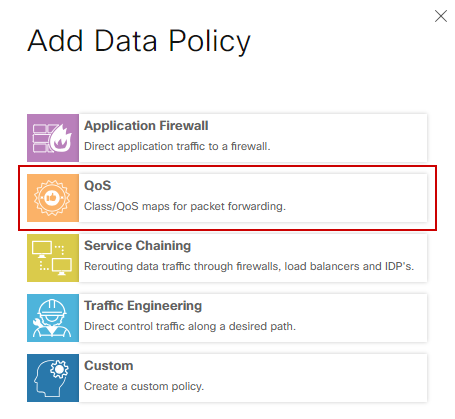 Sequence Type Selection
Provide a name and description for the QoS Policy. Click on Sequence Rule, select your application under the Match field, and under the Action tab, select DSCP, Forwarding Class. Repeat this process for other applications or traffic patterns that require matching.
 Create a Sequence Rule
Once all sequences are created, click Save Data Policy. To apply the QoS Policy to correct VPN and site list, navigate to Policy Application > Traffic Data, find your QoS Policy, click on New Site/Region List and VPN List.
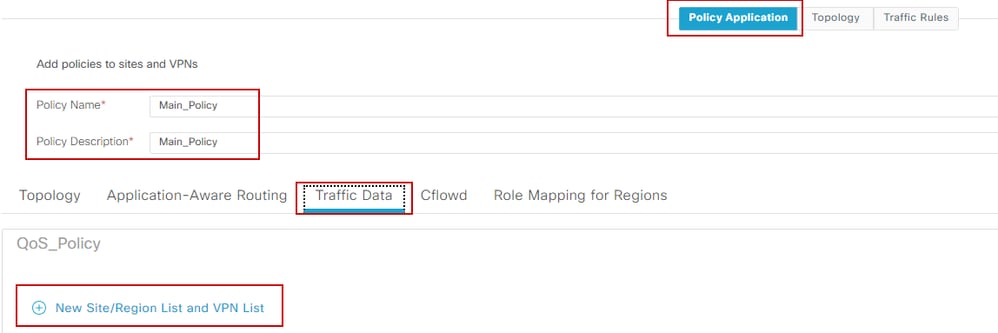 Ataching QoS policy on the main policy
This policy need to be applied From Service direction, select Site List and VPN list where this policy applies. Click Add when finished.
 assigning the site and vpn list
We can verify the changes during the template push on Config Preview
Under class-map section you notice the classes that you created.
In this example Best_Effor matches on Queue 2 and Voice matches on Queue 1. Please notice that Queue 0 is added by default since it is low-latency queuing (LLQ).
class-map match-any Best_Effor
match qos-group 2
!
class-map match-any Queue0
match qos-group 0
!
class-map match-any Queue1
match qos-group 1
!
class-map match-any Queue2
match qos-group 2
!
class-map match-any Voice
match qos-group 1
!
Under policy-map section you can see the policy name, police rate in percentage, scheduler type.
In this example class Queue0 has a 40% bandwidth and priority level 1 since this queue it is LLQ, other queues 1 and w are used for data traffic and schedular type is set to random-detect precedence-based
policy-map QoS-Map
class Queue0
police rate percent 40
!
priority level 1
!
class Queue1
bandwidth remaining ratio 35
random-detect precedence-based
!
class class-default
bandwidth remaining ratio 25
random-detect precedence-based
!
Under each WAN interfaces you can see the QoS policy that it is applied outband.
interface GigabitEthernet1
service-policy output QoS-Map
interface GigabitEthernet2
service-policy output QoS-Map
You can monitor QoS by navigation to Monitor > Devices or Monitor > Network for codes 20.6.x and early. Select the desired router and navigate Applications > QoS > Select WAN interface and you can check Real Time or per hour traffic for each queue.
 Monitoring QoS graphic
Monitoring Commands
If you are using any local access list use commands:
show sdwan policy access-list-associations
show sdwan policy access-list-counters
show sdwan policy access-list-names
show sdwan policy access-list-policers
To check the QoS Data policy through centralize policy run command and from the output you are going to notice the QoS Policy name, what traffic you are matching, what dscp values and forward class are you are assigning per each sequence under action.
show sdwan policy data-policy-filter
For example:
policy
data-policy _vpn10_QoS_Policy
vpn-list vpn10
sequence 1
match
source-ip 0.0.0.0/0
app-list REAL_TIME_APPS
!
action accept
set
dscp 46
forwarding-class Best_Effor
!
sequence 11
match
source-ip 0.0.0.0/0
app-list VIDEO_CONF
!
action accept
set
dscp 46
forwarding-class Voice
!
default-action accept
!
Using command show policy-map interface GigabitEthernet 1, you are going to find useful information regarding traffic for each queue and if and drops associated.
For example:
GigabitEthernet1
 Class-map: class-default (match-any)
 1100 packets, 113813 bytes
 30 second offered rate 0000 bps, drop rate 0000 bps
 Match: any
 Queueing
 queue limit 1041 packets
 (queue depth/total drops/no-buffer drops) 0/0/0
 (pkts output/bytes output) 934/56377
 bandwidth remaining ratio 25
 Exp-weight-constant: 9 (1/512)
 Mean queue depth: 0 packets
 class          Transmitted     Random drop     Tail drop     Minimum    Maximum    Mark
                 pkts/bytes      pkts/bytes     pkts/bytes    thresh     thresh    prob
 0                 929/55910       0/0             0/0          260        520      1/10
 1                   0/0           0/0             0/0          292        520      1/10
 2                   0/0           0/0             0/0          325        520      1/10
 3                   0/0           0/0             0/0          357        520      1/10
 4                   0/0           0/0             0/0          390        520      1/10
 5                   0/0           0/0             0/0           422       520      1/10
 6                   5/467         0/0             0/0           455       520      1/10
 7                   0/0           0/0             0/0           487       520      1/10
Related Information


 Feedback