Introduction
This document describes the process to restrict Secure Shell (SSH) connection to Cisco IOS-XE® SD-WAN router.
Prerequisites
Requirements
Control connection between vManage and cEdge are required to make the proper tests.
Components Used
This procedure is not restricted to any software release in Cisco Edge or vManage devices, hence all releases could be used to with these steps. However, this document is exclusive for cEdge routers. To configure, this is needed:
- Cisco cEdge router (Virtual or Physical)
- Cisco vManage
The information in this document was created from the devices in a specific lab environment. All of the devices used in this document started with a cleared (default) configuration. If your network is live, ensure that you understand the potential impact of any command.
Background Information
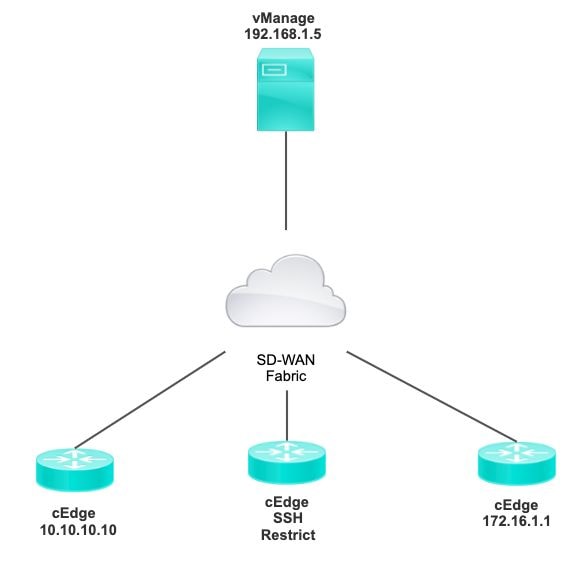
The purpose of this demonstration is to show the configuration on cEdge to restrict SSH access from cEdge 172.16.1.1 but allow cEdge 10.10.10.10 and vManage.
Topology
Restrict SSH Access Procedure
Connectivity Verification
Verification of connectivity is needed to validate the cEdge router can reach the vManage. By default, vManage uses IP 192.168.1.5 to log in to cEdge devices.
From vManage GUI, open SSH to cEdge and make sure the IP that was connected has the next output:
cEdge#show users
Line       User       Host(s)              Idle       Location
*866 vty 0 admin      idle                00:00:00    192.168.1.5
Interface  User        Mode               Idle        Peer Address
Ensure vManage does not use the tunnel, system, or public ip address to login to cEdge.
To confirm the IP that is used to Log in to cEdge, you can use the next access-list.
cEdge#show run  | section access
ip access-list extended VTY_FILTER_SHH
5 permit ip any any log                <<<< with this sequence you can verify the IP of the device that tried to access.
Access Control List Validation
Access-list applied on VTY line
cEdge#show sdwan running-config | section vty
line vty 0 4
 access-class VTY_FILTER_SSH in vrf-also
 transport input ssh
After the ACL was applied, you can open SSH again from vManage to cEdge and see the next message generated on the logs.
This message can be seen with command: show logging.
*Jul 13 15:05:47.781: %SEC_LOGIN-5-LOGIN_SUCCESS: Login Success [user: Tadmin] [Source: 192.168.1.5] [localport: 22] at 15:05:47 UTC Tue Jul 13 2022
On the previous log, you can see Local port 22. It means that 192.168.1.5 tried to open SSH to cEdge.
Now that you confirmed that source IP is 192.168.1.5, you can configure the ACL with the correct IP to allow vManage to be able to open SSH session.
Access Control List Configuration
If cEdge has multiple sequences, make sure to add the new sequence at the top of ACL.
Before:
cEdge#show access-list VTY_FILTER_SSH
Extended IP access list VTY_FILTER_SSH
   10 permit tcp 10.10.10.10 0.0.0.15 any eq 22
   100 deny   ip any any log
Configuration example:
cEdge#config-transaction
cEdgeconfig)# ip access-list
cEdge(config)# ip access-list extended VTY_FILTER_SSH
cEdge(config-ext-nacl)# 5 permit ip host 192.168.1.5 any log
cEdgeconfig-ext-nacl)# commit
Commit complete.
New sequence:
cEdge#show access-list VTY_FILTER_SSH
Extended IP access list VTY_FILTER_SSH
5 permit ip host 192.168.1.5 any log   <<<< New sequence to allow vManage to SSH
10 permit tcp 10.10.10.10 0.0.0.15 any eq 22
100 deny   ip any any log              <<<< This sequence deny all other SSH connections
Apply ACL on VTY line.
cEdge#show sdwan running-config | section vty
line vty 0 4
 access-class VTY_FILTER_SSH in vrf-also
 transport input ssh
!
line vty 5 80
 access-class VTY_FILTER_SSH in vrf-also
 transport input ssh
Configuration on vManage GUI
If the cEdge device has a template attached, you can use the next procedure.
Step 1. Create an ACL
Navigate to Configuration > Custom Options > Access Control List > Add Device Access Policy > Add ipv4 Device Access Policy
Add the name and description of the ACL and click Add ACL Sequence and then select Sequence Rule
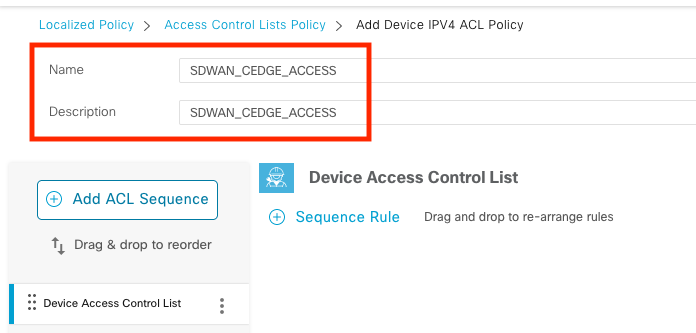
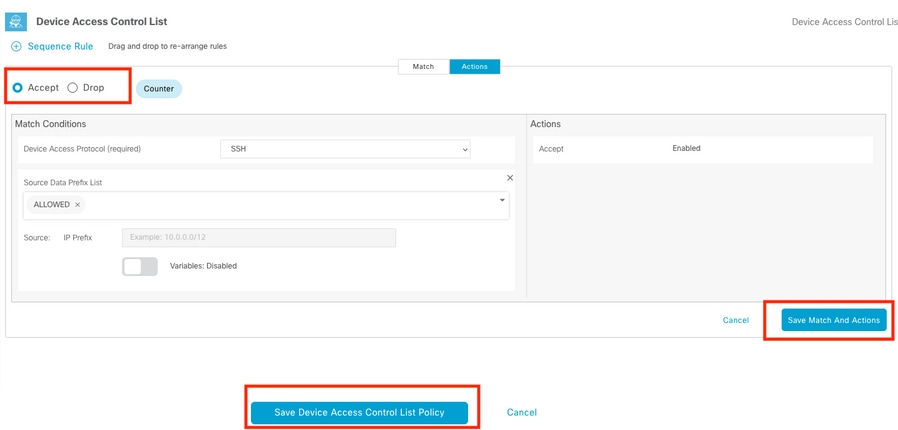
Select Device Access Protocol >SSH
Then select the source Data Prefix List.

Click Actions, select Accept, and then click Save Match And Actions.
Finally, you can select Save Device Access Control List Policy.
Step 2. Create Localized Policy
Navigate to Configuration > Localized Policy > Add Policy > Configure Access Control List > Add Device Access Policy > Import Existing.
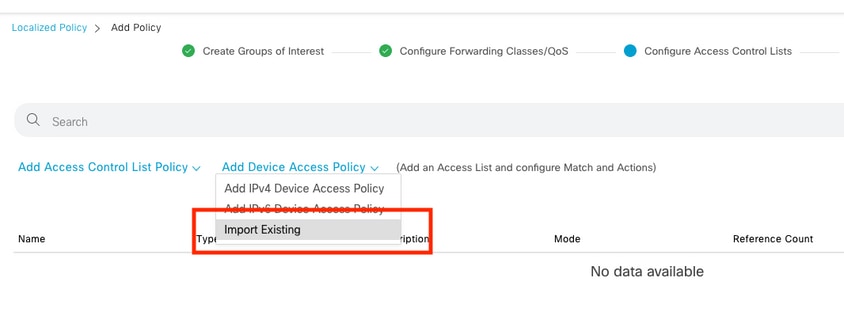
Select previous ACL and click Import.

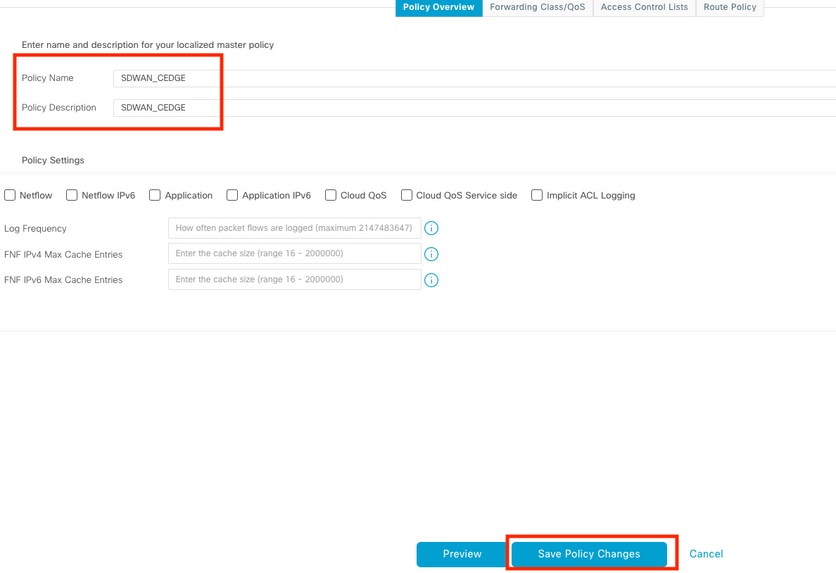
Add the Policy Name and Policy Description and then click Save Policy Changes.
Step 3. Attach the Localized Policy to Device Template
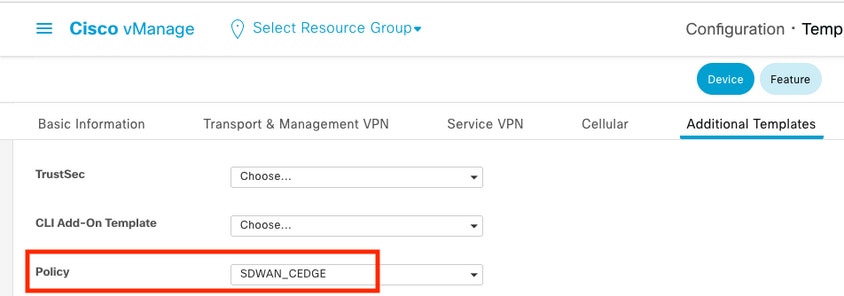
Navigate to Configuration > Template > Device > Select the Device and click on > ... > Edit > Additional Templates > Policy > SDWAN_CEDGE > Update.
Before you push the template, you can verify the Configuration Difference.
New ACL configuration

ACL applied to line vty

Verification
Now you can again test the SSH access to cEdge with previous filters from vManage with this path: Menu > Tools > SSH Terminal.
Router tried to SSH to 192.168.10.114m

If you check the ACL counters, you can confirm that Seq 30 has 1 match and SSH connection was denied.

Related Information


 Feedback