Configure CA Signed Certificate via CLI in Cisco Voice Operating System (VOS)
Available Languages
Download Options
Bias-Free Language
The documentation set for this product strives to use bias-free language. For the purposes of this documentation set, bias-free is defined as language that does not imply discrimination based on age, disability, gender, racial identity, ethnic identity, sexual orientation, socioeconomic status, and intersectionality. Exceptions may be present in the documentation due to language that is hardcoded in the user interfaces of the product software, language used based on RFP documentation, or language that is used by a referenced third-party product. Learn more about how Cisco is using Inclusive Language.
Contents
Introduction
This document describes configuration steps on how to upload 3rd party Certificate Authority (CA) signed certificate on any Cisco Voice Operating System (VOS) based collaboration server by using the command line interface (CLI).
Prerequisites
Requirements
Cisco recommends that you have knowledge of these topics:
- Basic understanding of Public Key Infrastructure (PKI) and its implementation on Cisco VOS servers and Microsoft CA
- DNS infrastructure is preconfigured
Components Used
The information in this document is based on these software and hardware versions:
- VOS Server: Cisco Unified Communications Manager (CUCM) version 9.1.2
- CA: Windows 2012 Server
- Client browser: Mozilla Firefox version 47.0.1
The information in this document was created from the devices in a specific lab environment. All of the devices used in this document started with a cleared (default) configuration. If your network is live, make sure that you understand the potential impact of any command.
Background Information
In all Cisco Unified Comunications VOS products there are at least two credentials types: application like (ccmadmin, ccmservice, cuadmin, cfadmin, cuic) and VOS platform (cmplatform, drf, cli).
In some specific scenarios it is very convenient to manage applications via the web page and perform platform related activities via the command line. Below you may find a procedure on how to import 3rd party signed certificate solely via CLI. In this example Tomcat certificate is uploaded. For CallManager or any other application it looks the same.
Generate CA Signed Certificate
Commands Summary
A list of the commands used in the article.
show cert list own
show cert own tomcat

set csr gen CallManager
show csr list own
show csr own CallManager

show cert list trust
set cert import trust CallManager
set cert import own CallManager CallManager-trust/allevich-DC12-CA.pem
Check Correct Certificate Information
List all uploaded trusted certificates.
admin:show cert list own

tomcat/tomcat.pem: Self-signed certificate generated by system
ipsec/ipsec.pem: Self-signed certificate generated by system
CallManager/CallManager.pem: Certificate Signed by allevich-DC12-CA
CAPF/CAPF.pem: Self-signed certificate generated by system
TVS/TVS.pem: Self-signed certificate generated by system
Check who issued the certificate for Tomcat service.
admin:show cert own tomcat

[
  Version: V3
  Serial Number: 85997832470554521102366324519859436690
  SignatureAlgorithm: SHA1withRSA (1.2.840.113549.1.1.5)
  Issuer Name: L=Krakow, ST=Malopolskie, CN=ucm1-1.allevich.local, OU=TAC, O=Cisco, C=PL
  Validity From: Sun Jul 31 11:37:17 CEST 2016
           To:   Fri Jul 30 11:37:16 CEST 2021
  Subject Name: L=Krakow, ST=Malopolskie, CN=ucm1-1.allevich.local, OU=TAC, O=Cisco, C=PL
  Key: RSA (1.2.840.113549.1.1.1)
    Key value: 3082010a0282010100a2
<output omited>
This is a self-signed certificate since the issuer matches the subject.
Generate Certificate Sign Request (CSR)
Generate CSR.
admin:set csr gen tomcat
Successfully Generated CSR  for tomcat
Verify that the certificate sign requst was generated successfully.
admin:show csr list own
tomcat/tomcat.csr
Open it and copy the content to the text file. Save it as tac_tomcat.csr file.
admin:show csr own tomcat

-----BEGIN CERTIFICATE REQUEST-----
MIIDSjCCAjICAQAwgb0xCzAJBgNVBAYTAlBMMRQwEgYDVQQIEwtNYWxvcG9sc2tp
ZTEPMA0GA1UEBxMGS3Jha293MQ4wDAYDVQQKEwVDaXNjbzEMMAoGA1UECxMDVEFD
MR4wHAYDVQQDExV1Y20xLTEuYWxsZXZpY2gubG9jYWwxSTBHBgNVBAUTQDlhMWJk
NDA5M2VjOGYxNjljODhmNGUyZTYwZTYzM2RjNjlhZmFkNDY1YTgzMDhkNjRhNGU1
MzExOGQ0YjZkZjcwggEiMA0GCSqGSIb3DQEBAQUAA4IBDwAwggEKAoIBAQCVo5jh
lMqTUnYbHQUnYPt00PTflWbj7hi6PSYI7pVCbGUZBpIZ5PKwTD56OZ8SgpjYX5Pf
l9D09H2gtQJTMVv1Gm1eGdlJsbuABRKn6lWkO6b706MiGSgqel+41vnItjn3Y3kU
7h51nruJye3HpPQzvXXpOKJ/JeJc8InEvQcC/UQmFMKn0ulO0veFBHnG7TLDwDaQ
W1Al1rwrezN9Lwn2a/XZQR1P65sjmnkFFF2/FON4BmooeiiNJD0G+F4bKig1ymlR
84faF27plwHjcw8WAn2HwJT6O7TaE6EOJd0sgLU+HFAI3txKycS0NvLuMZYQH81s
/C74CIRWibEWT2qLAgMBAAGgRzBFBgkqhkiG9w0BCQ4xODA2MCcGA1UdJQQgMB4G
CCsGAQUFBwMBBggrBgEFBQcDAgYIKwYBBQUHAwUwCwYDVR0PBAQDAgO4MA0GCSqG
SIb3DQEBBQUAA4IBAQBUu1FhKuyQ1X58A6+7KPkYsWtioS0PoycltuQsVo0aav82
PiJkCvzWTeEo6v9qG0nnaI53e15+RPpWxpEgAIPPhtt6asDuW30SqSx4eClfgmKH
ak/tTuWmZbfyk2iqNFy0YgYTeBkG3AqPwWUCNoduPZ0/fo41QoJPwjE184U64WXB
gCzhIHfsV5DzYp3IR5C13hEa5fDgpD2ubQWja2LId85NGHEiqyiWqwmt07pTkBc+
7ZKa6fKnpACehrtVqEn02jOi+sanfQKGQqH8VYMFsW2uYFj9pf/Wn4aDGuJoqdOH
StV2Eh0afxPEq/1rQP3/rzq4NMYlJ7glyNFGPUVP
-----END CERTIFICATE REQUEST-----
Generate Tomcat Server Certificate
Generate a certificate for Tomcat service on the CA.
Open the web page for the Certificate Authority in a browser. Put the correct credentials in the authentication prompt.
http://dc12.allevich.local/certsrv/

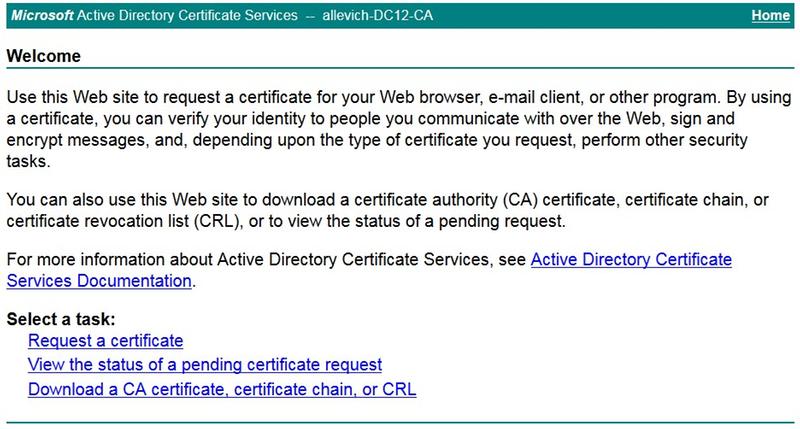
Download the CA root certificate. Select Download a CA certificate, certificate chain, or CRL menu. In the next menu choose the proper CA from the list. Encoding method should be Base 64. Download the CA certificate and save it to the operating system with name ca.cer.
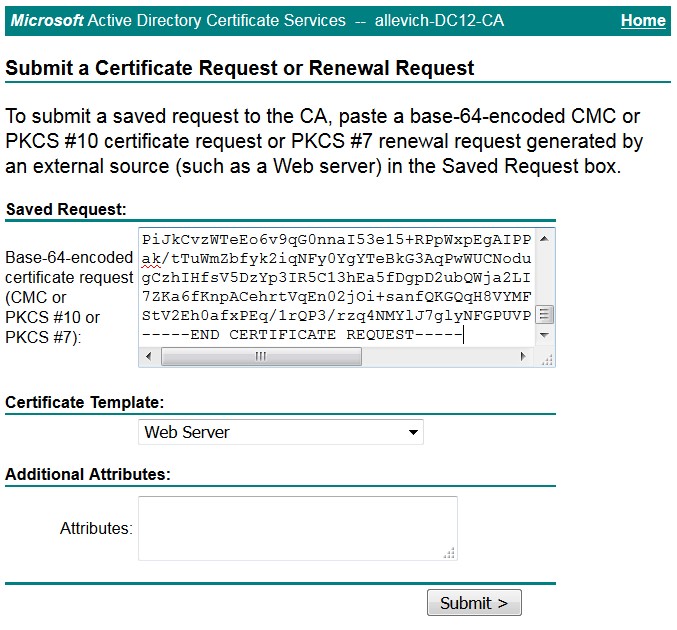
Press Request a Certificate and then Advanced Certificate Request. Set Certificate Template to web server and paste the CSR content from the text file tac_tomcat.csr as shown.
Tip: If the operation is done in the lab (or Cisco VOS server and the CA is under the same administrative domain) to save time copy and paste the CSR from the memory buffer.
Press Submit. Select Base 64 encoded option and download the certificate for the Tomcat service.
Note: If certificate generation is performed in bulk ensure to change a name of the certificate to a meaninful one.
Import Tomcat Certificate to the Cisco VOS Server
Import CA Certificate
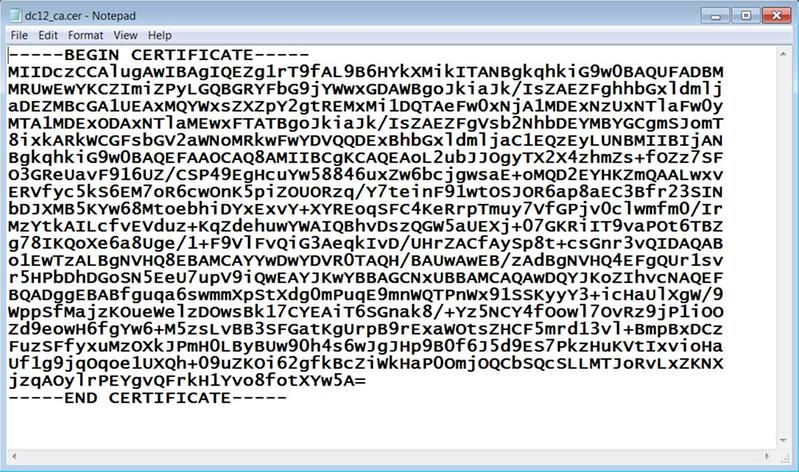
Open the CA certificate that was stored with a name ca.cer. It must be imported first.

Copy its content to the buffer and type the following command in the CUCM CLI:
admin:set cert import trust tomcat

Paste the Certificate and Hit Enter
Prompt to paste the CA certificate will be displayed. Paste it as shown below.
-----BEGIN CERTIFICATE-----
MIIDczCCAlugAwIBAgIQEZg1rT9fAL9B6HYkXMikITANBgkqhkiG9w0BAQUFADBM
MRUwEwYKCZImiZPyLGQBGRYFbG9jYWwxGDAWBgoJkiaJk/IsZAEZFghhbGxldmlj
aDEZMBcGA1UEAxMQYWxsZXZpY2gtREMxMi1DQTAeFw0xNjA1MDExNzUxNTlaFw0y
MTA1MDExODAxNTlaMEwxFTATBgoJkiaJk/IsZAEZFgVsb2NhbDEYMBYGCgmSJomT
8ixkARkWCGFsbGV2aWNoMRkwFwYDVQQDExBhbGxldmljaC1EQzEyLUNBMIIBIjAN
BgkqhkiG9w0BAQEFAAOCAQ8AMIIBCgKCAQEAoL2ubJJOgyTX2X4zhmZs+fOZz7SF
O3GReUavF916UZ/CSP49EgHcuYw58846uxZw6bcjgwsaE+oMQD2EYHKZmQAALwxv
ERVfyc5kS6EM7oR6cwOnK5piZOUORzq/Y7teinF91wtOSJOR6ap8aEC3Bfr23SIN
bDJXMB5KYw68MtoebhiDYxExvY+XYREoqSFC4KeRrpTmuy7VfGPjv0clwmfm0/Ir
MzYtkAILcfvEVduz+KqZdehuwYWAIQBhvDszQGW5aUEXj+07GKRiIT9vaPOt6TBZ
g78IKQoXe6a8Uge/1+F9VlFvQiG3AeqkIvD/UHrZACfAySp8t+csGnr3vQIDAQAB
o1EwTzALBgNVHQ8EBAMCAYYwDwYDVR0TAQH/BAUwAwEB/zAdBgNVHQ4EFgQUr1sv
r5HPbDhDGoSN5EeU7upV9iQwEAYJKwYBBAGCNxUBBAMCAQAwDQYJKoZIhvcNAQEF
BQADggEBABfguqa6swmmXpStXdg0mPuqE9mnWQTPnWx91SSKyyY3+icHaUlXgW/9
WppSfMajzKOueWelzDOwsBk17CYEAiT6SGnak8/+Yz5NCY4fOowl7OvRz9jP1iOO
Zd9eowH6fgYw6+M5zsLvBB3SFGatKgUrpB9rExaWOtsZHCF5mrd13vl+BmpBxDCz
FuzSFfyxuMzOXkJPmH0LByBUw90h4s6wJgJHp9B0f6J5d9ES7PkzHuKVtIxvioHa
Uf1g9jqOqoe1UXQh+09uZKOi62gfkBcZiWkHaP0OmjOQCbSQcSLLMTJoRvLxZKNX
jzqAOylrPEYgvQFrkH1Yvo8fotXYw5A=
-----END CERTIFICATE-----
In case a trust certificate upload is successful this output will be displayed.
Import of trust certificate is successful
Verify that the CA certificate is successfully imported as Tomcat-trust one.
admin:show cert list trust

tomcat-trust/ucm1-1.pem: Trust Certificate
tomcat-trust/allevich-win-CA.pem: w2008r2 139
<output omited for brevity>
Import Tomcat Certificate
Next step is to import Tomcat CA signed certificate. The operation looks the same as with tomcat-trust cert, just the command is different.
set cert import own tomcat tomcat-trust/allevich-DC12-CA.pem
Restart the Service
And lastly restart Tomcat service.
utils service restart Cisco Tomcat
Caution: Keep in mind that it disrupts the operation of web server dependant services, like Extension Mobility, Missed Calls, Corporate Directory and the others.
Verify
Verify the certificate that was generated.
admin:show cert own tomcat

[
  Version: V3
  Serial Number: 2765292404730765620225406600715421425487314965
  SignatureAlgorithm: SHA1withRSA (1.2.840.113549.1.1.5)
  Issuer Name: CN=allevich-DC12-CA, DC=allevich, DC=local
  Validity From: Sun Jul 31 12:17:46 CEST 2016
           To:   Tue Jul 31 12:17:46 CEST 2018
  Subject Name: CN=ucm1-1.allevich.local, OU=TAC, O=Cisco, L=Krakow, ST=Malopolskie, C=PL
  Key: RSA (1.2.840.113549.1.1.1)
    Key value: 3082010a028201010095a
Ensure that the issuer name belongs to the CA that constructed that certificate.
Login to the web page by typing FQDN of the server in a browser and no certificate warning will be displayed.
Troubleshoot
The goal of this article is to give a procedure with command syntax on how to upload the certificate via CLI, not to highlight the logic of Public Key Infrastucture (PKI). It does not cover SAN certificate, Subordinate CA, 4096 certificate key length and many other scenarios.
In some rare cases when uploading a web server certificate via the CLI the operation fails with an error message "Unable to read CA certificate". A workaround for that is to install the certificate using the web page.
A non standard Certificate Authority configuration can lead to the problem with certificate installation. Try to generate and install the certificate from another CA with a basic default configuration.
Back Out Plan
In case there will be a need to generate a self-signed certificate it can also be done in the CLI.
Type the command below and Tomcat certificate will be regenerated to the self-signed one.
admin:set cert regen tomcat

WARNING: This operation will overwrite any CA signed certificate previously imported for  tomcat

Proceed with regeneration (yes|no)? yes
Successfully Regenerated Certificate for tomcat.

You must restart services related to tomcat for the regenerated certificates to become active.
To apply a new certificate Tomcat service must be restarted.
admin:utils service restart Cisco Tomcat

 Don't press Ctrl-c while the service is getting RESTARTED.If Service has not Restarted Properly, execute the same Command Again

Service Manager is running
Cisco Tomcat[STOPPING]
Cisco Tomcat[STOPPING]
Commanded Out of Service
Cisco Tomcat[NOTRUNNING]
Service Manager is running
Cisco Tomcat[STARTING]
Cisco Tomcat[STARTING]
Cisco Tomcat[STARTED]
Related Articles
Upload certificate via Web Page
Procedure to obtain and upload Windows Server Self‐Signed or Certificate Authority (CA) ...
Contributed by Cisco Engineers
- Alexander LevichevCisco TAC Engineer
Contact Cisco
- Open a Support Case

- (Requires a Cisco Service Contract)

 Feedback