Introduction
This document describes about the Cisco Advanced Malware Protection (AMP) for Endpoints. Cisco AMP for Endpoints comes with an Application Programming Interface (API). It allows you to pull data from an AMP for Endpoints deployment, and manipulate them, when necessary.
This article demonstrates some basic functionalities of the API. The examples on this article uses a Windows 7 endpoint.
Contributed by Matthew Franks, Nazmul Rajib, and Cisco TAC Engineers.
Generate and Delete API Credentials
In order to use the AMP for Endpoint API, you have to set up an API credential. Follow the given steps to create a credential through the AMP Console.
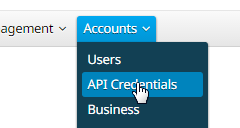
Step 1: Log into the Console, and navigate to Accounts > API Credentials.

Step 2: Click New API Credential to create a new set of Keys.

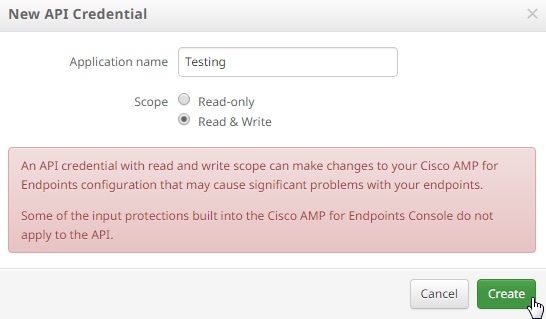
Step 3: Provide an Application name. Select the Scope of Read-only or Read & Write.

Note: An API credential with read and write scope can make changes to your Cisco AMP for Endpoints configuration that might cause significant problems with your endpoints. Some of the input protections built into the Cisco AMP for Endpoints Console do not apply to the API.
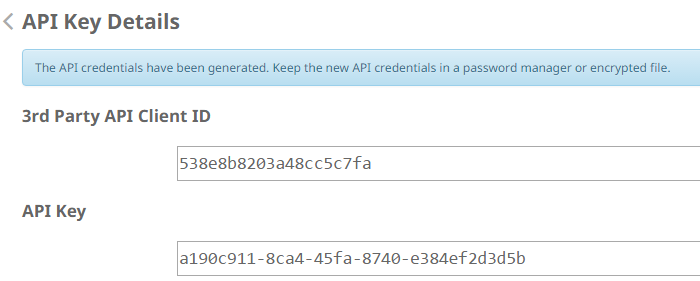
Step 4: Click the Create button. The API Key Details appears. Save this information as some of it will not be available after leaving the screen.

Note: API credentials (API Client ID & API Key) will allow other programs to retrieve and modify your Cisco AMP for Endpoints data. It is functionally equivalent to a username and password, and should be treated as such.
Caution: Your API credentials are displayed once only. If you lose the credentials, you have to generate new ones.
Delete the API credentials for an application if you suspect they have been compromised, and create a new one. When you delete an API credential, it locks out the client who uses the old ones, so update them with the new credentials.

API Versions and Current Options
There are currently two versions of the AMP for Endpoints API - Version 0 and Version 1. The Version 1 has additional functionality versus Version 0. The documentation for Version 1 is here. You can pull this information witn the use of Version 1.
- Computers
- Computer Activity
- Events
- Event Types
- File Lists
- File List Items
- Groups
- Policies
- Versions
Click on the relevant command in the document to see examples of its usage.
API Command Break-down and Example
Each API command contains similar information and can essentially break down to a curl command and can be looked at like this:
curl -o yourfilename.json https://clientID:APIKey@api.amp.cisco.com/v1/whatyouwanttodo
When you use the curl command with the -o option, it allows you to save the output to a file. In this case the file name is “yourfilename.json”.
Tip: More information on .json files can be found here.
The next step in the curl command is to set the address with your credentials before the @ symbol. When you generatie API Credentials, you know the clientID and APIKey, so this section of the command will resemble the link given below.
https://538e8b8203a48cc5c7fa:a190c911-8ca4-45fa-8740-e384ef2d3d5b@
Add the version number and what you would like to do. For this example, run the GET /v1/computers options.The full command looks like this:
curl -o computers.json https://538e8b8203a48cc5c7fa:a190c911-8ca4-45fa-8740-e384ef2d3d5b@api.amp.cisco.com/v1/computers
After you run the command, you should see a computers.json file downloaded to the directory where you initiated the command.


Note: Curl is available online and compiled for lots of platforms that includes Windows (generally you’ll want to use the Win32 – Generic version).
When you open the file you will see all of the data in a single line. If you would like to see this in its proper format, you can install a browser plugin to format it as JSON and open the file in a browser. This shows information for your computers that you can use however you would like, such as:
connector_guid, hostname, active, links, connector_version, operating_system, internal_ips, external_ip, group_guid, network_addresses, policy guid, and policy name.
{
version: "v1.0.0",
metadata: {
links: {
self: "https://api.amp.cisco.com/v1/computers"
},
results: {
total: 4,
current_item_count: 4,
index: 0,
items_per_page: 500
}
},
data: [
{
connector_guid: "abcdef-1234-5678-9abc-def123456789",
hostname: "test.cisco.com",
active: true,
links: {
computer: "https://api.amp.cisco.com/v1/computers/abcdef-1234-5678-9abc-def123456789",
trajectory: "https://api.amp.cisco.com/v1/computers/abcdef-1234-5678-9abc-def123456789/trajectory",
group: "https://api.amp.cisco.com/v1/groups/abcdef-1234-5678-9abc-def123456789"
},
connector_version: "4.4.2.10200",
operating_system: "Windows 7, SP 1.0",
internal_ips: [
"10.1.1.2",
" 192.168.1.2",
" 192.168.2.2",
" 169.254.245.1"
],
external_ip: "1.1.1.1",
group_guid: "abcdef-1234-5678-9abc-def123456789",
network_addresses: [
{
mac: "ab:cd:ef:01:23:45",
ip: "10.1.1.2"
},
{
mac: "bc:de:f0:12:34:56",
ip: "192.168.1.2"
},
{
mac: "cd:ef:01:23:45:67",
ip: "192.168.2.2"
},
{
mac: "de:f0:12:34:56:78",
ip: "169.254.245.1"
}
],
policy: {
guid: "abcdef-1234-5678-9abc-def123456789",
name: "Protect Policy"
}
Now that you have seen a basic example in action, you can use the various command options to pull and manipulate data in your environment.
Related Information
Technical Support & Documentation - Cisco Systems


 Feedback