Cisco recently launched two packages for AMP for Endpoints: Essentials and Advantage. Orbital Advanced Search is a key feature in the Advantage package. All existing customers as of the date of launch (January 8 2020) can opt-in to use it at no charge for the rest of their contract term. This FAQ has more information on the packages and how it affects existing customers as of the launch date.
Orbital Advanced Search is a new advanced capability in Cisco AMP for Endpoints designed to make security investigation and threat hunting simple by providing over a hundred catalog queries. This allows you to quickly run complex queries on any or all endpoints. This also enables you to gain deeper visibility on what happened on any endpoint at any given time by taking a snapshot of its current state.
With Orbital Advanced Search, you can do the following important tasks better, faster:
- Threat Hunting. Search for malicious artifacts in near real-time to accelerate your hunt for threats.
- Incident Investigation. Get to the root cause of the incident fast, accelerating remediation.
- IT Operations. Simply track disk space, memory, and other IT operations artifacts.
- Vulnerability and Compliance. Quickly check the status of Operating Systems for things like versions and patch updates, ensuring your endpoints are in compliance with current policies.
This document is a step-by-step guide to walk you through how to opt-in to the new feature and enable it on your endpoints. A full Orbital User Guide is available as well. AMP for Endpoints customers can enable Orbital Advanced Search easily if your endpoints already have a Connector installed (7.1.5 or higher). See the AMP for Endpoints Console Help topic on Orbital for the most current Connector version and other information. Orbital Advanced Search is currently supported on 64-bit Windows 10 hosts running Version 1703 (Creators Update) or later.
Once you’ve completed these steps, see the Quick Start guide for a more detailed description of how to get started using Orbital Advanced Search.
Step 1: Opt-In to Orbital Advanced Search
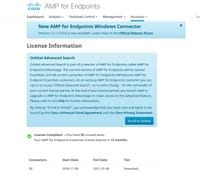
If you have not previously enrolled in the Orbital Advanced Search beta or opted in explicitly, you can do so from the License Information page in the AMP for Endpoints console. To opt-in to Orbital Advanced Search, log into the AMP for Endpoints console and select the drop down of Accounts > License Information. On this page you can click Enroll in Orbital to get access to this capability.

NOTE: You must be a privileged (admin) user to opt-in to Orbital Advanced Search.
Step 2: Enable Orbital Advanced Search in an Existing Policy
If your endpoints already have a Connector installed (version 7.1.5 or higher) then you can simply enable Orbital Advanced Search in an existing policy for your endpoints.
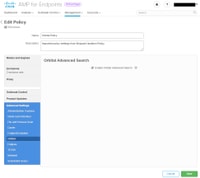
- Go to the AMP for Endpoints Console. In Management > Policies, select the policy you want to enable Orbital Advanced Search in and click the Edit button to open the Edit Policy Under Advanced Settings select Orbital and verify that Orbital Advanced Search is enabled. The Enable Orbital Advanced Search box should be checked. If not, check the box to enable it.

At this point any connectors installed with this policy will automatically enable Orbital Advanced Search on that endpoint.
Step 3: Enable Orbital Advanced Search in a New Policy and Group of Computers (optional)
As described above, once you have enabled Orbital Advanced Search in an existing policy then all the connectors using that policy will have Orbital Advanced Search enabled and any new connectors you install, which use that policy, will also have Orbital Advanced Search enabled. For example, if you have 1000 computers in your “Protect” group, simply enabling Orbital Advanced Search in that policy will automatically enable Orbital Advanced Search on those endpoints as long as Connector version 7.1.5 or later is deployed.
Creating new policies and groups is optional. However, if you want to use Orbital Advanced Search on a specific group of endpoints using a new policy and group, then simply follow the product documentation to create a new policy and/or group and make sure that Orbital Advanced Search is enabled in the policy as shown above.
Step 4: Explore the Orbital Console
Once you have enabled Orbital Advanced Search in a policy with a Connector version higher than 7.1.5 installed on at least one endpoint, you can now execute queries on an endpoint in order to gather information from it.
- Go to Management > Computers and locate a computer with Orbital Advanced Search Expand the pane and click Orbital Query. (You can also access the Orbital console by going to Analysis > Orbital Advanced Search).
- The Orbital console is loaded in a new browser tab. If needed, click Log in with Cisco Security to authenticate using your existing AMP Console credentials.
NOTE: You can also access Orbital Advanced Search directly at https://orbital.amp.cisco.com
- The Endpoints field shows the computer(s) that will be queried. You can enter a specific GUID or enter all in this field to query every endpoint in your organization that has Orbital Advanced Search enabled. If you’d like to take a random sampling of endpoints, click the ellipses (...) to open the Add Random Endpoints dialog box.
- You can enter custom SELECT statements in the SQL field, or click Browse Query Catalog to open the Query Catalog, which contains dozens of queries that you can add to your query. You do not need to know how to write an SQL SELECT statement to use Orbital.

- Click Query. The query is run against the specified endpoints, and results are displayed in the right pane. You can edit the query and rerun. You can download the results. You can save the query as a Job to be run on a scheduled basis that you can configure.
- For further information getting started with Orbital Advanced Search, explore the Quick Start
