Introduction
This document describes how to check all certificate authorities installed when Secure Endpoint installation fails due to a certificate errors.
Components Used
- Security Connector (formerly AMP for Endpoints) 6.3.1 Onwards
- Windows 7 Onwards
The information in this document was created from the devices in a specific lab environment. All of the devices used in this document started with a cleared (default) configuration. If your network is live, ensure that you understand the potential impact of any command.
Problem
If you experience problems with Secure Endpoint Connector for Windows, check logs under this location.
C:\ProgramData\Cisco\AMP\immpro_install.log
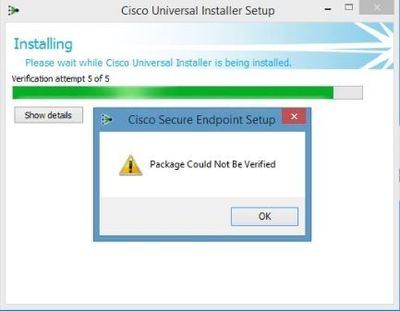
If you see this or a similar message.
ERROR: Util::VerifyAll: signature verification failed : -2146762487 : A certificate chain processed, but terminated in a root certificate which is not trusted by the trust provider.
Package could not be verified

Ensure you have all the necessary RootCA certificates installed.
Solution
Step 1. Open PowerShell with administrative privileges and run the command.
Get-ChildItem -Path Cert:LocalMachine\Root
The result shows a list of installed RootCA certificates stored in a machine.
Step 2. Compare thumbprints obtained on Step 1 with thost listed on the Table 1, below:
| Thumbprint |
Subject Name / Attributes |
| 3B1EFD3A66EA28B16697394703A72CA340A05BD5 |
CN=Microsoft Root Certificate Authority 2010, O=Microsoft Corporation, L=Redmond, S=Washington, C=US |
| D69B561148F01C77C54578C10926DF5B856976AD |
CN=GlobalSign, O=GlobalSign, OU=GlobalSign Root CA - R3 |
| D4DE20D05E66FC53FE1A50882C78DB2852CAE474 |
CN=Baltimore CyberTrust Root, OU=CyberTrust, O=Baltimore, C=IE |
| D1EB23A46D17D68FD92564C2F1F1601764D8E349 |
CN=AAA Certificate Services, O=Comodo CA Limited, L=Salford, S=Greater Manchester, C=GB |
| B1BC968BD4F49D622AA89A81F2150152A41D829C |
CN=GlobalSign Root CA, OU=Root CA, O=GlobalSign nv-sa, C=BE |
| AD7E1C28B064EF8F6003402014C3D0E3370EB58A |
OU=Starfield Class 2 Certification Authority, O="Starfield Technologies, Inc.", C=US |
| A8985D3A65E5E5C4B2D7D66D40C6DD2FB19C5436 |
CN=DigiCert Global Root CA, OU=www.digicert.com, O=DigiCert Inc, C=US |
| 742C3192E607E424EB4549542BE1BBC53E6174E2 |
OU=Class 3 Public Primary Certification Authority, O="VeriSign, Inc.", C=US |
| 5FB7EE0633E259DBAD0C4C9AE6D38F1A61C7DC25 |
CN=DigiCert High Assurance EV Root CA, OU=www.digicert.com, O=DigiCert Inc, C=US |
| 4EB6D578499B1CCF5F581EAD56BE3D9B6744A5E5 |
CN=VeriSign Class 3 Public Primary Certification Authority - G5, OU="(c) 2006 VeriSign, Inc. - For authorized use only", OU=VeriSign Trust Network, O="VeriSign, Inc.", C=US |
| 2796BAE63F1801E277261BA0D77770028F20EEE4 |
OU=Go Daddy Class 2 Certification Authority, O="The Go Daddy Group, Inc.", C=US |
| 0563B8630D62D75ABBC8AB1E4BDFB5A899B24D43 |
CN=DigiCert Assured ID Root CA, OU=www.digicert.com, O=DigiCert Inc, C=US |
| DDFB16CD4931C973A2037D3FC83A4D7D775D05E4 |
CN=DigiCert Trusted Root G4, OU=www.digicert.com, O=DigiCert Inc, C=US |
| CA3AFBCF1240364B44B216208880483919937CF7 |
CN=QuoVadis Root CA 2, O=QuoVadis Limited, C=BM |
| 2B8F1B57330DBBA2D07A6C51F70EE90DDAB9AD8E |
CN=USERTrust RSA Certification Authority, O=The USERTRUST Network, L=Jersey City, S=New Jersey, C=US |
| F40042E2E5F7E8EF8189FED15519AECE42C3BFA2 |
CN=Microsoft Identity Verification Root Certificate Authority 2020, O=Microsoft Corporation, L=Redmond, S=Washington, C=US |
| DF717EAA4AD94EC9558499602D48DE5FBCF03A25 |
CN=IdenTrust Commercial Root CA 1,O=IdenTrust,C=US |
Table 1. List of required certificates for Cisco Secure Connector.
Step 3. Download certificates that are not present in the machine store from the issuers in the PEM format.
Tip: You can search the certificate by the thumbprint on the internet. They uniquely define the certificate.
Step 4. Open the mmc console from the Start menu.
Step 5. Navigate to File > Add/Remove Snap-in... > Certificates > Add > Computer Account > Next > Finish > OK.
Step 6. Open Certificates under Trusted Root Certification Authorities. Right-click Certificates folder, then select All Tasks > Import... and continue the wizard in order to import the certificate until it appears in the Certificates folder.
Step 7. Repeat step 6 if you have more certificates to import.
Step 8. After you import all certificates, check if the AMP for Endpoints Connector installation is successful. If it is not, check again logs in immpro_install.log file.


 Feedback