Introduction
This document describes how to configure PerApp VPN on Apple iOS devices managed by Meraki Mobile Device Manager (MDM), System Manager (SM).
Prerequisites
Requirements
- AnyConnect v4.0 Plus or Apex license.
- ASA 9.3.1 or later to support Per App VPN.
- Cisco Enterprise Application Selector tool available on Cisco.com
Components Used
The information in this document is based on these software versions:
- ASA 5506W-X version 9.15(1)10
- iPad iOS version 15.1
The information in this document was created from the devices in a specific lab environment. All of the devices used in this document started with a cleared (default) configuration. If your network is live, ensure that you understand the potential impact of any command.
Background Information
This document does not include the listed processes:
- SCEP CA Configuration on Systems Manager for client certificate generation
- PKCS12 client certificate generation for the iOS clients
Configure
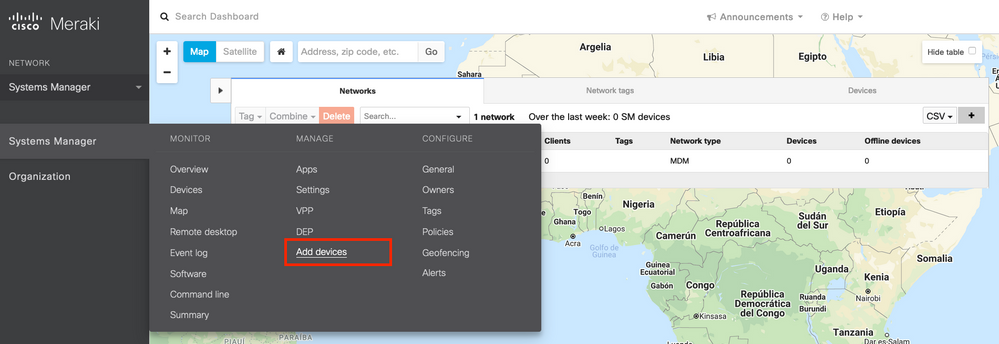
Step 1. Register iOS Device to Meraki Systems Manager
1.1. Navigate to Systems Manager > Add Devices
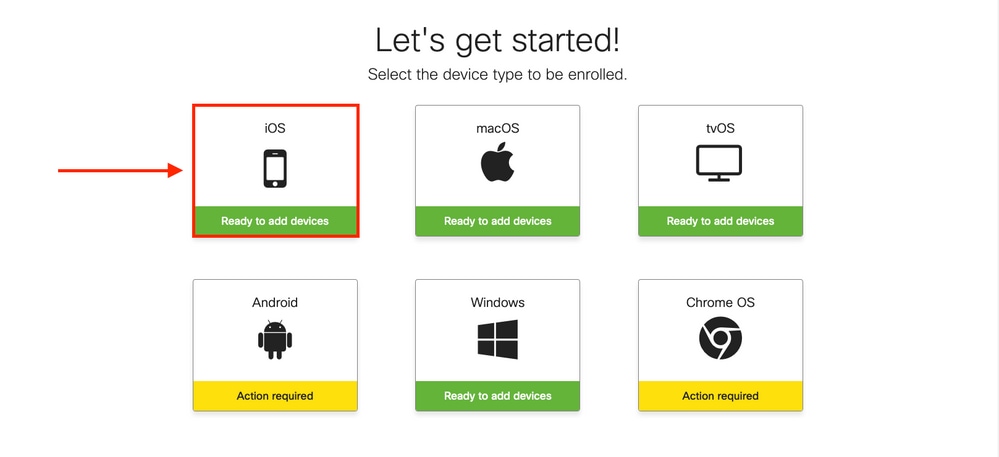
1.2. Click on the iOS option to start the enrollment.
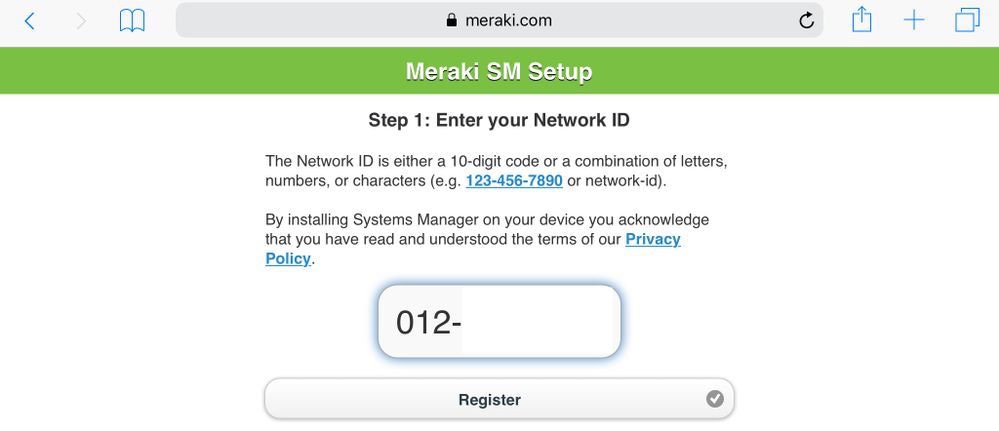
1.3. Enroll the device via internet browser or scan the QR code with the camera. In this document, the camera was used for the enrollment process.

1.4. When the QR code is recognized by the camera, select the Open "meraki.com" in Safari notification that pops up.

1.5. When prompted, select Register.
1.6. Select Allow in order to allow the device to download the MDM profile.

1.7. Select Close to complete the download.

1.8. Navigate to the iOS Settings App and locate the Profile Downloaded option in the left pane and select the Meraki Management section.

1.9. Select the Install option to install the MDM profile.

1.10. You must grant the access to Install the SM application.

1.11. Open the recently downloaded application called Meraki MDM located in the home screen.

1.12. Verify all the statuses have a green tick that confirms the enrollment is in complete.

Step 2. Setup Managed Apps
In order to setup the Tunneled Apps for PerApp later in this document, you need to manage those same applications via SM. In this configuration example, Firefox is intended to be tunneled via Per App, hence it is added to the managed Apps.
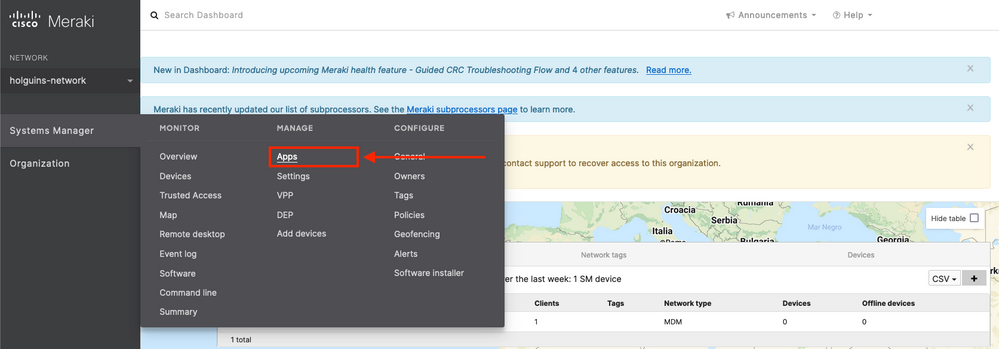
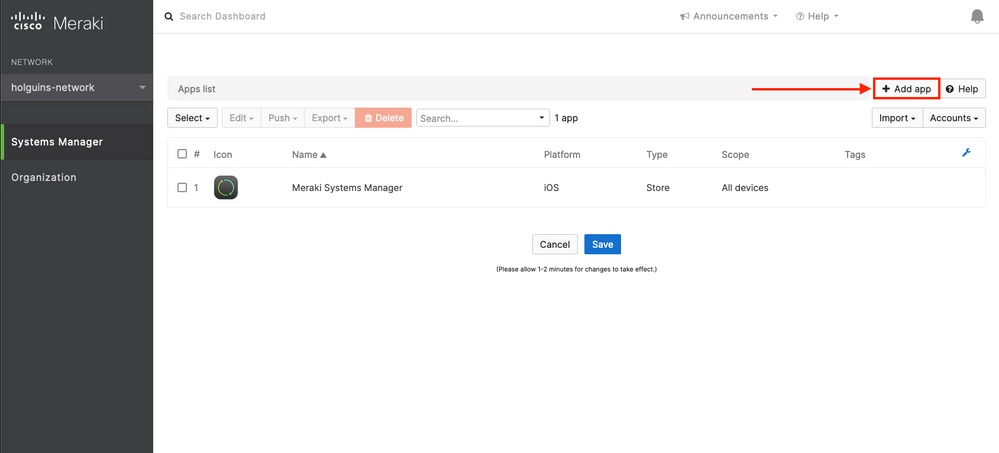
2.1. Navigate to Systems Manager > Manage > Apps in order to add the managed apps.
2.2. Select the Add app option.
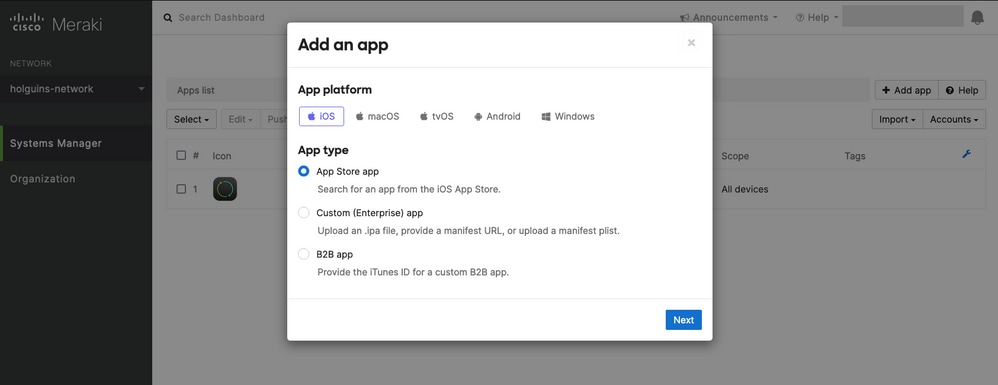
2.3. Select the type of application (App Store app, Custom, B2B) based on where the app is stored. Select Next once it is selected.
In this example the app is stored publicly in the App Store.
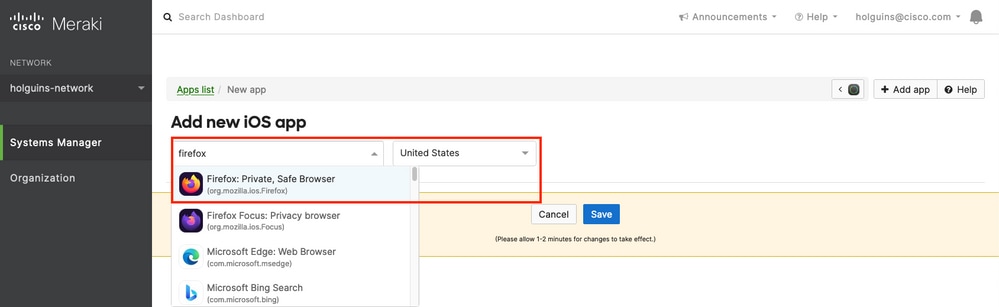
2.4. When prompted, search for the desired application and select the region from where the application is downloaded from. Select Save once the app is selected.
Note: If the country does not match the Apple account's region, the user may experience problems with the application.
2.5. Click Save once you select all the desired applications.
Step 3. Configure PerApp VPN profile
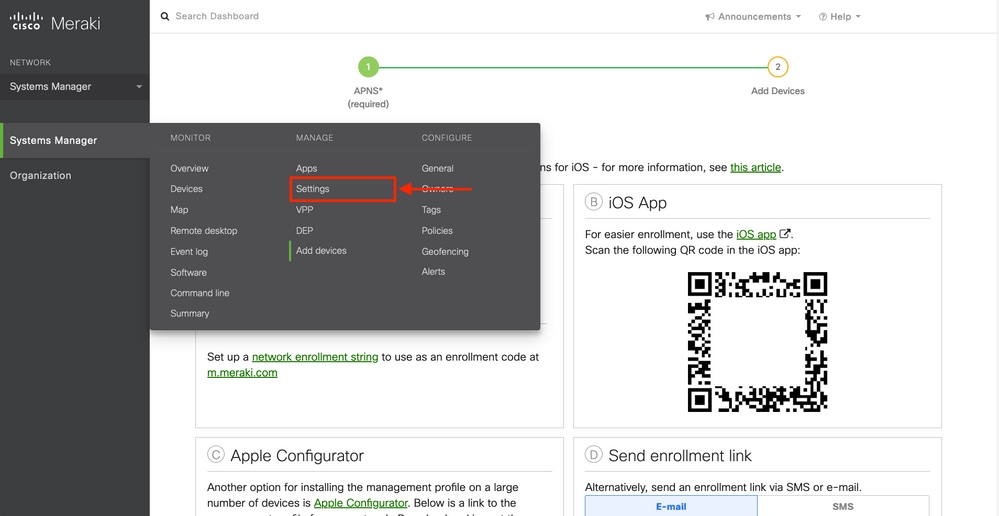
3.1. Navigate to Systems Manager > Manage > Settings
3.2. Select the Add profile option.
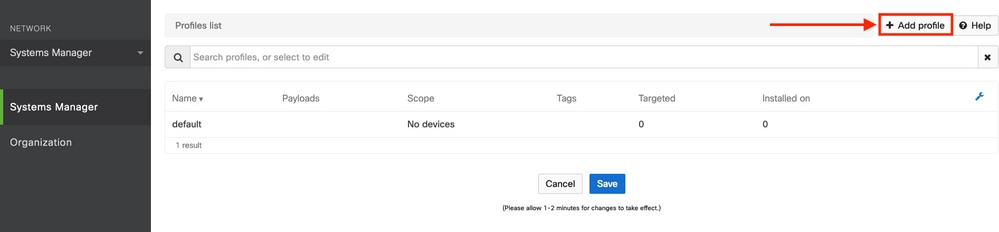
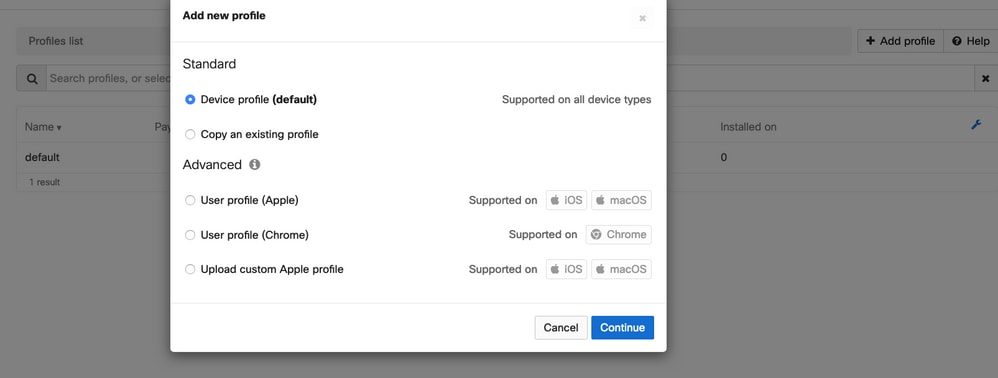
3.3. Select Device profile (default) and click Continue.
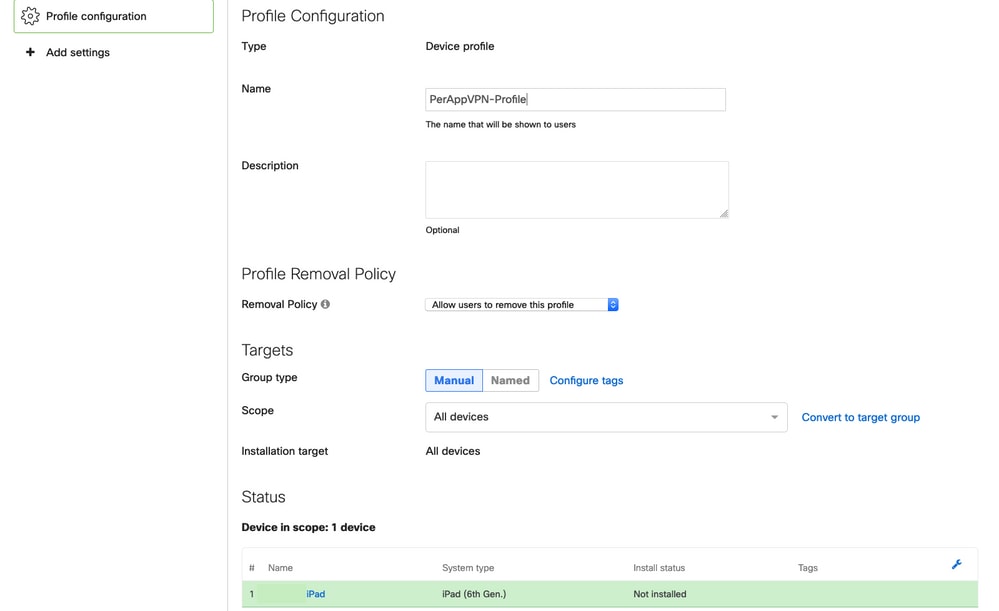
3.4. Once the Profile Configuration menu is displayed, write the Name and select the target devices under Scope.
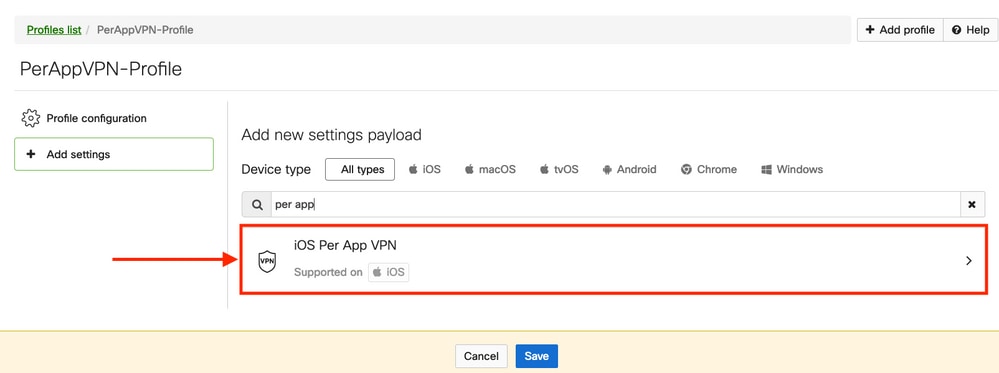
3.5. Select Add settings and filter the types of profile by iOS Per App VPN, select the option as seen below.
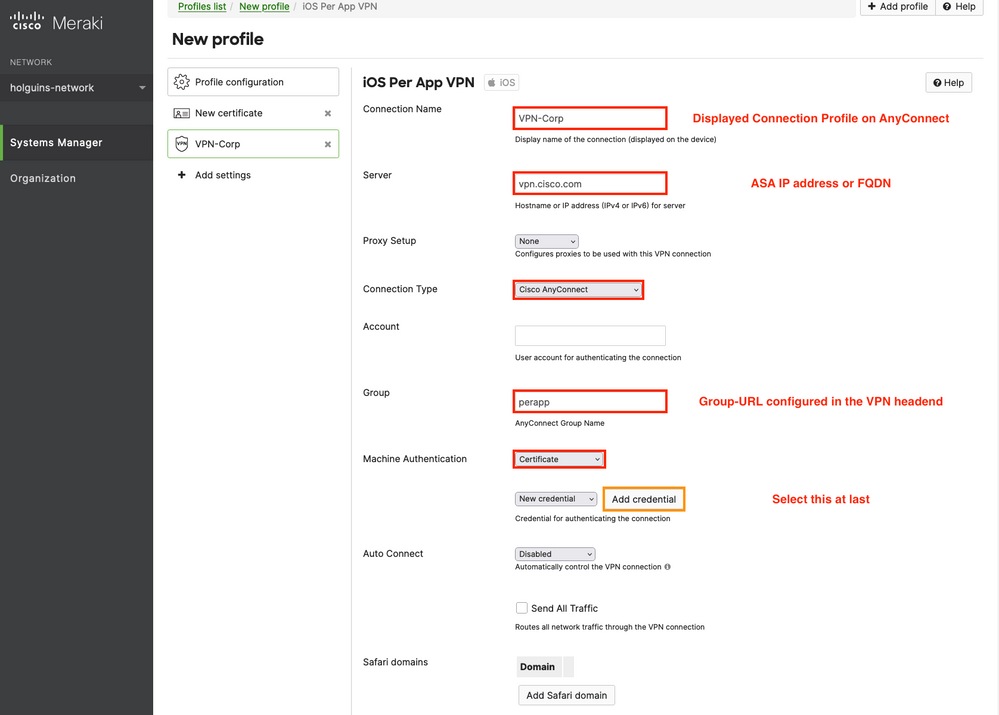
3.6. Once the menu is displayed, write the connection information based on the example below.
Systems Manager supports two certificate enrollments for these connections, SCEP and manual enrollment. In this example manual enrollment was used.
Note: Select Add credential once you filled the text-boxes since this option takes you to a new menu to add a certificate file.
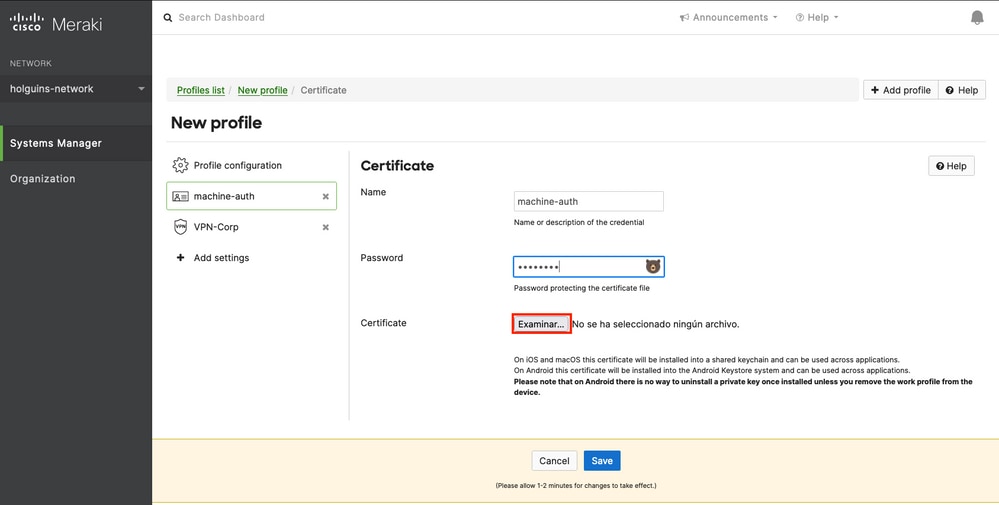
3.7. Once you clicked on Add credential and you got redirected to the Certificate menu, write the Name of the Certificate, browse in your computer and look for the the Password that protects the .pfx file (encrypted certificate file).
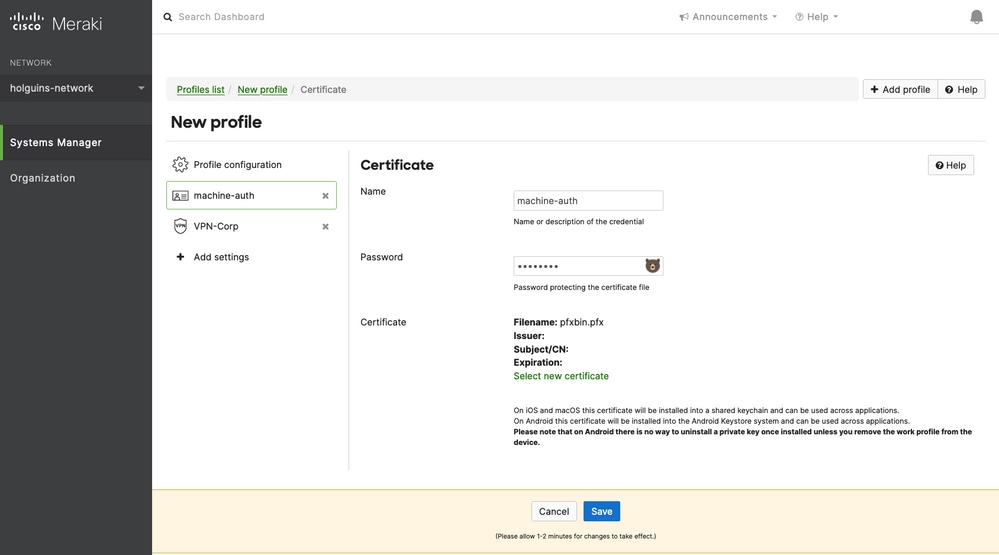
3.8. After the certificate is selected, the certificate filename is displayed.
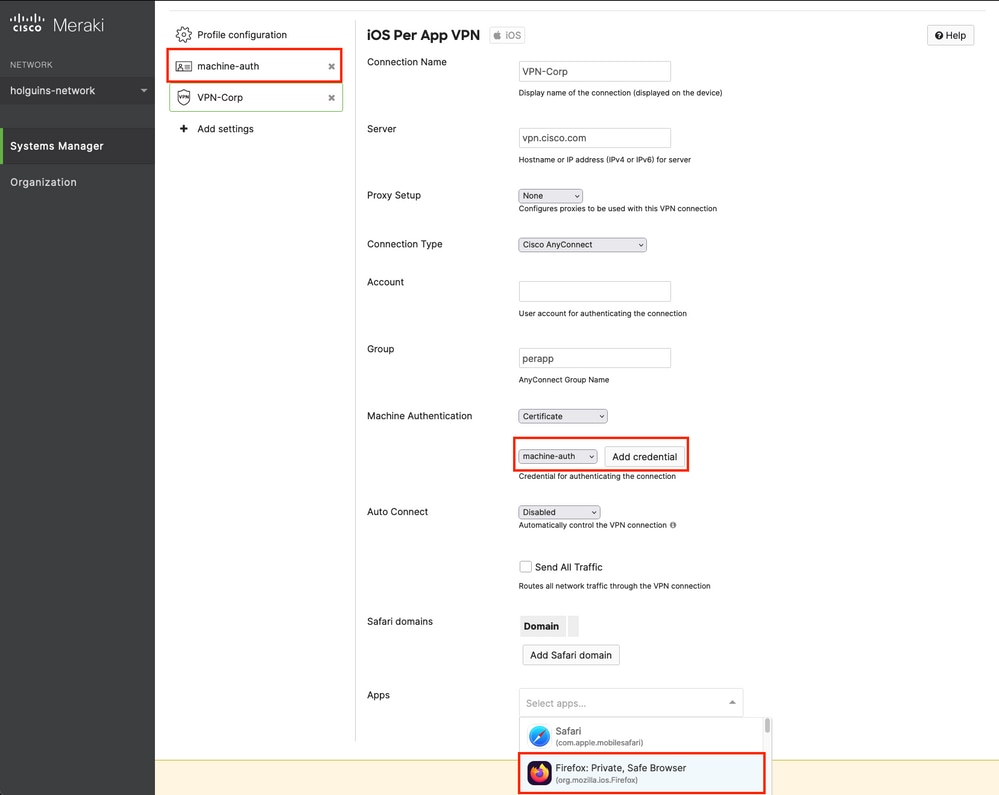
3.9. Once you selected the certificate, navigate to the VPN profile you were previously on and select the recently imported credential and Select the tunneled App (Firefox in this case).
Click Save once this is completed.
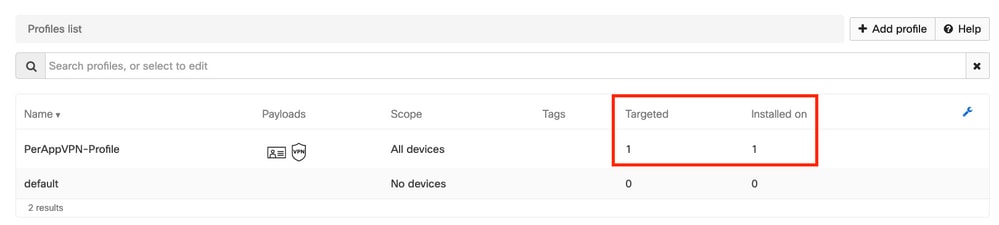
3.10. Verify the profile is installed on the target devices.
Step 4. App Selector Configuration
4.1. Download app selector from cisco website https://software.cisco.com/download/home/286281283/type/282364313/release/AppSelector-2.0
Caution: Run the application on a Windows machine. The results displayed are not be the expected when the tool is used on MacOS devices.
4.2. Open the java application. Select iOS from the dropdown menu, add a friendly name and ensure you type *.* in the App ID.
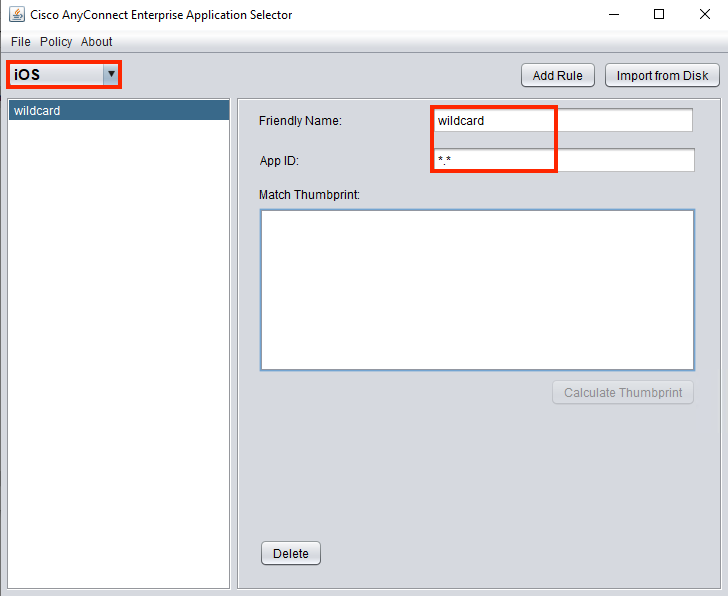
4.3. Navigate to Policy and select View Policy

4.4. Copy the string displayed. (This is later used in the VPN headend configuration).

Step 5. ASA Sample Per App VPN Configuration
conf t
webvpn
anyconnect-custom-attr perapp description PerAppVPN
anyconnect-custom-data perapp wildcard eJyrVnLOLE7Od84vqCzKTM8oUbJSgrMVNJI1FYwMDEwUwGoUgiuLS1Jzi3UUPPOS9ZR0lFxSyzKTU30yi4G6oquh3JDKglSgIYkFBTmpupn5xUB1jgUFcEVA8cwUoLyWnhZQJi0vMRekujwzJyU5sShFqTYWCAFHcjDB


ip local pool vpnpool 10.204.201.20-10.204.201.30 mask 255.255.255.0

access-list split standard permit 172.168.0.0 255.255.0.0
access-list split standard permit 172.16.0.0 255.255.0.0

group-policy GP-perapp internal
group-policy GP-perapp attributes
vpn-tunnel-protocol ssl-client
split-tunnel-policy tunnelspecified
split-tunnel-network-list value split
split-tunnel-all-dns disable
anyconnect-custom perapp value wildcard

tunnel-group perapp type remote-access
tunnel-group perapp general-attributes
address-pool vpnpool
default-group-policy GP-perapp
tunnel-group perapp webvpn-attributes
authentication certificate
group-alias perapp enable
group-url https://vpn.cisco.com/perapp enable
Verify
6. Verify Profile Installation on AnyConnect Application
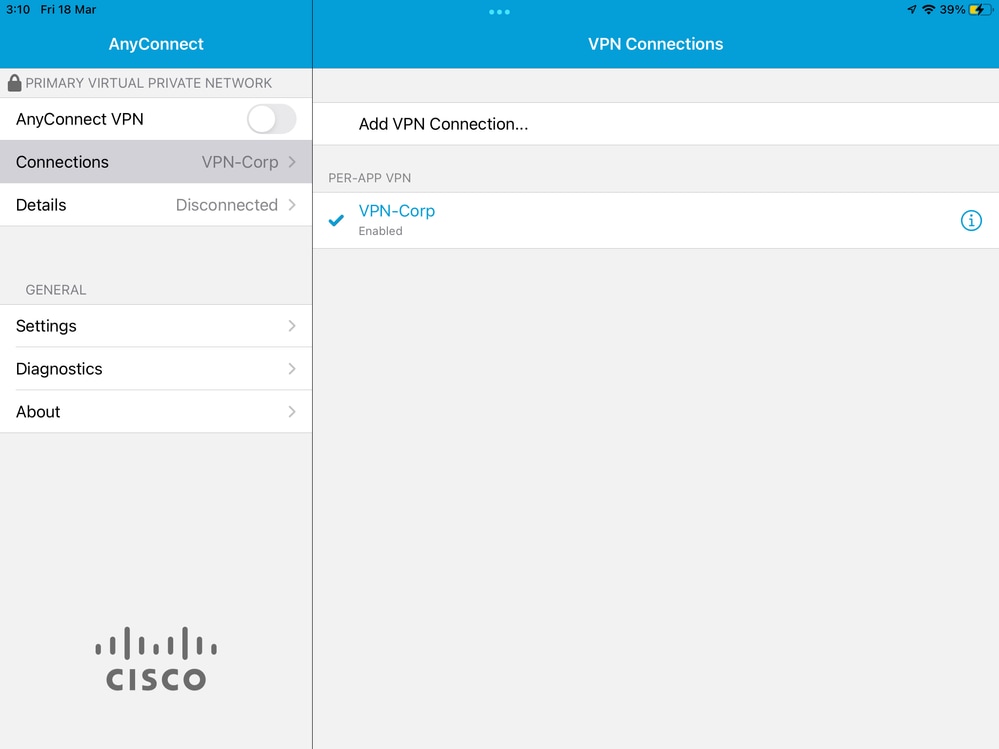
6.1. Open the AnyConnect Application and select Connections in the left pane. The PerApp VPN profile must be displayed under a new section called PER-APP VPN.
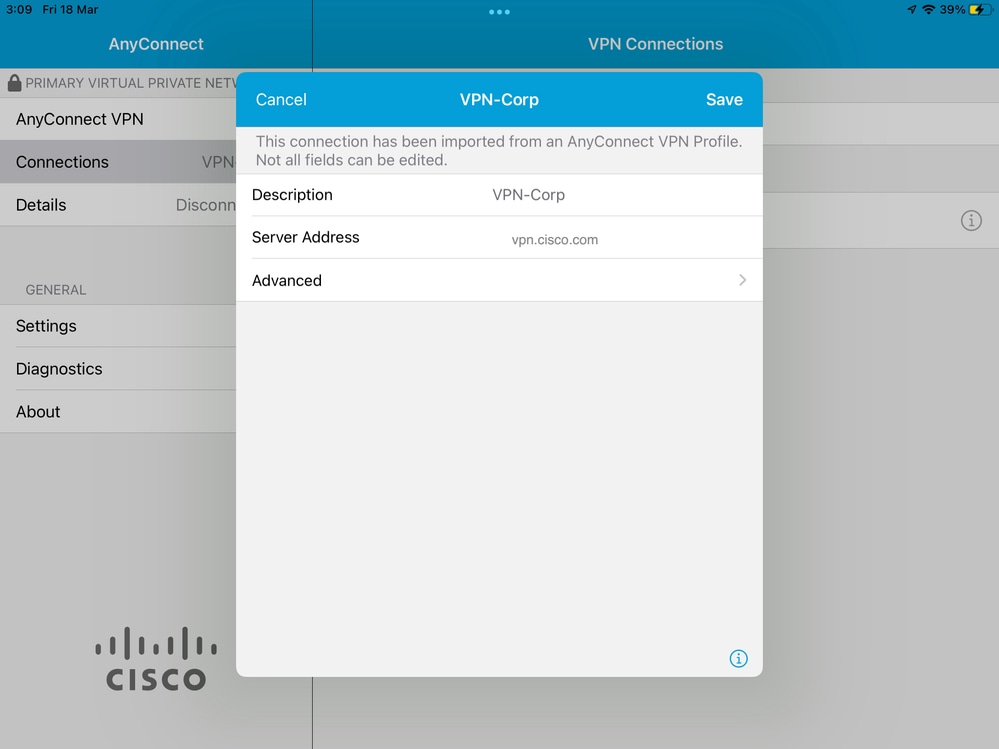
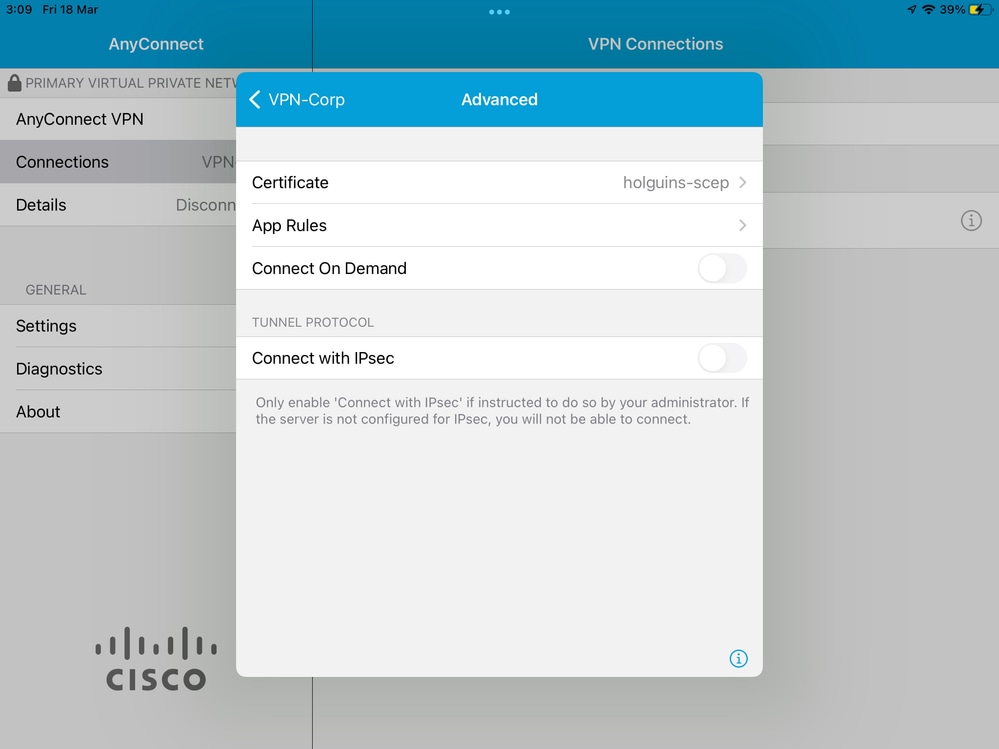
Select the i to display the advanced settings.
6.2. Select the Advanced option.
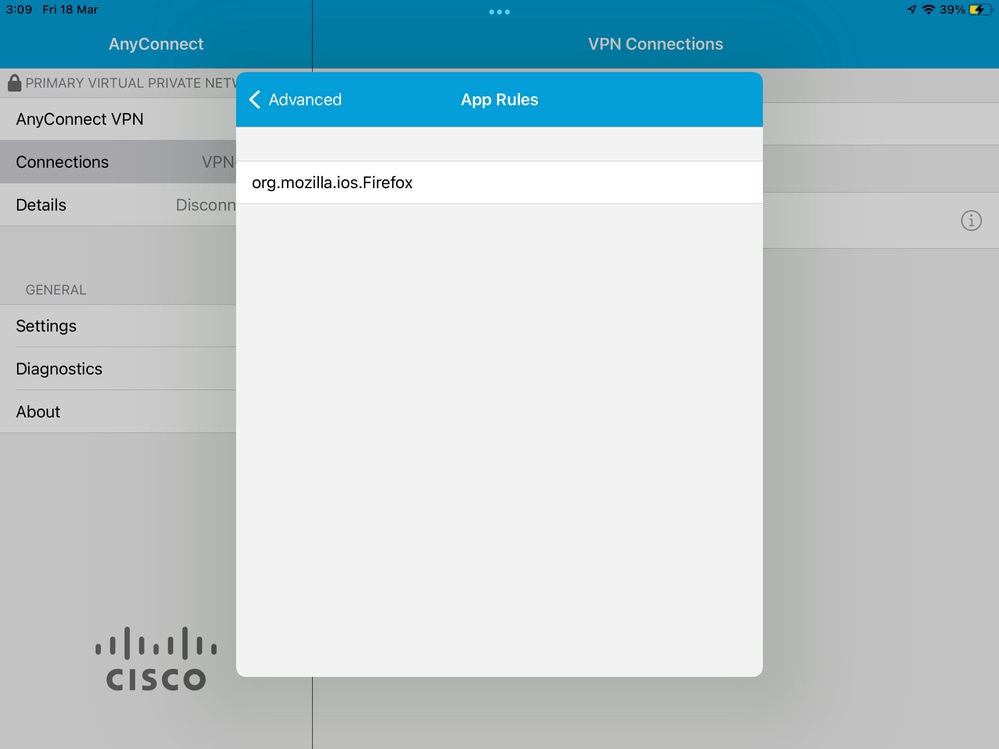
6.3. Select the App Rules option.
6.4. Lastly, confirm the App Rule is installed. (Mozilla is the tunneled App desired in this document, so the app installation was successful).
Troubleshoot
There are currently no specific troubleshooting steps for this document.
 Feedback