Configure Password Management Using LDAPs for RA VPN on FTD Managed by FMC
Available Languages
Download Options
Bias-Free Language
The documentation set for this product strives to use bias-free language. For the purposes of this documentation set, bias-free is defined as language that does not imply discrimination based on age, disability, gender, racial identity, ethnic identity, sexual orientation, socioeconomic status, and intersectionality. Exceptions may be present in the documentation due to language that is hardcoded in the user interfaces of the product software, language used based on RFP documentation, or language that is used by a referenced third-party product. Learn more about how Cisco is using Inclusive Language.
Introduction
This document describes configuring Password Management using LDAPs for AnyConnect Clients connecting to Cisco Firepower Threat Défense (FTD).
Prerequisites
Requirements
Cisco recommends that you have basic knowledge of these topics:
- Basic knowledge of RA VPN (Remote Access Virtual Private Network) configuration on FMC
- Basic knowledge of LDAP server configuration on FMC
- Basic knowledge of Active Directory
Components Used
The information in this document is based on these software and hardware versions:
- Microsoft 2012 R2 Server
- FMCv running 7.3.0
- FTDv running 7.3.0
The information in this document was created from the devices in a specific lab environment. All of the devices used in this document started with a cleared (default) configuration. If your network is live, ensure that you understand the potential impact of any command.
Configuration
Network Diagram and Scenario
Windows server is pre-configured with ADDS and ADCS in order to test the user password-management process. In this configuration guide, these user accounts are created.
User Accounts:
-
Administrator: This is used as the directory account in order to allow the FTD to bind to the Active Directory server.
-
admin: A test administrator account used to demonstrate user identity.
Determine LDAP Base DN and Group DN
-
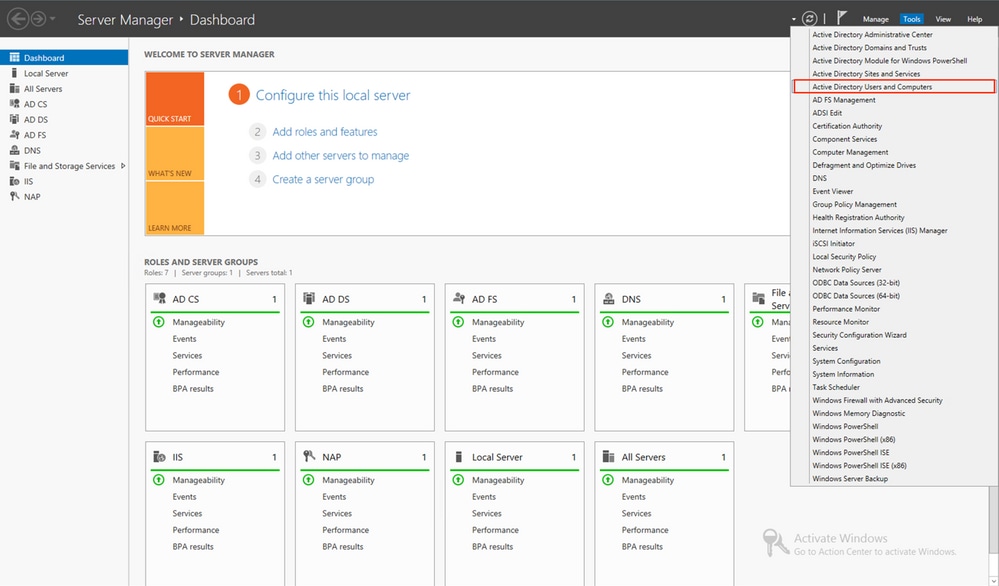
Open
Active Directory Users and Computersthrough the Server Manager Dashboard.
-
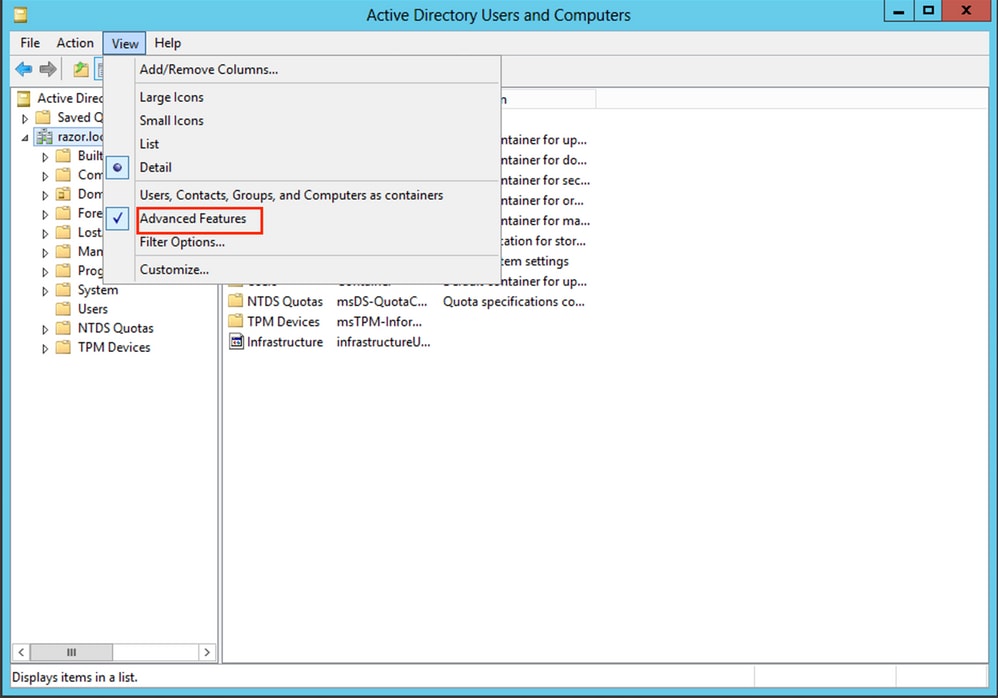
Open the
View Optionon the top panel, and enable theAdvanced Features, as shown in the image:
-
This allows the view of additional properties under the AD objects.
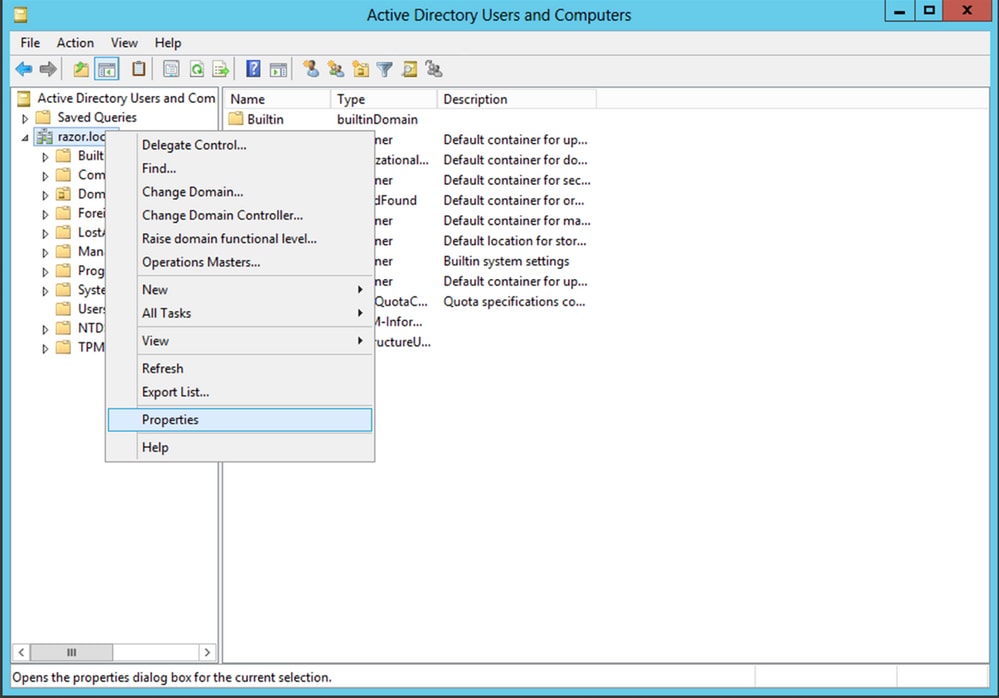
For example, in order to find the DN for the rootrazor.local, right-clickrazor.local, and then chooseProperties, as shown in this image:
-
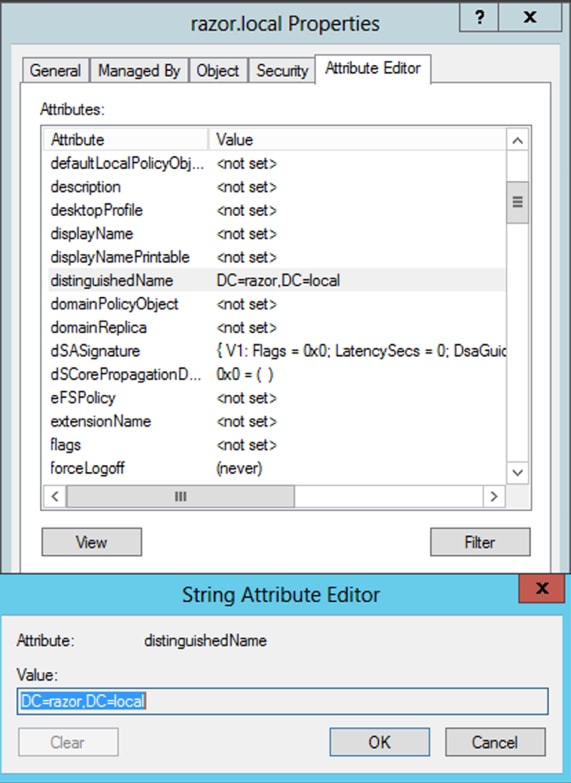
Under
Properties, choose theAttribute Editortab. FinddistinguishedNameunder the Attributes, then clickView, as shown in the image.
This opens a new window where the DN can be copied and pasted into FMC later.
In this example, the root DN is DC=razor, DC=local. Copy the value and save it for later. Click OK in order to exit the String Attribute Editor window and click OK again in order to exit the Properties.
Copy the LDAPS SSL Certificate Root
-
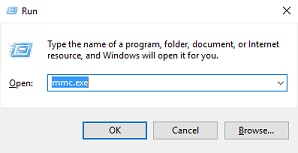
Press
Win+Rand entermmc.exe, then clickOK, as shown in this image.
-
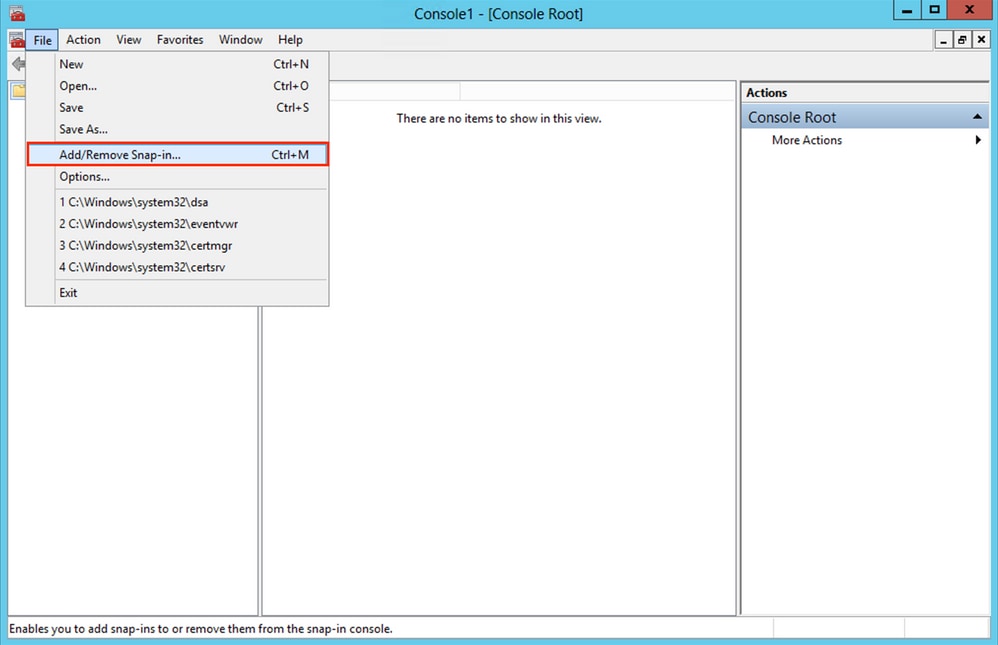
Navigate to
File > Add/Remove Snap-in..., ss shown in this image:
-
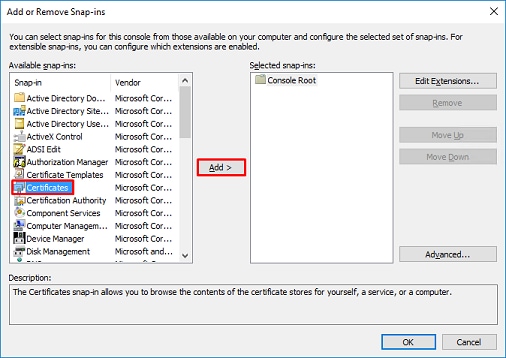
Under available snap-ins, choose
Certificatesand then clickAdd, as shown in this image:
-
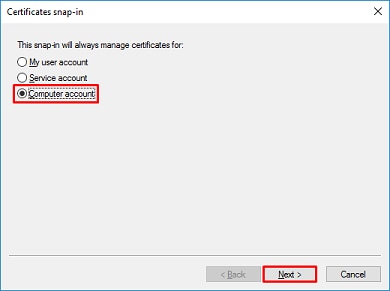
Choose
Computer accountand then clickNext, as shown in this image:
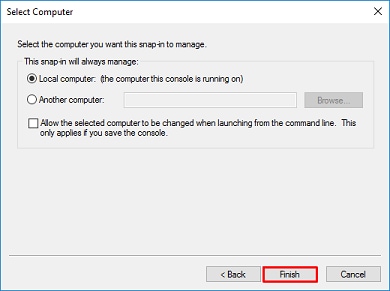
As shown here, click Finish.
-
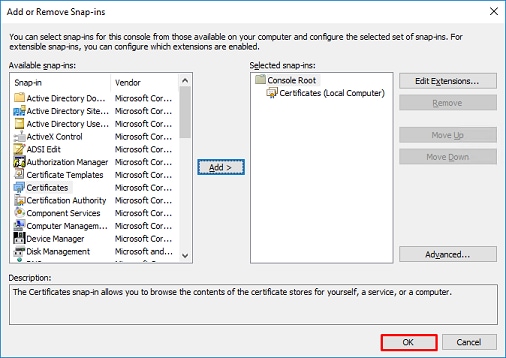
Now, click
OK, as shown in this image.
-
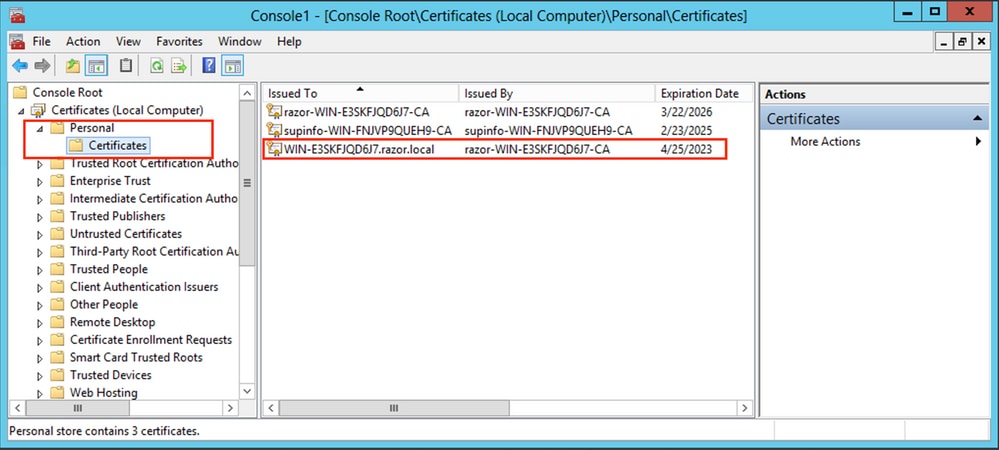
Expand the
Personalfolder, then clickCertificates. The certificate used by LDAPs must be issued to the Fully Qualified Domain Name (FQDN) of the Windows server. On this server, there are three certificates listed:
-
A CA Certificate was issued to and by
razor-WIN-E3SKFJQD6J7-CA. -
A CA Certificate issued to and by
supinfo-WIN-FNJVP9QUEH9-CA. -
An identity certificate was issued to
WIN-E3SKFJQD6J7.razor.localbyrazor-WIN-E3SKFJQD6J7-CA.
In this configuration guide, the FQDN is WIN-E3SKFJQD6J7.razor.local and so the first two certificates are not valid for use as the LDAPs SSL certificate. The identity certificate issued to WIN-E3SKFJQD6J7.razor.local is a certificate that was automatically issued by the Windows Server CA service. Double-click the certificate in order to check the details.
-
In order to be used as the LDAPs SSL Certificate, the certificate must meet these requirements:
-
The common name or DNS Subject Alternate Name matches the FQDN of the Windows Server.
-
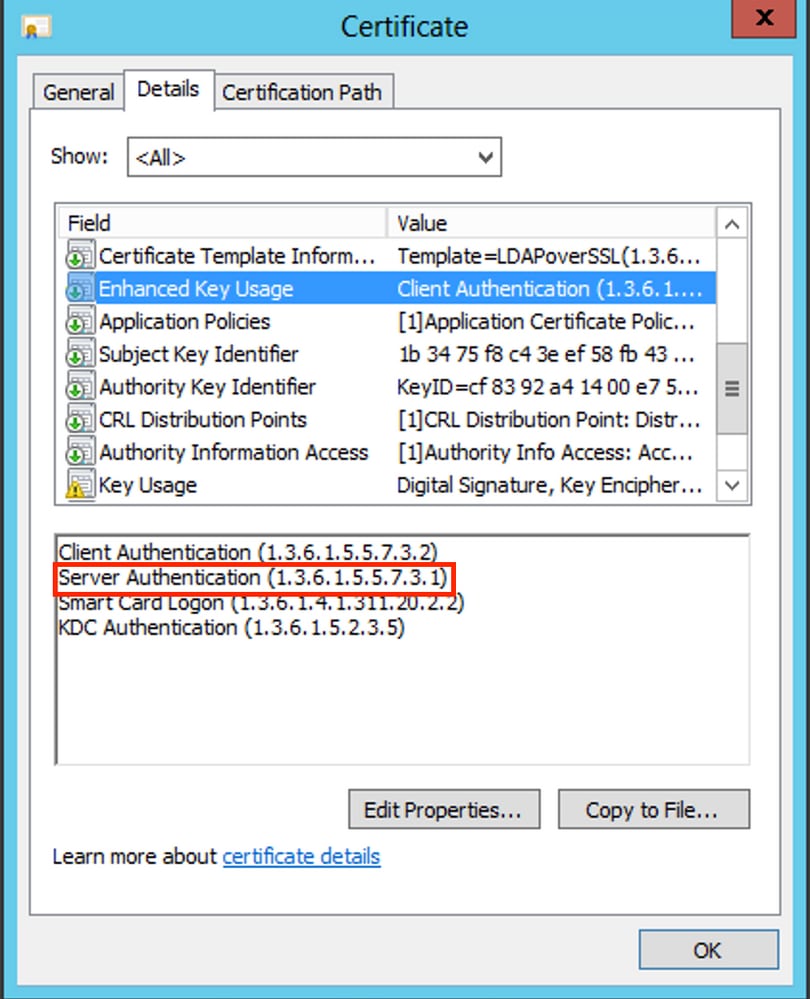
The Certificate has Server Authentication under the Enhanced Key Usage field.
Under the Details tab for the certificate, choose Subject Alternative Name, where the FQDN WIN-E3SKFJQD6J7.razor.local is present.
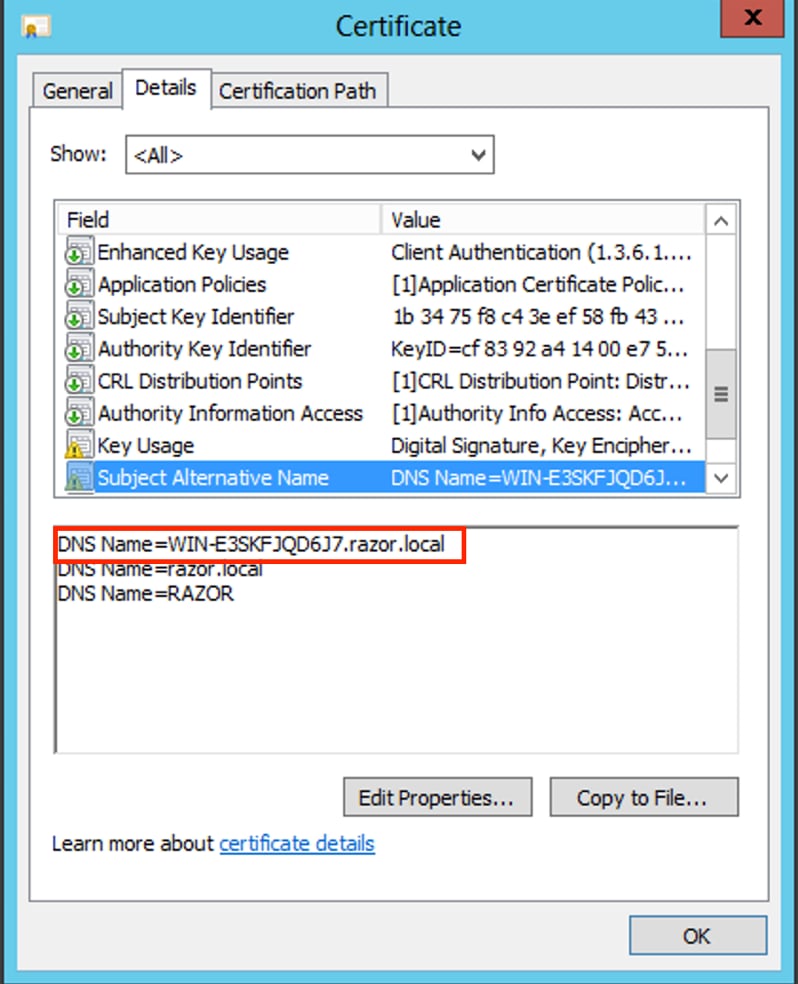
Under Enhanced Key Usage, Server Authentication is present.
-
Once that is confirmed, under the
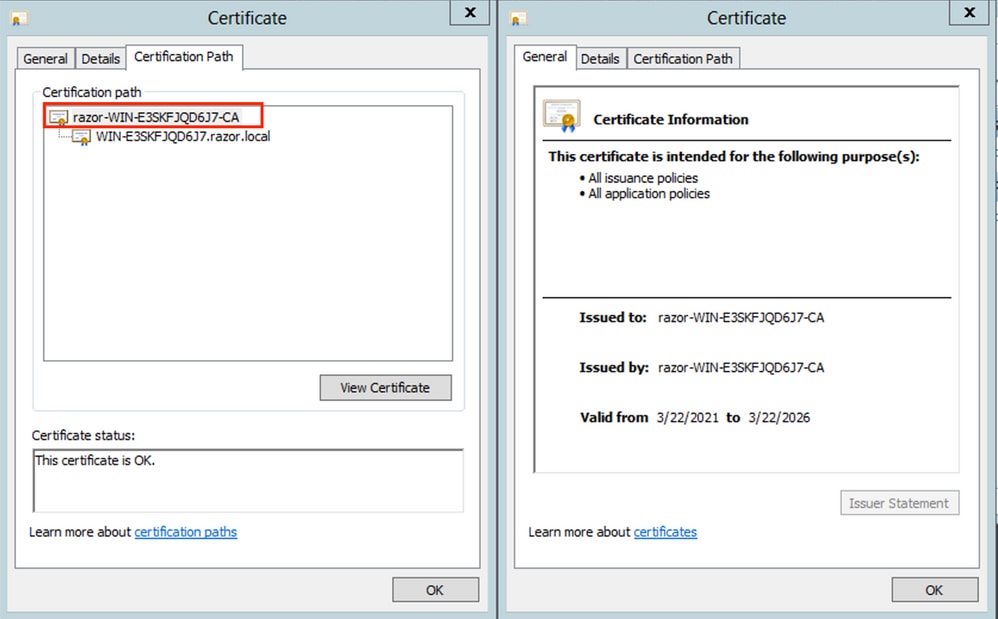
Certification Pathtab, choose the top-level certificate which is the root CA certificate, and then clickView Certificate. This opens the certificate details for the root CA certificate as shown in the image:
-
Under the
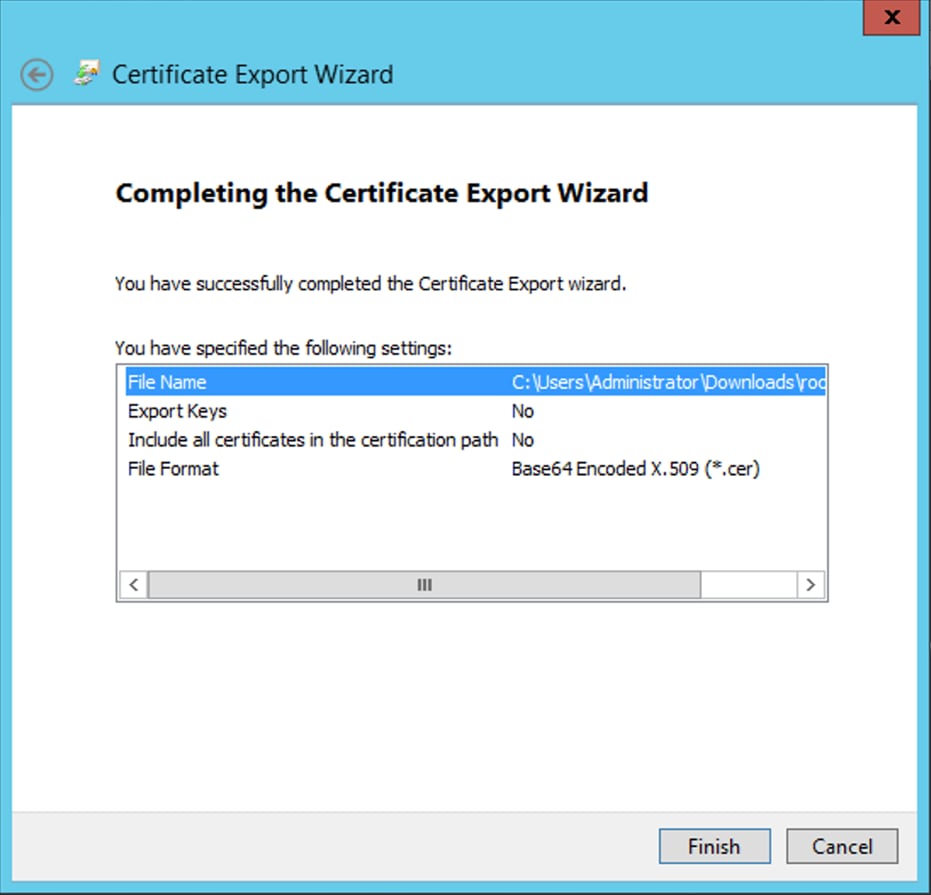
Detailstab of the root CA certificate, clickCopy to Fileand navigate through theCertificate Export Wizardwhich exports the root CA in PEM format.
Choose Base-64 encoded X.509 as the file format.
-
Open the Root CA certificate stored in the selected location on the machine with a notepad or some other text editor.
This shows the PEM format certificate. Save this for later.
-----BEGIN CERTIFICATE-----
MIIDfTCCAmWgAwIBAgIQV4ymxtI3BJ9JHnDL+luYazANBgkqhkiG9w0BAQUFADBRMRUwEwYKCZImiZPyLGQBGRYFbG9jYWwxFTATBgoJkiaJk/IsZAEZFgVyYXp
vcjEhMB8GA1UEAxMYcmF6b3ItV0lOLUUzU0tGSlFENko3LUNBMB4XDTIxMDMyMjE0MzMxNVoXDTI2MDMyMjE0NDMxNVowUTEVMBMGCgmSJomT8ixkARkW
BWxvY2FsMRUwEwYKCZImiZPyLGQBGRYFcmF6b3IxITAfBgNVBAMTGHJhem9yLVdJTi1FM1NLRkpRRDZKNy1DQTCCASIwDQYJKoZIhvcNAQEBBQADggEPAD
CCAQoCggEBAL803nQ6xPpazjj+HBZYc+8fV++RXCG+cUnblxwtXOB2G4UxZ3LRrWznjXaS02Rc3qVw4lnOAziGs4ZMNM1X8UWeKuwi8QZQljJtuSBxL4yjWLyPIg
9dkncZaGtQ1cPmqcnCWunfTsaENKbgoKi4eXjpwwUSbEYwU3OaiiI/tp422ydy3Kgl7Iqt1s4XqpZmTezykWra7dUyXfkuESk6lEOAV+zNxfBJh3Q9Nzpc2IF/FtktWnhj
CSkTQTRXYryy8dJrWjAF/n6A3VnS/l7Uhujlx4CD20BkfQy6p5HpGxdc4GMTTnDzUL46ot6imeBXPHF0IJehh+tZk3bxpoxTDXECAwEAAaNRME8wCwYDVR0PBAQ
DAgGGMA8GA1UdEwEB/wQFMAMBAf8wHQYDVR0OBBYEFM+DkqQUAOdY379NnViaMIJAVTZ1MBAGCSsGAQQBgjcVAQQDAgEAMA0GCSqGSIb3DQEBBQU
AA4IBAQCiSm5U7U6Y7zXdx+dleJd0QmGgKayAAuYAD+MWNwC4NzFD8Yr7BnO6f/VnF6VGYPXa+Dvs7VLZewMNkp3i+VQpkBCKdhAV6qZu15697plajfI/eNPrcI
4sMZffbVrGlRz7twWY36J5G5vhNUhzZ1N2OLw6wtHg2SO8XlvpTS5fAnyCZgSK3VPKfXnn1HLp7UH5/SWN2JbPL15r+wCW84b8nrylbBfn0NEX7l50Ff502DYCP
GuDsepY7/u2uWfy/vpTJigeok2DH6HFfOET3sE+7rsIAY+of0kWW5gNwQ4hOwv4Goqj+YQRAXXi2OZyltHR1dfUUbwVENSFQtDnFA7X
-----END CERTIFICATE-----
In Case of Multiple Certificates Installed in the Local Machine Store on the LDAPs Server (Optional)
1. In a situation of multiple identity certificates that can be used by LDAPS and when there is uncertainty as to which is used, or there is no access to the LDAPS server, it is still possible to extract the root CA from a packet capture done on the FTD.
2. In the case where you have multiple certificates valid for Server Authentication in the LDAP server (such as AD DS domain controller) local computer certificate store, it can be noticed that a different certificate is used for LDAPS communications. The best resolution for such an issue is to remove all unnecessary certificates from the local computer certificate store and have only one certificate that is valid for server authentication.
However, if there is a legitimate reason that you require two or more certificates and have at least a Windows Server 2008 LDAP server, the Active Directory Domain Services (NTDS\Personal) certificate store can be used for LDAPs communications.
These steps demonstrate how to export an LDAPS-enabled certificate from a domain controller local computer certificate store to the Active Directory Domain Services service certificate store (NTDS\Personal).
-
Navigate to the MMC console on the Active Directory Server, choose File, and then click
Add/Remove Snap-in. -
Click
Certificatesand then clickAdd. -
In the
Certificates snap-in, chooseComputer accountand then clickNext. -
In
Select Computer, chooseLocal Computer, clickOK, and then clickFinish. InAdd or Remove Snap-ins, clickOK. -
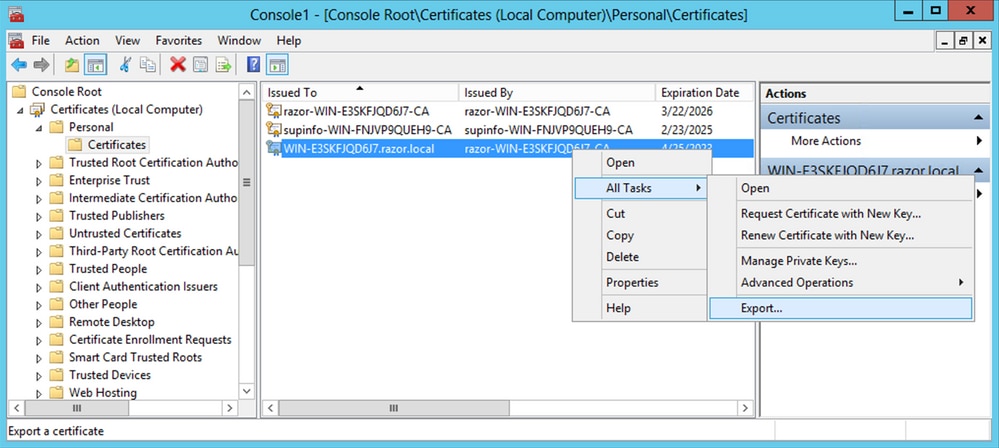
In the certificates console of a computer that contains a certificate used for Server Authentication, right-click the
certificate, clickAll Tasks, and then clickExport.
- Export the certificate in the
pfxformat in the subsequent sections. Reference this article on how to export a certificate in thepfxformat from MMC:
-
Once the export of the certificate is done, navigate to
Add/Remove Snap-inonMMC console. ClickCertificatesand then clickAdd. -
Choose
Service accountand then clickNext.

-
In the
Select Computerdialog box, chooseLocal Computerand clickNext. -
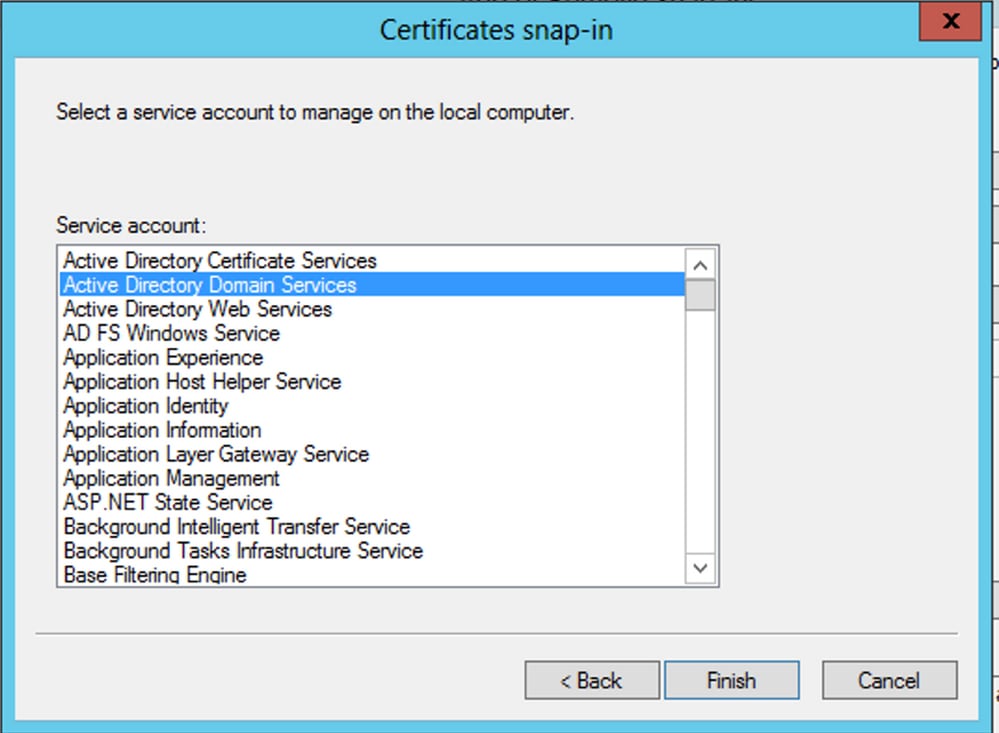
Choose
Active Directory Domain Servicesand then clickFinish.
-
On the
Add/Remove Snap-insdialog box, clickOK. -
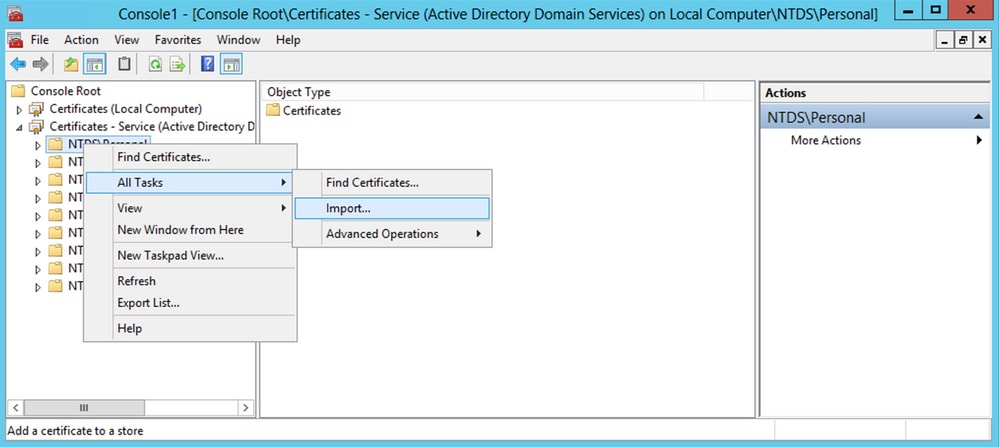
Expand
Certificates - Services (Active Directory Domain Services)and then clickNTDS\Personal. -
Right-click
NTDS\Personal, clickAll Tasks, and then clickImport.
-
On the
Certificate Import Wizardwelcome screen, clickNext. -
On the File to Import screen, click
Browse, and locate the certificate file that you exported previously. -
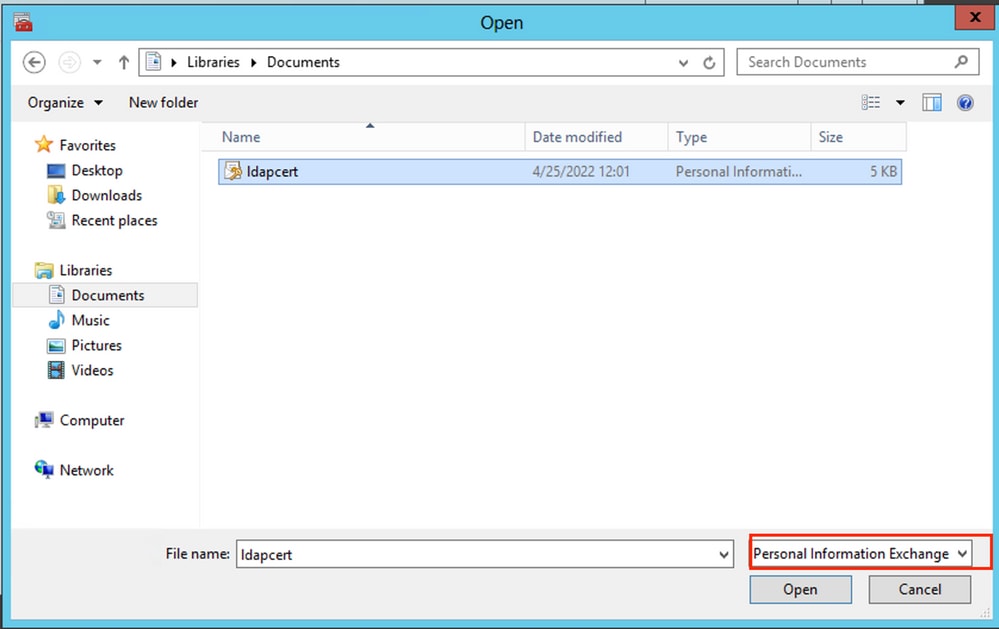
On the Open screen, ensure that Personal Information Exchange (
*pfx,*.p12) is selected as the file type and then navigate the file system to locate the certificate you exported previously. Then, click that certificate.
-
Click
Openand then clickNext. -
On the Password screen, enter the password you set for the file, and then click
Next.
-
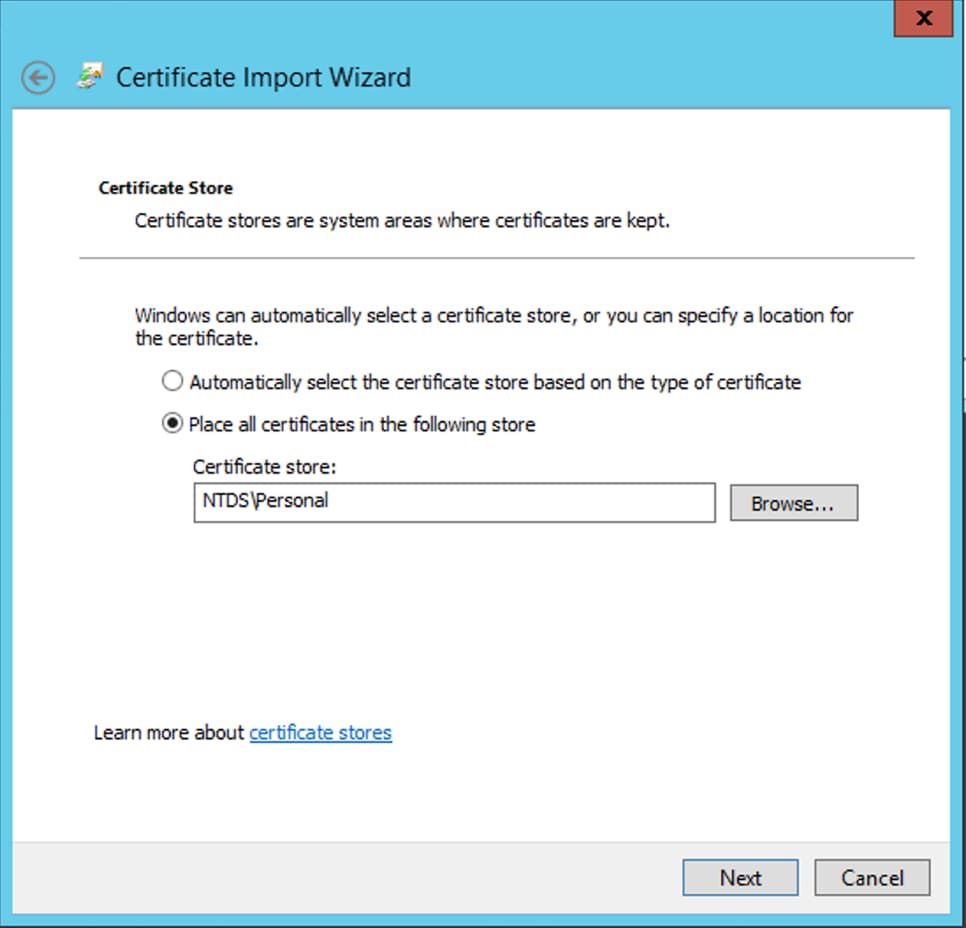
On the Certificate Store page, ensure that Place all certificates are selected and read Certificate Store:
NTDS\Personaland then clickNext.
-
On the
Certificate Import Wizardcompletion screen, clickFinish. You then see a message that the import was successful. ClickOK. It is seen that the certificate has been imported under the Certificate store:NTDS\Personal.
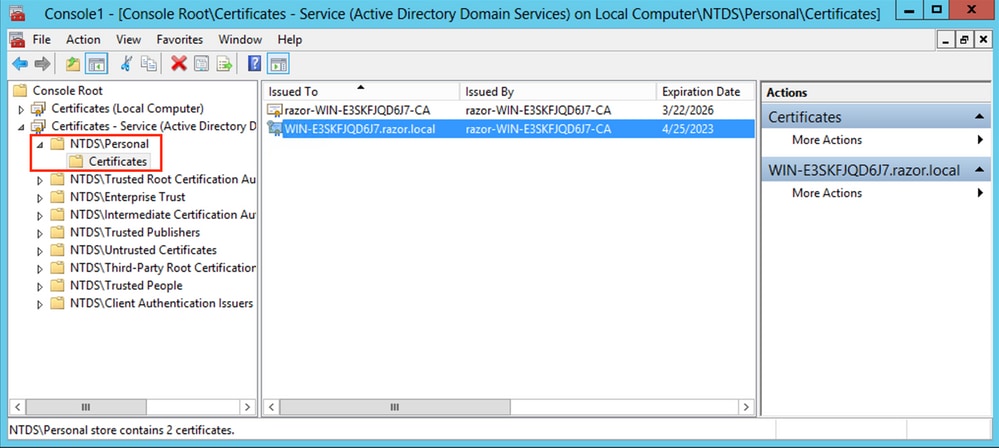
FMC Configurations
Verify Licensing
In order to deploy the AnyConnect configuration, the FTD must be registered with the smart licensing server, and a valid Plus, Apex, or VPN Only license must be applied to the device.
Setup Realm
-
Navigate to
System > Integration. Navigate toRealms, then clickAdd Realm, as shown in this image:

-
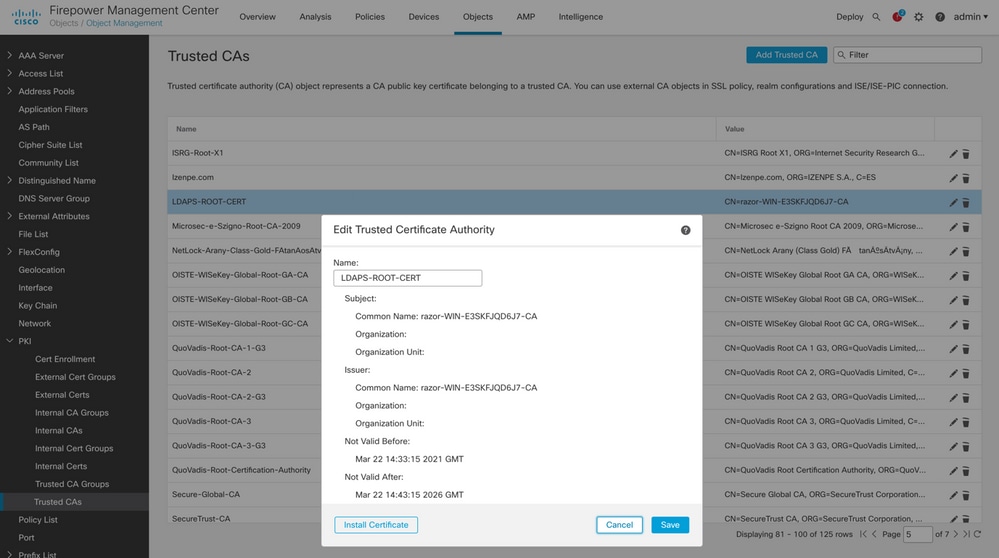
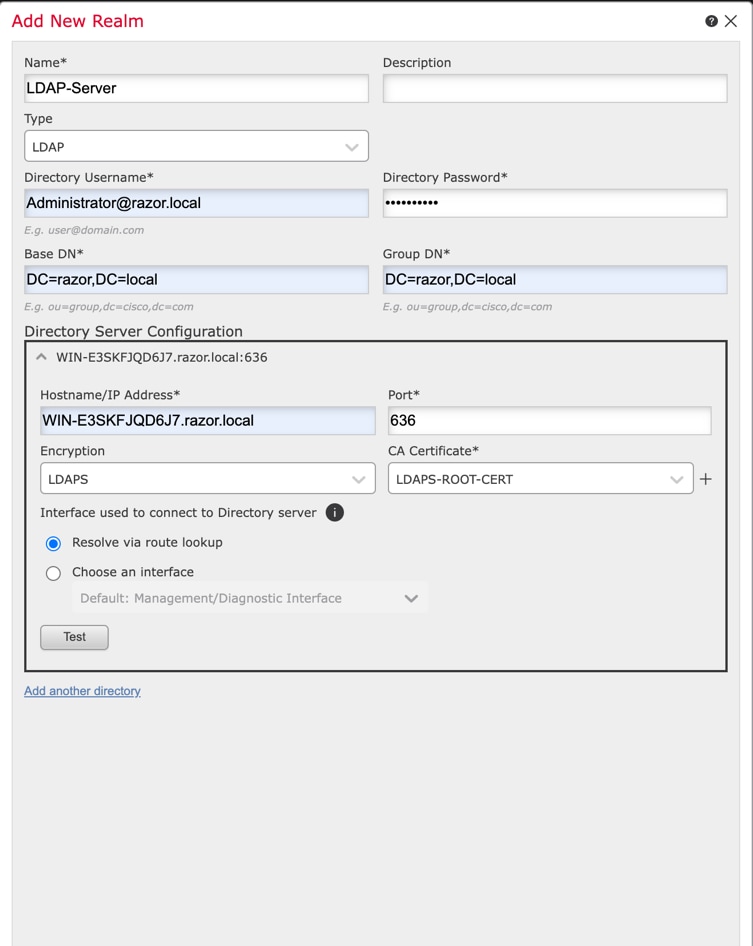
Fill out the displayed fields based on the information collected from the Microsoft server for LDAPs. Prior to this, import the Root CA Certificate that has signed the LDAPs service Certificate on the Windows Server under
Objects > PKI > Trusted CAs > Add Trusted CA, as this is referenced under theDirectory Server Configurationof the Realm. Once done, clickOK.
-
Click
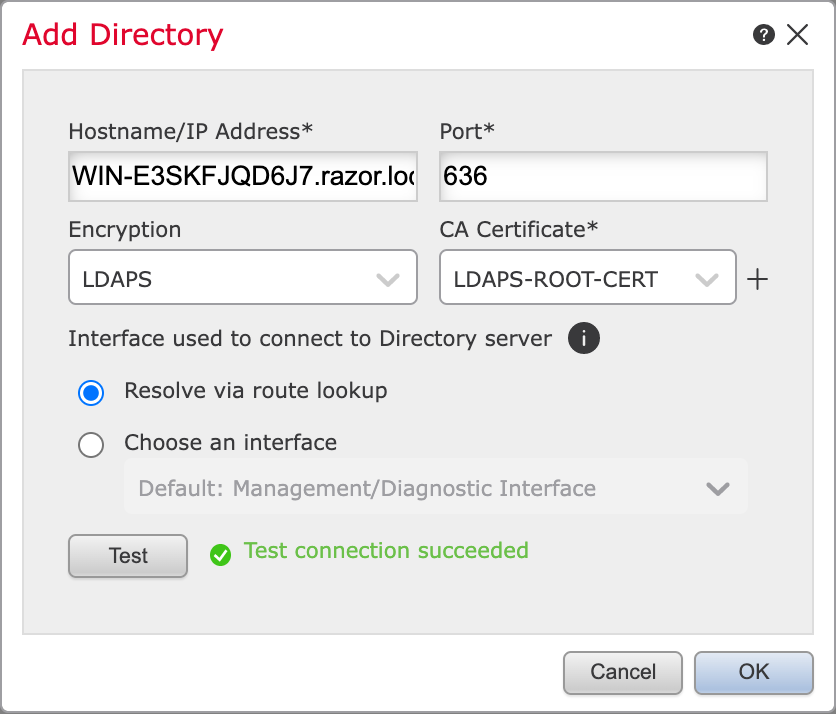
Testin order to ensure FMC can successfully bind with the Directory Username and password provided in the earlier step. Since these tests are initiated from the FMC and not through one of the routable interfaces configured on the FTD (such as inside, outside, dmz), a successful (or failed) connection does not guarantee the same result for AnyConnect authentication since AnyConnect LDAP authentication requests are initiated from one of the FTD routable interfaces.
-
Enable the new realm.

Configure AnyConnect for Password-Management
-
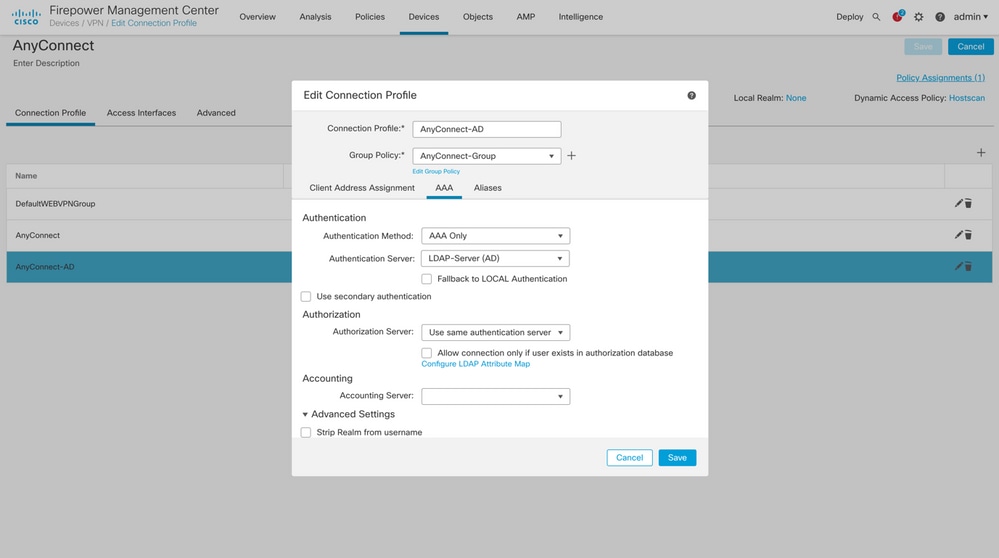
Choose the existing Connection Profile or create a new one, if it is an initial setup of AnyConnect. Here, an existing Connection Profile named 'AnyConnect-AD' mapped with Local Authentication is used.

-
Edit the Connection profile and map the new LDAPs server configured in the earlier steps, under the AAA settings of the Connection Profile. Once done, click
Saveon the top right corner.
-
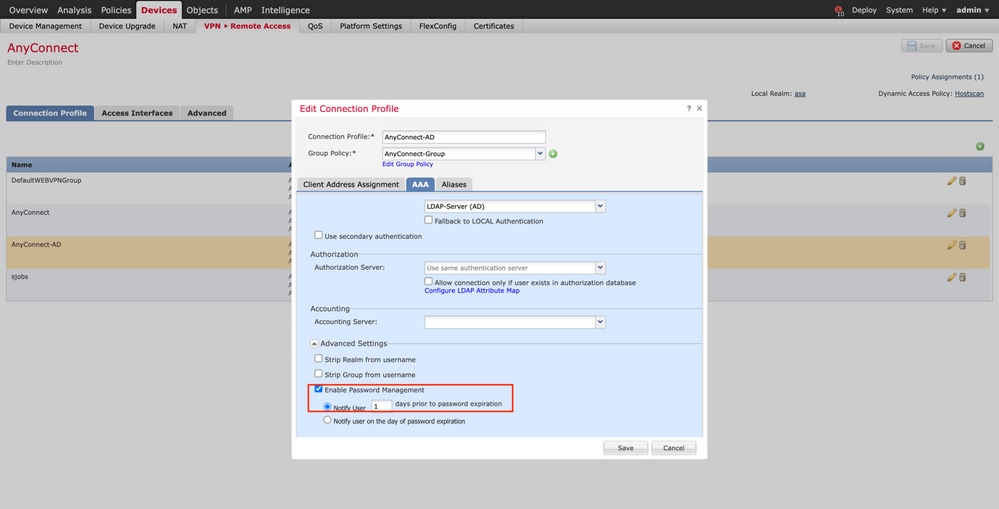
Enable password management under the
AAA > Advanced Settingsand save the configuration.
Deploy
-
Once done with all the configuration, click the
Deploybutton on the top right.

-
Click the checkbox next to the FTD configuration applied to it and then click
Deploy, as shown in this image:
Final Configuration
This is the configuration seen in the FTD CLI after the successful deployment.
AAA Configuration
> show running-config aaa-server

aaa-server LDAP-Server protocol ldap                                                          <------ aaa-server group configured for LDAPs authentication


 max-failed-attempts 4

 realm-id 8

aaa-server LDAP-Server host WIN-E3SKFJQD6J7.razor.local                          <-------- LDAPs Server to which the queries are sent


 server-port 636

 ldap-base-dn DC=razor,DC=local

 ldap-group-base-dn DC=razor,DC=local

 ldap-scope subtree

 ldap-naming-attribute sAMAccountName

 ldap-login-password *****

 ldap-login-dn *****@razor.local

 ldap-over-ssl enable

 server-type microsoft
AnyConnect Configuration
> show running-config webvpn

webvpn

 enable Outside

 anyconnect image disk0:/csm/anyconnect-win-4.10.01075-webdeploy-k9.pkg 1 regex "Windows"

 anyconnect profiles FTD-Client-Prof disk0:/csm/ftd.xml

 anyconnect enable

 tunnel-group-list enable

 cache

  no disable

error-recovery disable


> show running-config tunnel-group

tunnel-group AnyConnect-AD type remote-access

tunnel-group AnyConnect-AD general-attributes

 address-pool Pool-1

authentication-server-group LDAP-Server                                            <-------- LDAPs Server group name mapped to the tunnel-group


 default-group-policy AnyConnect-Group

 password-management password-expire-in-days 1                             <-------- Password-management configuration mapped under the tunnel-group


tunnel-group AnyConnect-AD webvpn-attributes

 group-alias Dev enable


> show running-config group-policy AnyConnect-Group

group-policy AnyConnect-Group internal                                                    <--------- Group-Policy configuration that is mapped once the user is authenticated

group-policy AnyConnect-Group attributes

 vpn-simultaneous-logins 3

 vpn-idle-timeout 35791394

 vpn-idle-timeout alert-interval 1

 vpn-session-timeout none

 vpn-session-timeout alert-interval 1

 vpn-filter none

vpn-tunnel-protocol ikev2 ssl-client                                                 <-------- Protocol specified as SSL to entertain the AnyConnect connection over port 443


 split-tunnel-policy tunnelspecified

 split-tunnel-network-list value Remote-Access-Allow

 default-domain none

 split-dns none

 split-tunnel-all-dns disable

 client-bypass-protocol disable

 vlan none

 address-pools none

 webvpn

  anyconnect ssl dtls enable

  anyconnect mtu 1406

  anyconnect firewall-rule client-interface public none

  anyconnect firewall-rule client-interface private none

  anyconnect ssl keepalive 20

  anyconnect ssl rekey time none

  anyconnect ssl rekey method none

  anyconnect dpd-interval client 30

  anyconnect dpd-interval gateway 30

  anyconnect ssl compression none

  anyconnect dtls compression none

  anyconnect modules value none

  anyconnect profiles value FTD-Client-Prof type user

  anyconnect ask none default anyconnect

  anyconnect ssl df-bit-ignore disable


> show running-config ssl


ssl trust-point ID-New-Cert Outside                                                   <-------- FTD ID-cert trustpoint name mapped to the outside interface on which AnyConnect Connections are entertained
Verification
Connect with AnyConnect and Verify the Password-Management Process for the User Connection
1. Initiate a Connection to the concerned connection profile. Once it is determined at the initial login that the password must be changed since the earlier password was rejected by the Microsoft Server as it is expired, the user is prompted with the change of password.


-
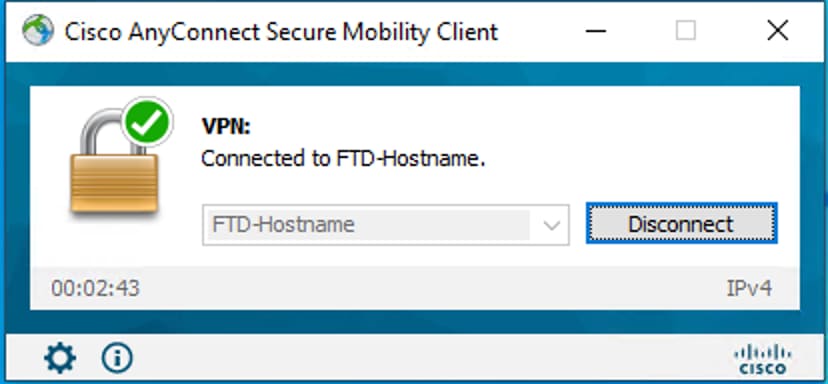
Once the user enters the new password for login, the connection is established successfully.
-
Verify the user connection on the FTD CLI:
FTD_2# sh vpn-sessiondb anyconnect


Session Type: AnyConnect


Username     : admin                Index        : 7                                                                                                    <------- Username, IP address assigned information of the client

Assigned IP  : 10.1.x.x               Public IP    : 10.106.xx.xx

Protocol     : AnyConnect-Parent SSL-Tunnel DTLS-Tunnel

License      : AnyConnect Premium

Encryption   : AnyConnect-Parent: (1)none  SSL-Tunnel: (1)AES-GCM-256  DTLS-Tunnel: (1)AES-GCM-256

Hashing      : AnyConnect-Parent: (1)none  SSL-Tunnel: (1)SHA384  DTLS-Tunnel: (1)SHA384

Bytes Tx     : 16316                  Bytes Rx     : 2109

Group Policy : AnyConnect-Group       Tunnel Group : AnyConnect-AD                                                  <-------- Tunnel-Group to which the AnyConnect connection falls, and the group-policy assigned to user


Login Time   : 13:22:24 UTC Mon Apr 25 2022

Duration     : 0h:00m:51s

Inactivity   : 0h:00m:00s

VLAN Mapping : N/A                    VLAN         : none

Audt Sess ID : 0ac5e0fa000070006266a090

Security Grp : none                   Tunnel Zone  : 0
Troubleshoot
Debugs
This debug can be run in diagnostic CLI in order to troubleshoot password management-related issues: debug ldap 255.
Working Password-Management Debugs
[24] Session Start

[24] New request Session, context 0x0000148f3c271830, reqType = Authentication

[24] Fiber started

[24] Creating LDAP context with uri=ldaps://10.106.71.234:636

[24] Connect to LDAP server: ldaps://10.106.71.234:636, status = Successful                                                    <-------- Successful connection to the LDAPs server over post 636


[24] supportedLDAPVersion: value = 3

[24] supportedLDAPVersion: value = 2

[24] Binding as *****@razor.local

[24] Performing Simple authentication for *****@razor.local to 10.106.71.234

[24] LDAP Search:

         Base DN = [DC=razor,DC=local]

         Filter  = [sAMAccountName=admin]

         Scope   = [SUBTREE]

[24] User DN = [CN=admin,CN=Users,DC=razor,DC=local]

[24] Talking to Active Directory server 10.106.71.234

[24] Reading password policy for admin, dn:CN=admin,CN=Users,DC=razor,DC=local                                <--------- Once the client enters credentials during initial login, if the password is expired, then it is read and the user is asked to provide a new password


[24] Read bad password count 3

[24] Binding as admin

[24] Performing Simple authentication for admin to 10.106.71.234

[24] Simple authentication for admin returned code (49) Invalid credentials


[24] Message (admin): 80090308: LdapErr: DSID-0C0903C5, comment: AcceptSecurityContext error, data 773, v23f0

[24] Checking password policy

[24] New password is required for admin                                                                                                           <---------- New password is asked to be provided


[24] Fiber exit Tx=622 bytes Rx=2771 bytes, status=-1

[24] Session End


[25] Session Start

[25] New request Session, context 0x0000148f3c271830, reqType = Modify Password

[25] Fiber started

[25] Creating LDAP context with uri=ldaps://10.106.71.234:636

[25] Connect to LDAP server: ldaps://10.106.71.234:636, status = Successful                                                                       <----------- New connection is initiated to the LDAPs server for the password change


[25] supportedLDAPVersion: value = 3

[25] supportedLDAPVersion: value = 2

[25] Binding as *****@razor.local

[25] Performing Simple authentication for *****@razor.local to 10.106.71.234

[25] LDAP Search:

         Base DN = [DC=razor,DC=local]

         Filter  = [sAMAccountName=admin]

         Scope   = [SUBTREE]

[25] User DN = [CN=admin,CN=Users,DC=razor,DC=local]

[25] Talking to Active Directory server 10.106.71.234

[25] Reading password policy for admin, dn:CN=admin,CN=Users,DC=razor,DC=local

[25] Read bad password count 3

[25] Change Password for admin successfully converted old password to unicode


[25] Change Password for admin successfully converted new password to unicode                                                            <----------- Client provides the new password value


[25] Password for admin successfully changed                                                                                                                  <----------- Password is changed successfully for the client


[25] Retrieved User Attributes:

[25]   objectClass: value = top

[25]   objectClass: value = person

[25]   objectClass: value = organizationalPerson

[25]   objectClass: value = user

[25]   cn: value = admin

[25]   givenName: value = admin

[25]   distinguishedName: value = CN=admin,CN=Users,DC=razor,DC=local

[25]   instanceType: value = 4

[25]   whenCreated: value = 20201029053516.0Z

[25]   whenChanged: value = 20220426032127.0Z

[25]   displayName: value = admin

[25]   uSNCreated: value = 16710

[25]   uSNChanged: value = 98431

[25]   name: value = admin

[25]   objectGUID: value = ..0.].LH.....9.4

[25]   userAccountControl: value = 512

[25]   badPwdCount: value = 3

[25]   codePage: value = 0

[25]   countryCode: value = 0

[25]   badPasswordTime: value = 132610388348662803

[25]   lastLogoff: value = 0

[25]   lastLogon: value = 132484577284881837

[25]   pwdLastSet: value = 0

[25]   primaryGroupID: value = 513

[25]   objectSid: value = ................7Z|....RQ...

[25]   accountExpires: value = 9223372036854775807

[25]   logonCount: value = 0

[25]   sAMAccountName: value = admin

[25]   sAMAccountType: value = 805306368

[25]   userPrincipalName: value = ******@razor.local

[25]   objectCategory: value = CN=Person,CN=Schema,CN=Configuration,DC=razor,DC=local

[25]   dSCorePropagationData: value = 20220425125800.0Z

[25]   dSCorePropagationData: value = 20201029053516.0Z

[25]   dSCorePropagationData: value = 16010101000000.0Z

[25]   lastLogonTimestamp: value = 132953506361126701

[25]   msDS-SupportedEncryptionTypes: value = 0

[25]   uid: value = ******@razor.local

[25] Fiber exit Tx=714 bytes Rx=2683 bytes, status=1

[25] Session End
Common Errors Encountered During the Password-Management
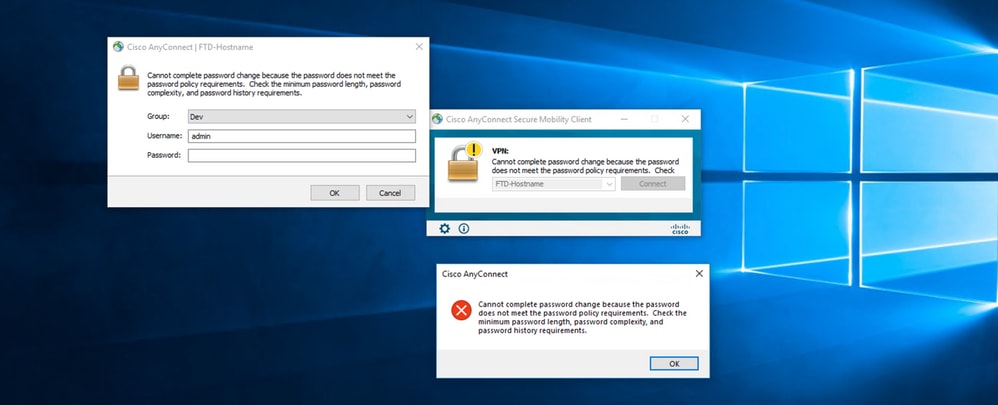
Usually, if the password policy that is set by the Microsoft Server is not met during the time the user provides the new password, the connection gets terminated with the error “Password does not meet the Password Policy Requirements”. Hence, ensure that the new password meets the policy set by the Microsoft Server for LDAPs.
Revision History
| Revision | Publish Date | Comments |
|---|---|---|
1.0 |
12-Sep-2023 |
Initial Release |
Contributed by Cisco Engineers
- Rana Sameer Pratap SinghCisco TAC Engineer
Contact Cisco
- Open a Support Case

- (Requires a Cisco Service Contract)


 Feedback