Configure Intrusion Policy and Signature Configuration in Firepower Module (On-Box Management)
Available Languages
Download Options
Bias-Free Language
The documentation set for this product strives to use bias-free language. For the purposes of this documentation set, bias-free is defined as language that does not imply discrimination based on age, disability, gender, racial identity, ethnic identity, sexual orientation, socioeconomic status, and intersectionality. Exceptions may be present in the documentation due to language that is hardcoded in the user interfaces of the product software, language used based on RFP documentation, or language that is used by a referenced third-party product. Learn more about how Cisco is using Inclusive Language.
Contents
Introduction
This document describes the Intrusion Prevention System (IPS )/Intrusion Detection system (IDS) functionality of FirePOWER module and various Intrusion Policy's elements that make a detection policy in FirePOWER Module.
Prerequisites
Requirements
Cisco recommends that you have knowledge of these topics:
* Knowledge of Adaptive Security Appliance (ASA) firewall, Adaptive Security Device Manager (ASDM).
* FirePOWER Appliance Knowledge.
Components Used
The information in this document is based on these software and hardware versions:
ASA FirePOWER modules (ASA 5506X/5506H-X/5506W-X, ASA 5508-X, ASA 5516-X ) running software version 5.4.1 and higher.
ASA FirePOWER module (ASA 5515-X, ASA 5525-X, ASA 5545-X, ASA 5555-X) running software version 6.0.0 and higher.
The information in this document was created from the devices in a specific lab environment. All of the devices used in this document started with a cleared (default) configuration. If your network is live, ensure that you understand the potential impact of any command.
Background Information
FirePOWER IDS/IPS is designed to examine the network traffic and identify any malicious patterns (or signatures) that indicate a network/system attack. FirePOWER module works in IDS mode if the ASA's service-policy is specifically configured in monitor mode (promiscuous) else, it works in Inline mode.
FirePOWER IPS/IDS is a signature-based detection approach. FirePOWERmodule in IDS mode generates an alert when signature matches the malicious traffic, whereas FirePOWER module in IPS mode generates alert and block malicious traffic.
Note: Ensure that FirePOWER Module must have Protect license to configure this functionality. To verify the license, navigate to Configuration > ASA FirePOWER Configuration > License.
Configuration
Step 1. Configure Intrusion Policy
Step 1.1. Create Intrusion Policy
To configure Intrusion Policy, login to Adaptive Security Device Manager (ASDM) and complete these steps:
Step 1. Navigate to Configuration > ASA FirePOWER Configuration > Policies > Intrusion Policy > Intrusion Policy.
Step 2. Click the Create Policy.
Step 3. Enter the Name of the Intrusion Policy.
Step 4. Enter the Description of the Intrusion Policy (optional).
Step 5. Specify the Drop when Inline option.
Step 6. Select the Base Policy from the drop down list.
Step 7. Click Create Policy to complete Intrusion Policy creation.
Tip: Drop when Inline option is crucial in certain scenarios when the sensor is configured in Inline mode and it is required not to drop the traffic even though it matches a signature which has a drop action.

You can notice that the policy is configured, however, it is not applied to any device.

Step 1.2. Modify Intrusion Policy
To modify Intrusion Policy, navigate to Configuration > ASA FirePOWER Configuration > Policies > Intrusion Policy > Intrusion Policy and select Edit option.

Step 1.3. Modify Base Policy
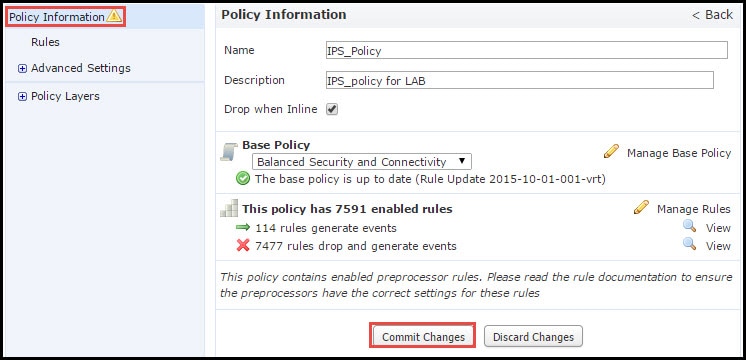
Intrusion Policy Management page gives the option to change the Base Policy/ Drop when Inline/ Save and Discard option.
Base Policy contains some system-provided policies, which are built-in policies.
- Balanced Security and Connectivity: It is an optimal policy in terms of security and connectivity. This policy has around 7500 rules enabled, some of them only generate events whereas others generate events as well as drop the traffic.
- Security over connectivity:If your preference is security then you can choose security over connectivity policy, which increases the number of enabled rules.
- Connectivity over security: If your preference is connectivity rather than security then you can choose connectivity over security policy which will reduce the number of enabled rules.
- Maximum Detection - Select this policy to get maximum detection.
- No Rule Active - This option disables all rules. You need to enable the rules manually based upon your security policy.

Step 1.4. Signature filtering with Filter bar option
Navigate to Rules option in navigational panel and the Rule Management page appears. There are thousands of the rule in Rule database. Filter bar provides a good search engine option to search the rule effectively.
You can insert any keyword into the Filter bar and system grabs the results for you. If there is a requirement to find the signature for Secure Sockets Layer (SSL) heartbleed vulnerability, you can search keyword heartbleed in the filter bar and it will fetch the signature for the heartbleed vulnerability.
Tip: If multiple keywords are used in Filter bar then system combines them using AND logic to create a compound search.
You can also search the rules by using Signature ID (SID), Generator ID (GID), Category: dos etc.
Rules are effectively divided into multiple ways such as based on Category/ Classifications/ Microsoft Vulnerabilities / Microsoft Worms/ Platform Specific. Such association of rules helps the customer to get the right signature in an easy way and help the customer to effectively tune the signatures.

You can also search with CVE number to find the rules that cover them. You can use the syntax CVE: <cve-number>.

Step 1.5. Configure the Rule State
Navigate to Rules option in navigational panel and Rule Management page appears. Select the rules and choose option Rule State to configure the state of the rules. There are three states which can be configured for a rule:
1. Generate Events: This option generates events when the rule matches the traffic.
2. Drop and Generate Events: This option generates events and drop traffic when the rule matches the traffic.
3. Disable: This option disables the rule.

Step 1.6. Event Filter Configure
The importance of an intrusion event can be based on the frequency of occurrence, or on the source or the destination IP address. In some cases, you may not care about an event until it has occurred a certain number of times. For example, you might not be concerned if someone attempts to log-in to a server until they fail a certain number of times. In other cases, you might only need to see a few occurrences of rule hit to check if there is a widespread problem.
There are two ways by which you can achieve this:
1. Event threshold.
2. Event Suppression.
Event Threshold
You can set thresholds that dictate how often an event is displayed, based on the number of occurrences. You can configure thresholding per event and per policy.
Steps to configure Event Threshold:
Step 1. Select the Rule(s) for which you want to configure the Event Threshold.
Step 2. Click the Event Filtering.
Step 3. Click the Threshold.
Step 4. Select the Type from the drop down list. (Limit or Threshold or Both).
Step 5. Select how you want to track from Track By drop box. (Source or Destination).
Step 6. Enter the Count of events to meet the threshold.
Step 7. Enter the Seconds to elapse before the count resets.
Step 8. Click OK to complete.

After an event filter is added to a rule, you should be able to see a filter icon next to the rule indication, which shows that there is an event filtering enabled for this rule.
Event Suppression
Specified events notifications can be suppressed on the basis of source/ destination IP address or per Rule.
Note: When you add event suppression for a rule. The signature inspection works as normally but the system does not generate the events if traffic matches the signature. If you specify a specific Source/Destination then events do not appear only for the specific source/destination for this rule. If you choose to suppress the complete rule then the system does not generate any event for this rule.
Steps to configure Event Threshold:
Step 1. Select the Rule(s) for which you want to configure Event Threshold.
Step 2. Click Event Filtering.
Step 3. Click Suppression.
Step 4.Select Suppression Type from the drop down list. (Rule or Source or Destination).
Step 5. Click OK to complete.

After the event filter is added to this rule, you should be able to see a filter icon with the count two next to the rule indication, which shows that there are two event filters enabled for this rule.
Step 1.7. Configure Dynamic State
It is a feature wherein we can change the state of a rule if the specified condition matches.
Suppose a scenario of brute force attack to crack the password. If a signature detects password fail attempt and the rule action is to generate an event. The system keeps on generating the alert for password fail attempt. For this situation, you can use the Dynamic state where an action of Generate Events can be changed to Drop and Generate Events to block the brute force attack.
Navigate to Rules option in navigational panel and Rule Management page appears. Select the rule for which you want to enable the Dynamic state and choose options Dynamic State > Add a Rate-base Rule State.
To configure Rate-Based Rule State:
- Select the Rule(s) for which you want to configure Event Threshold.
- Click the Dynamic State.
- Click the Add Rate-Based Rule State.
- Select how you want to track the rule state from Track By drop box. (Rule or Source or Destination).
- Enter the Network. You can specify a single IP address, address block, variable, or a comma‑separated list which is comprised of any combination of these.
- Enter the Count of events and the timestamp in seconds.
- Select the New State, you want to define for the rule.
- Enter the Timeout after which the rule state is reverted.
- Click OK to complete.

Step 2. Configure the Network Analysis Policy (NAP) & Variable sets (optional)
Configure Network Analysis Policy
Network Access Policy is also known as preprocessors. The preprocessor does packet re-assembly and normalize the traffic. It helps to identify network layer and transport layer protocol anomalies on identification of inappropriate header options.
NAP does defragmentation of IP datagrams, provides TCP stateful inspection and stream reassembly and validating checksums. The preprocessor normalizes the traffic, validate and verify the protocol standard.
Each preprocessor has its own GID number. It represents which preprocessor has been triggered by the packet.
To configure Network Analysis Policy, Navigate to Configuration > ASA FirePOWER Configuration > Policies > Access Control Policy > Advanced > Network Analysis and Intrusion Policy
Default Network Analysis Policy is Balanced Security and Connectivity which is optimal recommended policy. There is other three more system provided NAP policies which can be selected from the drop-down list.
Select option Network Analysis Policy List to create custom NAP policy.

Configure Variable Sets
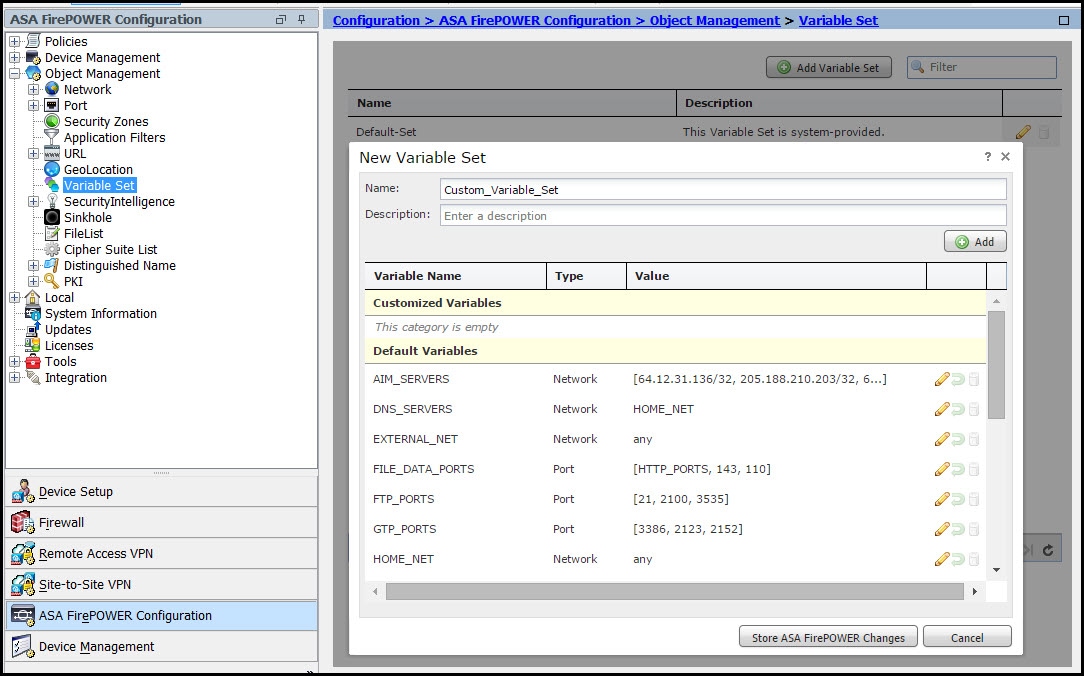
Variable sets are used in intrusion rules to identify the source and destination addresses and ports. Rules are more effective when variables reflect your network environment more accurately. Variable plays an important role in performance tuning.
Variable sets have been already configured with default option (Network/Port). Add new Variable Sets if you want to change the default configuration.
To configure the Variable Sets, navigate to Configuration > ASA Firepower Configuration > Object Management > Variable Set. Select option Add Variable Set to add new variable sets. Enter the Name of Variable Sets and specify the Description.
If any custom application works on a specific port then define the port number in the Port number field. Configure the network parameter.
$Home_NET specify the internal network.
$External_NET specify the external network.

Step 3: Configure Access Control to include Intrusion policy/ NAP/ Variable sets
Navigate to Configuration > ASA Firepower Configuration > Policies > Access Control Policy. You need to complete these steps:
- Edit the Access Policy rule where you want to assign the Intrusion policy.
- Choose the Inspection tab.
- Choose the Intrusion Policy from the drop down list and choose the Variable Sets from drop down list
- Click Save.


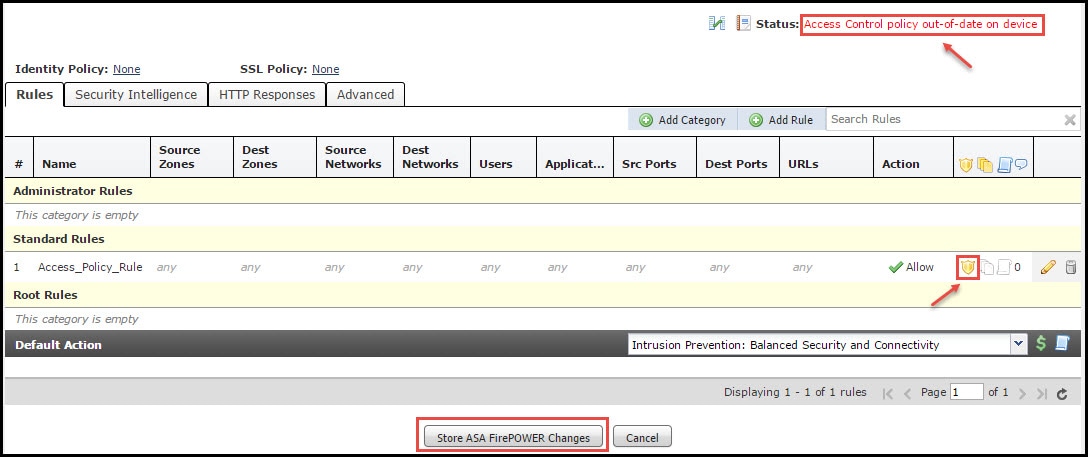
Since an Intrusion Policy is added to this Access Policy Rule. You can see the shield icon in Golden Color that indicates that the Intrusion Policy is enabled.

Click Store ASA FirePOWER changes to save the changes.
Step 4. Deploy Access Control Policy
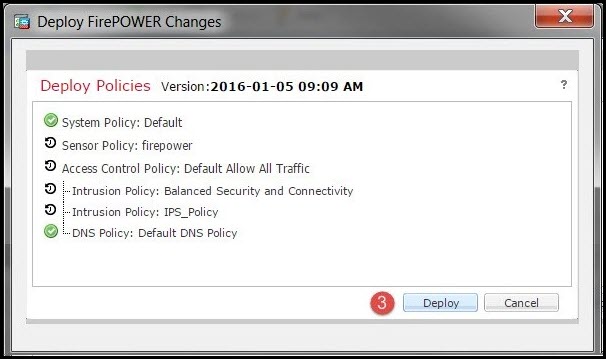
Now, you must deploy the Access Control policy. Before you apply the policy, you will see an indication Access Control Policy out-of-date on the device. To deploy the changes to the sensor:
- Click Deploy.
- Click Deploy FirePOWER Changes.
- Click Deploy in the pop-up window.


Note: In version 5.4.x, to apply the access policy to the sensor, you need to click Apply ASA FirePOWER Changes
Note: Navigate to Monitoring > ASA Firepower Monitoring > Task Status. Ensure that task must complete to apply the configuration change.
Step 5. Monitor Intrusion Events
To see the Intrusion events generated by the FirePOWER Module, navigate to Monitoring > ASA FirePOWER Monitoring > Real Time Eventing.

Verify
There is currently no verification procedure available for this configuration.
Troubleshoot
Step 1. Ensure that Rule State of Rules is appropriately configured.
Step 2. Ensure that correct IPS Policy has been included in Access Rules.
Step 3. Ensure that Variables sets are configured correctly. If the variable sets are not configured correctly then the signatures will not match the traffic.
Step 4. Ensure that the Access Control Policy deployment completes successfully.
Step 5. Monitor the connection events and Intrusion events to verify if the traffic flow is hitting the correct rule or not.
Related Information
Contributed by Cisco Engineers
- Prasad MuralidaranCisco TAC Engineer
- Sunil KumarCisco TAC Engineer
- Prashant JoshiCisco TAC Engineer
Contact Cisco
- Open a Support Case

- (Requires a Cisco Service Contract)
 Feedback