Configure the SSL decryption on FirePOWER Module using ASDM (On-Box Management)
Available Languages
Download Options
Bias-Free Language
The documentation set for this product strives to use bias-free language. For the purposes of this documentation set, bias-free is defined as language that does not imply discrimination based on age, disability, gender, racial identity, ethnic identity, sexual orientation, socioeconomic status, and intersectionality. Exceptions may be present in the documentation due to language that is hardcoded in the user interfaces of the product software, language used based on RFP documentation, or language that is used by a referenced third-party product. Learn more about how Cisco is using Inclusive Language.
Contents
Introduction
This document describes the configuration of Secure Sockets Layer (SSL) decryption on the FirePOWER Module using ASDM (On-Box Management).
Prerequisites
Requirements
Cisco recommends that you have knowledge of these topics:
- Knowledge of ASA (Adaptive Security Appliance) firewall, ASDM (Adaptive Security Device Manager)
- Knowledge of FirePOWER appliance
- Knowledge of HTTPS/SSL protocol
Components Used
The information in this document is based on these software and hardware versions:
- ASA FirePOWER modules (ASA 5506X/5506H-X/5506W-X, ASA 5508-X, ASA 5516-X ) running software version 6.0.0 and above
- ASA FirePOWER module (ASA 5515-X, ASA 5525-X, ASA 5545-X, ASA 5555-X) running software version 6.0.0 and above
The information in this document was created from the devices in a specific lab environment. All of the devices used in this document started with a cleared (default) configuration. If your network is live, make sure that you understand the potential impact of any command.
Note: Ensure that FirePOWER Module has a Protect license to configure this functionality. To verify the license, navigate to Configuration > ASA FirePOWER Configuration > License.
Background Information
Firepower Module decrypts and inspects inbound and outbound SSL connections which are redirected to it. Once the traffic is decrypted, tunneled applications such as facebook chat etc, are detected and controlled. The decrypted data is inspected for threats, URL filtering, file blocking, or malicious data.
Outbound SSL Decryption
The firepower module acts as the forward proxy for outbound SSL connections by intercepting outbound SSL requests and re-generating a certificate for the site which user wants to visit. The issuing authority (CA) is the Firepower Self-Signed certificate. If the firepower's certificate is not part of a hierarchy that exists or if it is not added to a client’s browser cache, the client receives a warning while it browses to a secure site. Decrypt-Resignmethod is used to perform outbound SSL decryption.
Inbound SSL Decryption
In the case of inbound traffic to an internal Web Server or device, the administrator imports a copy of the protected server’s certificate and the key. When the SSL server certificate is loaded on the firepower module, and SSL decryption policy is configured for the inbound traffic, the device then decrypts and inspects the traffic as it forwards the traffic. The module then detects malicious content, threats, malware flowing over this secure channel. Moreover, the Decrypt-Known Keymethod is used to perform inbound SSL decryption.
Configuration for SSL Decryption
There are two methods of SSL traffic decryption.
- Decrypt - Resign for Outbound SSL traffic
- Decrypt - Known for Inbound SSL traffic
Outbound SSL decryption (Decrypt - Resign)
Firepower module acts as MITM (man-in-the-middle) for any SSL negotiations for public SSL servers. It resigns the certificate of the public server with an intermediate CA certificate which is configured on the firepower module.
These are the three steps to configure the Outbound SSL Decryption.
Step 1. Configure the CA certificate.
Configure either a self-signed Certificate or an intermediate trusted CA certificate for certificate resign.
Configure the Self-Signed CA Certificate
In order to configure the Self-Signed CA Certificate, navigate to Configuration > ASA Firepower Configuration > Object Management > PKI > Internal CAs and click on Generate CA. The system prompts for the details of the CA certificate. As shown in the image, fill up the details as per your requirement.

Click on Generate self-signed CA to generate the internal CA certificate. Then click on Generate CSR to generate the certificate-signing-request which is consequently shared with the CA server to sign.
Configure the Intermediate CA Certificate
In order to configure the Intermediate CA Certificate which is signed by another third party CA, navigate to Configuration > ASA Firepower Configuration > Object Management > PKI > Internal CAs and click on Import CA.
Specify the Nameof the Certificate. Select browse and upload the certificate from the local machine or copy-paste the content of the certificate in the Certificate Data option. In order to specify the private key of the certificate, either browse the key file or copy-paste the key in the Key option.
If the key is encrypted, enable the check-box Encrypted and specify the password. Click OK to save the certificate content, as shown in the image:

Step 2. Configure the SSL Policy.
SSL policy defines the decryption action and identifies the traffic on which Decrypt-Resign method of decryption is applied. Configure the multiple SSL rules based on your business requirement and organization security policy.
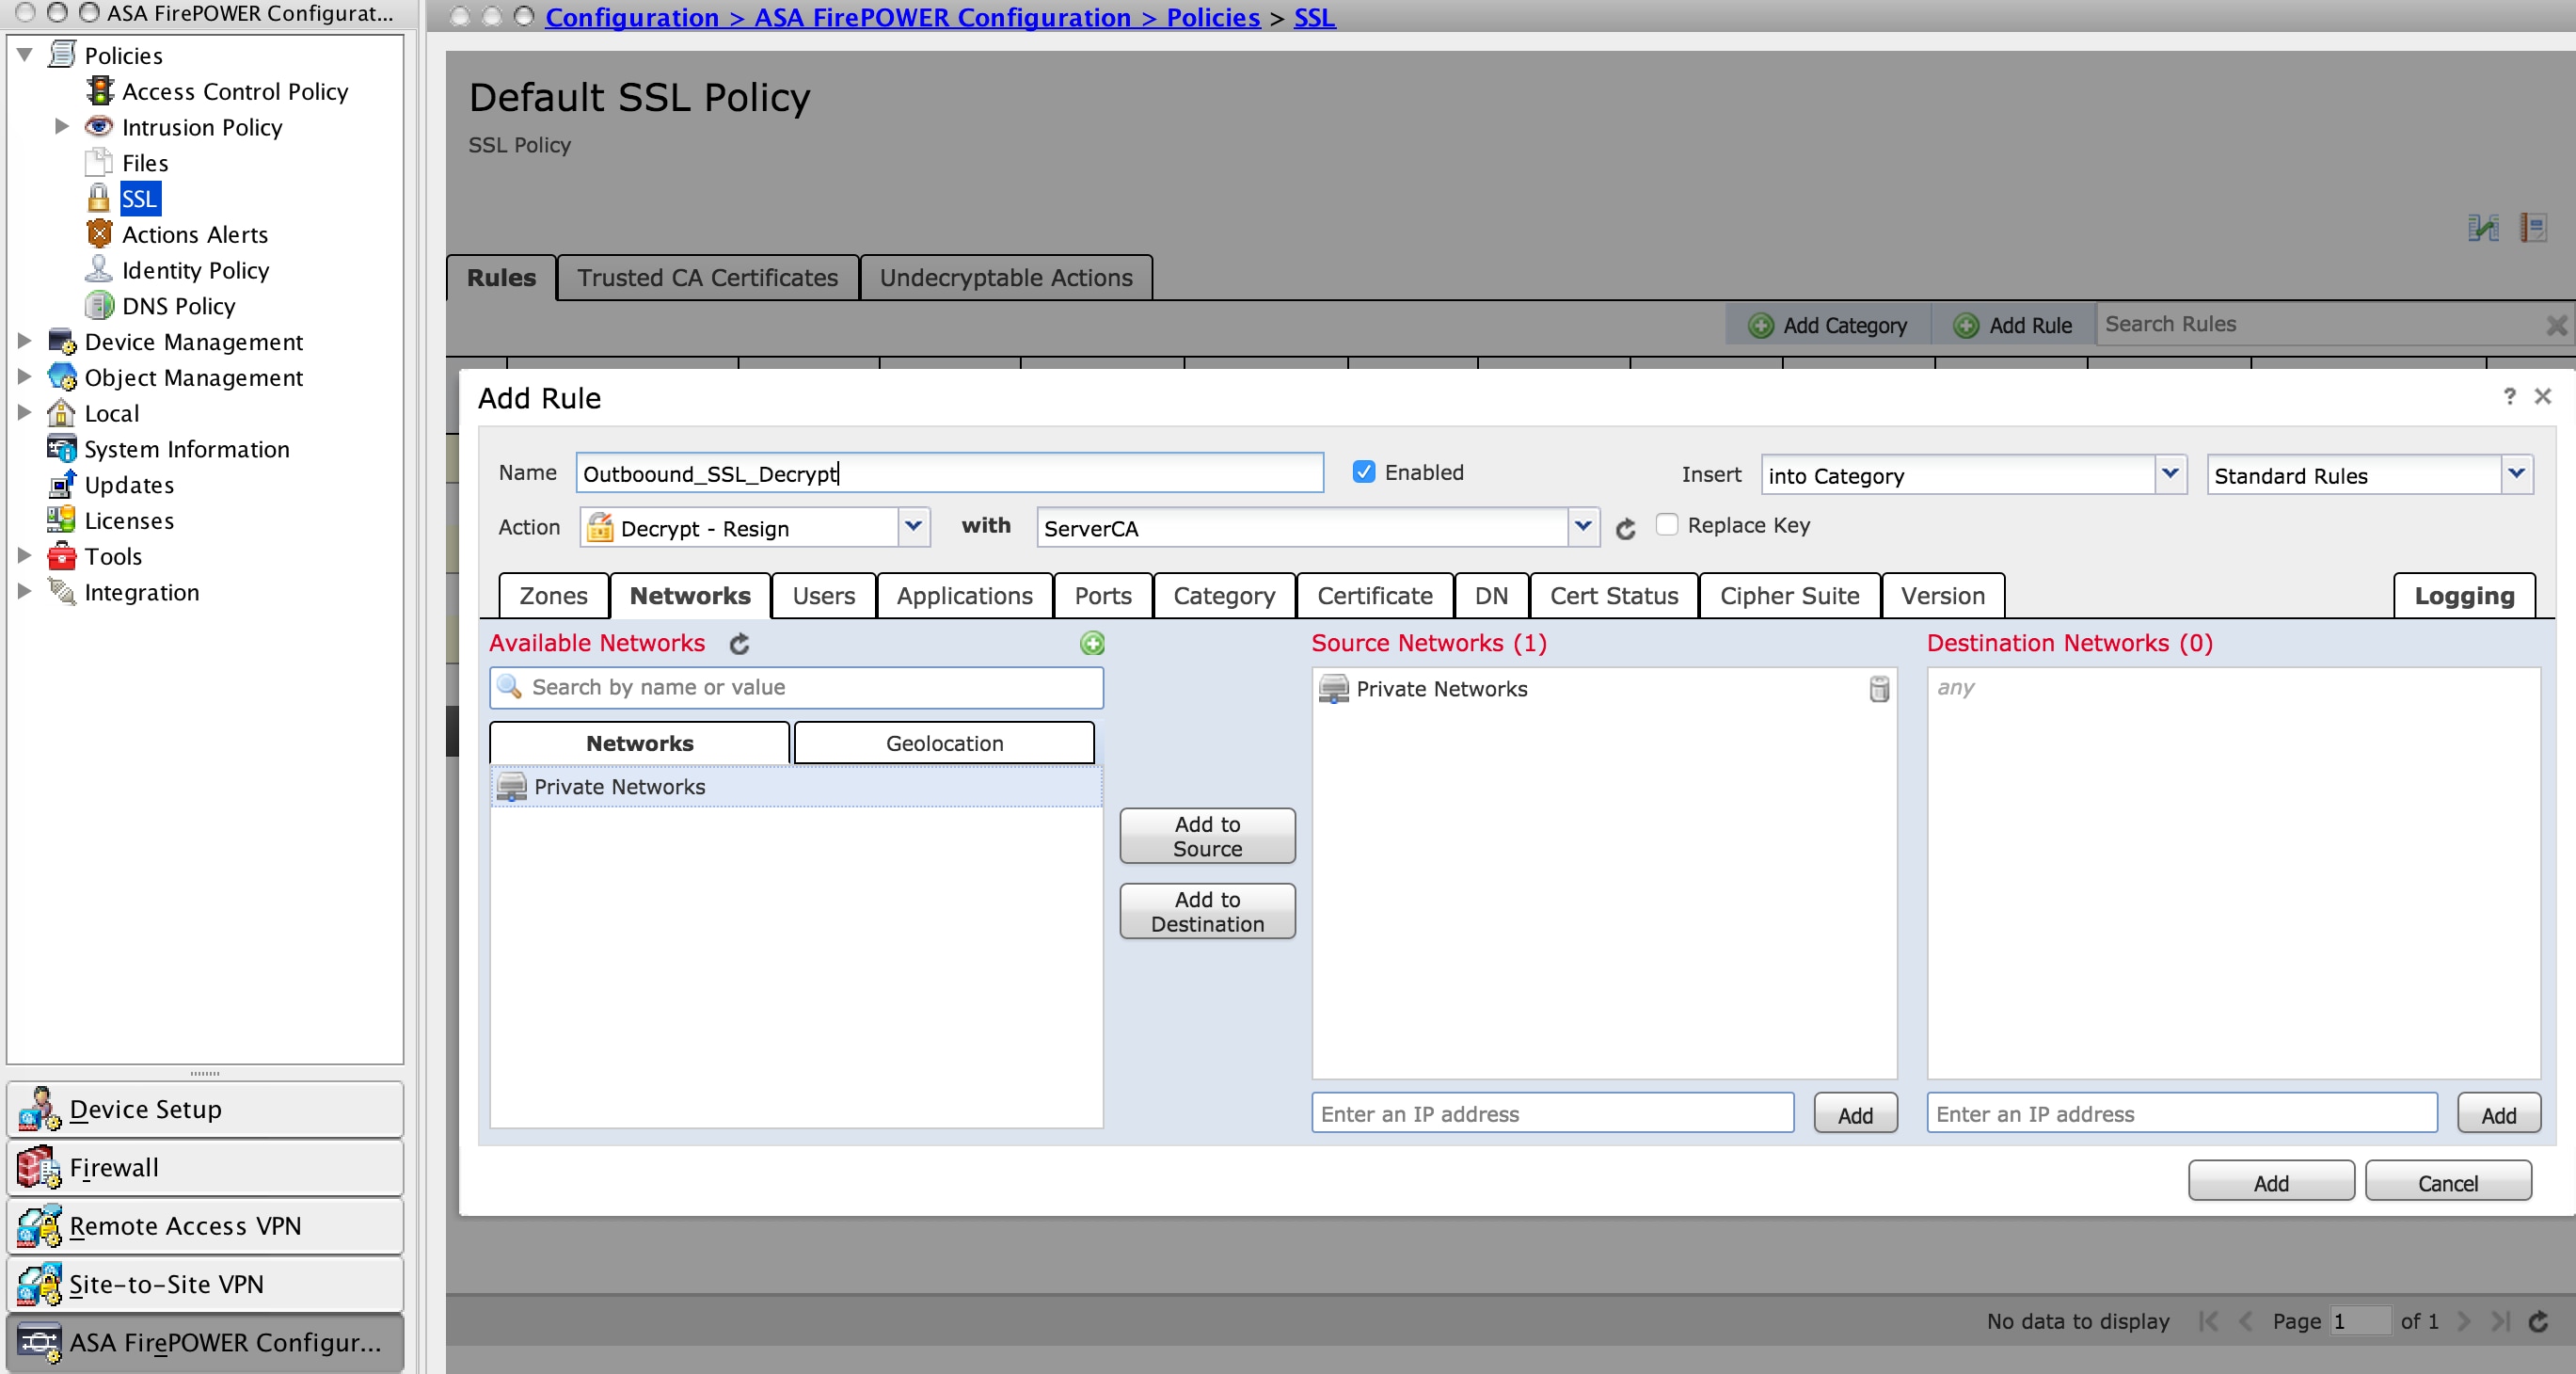
In order to configure the SSL policy, navigate to Configure > ASA FirePOWER Configuration > Policies > SSL and click Add Rule.
Name: Specify the name of the rule.
Action: Specify the action as Decrypt - Resign and choose the CA certificate from the drop-down list which is configured in the previous step.
Define conditions in the rule to match traffic as there are multiple options (zone, network, users etc.), specified to define the traffic that needs to be decrypted.
To generate the events of SSL decryption, enable the loggingat logging option, as shown in the image:

Click Add to add the SSL rule.
Click Store ASA Firepower Changes to save the configuration of SSL policy.
Step 3. Configure the Access Control Policy
Once you configure the SSL policy with appropriate rules, you must specify the SSL policy in the Access Control to implement the changes.
To configure the Access Control policy, navigate to Configuration > ASA Firepower Configuation > Policies > Access Control.
Either click None of the SSL Policy or navigate to Advanced > SSL Policy Setting. Specify the SSL policy from the drop-down list and click OK to save it, as shown in the image:

Click Store ASA Firepower Changes to save the configuration of SSL policy.
You must deploy the Access Control policy to the sensor. Before you apply the policy, there is an indication that Access Control Policy out-of-date on the module. To deploy the changes to the sensor, click Deploy and select Deploy FirePOWER Changes option. Verify the changes made and click Deploy.
Note: In version 5.4.x, if you need to apply the access policy to the sensor, click Apply ASA FirePOWER Changes.
Note: Navigate to Monitoring > ASA Firepower Monitoring > Task Status. You then apply for cofiguration changes to ensure that the task is completed.
Inbound SSL Decryption (Decrypt - Known)
Inbound SSL Decryption (Decrypt-Known) method is used to decrypt the inbound SSL traffic for which you have configured server certificate and private key. You need to import the Server Certificate and Private key to the Firepower module. When SSL traffic hits the Firepower module, it decrypts the traffic and performs the inspection on decrypted traffic. After inspection, Firepower module re-encrypts the traffic and sends it to the server.
These are the four steps to configure the Outbound SSL Decryption:
Step 1. Import the Server Certificate and Key.
In order to import the Server Certificate and Key, navigate to Configuration > ASA Firepower Configuration > Object Management > PKI > Internal Certs and click on Add Internal Cert.
As shown in the image, specify the Nameof the Certificate. Either select browse to select the certificate from the local machine or copy-paste the content of the certificate in the Certificate Data. In order to specify the private key of the certificate, either browse the key file or copy-paste the key in the option Key.
If the key is encrypted, then enable the checkbox Encrypted and specify the password, as shown in the image:

Click on Store ASA FirePOWER Changes to save the certificate content.
Step 2. Import the CA certificate (optional).
For server certificate signed by Internal intermediate or root CA certificate, you need to import the internal chain of CA certificates to the firepower module. After the import is carried out, firepower module is able to validate the server certificate.
To import the CA certificate, navigate to Configuration > ASA Firepower Configuration > Object Management > Trusted CAs and click Add Trusted CA to add the CA certificate.
Step 3. Configure the SSL Policy.
SSL policy defines the action and server details for which you wish to configure Decrypt-known method to decrypt the inbound traffic. If you have multiple internal servers, configure multiple SSL rules based on different servers and the traffic they handle .
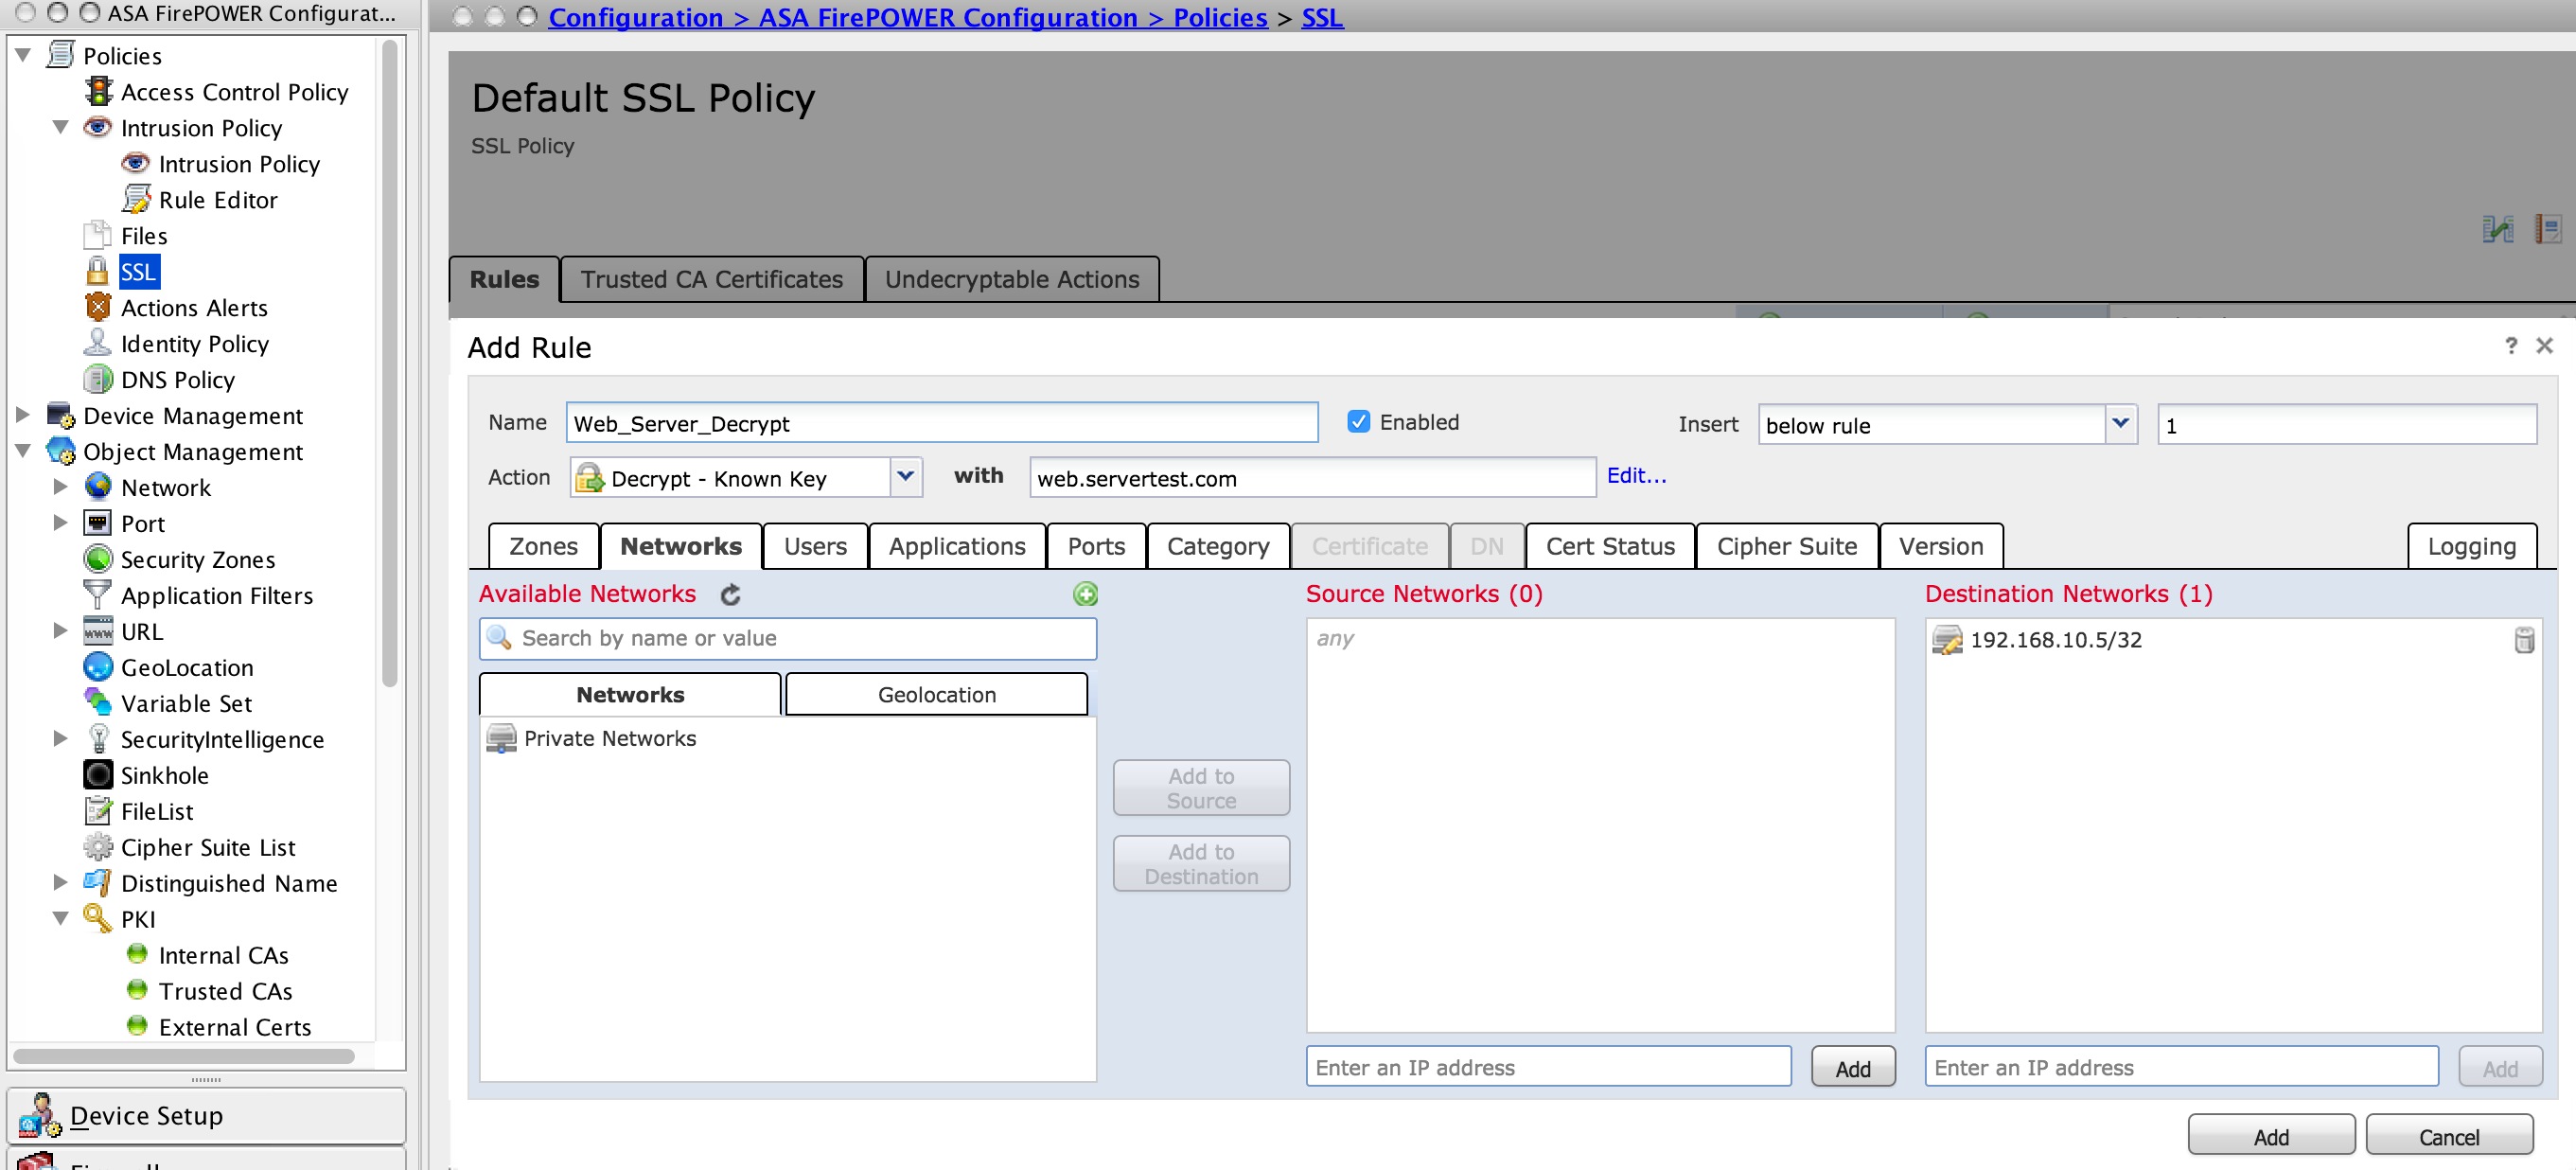
To configure the SSL policy, navigate to Configure > ASA FirePOWER Configuration > Policies > SSL and click on Add Rule.
Name: Specify the name of the rule.
Action: Specify the action as Decrypt - known and choose the CA certificate from the drop-down list which is configured in the previous step.
Define the condition to match this rules, as there are multiple options (network, application, ports etc.) specified to define the interesting traffic of the server for which you want to enable the SSL decryption. Specify the internal CA in Selected Trusted CAs inTrusted CA certificate tab.
To generate the events of SSL decryption, enable the loggingat logging option.

Click Add to add the SSL rule.
And then click on Store ASA Firepower Changes to save the configuration of SSL policy.
Step 4. Configure the Access Control Policy.
Once you configure the SSL policy with appropriate rules, you must specify the SSL policy in the Access Control to implement the changes.
To configure the Access Control policy, navigate to Configuration > ASA Firepower Configuation > Policies > Access Control.
Either click the None option beside of SSL Policy or navigate to Advanced > SSL Policy Setting, specify the SSL policy from the drop-down list and click OK to save it.
Click Store ASA Firepower Changes to save the configuration of SSL policy.
You must deploy the Access Control policy. Before you apply the policy, you can see an indication Access Control Policy out-of-date on the module. To deploy the changes to the sensor, click Deploy and choose Deploy FirePOWER Changes option. Verify the changes made and click Deploy in the pop-up window.
Note: In version 5.4.x, if you need to apply the access policy to the sensor, click Apply ASA FirePOWER Changes.
Note: Navigate to Monitoring > ASA Firepower Monitoring > Task Status. You then apply for cofiguration changes to ensure that the task is completed.
Verify
Use this section in order to confirm that your configuration works properly.
- For Outbound SSL connection, once you browse a public SSL website from the internal network, the system prompts an error message of the certificate. Check the certificate content and verify the CA information. The internal CA certificate you configured in the Firepower module appears. Accept the error message to browse the SSL certificate. To avoid the error message, add the CA certificate into your browser trusted CA list.

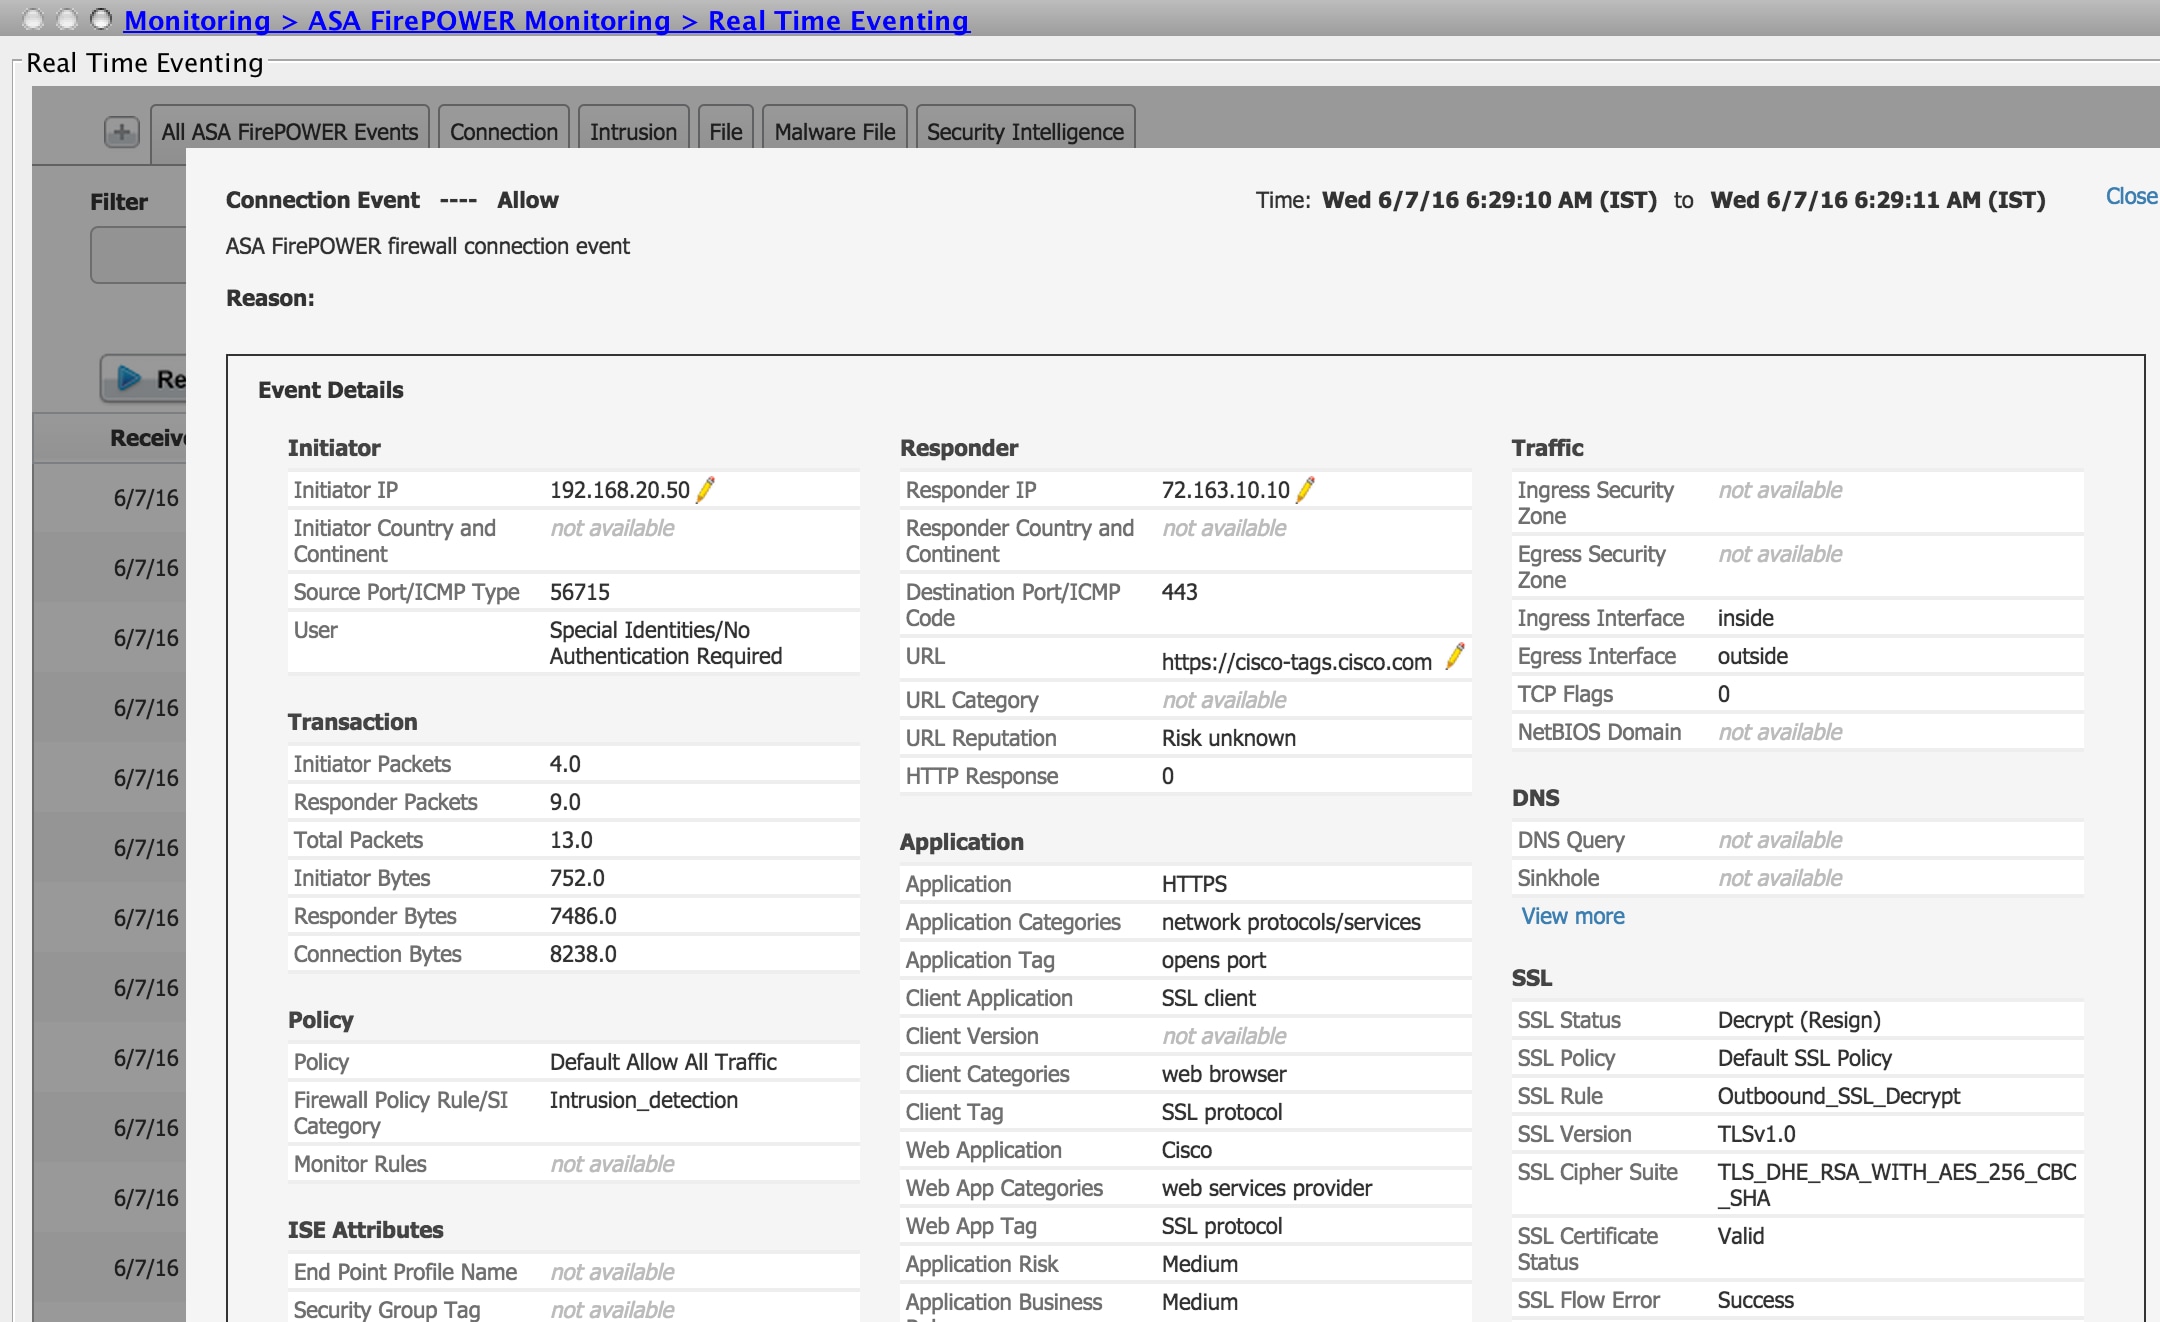
- Check the connection events to verify which SSL policy and SSL rule is hitby the traffic. Navigate to Monitoring > ASA FirePOWER Monitoring > Real-Time Eventing.Select an event and click on View Details. Verify the SSL decryption statistics.

- Ensure that the Access Control Policy deployment completes successfully.
- Ensure that SSL policy is included in the Access Control Policy.
- Ensure that SSL policy contains appropriate rules for Inbound and Outbound direction.
- Ensure that SSL rules contain the proper condition to define the interesting traffic.
- Monitor the connection events to verify the SSL policy and SSL rule.
- Verify the SSL decryption status.
Troubleshoot
There is currently no specific troubleshooting information available for this configuration.
Related Information
Contributed by Cisco Engineers
- Sunil KumarCisco TAC Engineer
- Gaurav SharmaCisco TAC Engineer
- Prashant JoshiCisco TAC Engineer
Contact Cisco
- Open a Support Case

- (Requires a Cisco Service Contract)
 Feedback