ASA Clientless SSL VPN (WebVPN) Troubleshooting Tech Note
Available Languages
Contents
Introduction
This document lists the Clientless SSL VPN (WebVPN) troubleshooting techniques adopted for ASA versions 7.1, 7.2, and 8.0. There are significant advancements between these releases that require varied troubleshooting techniques to be adopted.
Prerequisites
Requirements
There are no specific requirements for this document.
Components Used
The information in this document is based on the Cisco 5500 Series ASA that runs software version 7.1 or higher.
The information in this document was created from the devices in a specific lab environment. All of the devices used in this document started with a cleared (default) configuration. If your network is live, make sure that you understand the potential impact of any command.
Conventions
Refer to Cisco Technical Tips Conventions for more information on document conventions.
Troubleshooting
The prerequisite for troubleshooting clientless SSL VPN connections (WebVPN) on the ASA is to gain visibility into both the client experience via screenshots and HTML capture tools and then to compare this to the same information when connected directly to the URL/Application being accessed.
ASA Version 7.1/7.2 Clientless
This section describes the troubleshooting techniques for ASA Versions 7.1/7.2 and all interims up to, but not including, the 8.0 release.
In this release if complex Java/Javascript functions have difficulty, other options (such as application access port forwarding or the use of proxy-bypass) might be considered. Refer to Configuring Application Access and Using Proxy Bypass for more information about these alternatives.
In most scenarios, if the URL that is accessed through Clientless SSL VPN fails for Internet Explorer, it will also fail for another browser.
In order to ensure that this is not dependant on the client PC or operating system, use another client from a different location. The use of an IPsec or SSL VPN client can also be tested.
Ensure that the ASA is included in the browser Trusted Zone as described in Enabling Cookies on Browsers for WebVPN and that cookies are enabled as described in Enable Cookies.
If the process still fails, complete these steps in order to gather the necessary information, and then open a TAC case.
-
Clear the browser cache as described in Clear the Browser Cache.
-
Clear the Java cache as described in Clear the Java Cache.
-
Disable the WebVPN cache on the ASA as described in Configuring Caching.
-
If a Java applet is present, use debug level 5 in the applet window as described in Enable Java Applet Debugging Options.
-
Log into the ASA via Clientless SSL VPN.
-
At the URL just prior to the problematic URL, enable an HTML capture tool in the browser as described in Enable the HTML Capture Tools.
-
Capture the sequence from this point to the problematic URL.
-
Press Ctrl+Print Screen on your keyboard in order to capture a screenshot.
-
Stop the HTML capture tool.
-
Perform the same steps 1 through 9 when you connect directly to the URL via either an IPsec or SSL VPN session through the ASA or directly connect on the same LAN segment (if possible) and send the data to TAC for analysis.
ASA Version 8.0 Clientless
This section describes the troubleshooting techniques used for ASA Versions 8.0 and all interims.
In this release if complex URLs or applications have difficulty through clientless SSL VPN, other options (such as the use of smart tunnels) are a powerful alternative. Refer to Configuring Smart Tunnel Access for more information about smart tunnels.
You might also consider application access port forwarding or the use of proxy-bypass. Refer to Configuring Application Access and Using Proxy Bypass for more information about these alternatives.
In most scenarios, if the URL that is accessed through Clientless SSL VPN fails for Internet Explorer, it will also fail for another browser.
In order to ensure that this is not dependant on the client PC or operating system, use another client from a different location. The use of an IPsec or SSL VPN client can also be tested.
Ensure that the ASA is included in the browser Trusted Zone as described in Enabling Cookies on Browsers for WebVPN and that cookies are enabled as described in Enable Cookies.
If an application experiences an issue with the clientless content transformation engine (CTE/rewriter), you can modify the bookmark for that application in order to enable the Smart Tunnel option as shown in this image:
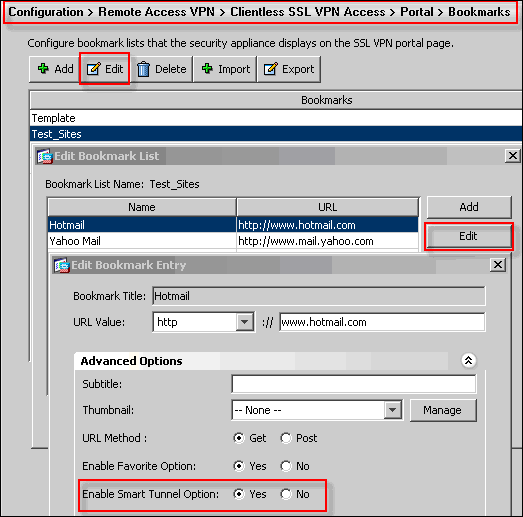
Enabling this option for a bookmark does not require additional configuration. Similar to port forwarding, this is another convenient option to click a bookmark in order to open a new window that uses the smart tunnel to pass application traffic and avoid rewrite issues.
When you use this feature for TCP Winsock 32 applications (such as RDP), the administrator is required to identify the process(es) to be utilized through smart tunnels. For instance, RDP uses the mstsc.exe process; a simple smart tunnel entry can be created for this process.
More complicated applications may spawn multiple processes. From within the WebVPN Portal Page, choose the Application Access panel. As soon as it loads, the list of allowed applications are able to connect to the private side of the network.
If the process still fails, complete these steps in order to gather the necessary information, and then open a TAC case.
-
Clear the browser cache as described in Clear the Browser Cache.
-
Clear the Java cache as described in Clear the Java Cache.
-
Disable the WebVPN cache on the ASA as described in Configuring Caching.
-
If a Java applet is present, use debug level 5 in the applet window as described in Enable Java Applet Debugging Options.
-
Log into the ASA via Clientless SSL VPN.
-
At the URL just prior to the problematic URL, enable an HTML capture tool in the browser as described in Enable the HTML Capture Tools.
-
Capture the sequence from this point to the problematic URL.
-
Press Ctrl+Print Screen on your keyboard in order to capture a screenshot.
-
Stop the HTML capture tool.
-
Perform the steps 1 through 9 when you connect directly to the URL via either an IPsec or Any Connect SSL session through the ASA or directly connect on the same LAN segment (if possible), complete these steps, and send the data to TAC for analysis
Procedures
Add the ASA as a Trusted Site
When you access the ASA in Internet Explorer, you will receive a certificate error if the site is not included as a trusted site.

Complete these steps in order to add the ASA as a trusted site:
-
In Interent Explorer, choose Tools > Internet Options.
-
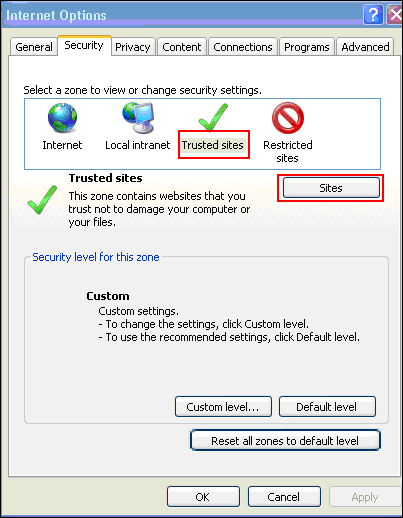
Click the Security tab, and choose Trused sites.
-
Click Sites.
-
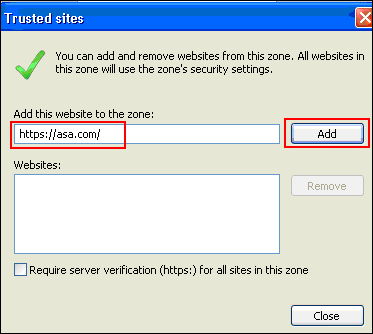
Add the https:// address of the ASA, and click Add.
-
Once the site is added, the Trusted sites icon appears in the Internet Explorer status bar.

Note: Refer to Working with Internet Explorer 6 Security Settings ![]() for detailed information about this procedure.
for detailed information about this procedure.
Enable Cookies
Complete these steps in order to enable cookies:
-
In Internet Explorer, choose Tools > Internet Options.
-
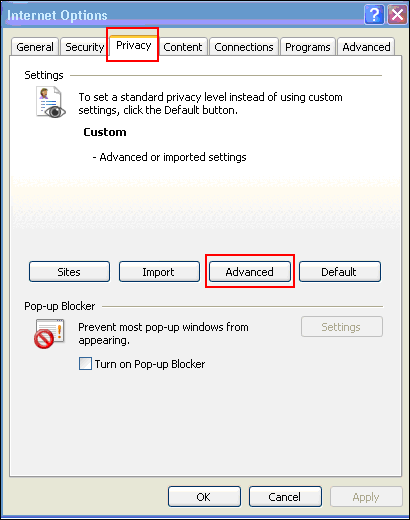
Click the Privacy tab, and then click Advanced.
-
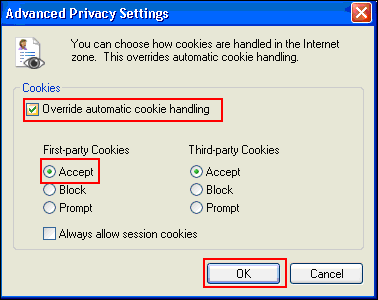
In the Advanced Privacy Settings dialog box, check the Override automatic cookie handling check box, click the Accept radio button, and click OK.
Clear the Browser Cache
Complete these steps in order to clear the cache for Internet Explorer:
-
In Internet Explorer, choose Tools > Internet Options.
-
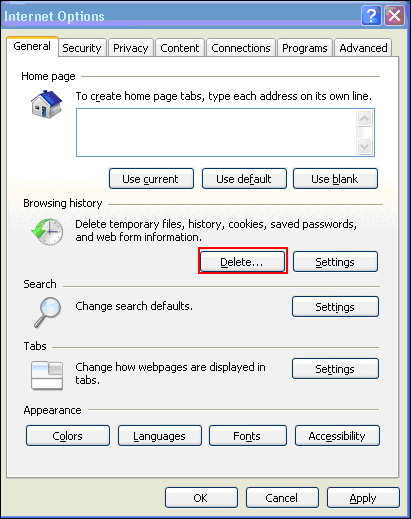
On the General tab, click Delete within the Browsing history section.
-
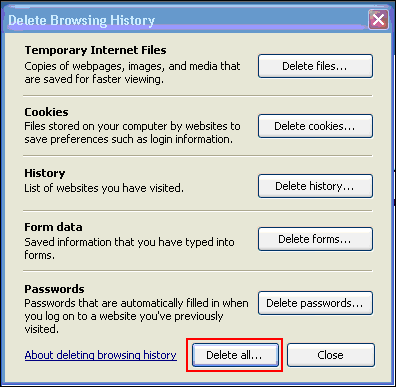
Click Delete All.
-
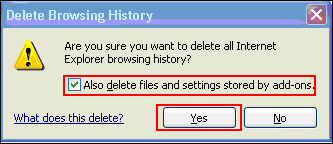
Check the Also delete files and settings stored by add-ons check box, and click Yes.
-
Once the cache is cleared, shut down all instances of the browser, and restart the browser.
Note: In order to clear the cache for other browsers, refer to How do I clear my browser’s cache (to improve its performance)? ![]()
Clear the Java Cache
Complete these steps in order to clear the Java cache:
-
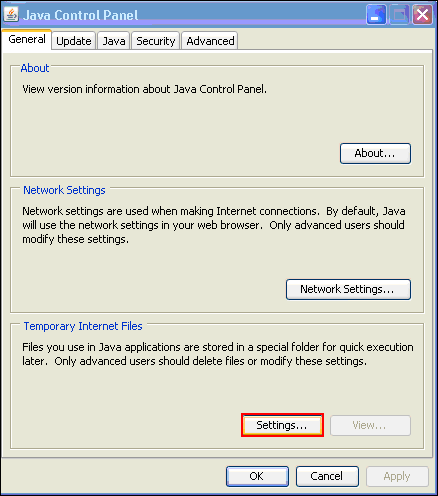
Choose Control Panel from the Windows Start menu.
-
Double-click Java.
-
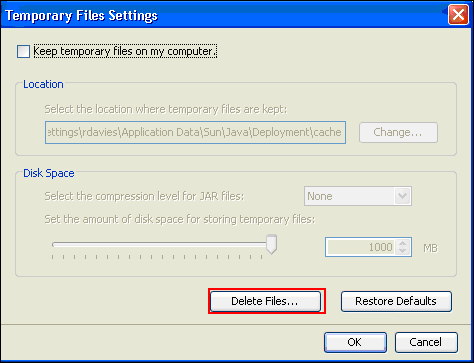
Click Settings.
-
Click Delete Files.
Note: Refer to How do I clear my Java cache? ![]() for more information about this procedure.
for more information about this procedure.
Enable Java Applet Debugging Options
Complete these steps in order to enable the Java applet debugging option:
-
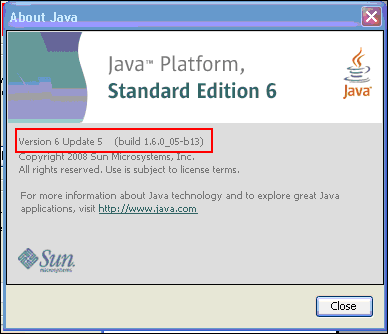
Ensure Java 1.4 or above is enabled:
-
Choose Control Panel from the Windows Start menu.
-
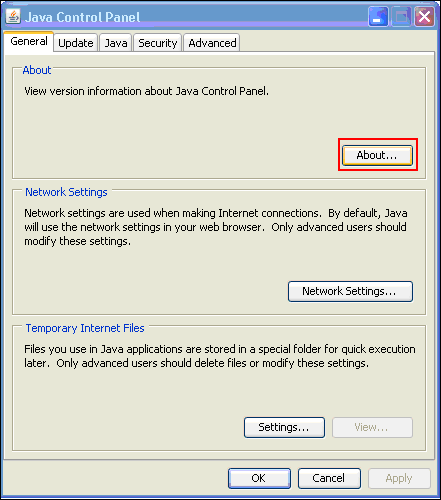
Double-click Java.
-
Click About, and check the version number.
Note: You can download Java updates from http://java.com/en/
 .
. -
-
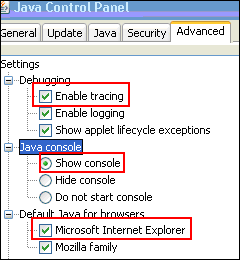
Ensure that Java is configured to enable tracing, to show the console, and to set Microsoft Internet Explorer as the default browser as shown in this image:
-
Ensure that the Java cache is cleared as described in Clear the Java Cache.
-
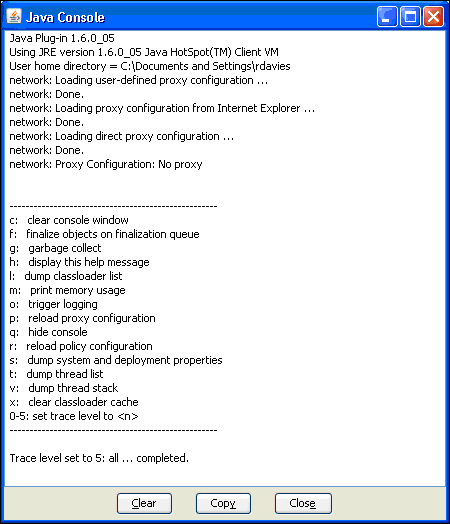
In Internet Explorer, choose Tools > Java Console in order to open the Java debug window.
-
Once the Java Console debug window is open, press 5 in order to set the trace level
When a URL is accessed that contains a Java Applet, the activity is captured in this window.
-
Click Copy in order to copy the information.
Enable the HTML Capture Tools
A number of different HTML capture tools are available to gather data, some of which have been listed here. Install one of these HTML capture tools onto the client PC that is used for is data gathering exercise:
Note: This procedures uses the HTTPWatch application.
Once the application is installed, complete these steps:
-
Press Shift+P+F+2 or click the icon in the browser window in order to enable HTTPWatch.

-
Once the application is enabled, a window appears embedded at the bottom of the browser window similar to this image:

-
Click Record in order to record data; click Stop in order to stop recording.
Note: It is recommended to use HttpWatch 7.x in order to record the data.
Related Information
Revision History
| Revision | Publish Date | Comments |
|---|---|---|
1.0 |
29-Apr-2008 |
Initial Release |
Contact Cisco
- Open a Support Case

- (Requires a Cisco Service Contract)


 Feedback