ASA 8.X: Routing SSL VPN Traffic through Tunneled Default Gateway Configuration Example
Available Languages
Contents
Introduction
This document describes how to configure the Adaptive Security Appliance (ASA) to route the SSL VPN traffic through the tunneled default gateway (TDG). When you create a default route with the tunneled option, all traffic from a tunnel terminating on the ASA that cannot be routed using learned or static routes is sent to this route. For traffic emerging from a tunnel, this route overrides any other configured or learned default routes.
Prerequisites
Requirements
Ensure that you meet these requirements before you attempt this configuration:
-
ASA that runs on version 8.x
-
Cisco SSL VPN Client (SVC) 1.x
Note: Download the SSL VPN Client package (sslclient-win*.pkg) from Cisco Software Download (registered customers only) . Copy the SVC to the flash memory on the ASA. The SVC needs to be downloaded to the remote user computers in order to establish the SSL VPN connection with the ASA.
Components Used
The information in this document is based on these software and hardware versions:
-
Cisco 5500 Series ASA that runs software version 8.x
-
Cisco SSL VPN Client version for Windows 1.1.4.179
-
PC that runs Windows 2000 Professional or Windows XP
-
Cisco Adaptive Security Device Manager (ASDM) version 6.1(5)
The information in this document was created from the devices in a specific lab environment. All of the devices used in this document started with a cleared (default) configuration. If your network is live, make sure that you understand the potential impact of any command.
Conventions
Refer to the Cisco Technical Tips Conventions for more information on document conventions.
Background Information
The SSL VPN Client (SVC) is a VPN tunneling technology that gives remote users the benefits of an IPSec VPN client without the need for network administrators to install and configure IPSec VPN clients on remote computers. The SVC uses the SSL encryption that is already present on the remote computer as well as the WebVPN login and authentication of the Security Appliance.
In the current scenario, there is an SSL VPN client connecting to the internal resources behind the ASA through the SSL VPN tunnel. The split-tunnel is not enabled. When the SSL VPN client is connected to the ASA, all the data will be tunneled. Besides accessing the internal resources, the main criterion is to route this tunneled traffic through the Default Tunneled Gateway (DTG).
You can define a separate default route for tunneled traffic along with the standard default route. Unencrypted traffic received by the ASA, for which there is no static or learned route, is routed through the standard default route. Encrypted traffic received by the ASA, for which there is no static or learned route, will be passed to the DTG defined through the tunneled default route.
In order to define a tunneled default route, use this command:
route <if_name> 0.0.0.0 0.0.0.0 <gateway_ip> tunneled
Configure
In this section, you are presented with the information to configure the features described in this document.
Note: Use the Command Lookup Tool (registered customers only) to obtain more information on the commands used in this section.
Network Diagram
This document uses this network setup:

In this example, the SSL VPN Client accesses the inside network of the ASA through the tunnel. The traffic meant for destinations other than the inside network are also tunneled, as there is no split-tunnel configured, and are routed through the TDG (192.168.100.20).
After the packets are routed to the TDG, which is Router 2 in this case, it performs the address translation to route those packets ahead to the Internet. For more information on configuring a router as an Internet Gateway, refer to How to Configure a Cisco Router Behind a Non-Cisco Cable Modem.
ASA Configuration using ASDM 6.1(5)
This document assumes the basic configurations, such as interface configuration, are complete and work properly.
Note: Refer to Allowing HTTPS Access for ASDM for information on how to allow the ASA to be configured by the ASDM.
Note: WebVPN and ASDM cannot be enabled on the same ASA interface unless you change the port numbers. Refer to ASDM and WebVPN Enabled on the Same Interface of ASA for more information.
Complete these steps in order to configure the SSL VPN by using the SSL VPN Wizard.
-
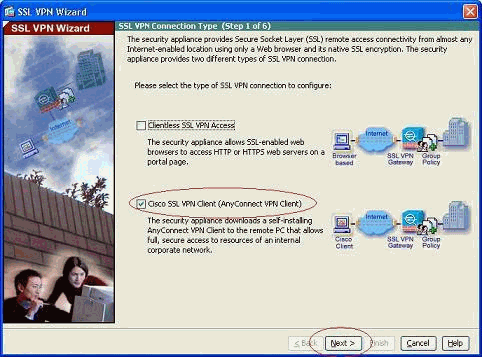
From the Wizards menu, choose SSL VPN Wizard.

-
Click the Cisco SSL VPN Client check box, and click Next.
-
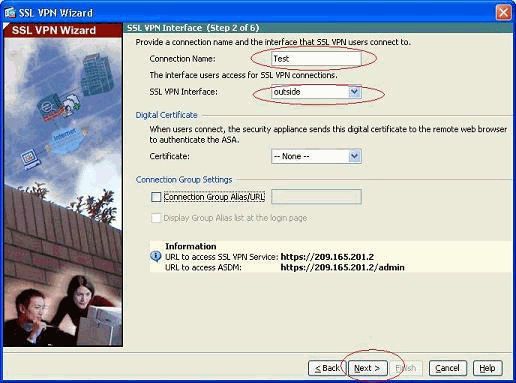
Enter a name for the connection in the Connection Name field, and then choose the interface that is being used by the user to access the SSL VPN from the SSL VPN Interface drop-down list.
-
Click Next.
-
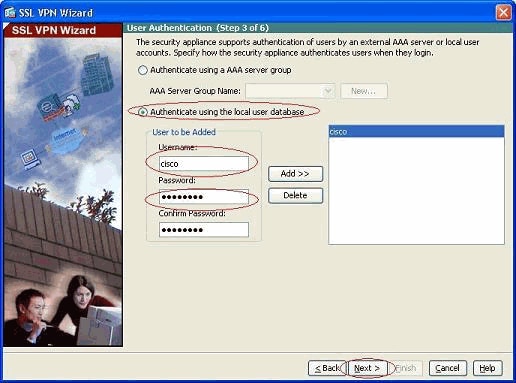
Choose an authentication mode, and click Next. (This example uses local authentication.)
-
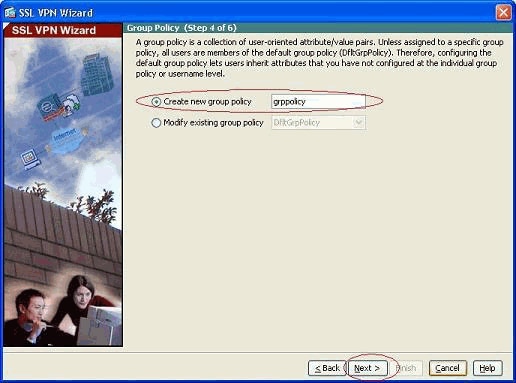
Create a new group policy other than the existing default group policy.
-
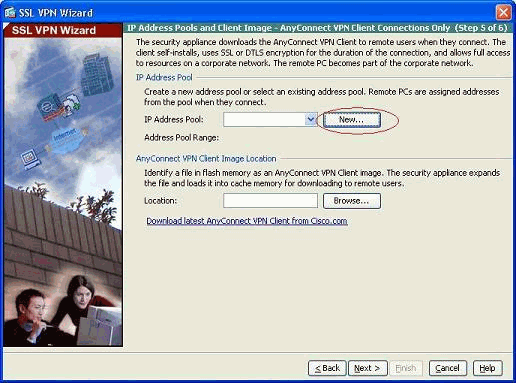
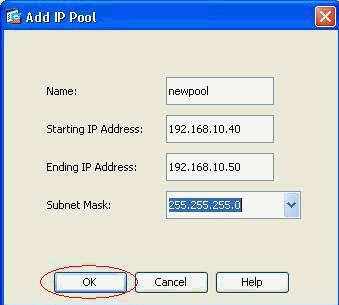
Create a new pool of addresses which will be assigned to the SSL VPN client PCs once they get connected.
A pool of range 192.168.10.40-192.168.10.50 has been created by name newpool.
-
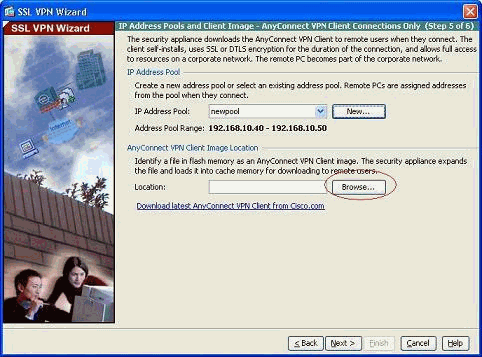
Click Browse in order to choose and upload the SSL VPN Client image to the flash memory of the ASA.
-
Click Upload in order to set the file path from the local directory of the machine.

-
Click Browse Local Files in order to select the directory where the sslclient.pkg file exists.

-
Click Upload File in order to upload the selected file to the flash of ASA.


-
Once the file is uploaded on to the flash of ASA, click OK to complete that task.

-
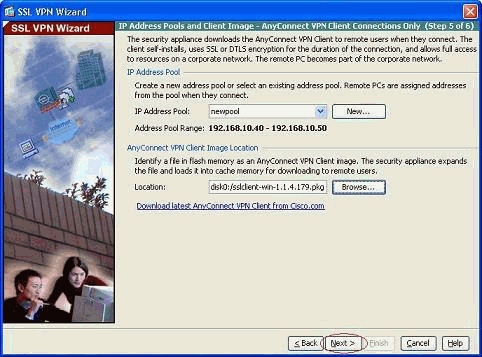
Now it shows the latest anyconnect pkg file uploaded on to the flash of ASA. Click Next.
-
The summary of the SSL VPN client configuration is shown. Click Finish to complete the wizard.
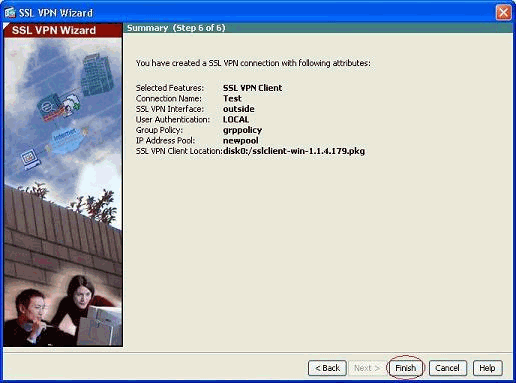
The configuration shown in ASDM mainly pertains to the SSL VPN client Wizard configuration.
In the CLI, you can observe some additional configuration. The complete CLI configuration is shown below and important commands have been highlighted.
| ciscoasa |
|---|
ciscoasa#show running-config : Saved : ASA Version 8.0(4) ! hostname ciscoasa enable password 8Ry2YjIyt7RRXU24 encrypted names ! interface Ethernet0/0 nameif outside security-level 0 ip address 209.165.201.2 255.255.255.224 ! interface Ethernet0/1 nameif inside security-level 100 ip address 192.168.100.2 255.255.255.0 ! interface Ethernet0/2 nameif manage security-level 0 ip address 10.1.1.1 255.255.255.0 ! interface Ethernet0/3 shutdown no nameif no security-level no ip address ! interface Ethernet0/4 shutdown no nameif no security-level no ip address ! interface Ethernet0/5 shutdown no nameif no security-level no ip address ! passwd 2KFQnbNIdI.2KYOU encrypted ftp mode passive access-list nonat extended permit ip 192.168.100.0 255.255.255.0 192.168.10.0 255.255.255.0 access-list nonat extended permit ip 192.168.10.0 255.255.255.0 192.168.100.0 255.255.255.0 !--- ACL to define the traffic to be exempted from NAT. no pager logging enable logging asdm informational mtu outside 1500 mtu inside 1500 mtu manage 1500 !--- Creating IP address block to be assigned for the VPN clients ip local pool newpool 192.168.10.40-192.168.10.50 mask 255.255.255.0 no failover icmp unreachable rate-limit 1 burst-size 1 asdm image disk0:/asdm-615.bin no asdm history enable arp timeout 14400 global (outside) 1 interface nat (inside) 0 access-list nonat !--- The traffic permitted in "nonat" ACL is exempted from NAT. nat (inside) 1 192.168.100.0 255.255.255.0 route outside 0.0.0.0 0.0.0.0 209.165.201.1 1 !--- Default route is configured through "inside" interface for normal traffic. route inside 0.0.0.0 0.0.0.0 192.168.100.20 tunneled !--- Tunneled Default route is configured through "inside" interface for encrypted traffic ! timeout xlate 3:00:00 timeout conn 1:00:00 half-closed 0:10:00 udp 0:02:00 icmp 0:00:02 timeout sunrpc 0:10:00 h323 0:05:00 h225 1:00:00 mgcp 0:05:00 mgcp-pat 0:05:00 timeout sip 0:30:00 sip_media 0:02:00 sip-invite 0:03:00 sip-disconnect 0:02:00 timeout uauth 0:05:00 absolute dynamic-access-policy-record DfltAccessPolicy http server enable !--- Configuring the ASA as HTTP server. http 10.1.1.0 255.255.255.0 manage !--- Configuring the network to be allowed for ASDM access. ! !--- Output is suppressed ! telnet timeout 5 ssh timeout 5 console timeout 0 threat-detection basic-threat threat-detection statistics access-list ! class-map inspection_default match default-inspection-traffic ! ! policy-map type inspect dns preset_dns_map parameters message-length maximum 512 policy-map global_policy class inspection_default inspect dns preset_dns_map inspect ftp inspect h323 h225 inspect h323 ras inspect netbios inspect rsh inspect rtsp inspect skinny inspect esmtp inspect sqlnet inspect sunrpc inspect tftp inspect sip inspect xdmcp ! service-policy global_policy global ! !--- Output suppressed ! webvpn enable outside !--- Enable WebVPN on the outside interface svc image disk0:/sslclient-win-1.1.4.179.pkg 1 !--- Assign the AnyConnect SSL VPN Client image to be used svc enable !--- Enable the ASA to download SVC images to remote computers group-policy grppolicy internal !--- Create an internal group policy "grppolicy" group-policy grppolicy attributes VPN-tunnel-protocol svc !--- Specify SSL as a permitted VPN tunneling protocol ! username cisco password ffIRPGpDSOJh9YLq encrypted privilege 15 !--- Create a user account "cisco" tunnel-group Test type remote-access !--- Create a tunnel group "Test" with type as remote access tunnel-group Test general-attributes address-pool newpool !--- Associate the address pool vpnpool created default-group-policy grppolicy !--- Associate the group policy "clientgroup" created prompt hostname context Cryptochecksum:1b247197c8ff70ee4432c13fb037854e : end ciscoasa# |
Verify
The commands given in this section can be used to verify this configuration.
The Output Interpreter Tool (registered customers only) (OIT) supports certain show commands. Use the OIT to view an analysis of show command output.
-
show webvpn svc——Displays the SVC images stored in the ASA flash memory.
-
show VPN-sessiondb svc—Displays the information about the current SSL connections.
Troubleshoot
There is currently no specific troubleshooting information available for this configuration.
Related Information
Revision History
| Revision | Publish Date | Comments |
|---|---|---|
1.0 |
18-Oct-2010 |
Initial Release |
Contact Cisco
- Open a Support Case

- (Requires a Cisco Service Contract)


 Feedback