Remote VPN Client Load Balancing on ASA 5500 Configuration Example
Available Languages
Contents
Introduction
Load balancing is the ability to have Cisco VPN Clients shared across multiple Adaptive Security Appliance (ASA) units without user intervention. Load-balancing ensures that the public IP address is highly available to users. For example, if the Cisco ASA that services the public IP address fails, another ASA in the cluster assumes the public IP address.
Prerequisites
Requirements
Ensure that you meet these requirements before you attempt this configuration:
-
You have assigned IP addresses on your ASAs and configured the default gateway.
-
IPsec is configured on the ASAs for the VPN Client users.
-
VPN users are able to connect to all ASAs with the use of their individually assigned public IP address.
Eligible Clients
Load balancing is effective only on remote sessions initiated with these clients:
-
Cisco VPN Client (release 3.0 or later)
-
Cisco VPN 3002 Hardware Client (release 3.5 or later)
-
CiscoASA 5505 when acting as an Easy VPN client
All other clients, including LAN-to-LAN connections, can connect to a security appliance on which load balancing is enabled, but they cannot participate in load balancing.
Components Used
The information in this document is based on these software and hardware versions:
-
VPN Client Software Releases 4.6 and later
-
Cisco ASA Software Releases 7.0.1 and later
Note: Extends load balancing support to ASA 5510 and ASA models later than 5520 that have a Security Plus license with the 8.0(2) version.
The information in this document was created from the devices in a specific lab environment. All of the devices used in this document started with a cleared (default) configuration. If your network is live, make sure that you understand the potential impact of any command.
Network Diagram
This document uses this network setup:

Conventions
Refer to the Cisco Technical Tips Conventions for more information on document conventions.
Restrictions
-
VPN virtual cluster IP address, User Datagram Protocol (UDP) port, and shared secret must be identical on every device in the virtual cluster.
-
All devices in the virtual cluster must be on the same outside and inside IP subnets.
Configuration
IP Address Assignment
Ensure that the IP addresses are configured on the outside and inside interfaces and you are able to get to the Internet from your ASA.
Note: Ensure that ISAKMP is enabled on both the inside and outside interface. Select Configuration > Features > VPN > IKE > Global Parameters in order to verify this.
Cluster Configuration
This procedure shows how to use the Cisco Adaptive Security Device Manager (ASDM) to configure load balancing.
Note: Many of the parameters in this example have default values.
-
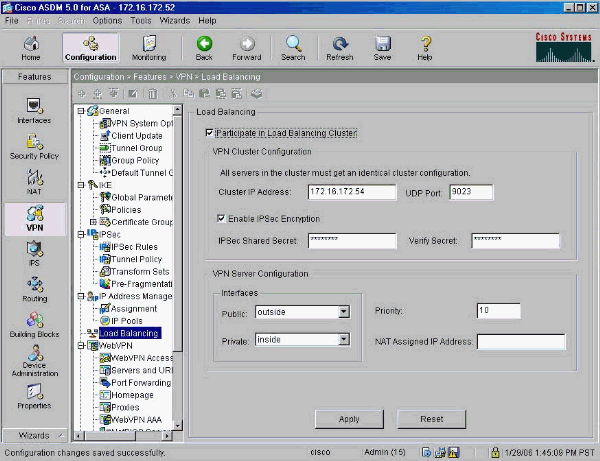
Select Configuration > Features > VPN > Load Balancing, and check Participate in Load Balancing Cluster to enable VPN load balancing.

-
Complete these steps to configure the parameters for all ASAs participating in the cluster in the VPN Cluster Configuration group box:
-
Type the IP address of the cluster in the Cluster IP Address text box.
-
Click Enable IPSec Encryption.
-
Type the encryption key in the IPSec Shared Secret text box and type it again in the Verify Secret text box.
-
-
Configure the options in the VPN Server Configuration group box:
-
Select an interface that accepts the incoming VPN connections in the Public list.
-
Select an interface that is the private interface in the Private list.
-
(Optional) Change the priority that the ASA has in the cluster in the Priority text box.
-
Type an IP address for the Network Address Translation (NAT) Assigned IP Address if this device is behind a firewall that uses NAT.
-
-
Repeat the steps on all the participating ASAs in the group.
The example in this section uses these CLI commands to configure load balancing:
VPN-ASA2(config)#vpn load-balancing
VPN-ASA2(config-load-balancing)#priority 10
VPN-ASA2(config-load-balancing)#cluster key cisco123
VPN-ASA2(config-load-balancing)#cluster ip address 172.16.172.54
VPN-ASA2(config-load-balancing)#cluster encryption
VPN-ASA2(config-load-balancing)#participate
Monitoring
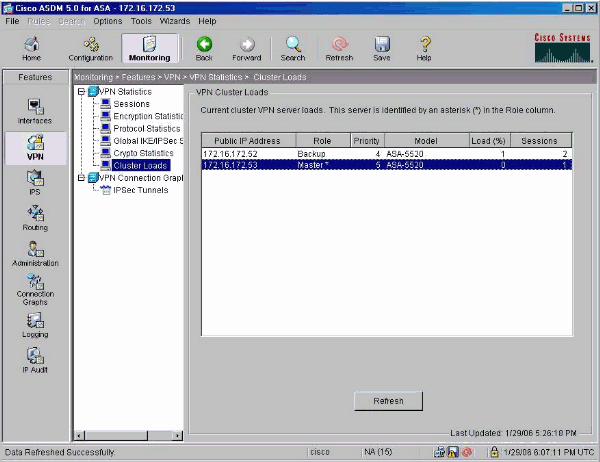
Select Monitoring > Features > VPN > VPN Statistics > Cluster Loads to monitor the load balancing feature on the ASA.

Verify
Use this section to confirm that your configuration works properly.
The Output Interpreter Tool (registered customers only) (OIT) supports certain show commands. Use the OIT to view an analysis of show command output.
-
show vpn load-balancing—Verifies the VPN load balancing feature.
Status: enabled
Role: Backup
Failover: n/a
Encryption: enabled
Cluster IP: 172.16.172.54
Peers: 1

Public IP Role Pri Model Load (%) Sessions
--------------------------------------------------------------
* 172.16.172.53 Backup 5 ASA-5520 0 1
172.16.172.52 Master 4 ASA-5520 n/a n/a
Troubleshoot
Use this section to troubleshoot your configuration.
Troubleshooting Commands
The Output Interpreter Tool (registered customers only) (OIT) supports certain show commands. Use the OIT to view an analysis of show command output.
Note: Refer to Important Information on Debug Commands before you use debug commands.
-
debug vpnlb 250—Used to troubleshoot the VPN load balancing feature.
VPN-ASA2#
VPN-ASA2# 5718045: Created peer[172.16.172.54]
5718012: Sent HELLO request to [172.16.172.54]
5718016: Received HELLO response from [172.16.172.54]
7718046: Create group policy [vpnlb-grp-pol]
7718049: Created secure tunnel to peer[192.168.0.11]
5718073: Becoming slave of Load Balancing in context 0.
5718018: Send KEEPALIVE request failure to [192.168.0.11]
5718018: Send KEEPALIVE request failure to [192.168.0.11]
5718018: Send KEEPALIVE request failure to [192.168.0.11]
7718019: Sent KEEPALIVE request to [192.168.0.11]
7718023: Received KEEPALIVE response from [192.168.0.11]
7718035: Received TOPOLOGY indicator from [192.168.0.11]
7718019: Sent KEEPALIVE request to [192.168.0.11]
7718023: Received KEEPALIVE response from [192.168.0.11]
7718019: Sent KEEPALIVE request to [192.168.0.11]
7718023: Received KEEPALIVE response from [192.168.0.11]
7718019: Sent KEEPALIVE request to [192.168.0.11]
7718023: Received KEEPALIVE response from [192.168.0.11]
7718019: Sent KEEPALIVE request to [192.168.0.11]
7718023: Received KEEPALIVE response from [192.168.0.11]
7718019: Sent KEEPALIVE request to [192.168.0.11]
Related Information
Revision History
| Revision | Publish Date | Comments |
|---|---|---|
1.0 |
09-Feb-2006 |
Initial Release |
Contact Cisco
- Open a Support Case

- (Requires a Cisco Service Contract)

 Feedback