ASA: Attach a US Robotics Modem to the Console Port
Available Languages
Contents
Introduction
This document explains how to attach a US Robotics modem to the console port of a Cisco Adaptive Security Appliance (ASA) that has RJ-45 console ports. This procedure can be used for other modem brands as well, however you must consult your modem documentation for the equivalent initialization string.
Note: You cannot attach a modem to the AUX port of the ASA as you might on routers or switches. The AUX port is intended for devices such as terminal servers.
Note: Unprotected modems should not be connected to the console port. The console ports do not log users off when the carrier detect is lost, which can leave a security hole. In order to avoid this, use a secure modem or console timeout setting in the ASA which logs off the user after the time period specified in the timeout command. For more information on the advantages and disadvantages of connecting a modem to the console port, see the Console Port Issues section of this document.
Prerequisites
Requirements
There are no specific requirements for this document.
Components Used
The information in this document is based on the Cisco 5500 Series ASA with software version 7.0 and later.
The information in this document was created from the devices in a specific lab environment. All of the devices used in this document started with a cleared (default) configuration. If your network is live, make sure that you understand the potential impact of any command.
Conventions
Refer to Cisco Technical Tips Conventions for more information on document conventions.
Tasks Performed
-
Configure the modem for console connectivity. Since the the console port lacks reverse Telnet capability, the modem initialization string (init string) must be set before you connect the modem to the console port of the ASA.
-
Connect the modem to the console port of the ASA.
-
Configure the ASA to accept incoming calls.
These tasks are explained in the Step-By-Step Procedure section of this document.
Step-By-Step Procedure
Complete these steps in order to attach a US Robotics modem to the console port of a Cisco ASA:
-
Connect the modem to a PC. This step is necessary in order to access the modem to set the initialization string.
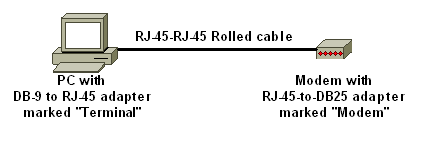
Attach an RJ-45-to-DB-9 adapter marked "Terminal" to the COM port of the PC. From the RJ-45 end of the adapter, connect a flat-satin Rolled RJ-45--RJ-45 cable (part number CAB-500RJ= ), which is provided with every Cisco ASA for console connections. You also need an RJ-45-to-DB-25 adapter marked "MODEM" (part number CAB-25AS-MMOD) in order to connect the rolled cable to the DB-25 port on the modem.

-
On the modem, turn off the modem, set DIP switch seven to down, and turn on the modem in order to restore the factory defaults. After this, turn the modem off again. See the Miscellaneous section of this document for information about DIP switch settings.
-
Reverse Telnet from the PC to the modem.
Use a terminal emulation program on the PC, such as HyperTerminal, and access the PC modem through the COM port you connected to in step 1. Once you connect to the PC modem through the COM port, you need to apply the initialization string (see step 4). For an example, refer to the Example HyperTerminal Session section of Configuring Client Modems to Work with Cisco Access Servers.
-
Type this initialization string which writes the desired initialization string settings to NVRAM:
AT&FS0=1&C1&D2&H0&R1&B1&M4&K0&N6&W
Note: The 0s in this string are zeroes. See the Miscellaneous section of this document for information about initialization strings.
Note: You should receive an OK response from the modem. If the modem does not respond, verify that the modem hardware and cabling function correctly.
-
Enter this initialization string in order to disable Echo and result codes:
ATE0Q1&W
-
Change DIP switches 4 and 8 to down and keep the rest as up. Then power cycle the modem.
-
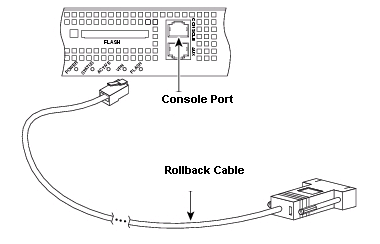
Unplug the rolled RJ-45 cable from the RJ-45-to-DB-9 adapter of the PC and attach it to the console port of the ASA.

Note: A rolled RJ-45-to-RJ-45 flat satin cable with RJ-45-to-DB-25 adapters (part number CAB-25AS-MMOD) on both ends cannot be used due to incorrect signal pairs.
-
Turn the modem on.
-
For security purposes, you need to configure the console timeout as well as enable password in the ASA.
!--- Configure console idle timeout for 10 minutes.

ASA5510(config)#console timeout 10
If the ASA does not have an enable password, incoming connections are not able to enter enable mode.
!--- In order to allow incoming calls to enter enable mode:

ASA5510(config)#enable password asa123
-
Use an analog phone to verify that the phone line is active and functions. Then connect the analog phone line to the modem.
-
Test the modem connection by initiating an EXEC modem call to the ASA from another device (for example, a PC).
Use a terminal emulation program on the PC, such as HyperTerminal, and access the PC modem through one of the COM ports. Once you have connected to the PC modem through the COM port, initiate the dial to the ASA. For an example, refer to the Example HyperTerminal Session section of Configuring Client Modems to Work with Cisco Access Servers.
Note: The console port line does not run Point-to-Point Protocol (PPP). Hence, you cannot dial using Microsoft Windows Dialup Networking (DUN) for this connection.
-
Once the connection is established, press <Return> in order to obtain the prompt on the ASA.
Console Port Issues
There are several advantages to connecting a modem to the console port of an ASA. However, the disadvantages are significant.
Advantages When You Connect a Modem on the Console Port
-
You can recover passwords remotely. You might still need someone on-site with the ASA to toggle the power. Aside from that, it is identical to being there with the ASA.
-
It is a convenient way to attach a modem to an ASA without async ports. This is beneficial if you need to access the ASA for configuration or management.
Disadvantages When You Connect a Modem on the Console Port
-
The console port does not support RS232 modem control (Data Set Ready/Data Carrier Detect (DSR/DCD), Data Terminal Ready (DTR)). Therefore, when the EXEC session terminates (logout), the modem connection does not drop automatically. The user needs to manually disconnect the session.
-
More seriously, if the modem connection does drop, the EXEC session does not automatically reset. This can present a security hole, in that a subsequent call into that modem is able to access the console without entering a password. You can make the hole smaller when you set a tight exec-timeout on the ASA. However, if security is important, use a modem that can provide a password prompt.
-
Unlike other async lines, the console port does not support hardware (Clear to Send/Ready to Send (CTS/RTS) flow control. Cisco recommends that you use no flow control. If data overruns are encountered, however, you can enable software (XON/XOFF) flow control.
-
The console port lacks reverse Telnet capability. If the modem loses its stored initialization string, the only remedy is to physically disconnect the modem from the ASA and attach it to another device (such as a PC) to reinitialize.
-
You cannot use a console port for dial-on-demand routing because it has no corresponding async interface.
Miscellaneous
Dip Switches
This table contains a list of the functions of the DIP switches on a US Robotics modem:
ON = Down, OFF = Up
| Dip Switch | Description |
|---|---|
| 1 | DTR Override |
| 2 | Verbal/Numeric Result Codes |
| 3 | Result Code Display |
| 4 | Command Mode Local Echo Suppression |
| 5 | Auto Answer Suppression |
| 6 | CD Override |
| 7 | Power-on and ATZ Reset Software Defaults |
| 8 | AT Command Set Recognition |
Initialization String
The initialization string entered for this configuration has these characteristics:
AT&FS0=1&C1&D2&H0&R1&B1&M4&K0&N6&W
| AT Command | Description |
|---|---|
| &F0 | Set to Factory Defaults (no Flow Control) |
| S0=1 | Auto Answer on first ring |
| &C1 | Uses the actual state of the carrier from the remote modem for the Data Carrier Detect (recommended) |
| &D2 | DTR going off triggers modem disconnect, sends OK result code, and disables auto answer while DTR is OFF. (default) |
| &R1 | In synchronous mode, CTS is always on, and RTS is ignored |
| &M4 | ARQ/Normal Mode |
| &K0 | Disable Data Compression |
| &N6 | Highest Link Speed (DCE rate) is 9600 bps |
| &W | Store configuration to NVRAM |
| &Q1 | Selects synchronous connect mode with async off-line command mode |
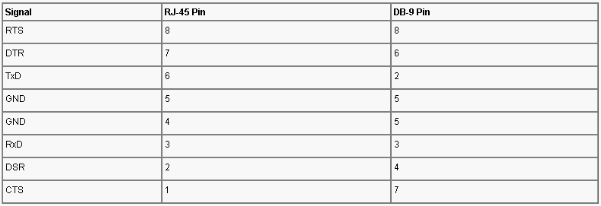
Cable Pinouts for RJ-45 to DB-9 or DB-25

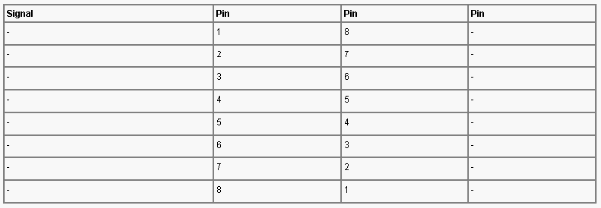
RJ-45 Rolled (Console) Cable Pinouts

Related Information
Revision History
| Revision | Publish Date | Comments |
|---|---|---|
1.0 |
04-Dec-2006 |
Initial Release |
Contact Cisco
- Open a Support Case

- (Requires a Cisco Service Contract)


 Feedback