ASA 8.x Anyconnect Authentication with the Belgian eID Card
Available Languages
Contents
Introduction
This document describes how to set up ASA 8.x Anyconnect authentication to use the Belgian eID card.
Prerequisites
Requirements
There are no specific requirements for this document.
Components Used
The information in this document is based on these software and hardware versions:
-
ASA 5505 with the appropriate ASA 8.0 software
-
AnyConnect Client
-
ASDM 6.0
The information in this document was created from the devices in a specific lab environment. All of the devices used in this document started with a cleared (default) configuration. If your network is live, make sure that you understand the potential impact of any command.
Conventions
Refer to Cisco Technical Tips Conventions for more information on document conventions.
Background Information
The eID is a PKI (Public Key Infrastructure) card issued by the Belgian government that users must use in order to authenticate on a remote Windows PC. The AnyConnect software client is installed on the local PC and takes authentication credentials from the remote PC. Once authentication is complete, the remote user gains access to the central resources through a full SSL tunnel. The remote user is provisioned with an IP address obtained from a pool managed by the ASA.
Local PC Setup
Operating System
The operating system (Windows, MacOS, Unix, or Linux) on your local PC must be current with all required patches installed.
Card Reader
An electronic card reader must be installed on your local computer in order to use the eID card. The electronic card reader is a hardware device that establishs a channel of communication between the programs on the computer and the chip on the ID card.
For a list of approved card readers, refer to this URL: http://www.cardreaders.be/en/default.htm ![]()
Note: In order to use the card reader, you must install the drivers recommended by the hardware vendor.
eID Runtime Software
You must install the eID runtime software provided by the Belgian government. This software allows the remote user to read, validate, and print the contents of the eID card. The software is available in French and Dutch for Windows, MAC OS X, and Linux.
For more information, refer to this URL:
Authentication Certificate
You must import the authentication certificate into the Microsoft Windows store on the local PC. If you fail to import the certificate into the store, the AnyConnect Client will be unable to establish an SSL connection to the ASA.
Procedure
In order to import the authentication certificate into the Windows store, complete these steps:
-
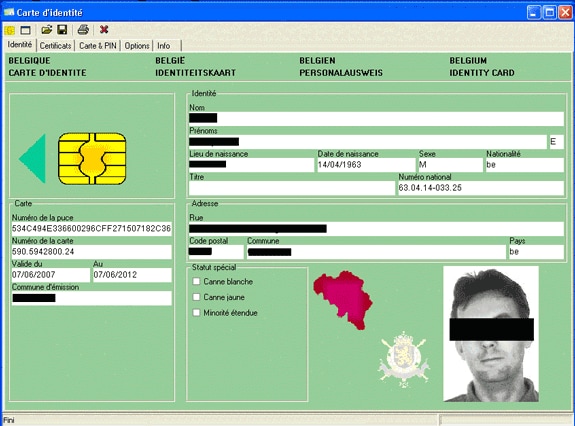
Insert your eID into the card reader, and launch the middleware in order to access the contents of the eID card.
The contents of the eID card appear.
-
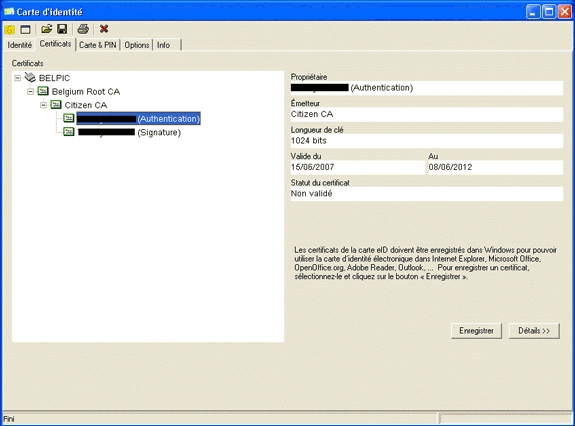
Click the Certificats (FR) tab.
The certificates hierarchy is displayed.
-
Expand Belgium Root CA, and then expand Citizen CA.
-
Choose the Authentication version of your named certificate.
-
Click the Enregistrer (FR) button.
The certificate is copied into the Windows store.
Note: When you click the Details button, a window appears that displays details about the certificate. In the Details tab, select the Subject field in order to view the Serial Number field. The Serial Number field contains a unique value that is used for user authorization. For example, the serial number “56100307215” represents a user whose date of birth is October 3rd, 1956 with a sequence number of 072 and a check digit of 15. You must submit a request for approval from federal authorities in order to store these numbers. It is your responsibility to make the appropriate official declarations related to the maintenance of a database of Belgian citizens in your country.
Verify
In order to verify that the certificate imported successfully, complete these steps:
-
On a Windows XP machine, open a DOS window, and type the mmc command.
The Console application appears.
-
Choose File > Add/Remove Snap-in (or press Ctrl+M).
The Add/Remove Snap-in dialog box appears.
-
Click the Add button.
The Add Standalone Snap-in dialog box appears.
-
In the Available Standalone Snap-ins list, choose Certificates, and click Add.
-
Click the My user account radio button, and click Finish.
The Certificate snap-in appears in the Add/Remove Snap-in dialog box.
-
Click Close in order to close the Add Standalone Snap-in dialog box, and then click OK in the Add/Remove Snap-in dialog box in order to save your changes and return to the Console application.
-
Under the Console Root folder, expand Certificates - Current User.
-
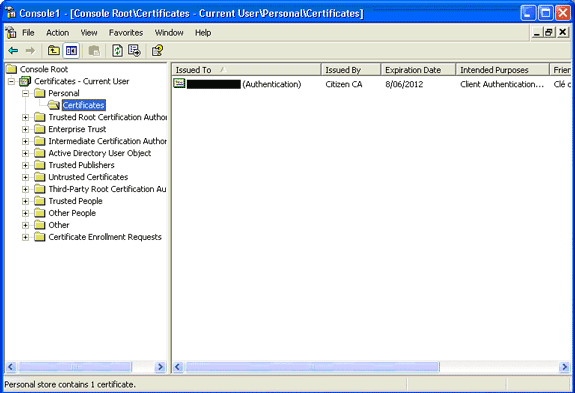
Expand Personal, and then expand Certificates.
The imported certificate must appear in the Windows store as shown in this image:
AnyConnect Installation
You must install the AnyConnect Client on the remote PC. The AnyConnect software uses an XML configuration file that can be edited in order to preset a list of available gateways. The XML file is stored in this path on the remote PC:
C:\Documents and Settings\%USERNAME%\Application Data\Cisco\Cisco AnyConnect VPN Client
where %USERNAME% is the name of the user on the remote PC.
The name of the XML file is preferences.xml. Here is an example of the contents of the file:
<?xml version="1.0" encoding="UTF-8"?>
<AnyConnectPreferences>
<DefaultHost>192.168.0.1</DefaultHost>
</AnyConnectPreferences>
where 192.168.0.1 is the IP address of the ASA gateway.
ASA Requirements
Ensure that the ASA meets these requirements:
-
AnyConnect and ASDM must run in flash.
In order to complete the procedures in this document, use an ASA 5505 with the appropriate ASA 8.0 software installed. The AnyConnect and ASDM applications must be preloaded in flash. Use the show flash command in order to view the contents of flash:
ciscoasa#show flash:
--#--  --length--  -----date/time------  path
   66  14524416    Jun 26 2007 10:24:02  asa802-k8.bin
   67  6889764     Jun 26 2007 10:25:28  asdm-602.bin
   68  2635734     Jul 09 2007 07:37:06  anyconnect-win-2.0.0343-k9.pkg
-
ASA must run with factory defaults.
You can skip this requirement if you use a new ASA chassis in order to complete the procedures in this document. Otherwise, complete these steps in order to reset the ASA to the factory defaults:
-
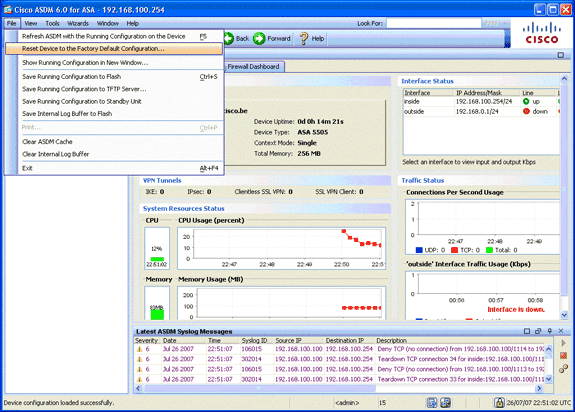
In the ASDM application, connect to the ASA chassis, and choose File > Reset Device to the Factory Default Configuration.
-
Leave the default values in the template.
-
Connect your PC on the Ethernet 0/1 inside interface, and renew your IP address that will be provisioned by the DHCP server of the ASA.
Note: In order to reset the ASA to the factory defaults from the command line, use these commands :
ciscoasa#conf t
ciscoasa#config factory-default 192.168.0.1 255.255.255.0
-
ASA Configuration
Once you reset the ASA factory defaults, you can start ASDM to 192.168.0.1 in order to connect to the ASA on the Ethernet 0/1 inside interface.
Note: Your previous password is preserved (or it can be blank by default).
By default, the ASA accepts an incoming management session with a source IP address in the subnet 192.168.0.0/24. The default DHCP server that is enabled on the inside interface of the ASA provides IP addresses in the range 192.168.0.2-129/24, valid to connect to the inside interface with ASDM.
Complete these steps in order to configure the ASA:
Step 1. Enable the Outside Interface
This step describes how to enable the outside interface.
-
In the ASDM application, click Configuration, and then click Device Setup.
-
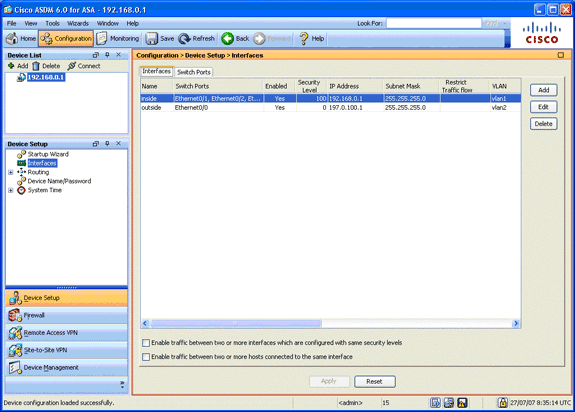
In the Device Setup area, choose Interfaces, and then click the Interfaces tab.
-
Select the outside interface, and click Edit.
-
In the IP address section of the General tab, choose the Use Static IP option.
-
Enter 197.0.100.1 for the IP address and 255.255.255.0 for the subnet mask.
-
Click Apply.
Step 2. Configure the Domain Name, Password, and System Time
This step describes how to configure the domain name, password, and system time.
-
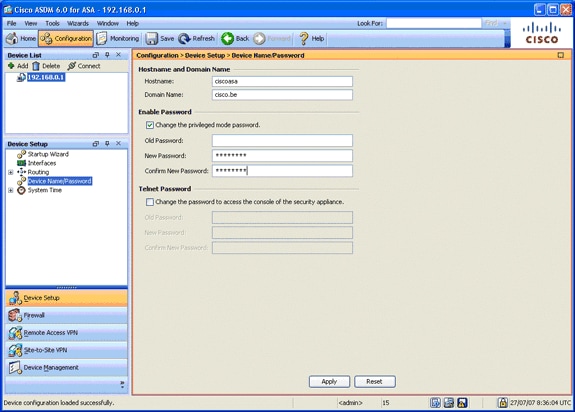
In the Device Setup area, choose Device Name/Password.
-
Enter cisco.be for the domain name, and enter cisco123 for the Enable Password value.
Note: By default, the password is blank.
-
Click Apply.
-
In the Device Setup area, choose System Time, and change the clock value (if necessary).
-
Click Apply.
Step 3. Enable a DHCP Server on the Outside Interface.
This step describes how to enable a DHCP server on the outside interface in order to facilitate testing.
-
Click Configuration, and then click Device Management.
-
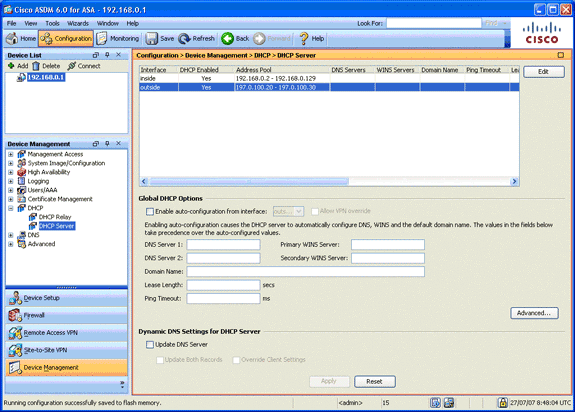
In the Device Management area, expand DHCP, and choose DHCP Server.
-
Select the outside interface from the Interface list, and click Edit.
The Edit DHCP Server dialog box appears.
-
Check the Enable DHCP Server check box.
-
In the DHCP Address Pool, enter an IP address from 197.0.100.20 to 197.0.100.30.
-
In the Global DHCP Options area, uncheck the Enable auto-configuration from interface check box.
-
Click Apply.
Step 4. Configure the eID VPN Address Pool
This step describes how to define a pool of IP addresses that are used to provision the remote AnyConnect Clients.
-
Click Configuration, and then click Remote Access VPN.
-
In the Remove Access VPN area, expand Network (Client) Access, and then expand Address Assignment.
-
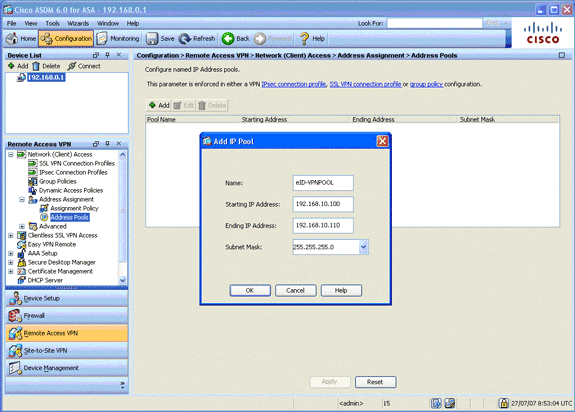
Choose Address Pools, and then click the Add button located in the Configure named IP Address pools area.
The Add IP Pool dialog box appears.
-
In the Name field, enter eID-VPNPOOL.
-
In the Starting IP Address and Ending IP Address fields, enter a range of IP address from 192.168.10.100 to 192.168.10.110.
-
Choose 255.255.255.0 from the Subnet Mask drop-down list, click OK, and then click Apply.
Step 5. Import the Belgium Root CA Certificate
This step describes how to import into the ASA the Belgium Root CA certificate.
-
Download and install the Belgium Root CA certificates (belgiumrca.crt and belgiumrca2.crt) from the government website and store it on your local PC.
The Belgium government website is located at this URL: http://certs.eid.belgium.be/

-
In the Remote Access VPN area, expand Certificate Management, and choose CA Certificates.
-
Click Add, and then click Install from file.
-
Browse to the location in which you saved the the Belgium Root CA certificate (belgiumrca.crt) file, and click Install Certificate.
-
Click Apply in order to save your changes.
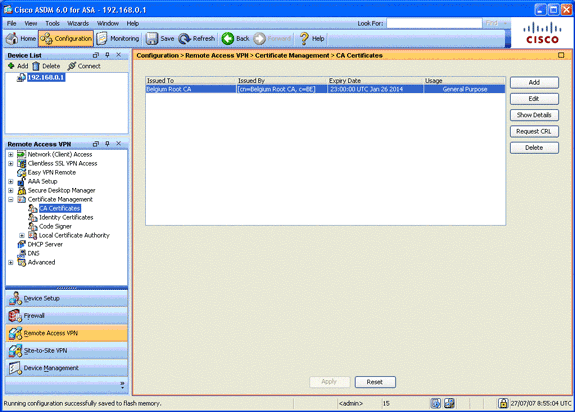
This image shows the certificate installed on the ASA:
Step 6. Configure Secure Sockets Layer
This step describes how to prioritize secure encryption options, define the SSL VPN client image, and define the connection profile.
-
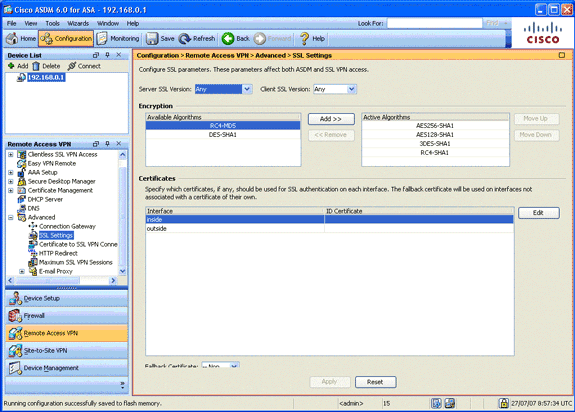
Prioritize the most secure encryption options.
In the Remote Access VPN area, expand Advanced, and choose SSL Settings. In the Encryption section, the Active Algorithms are stacked, top down, as follows:
-
AES256-SHA1
-
AES128-SHA1
-
3DES-SHA1
-
RC4-SHA1
-
-
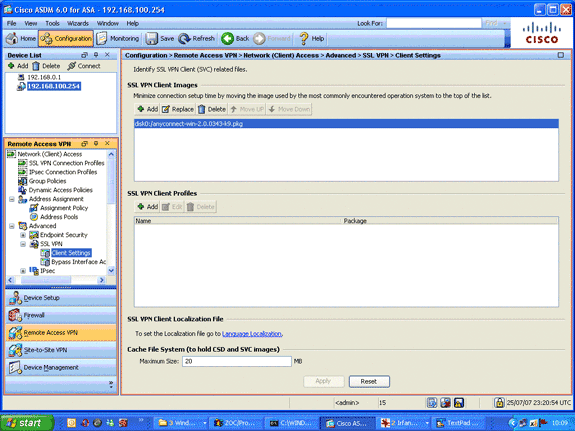
Define the SSL VPN client image for the AnyConnect Client.
-
In the Remote Access VPN area, expand Advanced, expand SSL VPN, and choose Client Settings.
-
In the SSL VPN Client Images area, click Add.
-
Choose the AnyConnect package that is stored in flash.
The AnyConnect package appears in the SSL VPN Client Images list as shown in this image:
-
-
Define the DefaultWEBVPNGroup connection profile.
-
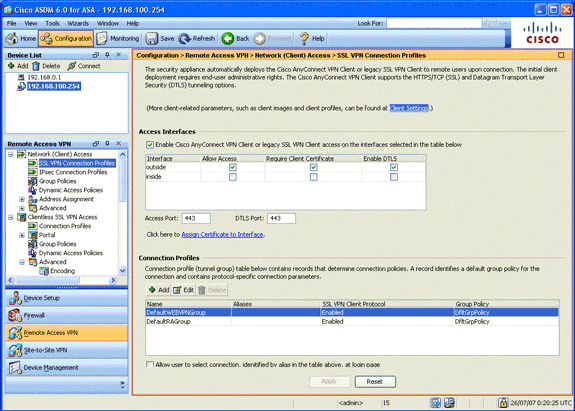
In the Remote Access VPN area, expand Network (Client) Access, and choose SSL VPN Connection Profiles.
-
In the Access Interfaces area, check the Enable Cisco AnyConnect VPN Client check box.
-
For the outside interface, check the Allow Access, Require Client Certificate, and Enable DTLS check boxes as shown in this image:
-
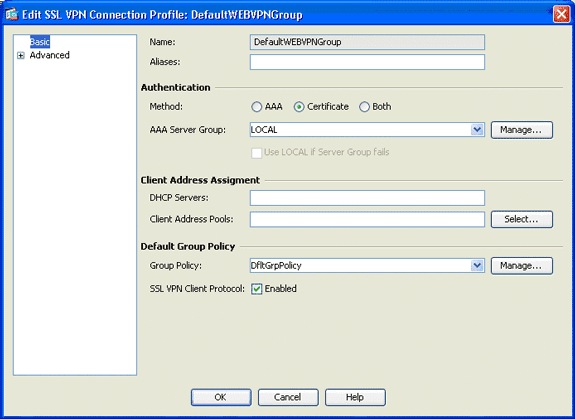
In the Connection Profiles area, choose DefaultWEBVPNGroup, and click Edit.
The Edit SSL VPN Connection Profile dialog box appears.
-
In the navigation area, choose Basic.
-
In the Authentication area, click the Certificate radio button.
-
In the Default Group Policy area, check the SSL VPN Client Protocol check box.
-
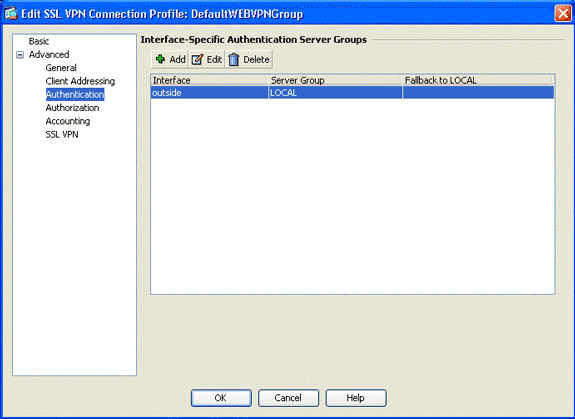
Expand Advanced, and choose Authentication.
-
Click Add, and add the outside interface with a local server group as shown in this image:
-
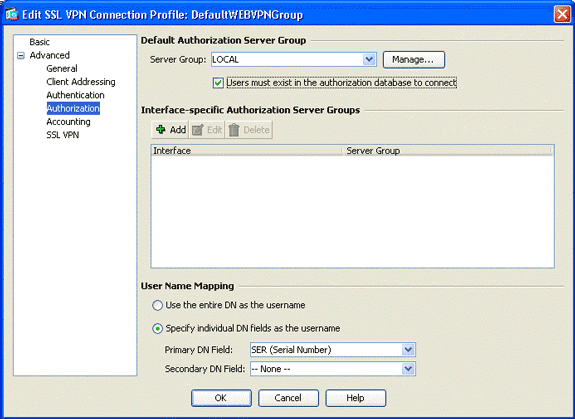
In the navigation area, choose Authorization.
-
In the Default Authorization Server Group area, choose LOCAL from the Server Group drop-down list, and check the Users must exist in the authorization database to connect check box.
-
In the User Name Mapping area, choose SER (Serial Number) from the Primary DN Field drop-down list, choose None from the Secondary DN Field, and click OK.
-
Step 7. Define the Default Group Policy
This step describes how to define the default group policy.
-
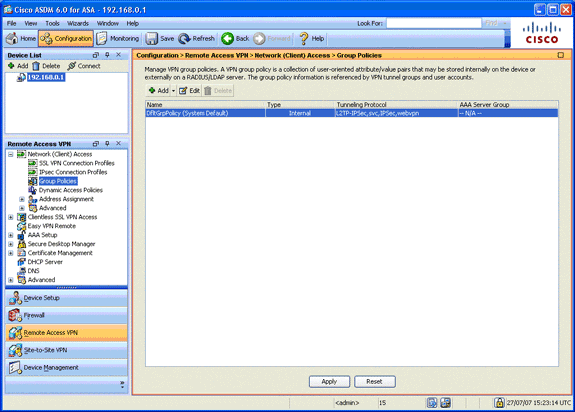
In the Remote Access VPN area, expand Network (Client) Access, and choose Group Policies.
-
Choose the DfltGrpPolicy from the list of group policies, and click Edit.
-
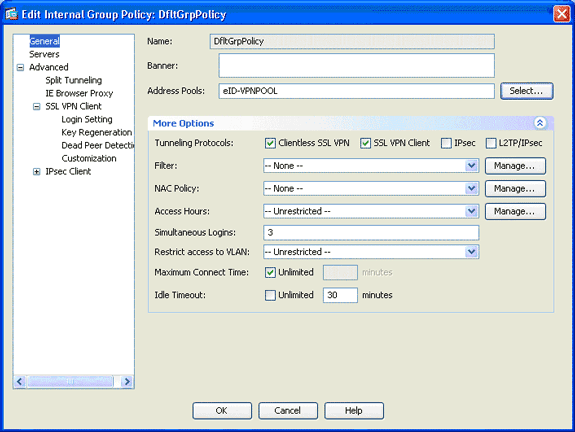
The Edit Internal Group Policy dialog box appears.
-
From the navigation area, choose General.
-
For Address Pools, click Select in order to choose a pool of addresses, and choose eID-VPNPOOL.
-
In the More Options area, uncheck the IPsec and L2TP/IPsec check boxes, and click OK.
Step 8. Define the Certificate Mapping
This step describes how to define the certificate mapping criteria.
-
In the Remote Access VPN area, click Advanced, and choose Certificate to SSL VPN Connection Profile Maps.
-
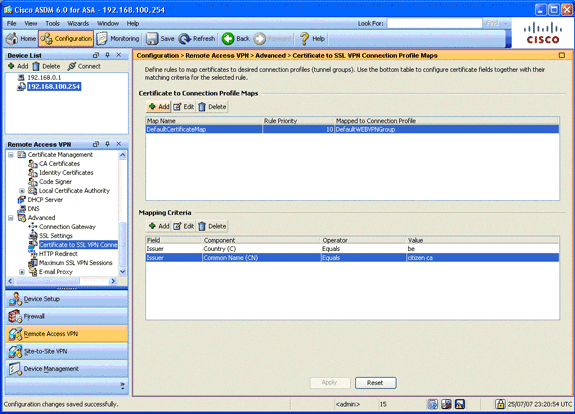
In the Certificate to Connection Profile Maps area, click Add, and choose DefaultCertificateMap from the map list.
This map must match DefaultWEBVPNProfile in the Mapped to Connection Profile field.
-
In the Mapping Criteria area, click Add, and add these values:
-
Field: Issuer, Country (C), Equals, “be”
-
Field: Issuer, Common Name (CN), Equals, “citizen ca”
The Mapping Criteria should appear as shown in this image:
-
-
Click Apply.
Step 9. Add a Local User
This step describes how to add a local user.
-
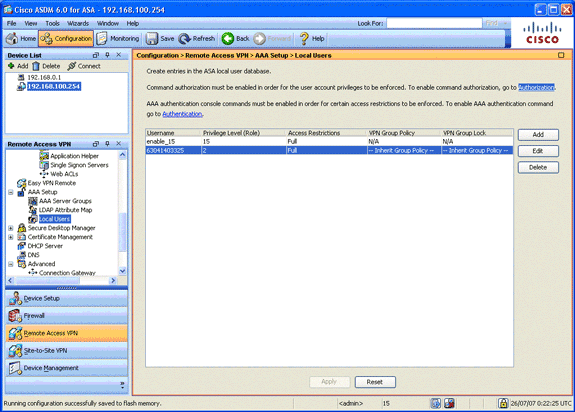
In the Remote Access VPN area, expand AAA Setup, and choose Local Users.
-
In the Local Users area, click Add.
-
In the Username field, enter the serial number of the user certificate. For example, 56100307215 (as described in the Authentication Certificate section of this document).
-
Click Apply.
Step 10. Reboot the ASA
Reboot the ASA in order to ensure that all changes are applied to the system services.
Fine Tune
While testing, some SSL tunnels might not close properly. Since the ASA assumes that the AnyConnect Client may disconnect and reconnect, the tunnel is not dropped, which gives it a chance to come back. However, during lab tests with a base license (2 SSL tunnels by default), you might exhaust your license when SSL tunnels are not closed properly. If this issue occurs, use the vpn-sessiondb logoff <option> command in order to logoff all active SSL sessions.
One-Minute Configuration
In order to quickly create a working configuration, reset your ASA to the factory default, and paste this configuration in configuration mode:
| ciscoasa |
|---|
ciscoasa#conf t
ciscoasa#clear configure all
ciscoasa#domain-name cisco.be
ciscoasa#enable password 9jNfZuG3TC5tCVH0 encrypted
!
interface Vlan1
 nameif inside
 security-level 100
 ip address 192.168.0.1 255.255.255.0
interface Vlan2
 nameif outside
 security-level 0
 ip address 197.0.100.1 255.255.255.0
interface Ethernet0/0
 switchport access vlan 2
 no shutdown
interface Ethernet0/1
 no shutdown
!
passwd 2KFQnbNIdI.2KYOU encrypted
dns server-group DefaultDNS
 domain-name cisco.be
ip local pool eID-VPNPOOL 192.168.10.100-192.168.10.110 mask 255.255.255.0
asdm image disk0:/asdm-602.bin
no asdm history enable
global (outside) 1 interface
nat (inside) 1 0.0.0.0 0.0.0.0
dynamic-access-policy-record DfltAccessPolicy
http server enable
http 192.168.0.0 255.255.255.0 inside
crypto ca trustpoint ASDM_TrustPoint0
 enrollment terminal
 crl configure
crypto ca certificate map DefaultCertificateMap 10
 issuer-name attr c eq be
 issuer-name attr cn eq citizen ca
crypto ca certificate chain ASDM_TrustPoint0
 certificate ca 580b056c5324dbb25057185ff9e5a650
    30820394 3082027c a0030201 02021058 0b056c53 24dbb250 57185ff9 e5a65030
    0d06092a 864886f7 0d010105 05003027 310b3009 06035504 06130242 45311830
    16060355 0403130f 42656c67 69756d20 526f6f74 20434130 1e170d30 33303132
    36323330 3030305a 170d3134 30313236 32333030 30305a30 27310b30 09060355
    04061302 42453118 30160603 55040313 0f42656c 6769756d 20526f6f 74204341
    30820122 300d0609 2a864886 f70d0101 01050003 82010f00 3082010a 02820101
    00c8a171 e91c4642 7978716f 9daea9a8 ab28b74d c720eb30 915a75f5 e2d2cfc8
    4c149842 58adc711 c540406a 5af97412 2787e99c e5714e22 2cd11218 aa305ea2
    21b9d9bb fff674eb 3101e73b 7e580f91 164d7689 a8014fad 226670fa 4b1d95c1
    3058eabc d965d89a b488eb49 4652dfd2 531576cb 145d1949 b16f6ad3 d3fdbcc2
    2dec453f 093f58be fcd4ef00 8c813572 bff718ea 96627d2b 287f156c 63d2caca
    7d05acc8 6d076d32 be68b805 40ae5498 563e66f1 30e8efc4 ab935e07 de328f12
    74aa5b34 2354c0ea 6ccefe36 92a80917 eaa12dcf 6ce3841d de872e33 0b3c74e2
    21503895 2e5ce0e5 c631f9db 40fa6aa1 a48a939b a7210687 1d27d3c4 a1c94cb0
    6f020301 0001a381 bb3081b8 300e0603 551d0f01 01ff0404 03020106 300f0603
    551d1301 01ff0405 30030101 ff304206 03551d20 043b3039 30370605 60380101
    01302e30 2c06082b 06010505 07020116 20687474 703a2f2f 7265706f 7369746f
    72792e65 69642e62 656c6769 756d2e62 65301d06 03551d0e 04160414 10f00c56
    9b61ea57 3ab63597 6d9fddb9 148edbe6 30110609 60864801 86f84201 01040403
    02000730 1f060355 1d230418 30168014 10f00c56 9b61ea57 3ab63597 6d9fddb9
    148edbe6 300d0609 2a864886 f70d0101 05050003 82010100 c86d2251 8a61f80f
    966ed520 b281f8c6 dca31600 dacd6ae7 6b2afa59 48a74c49 37d773a1 6a01655e
    32bde797 d3d02e3c 73d38c7b 83efd642 c13fa8a9 5d0f37ba 76d240bd cc2d3fd3
    4441499c fd5b29f4 0223225b 711bbf58 d9284e2d 45f4dae7 b5634544 110d2a7f
    337f3649 b4ce6ea9 0231ae5c fdc889bf 427bd7f1 60f2d787 f6572e7a 7e6a1380
    1ddce3d0 631e3d71 31b160d4 9e08caab f094c748 755481f3 1bad779c e8b28fdb
    83ac8f34 6be8bfc3 d9f543c3 6455eb1a bd368636 ba218c97 1a21d4ea 2d3bacba
    eca71dab beb94a9b 352f1c5c 1d51a71f 54ed1297 fff26e87 7d46c974 d6efeb3d
    7de6596e 069404e4 a2558738 286a225e e2be7412 b004432a
  quit
no crypto isakmp nat-traversal
!
dhcpd address 192.168.0.2-192.168.0.129 inside
dhcpd enable inside
dhcpd address 197.0.100.20-197.0.100.30 outside
dhcpd enable outside
!
service-policy global_policy global
ssl encryption aes256-sha1 aes128-sha1 3des-sha1 rc4-sha1
ssl certificate-authentication interface outside port 443
webvpn
 enable outside
 svc image disk0:/anyconnect-win-2.0.0343-k9.pkg 1
 svc enable
certificate-group-map DefaultCertificateMap 10 DefaultWEBVPNGroup
group-policy DfltGrpPolicy attributes
 vpn-tunnel-protocol svc webvpn
 address-pools value eID-VPNPOOL
username 63041403325 nopassword
tunnel-group DefaultWEBVPNGroup general-attributes
 authentication-server-group (outside) LOCAL
 authorization-server-group LOCAL
 authorization-required
 authorization-dn-attributes SER
tunnel-group DefaultWEBVPNGroup webvpn-attributes
 authentication certificate
exit
copy run start |
Related Information
Revision History
| Revision | Publish Date | Comments |
|---|---|---|
1.0 |
19-Oct-2007 |
Initial Release |
Contact Cisco
- Open a Support Case

- (Requires a Cisco Service Contract)


 Feedback