Introduction
This document describes how to configure Flexible Mail Policy Match on Cisco Email Security Appliance (ESA) and Cloud Email Security (CES).
Prerequisites
Requirements
Cisco recommends that you have knowledge of these topics:
- Understanding of mail policies and it's behaviour on the ESA/CES.
- Usage of the CLI.
- The differences between an Envelope Sender and the Headers: From, Reply-To and Sender.
Components Used
The information in this document is based on Cisco ESA/CES on AsyncOS.
The information in this document was created from the devices in a specific lab environment. All of the devices used in this document started with a cleared (default) configuration. If your network is live, make sure that you understand the potential impact of any command.
Background Information
Flexible Mail Policy Match was introduced into the Cisco ESA/CES devices on versions prior to 11.1.x releases. This allows administrators the ability to match emails to a policy based on either:
- Sender and any recipients.
- Any sender to specific recipient(s).
- Sender and specific recipient(s).
Recipient address matches the Envelope Recipient address.
Sender address matches in this order:
Note: The matching order is configurable in AsyncOS 11.1.x releases.
- Envelope Sender (RFC821 MAIL FROM address).
- Address found in the RFC822 From: header.
- Address found in the RFC822 Reply-To header.
User matches are evaluated as a top-down fashion, first match wins.
The ordering of your policies are critical to ensuring the messages are matched against a policy to your requirements.
If the email contains a sender and multiple recipients that would match more than one policy, the message is splintered from one Message ID(MID) to an additional MID of the policy matched.
Configure
Configurations
To configure flexible policy match on your ESA/CES:
From the GUI:
- Navigate to Mail Policies.
- Click on Incoming Mail Policies or Outgoing Mail Policies to create the policy.
- Click on Add Policy...
- Enter a meaningful Policy name, order it to your requirements (keeping in mind the top-down first match wins behaviour).
- Click on Add User...
- Configure the sender, recipient to match this policy.
- On the recipient side of the pane, verify if you require AND or OR behaviour for this policy.
- Click OK to proceed, submit and commit your changes.
Note: Following Recipients are Not is used to exclude specific recipients from the domain defined in the Following Recipients field.

From the CLI: (version 9.7.x - 11.0.x)
- Issue the command policyconfig.
- Enter 1 or 2 to configure your Incoming Mail Policies or Outgoing Mail Policies.
- Issue the command "new" to create a new mail policy.
- Follow the prompts to add users to match this policy.
- Follow the prompts to complete the policy security scanners configuration.
- Once completed, submit and commit your changes.
C680.esa.lab> policyconfig

Would you like to configure Incoming or Outgoing Mail Policies?
1. Incoming
2. Outgoing
[1]> 1
Note: Sender matching order can be modified in version AsyncOS 11.1.x GUI in the Mail Policies tab or CLI.
From CLI command policyconfig introduces an additional option for administrators to begin the change.
By default the priority is as provided above under Background Information. The editable values in version 11.1.x are Envelope sender, Headers: From, Reply-To and Sender.
This is the example of Default priority:
vesa2.lab> policyconfig

Would you like to configure Incoming Mail Policy or Outgoing Mail Policies or Match Headers Priority?
1. Incoming Mail Policies
2. Outgoing Mail Policies
3. Match Headers Priority
[1]> 3

Match Headers Priority Configuration
Priority: Headers:
--------- ---------
P1 Envelope Sender


Choose the operation you want to perform:
- ADD - Add match priority for headers
- EDIT - Edit an existing match priority for headers
- REMOVE - Remove an existing match priority for headers
Verify
Two available options are available to verify the policy match behaviour on the ESA/CES.
Option 1
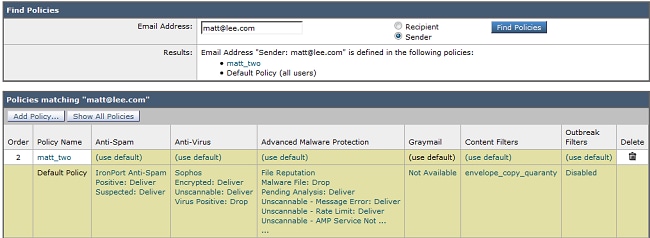
- Navigate to the GUI > Incoming/Outgoing Mail Policies.
- In the Find Policies box, enter the user address and click the radio button for the respective Sender or Recipient match.
- Click Find Policies.
Sample output is shown in th image:

Option 2
- Navigate to the GUI > System Administration > Trace.
- Enter in the details on the Trace tool, under the Envelope Information, enter the Sender/Recipient details to verify the match.
- Click Start Trace.
- Scroll down to Mail Policy Processing to verify the policy matched.
Sample output is shown in the image:


Troubleshoot
There is currently no specific troubleshooting information available for this configuration.
Related Information
