Introduction
This document describes the steps for Google Workspace (previously known as G Suite) and Gmail integration with Cisco Secure Email for inbound and outbound email delivery. This document applies to on-premises hardware, virtual Cisco Secure Email Gateway, and Cisco Secure Email Cloud Gateway.
Prerequisites
Requirements
Cisco recommends that you have the knowledge and administrative access to your environment:
- Cisco Secure Email
- CLI access to your Cisco Secure Email Gateway or Cisco Secure Email Cloud Gateway environment
- Google Workspace and Gmail
- SMTP
- DNS
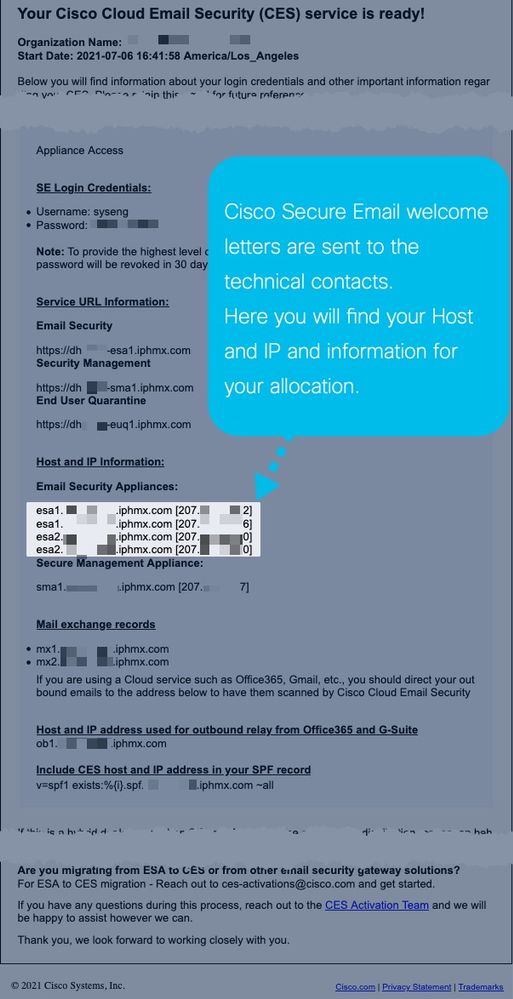
For Cisco Secure Email Cloud Gateway, your welcome letter includes your host and IP information needed throughout this document. If you have not received or do not have a copy of the welcome letter, please contact ces-activations@cisco.com with your name, contact information, company name, and domain name.

The Cisco Secure Email Cloud Gateway host and IP addresses are dedicated to each allocation and are not changed without notification. Therefore, you can use the assigned host and IP information in your Google Workspace (Gmail) configuration.
Note: Please validate configuration changes before any planned production mail cut-over because configuration changes take time to replicate in the Google Workspace console. At a minimum, allow 1 hour for all changes to take effect.
Configure Google Workspace (Gmail)
Configure Inbound Mail (Inbound Gateway) in Google Workspace (Gmail)
- Log in to your Google Admin console (https://admin.google.com)
- Navigate to Apps > Google Workspace
- Click on Gmail
- Scroll down and click on Spam, Phishing, and Malware
- Look for Inbound Gateway, hover over it, and click to edit
- Enter the information as required provided from the information in your welcome letter:
- Select Enable
- For Gateway IPs, click Add, enter all of the IP addresses in your welcome letter, and click Save.
- Select Automatically detect external IP (recommended)
- Select Message is considered spam if the following header regexp matches and enter x-ipas-suspect for the Regexp
-
Configuration for Message Tagging is optional but recommended, as we can make use of the Spam folder in Gmail with an x-header
-
See "Send Suspect Spam to Gmail Spam Folder [Optional]" later in this document
- Click Save in the lower right-hand corner of your browser
Compare your final Inbound Gateway configuration in Google Workspace to:

Note: For additional setup and questions, Google provides Google Workspace Admin Help: https://support.google.com/a/answer/60730?hl=en
Configure Inbound Mail for your Google Workspace (Gmail) in Cisco Secure Email
Destination Controls
Configuration of a delivery domain in Destination Controls imposes a self-throttle. Of course, you can remove this Destination Control later, but since your Cisco Secure Email gateways are "new" IPs to Google, you do not want any throttling by Google due to their unknown reputation.
- Log in to your Cisco Secure Email Gateway
- Navigate to Mail Policies > Destination Controls
- Click Add Destination
- Use these values:
- Destination: Your Domain Name
- Concurrent Connections: Use Default (500)
- Maximum Messages Per Connection: Use Default (50)
- Recipients: Maximum of 20 per 1 minute
- TLS Support: Preferred
- Click Submit
- Click Commit Changes in the upper right-hand of the UI to save your configuration changes.
Recipient Access Table
Next, set the Recipient Access Table (RAT) to accept mail for your domains:
- Navigate to Mail Policies > Recipient Access Table (RAT)
- Note: Make sure the "Overview for Listener" is set to IncomingMail if you have multiple Listeners configured
- Click Add Recipient
- Recipient Address: Your Domain Name
- Hostnames such as "example.com," IPv4, IPv6
- Partial hostnames such as ".example.com."
- Usernames such as "admin@."
- Complete email addresses such as "joe@example.com," "joe@[IPv4]," or "joe@[IPv6]"
- Separate multiple addresses with commas
- Action: Select the default action of Accept
- Click Submit
- Click Commit Changes in the upper right-hand of the UI to save your configuration changes.
SMTP Routes
Configure the SMTP route to deliver mail from your Cisco Secure Email gateway(s) to your Google Workspace (Gmail) domain:
- Navigate to Network > SMTP Routes
- Click Add Route...
- Receiving Domain: Your Domain Name
- Hostname: exchange.example.com
- Full domain: example.com
- Partial domain: .example.com
- IPv4 address
- IPv6 address
- Destination Hosts: add the Google Workspace (Gmail) records provided below, and add additional rows as needed
- Click Submit
- Click Commit Changes in the upper right-hand of the UI to save your configuration changes.
Google Workspace (Gmail) destination SMTP hosts:
|
Priority
|
Destination
|
Port
|
|
1
|
aspmx.l.google.com
|
25
|
|
5
|
alt1.aspmx.l.google.com
|
25
|
|
5
|
alt2.aspmx.l.google.com
|
25
|
|
10
|
alt3.aspmx.l.google.com
|
25
|
|
10
|
alt2.aspmx.l.google.com
|
25
|
Inbound mail configuration is complete!
DNS (MX record) Configuration
You are ready to cut over your domain through a Mail Exchange (MX) record change. First, work with your DNS administrator to resolve your MX records to the IP addresses for your Cisco Secure Email Gateway(s) as provided in your Cisco Secure Email welcome letter.
Once that is completed, you can verify the DNS changes in the Google Workspace console as to what Google sees your domain MX:
- Log in to your Google Admin console (https://admin.google.com)
- Navigate to Apps > Google Workspace
- Click on Gmail
- Scroll to Setup and click to view
- The current MX records, how Google provides your DNS and MX records associated with your domain, are displayed.
Note: Allow time for propagation if you update or change your domain DNS TTL.
Configure Outbound Mail for your Google Workspace (Gmail) in Cisco Secure Email
Please refer to your Cisco Secure Email welcome letter. In addition, a secondary interface is needed for outbound messages via your Cisco Secure Email Gateway.
- Log in to your Cisco Secure Email Gateway
- Navigate to Mail Policies > HAT Overview
- Note: Make sure the "Sender Groups (Listener)" is set to Outgoing if you have multiple Listeners configured
- Click Add Sender Group...
- Configure the Sender Group as:
- Name: RELAY_GMAIL
- Comment: Sender Group & Relay for Gmail
- Policy: RELAYED
- Click Submit and Add Senders
- Sender: .google.com
- Note: The "." (dot) at the start of the sender domain name is required
- Examples for your configuration:
- IPv4 addresses, subnets, ranges
- IPv6 addresses, subnets, ranges
- Hostnames such as example.com
- Partial hostnames such as .example.com
- Click Submit
- Click Commit Changes in the upper right-hand of the UI to save your configuration changes.
Compare your final Sender Group configuration to:

Configure Outbound Mail (Inbound Gateway) in Google Workspace (Gmail)
- Log in to your Google Admin console (https://admin.google.com)
- Navigate to Apps > Google Workspace
- Click on Gmail
- Scroll down and click on Routing
- For the Outbound gateway, enter the IP address or hostname of your "Outgoing Listener" or "OutgoingMail" and click Save
- Click Configure for Routing
- Configure routing as follows:
- Description: "CES-GMAIL_AUTH," or enter a name that is easily identified later
- Email messages to affect:
- Outbound
- Internal - Sending
- For these types of messages:
- Select, Add custom headers
- Note: To prevent unauthorized messages via your Gmail, a secret x-header is used when messages leave your Gmail domain; this header is then evaluated by Cisco Secure Email and removed before delivery to the Internet
- Click Add and enter: X-OUTBOUND-AUTH, mysecretkey
- Replace "mysecretkey" with a key of your choice; this is used in the next section.
- Click Save
Compare your Routing and Outbound Gateway configuration to:

Continue with the configuration of your Outbound Mail setup, and access the CLI for your Cisco Secure Email gateway.
Note: Cisco Secure Email Cloud Gateway? Click here for more information on CLI access.
Create a message filter to inspect outbound messages for the header and value of the x-header we just created from the Google Workspace (Gmail) configuration. This message filter also removes the header when it exists. The message filter drops the outbound message processed through your Gateway if the header is not present.
- Log in to your Cisco Secure Email Gateway
- Run the Filters command
- As all Cisco Secure Email Cloud Gateways are clustered, hit return to edit the Filters in "Cluster" mode
- Use the New operation to create a message filter, then copy and paste the provided code:
gmail_outbound: if sendergroup == "RELAY_GMAIL" {
if header("X-OUTBOUND-AUTH") == "^mysecretkey$" {
strip-header("X-OUTBOUND-AUTH");
} else {
drop();
}
}
- Be sure to edit the "mysecretkey" with the key of your choice per the previous section, with "^" (start of string) and "$" (end of the string) for your regex string
- Hit return one time to create a new, blank line
- Enter "." (period) on the new line to end to make your new message filter
- Hit return one time to exit the Filters menu
- Run the Commit command to save the changes to your configuration
Outbound mail configuration is complete!
Test Outbound Email
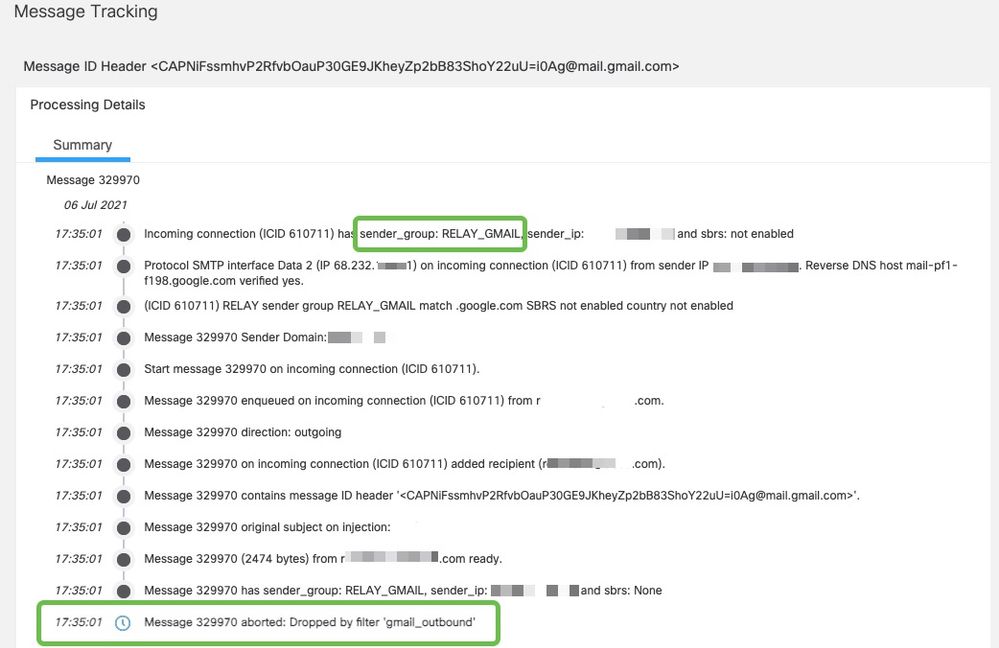
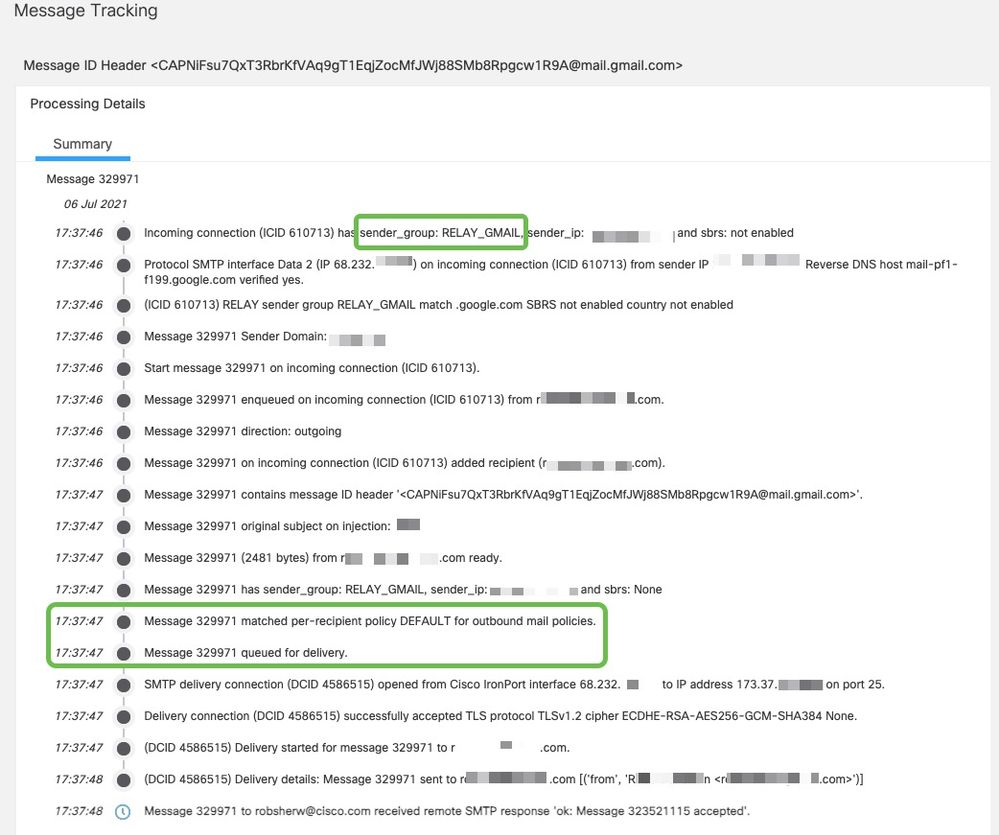
Compose and send an outbound message from your Gmail-managed email address to an external domain recipient. Then, you can review Message Tracking to assure it was routed outbound properly.
Example of a message where the x-header does not match:

Example of a message with successful delivery:

Internal Email Routing without Cisco Secure Email Scanning [Optional]
If you wish to keep user-to-user routing internal to Google Workspace (Gmail) [Optional, but Cisco recommended], follow the instructions below:
- Log in to your Google Admin console (https://admin.google.com)
- Navigate to Apps > Google Workspace
- Click on Gmail
- Click on Hosts
- Click Add route
- For the "Add mail route" pop-up:
- Top line: "Internal routing without CES scanning," or enter a name that is easily identified later
- Specify email server: Multiple hosts
- Primary: aspmx.l.google.com, (port) 25, (Load %) 100
- Secondary: alt1.aspmx.l.google.com, alt2.aspmx.l.google.com, (port) 25, (Load%) 50
- Options:
- Un-check Require CA signed certificate (Recommended)
- Click Save
- Click Save on the main Hosts section
Next:
- Click on Settings for Gmail
- Scroll down and click on Routing
- In the Routing section, click Add Another Rule
- For the "Add mail route" pop-up:
- Top line: "Internal routing without CES scanning," or enter a name that is easily identified later
- Email messages to affect: Internal - Sending
- For these types of messages:
- Leave as Modify message
- For Route, select: Change route and Also reroute spam
- Click Show options and scroll down
- For "B. Account type to affect": Users and Groups
- For "C. Envelope filter": Select Only affect specific envelope senders
- Select Pattern match
- For Regexp: .*your_domain
- Note: The "." (dot) and "*" (asterisk) at the start of the domain name is required
- Click Save
Test internal routing mail. Send an email to another recipient with the identical internal email domain name.
Test and Validate Email Delivery
Compose and send a message to your Gmail-managed email address. Then, check to see that it arrives in your Gmail-managed email inbox.
Then, validate message delivery in Message Tracking within Cisco Secure Email.
- Log in to your Gateway (ex. https://dhXXYY-esa1.iphmx.com/ng-login), or if you have a Cisco Secure Manager (ex. https://dhXXYY-sma1.iphmx.com/ng-login)
- Click Tracking
- Enter your message information search criteria (Subject, Envelope Recipient) and click Search; search results returned are similar to:

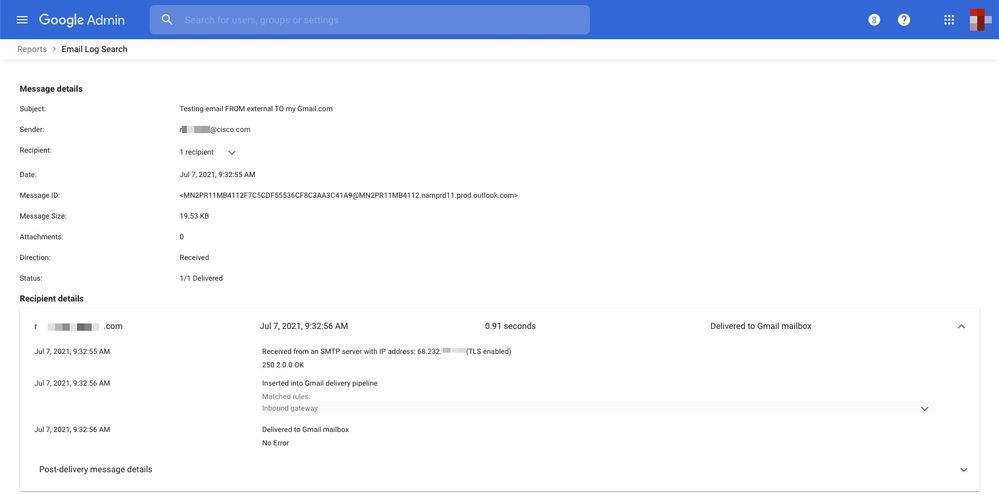
To see mail logs in Google Workspace (Gmail):
- Log in to the G Suite Admin console (https://admin.google.com)
- Navigate to Reports
- Scroll down, and in the right-hand menu, select Email Log Search
- Enter the needed search criteria and click Search; results are similar to:

Send Suspect Spam to Gmail Spam Folder [Optional]
If you wish to use Cisco Secure Email to send suspected spam to the Spam folder in Gmail:
- Log in to your Cisco Secure Email Gateway
- Navigate to Mail Policies > Incoming Mail Policies
- Select Anti-Spam for your policy name or use the "Default Policy."
- Click Advanced for Suspected Spam Settings
- For Add Custom Header (optional), insert x-ipas-suspect
- Note: This can also be configured for Positively-Identified Spam Settings if you do not wish to drop/quarantine spam via the Cisco Secure Email Gateway
Compare your final Anti-Spam Settings for Suspect Spam Setting to:

In your Gmail-managed email, search for "in:spam" or look in the Spam folder from your email application.
Related Information
Technical Support & Documentation - Cisco Systems


 Feedback