Introduction
This document describes the configuration to create a content filter that detects keyword in email subject and sends it securely through CRES service.
Prerequisites
Requirements
Cisco recommends knowledge of these topics:
- Cisco Secure Email Gateway (SEG / ESA)
- Cisco IronPort Email Encryptio feature enabled
- Content Filters Knowledge
- Encryption Knowledge
- Cisco Secure Email Encryption Service (CRES) knowledge
Components Used
The information in this document is based on these software and hardware versions:
The information in this document was created from the devices in a specific lab environment. All of the devices used in this document started with a cleared (default) configuration. If your network is live, ensure that you understand the potential impact of any command.
Background Information
In relation with your organization needs you can encrypt emails with the usage of CRES service.
This can be done by the creation of a content filter to trigger a Phrase or Expression in the subject header, this way every time end user wants to encrypt an email they can do it by simply add the expression in the mail subject.
Configuration
Create the Outgoing Content Filter
Create the content filter in the ESA:
- Navigate to Mail Policies > Outgoing Content Filters.
- Click Add Filter.
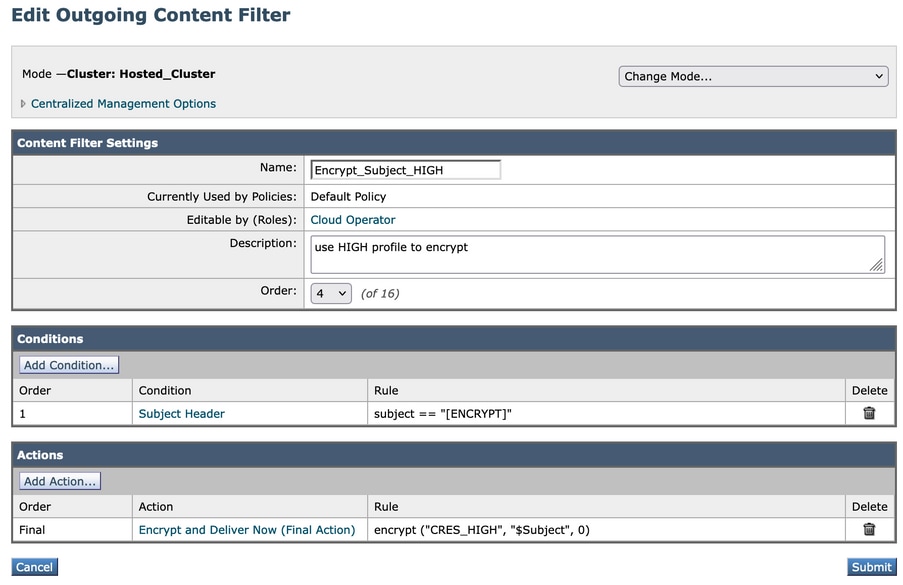
- Name the filter.
- Click Add Condition.
- Choose Subject Header.
- Choose the condition for the subject header as required and add the word or phrase in the box.

- Click Ok.
- Click Add Action.
- Choose Encrypt and Deliver Now (Final Action).
- Choose the encryption profile desired.
- Submit and Commit changes.

Warning: In case you want to add the subject header along with regular expressions, this is up to you since the combinations of regular expressions that can be used for this filter can be many and can cause an incorrect use in the configuration.
Example:
Add Content Filter to Outgoing Mail Policy
Once you create the content filter in the ESA, you need to make sure to enable it in your Outgoing Mail Policy.
- From the ESA GUI, navigate to Mail Policies > Outgoing Mail Policies.
- Choose which is the policy in where your content filter can work. In this case use the Default Policy.
- Go to the 7th column, the one that is related to Content Filters and click the fields that appear in that column.
- Choose the Enable Content Filters (Customize Settings) option and choose the Encrypt_Subject_HIGH content filter you want to enable in that policy.
- Click Submit and then Commit Changes.
Test the Filter After Configuration
The message has the word [ENCRYPT] in the subject.

The recipient receives the message, and once the recipient registers on CRES, are able to open it and see the content.


Check that a Message was Encrypted Correctly
Via Message Tracking
When you search for a Sender/Recipient coincidence in the Message Tracking, the line that describe that the encryption has been success, it is displayed like this.

Via CLI
You can use grep to find matches with the PXE encryption statement as follows:
(Machine esa1.cisco.com)> grep "PXE encryption" mail_logs

Tue Mar 28 16:06:41 2023 Info: MID 4794644 enqueued for PXE encryption
Tue Mar 28 16:06:49 2023 Info: MID 4794645 was generated based on MID 4794644 by PXE encryption filter 'Encrypt_Subject_HIGH'

Note: You can see a message that says MID XXXX was generated based on MID YYYY in the message tracking. This is normal, because the ESA, first take the unencrypted message and then enqueue that same message to send it to the PXE encryption engine.
Related Information
 Feedback