Introduction
This document describes how to create a Whitelist policy on the Cisco Email Security Appliance (ESA) or Cloud Email Security (CES) instance to allow phishing education tests/campaigns.
Prerequisites
Requirements
Cisco recommends that you have knowledge of these topics:
- Navigating and configuring rules on the Cisco ESA/CES on the WebUI.
- Creating message filters on the Cisco ESA/CES on the Command line interface (CLI).
- Knowledge of the resource used for the phishing campaign/test.
The information in this document was created from the devices in a specific lab environment. All of the devices used in this document started with a cleared (default) configuration. If your network is live, ensure that you understand the potential impact of any command.
Background Information
Administrators executing phishing education tests or campaigns will have emails generated with information that will be matched against the current Talos rules on the Anti-Spam and/or Outbreak Filter rule sets. In such an event, the phishing campaign emails will not reach end users and be actioned by the Cisco ESA/CES itself thus causing the test to a halt. Administrators would need to ensure the ESA/CES allows through these emails to carry out their campaign/test.
Configure
Warning: Cisco’s stance on whitelisting phishing simulation & education vendors globally Is not allowed. We advise administrators to work with the phishing simulator service (for example: PhishMe) to obtain their IPs then add them locally to the Whitelist. Cisco must protect our ESA/CES customers from those IPs if they ever change hands or actually become a threat.
Caution: Administrators should only keep these IPs in a Whitelist while testing, leaving external IPs on a Whitelist for an extended period of time post testing may bring unsolicited or malicious emails to end users should these IPs become compromised.
On the Cisco Email Security Appliance (ESA), create a new Sender Group for your phishing simulation and assign it to the $TRUSTED mail flow policy. This will allow all phishing simulation emails to be delivered to end-users. Members of this new sender group are not subject to rate limiting, and the content from those senders is not scanned by Cisco IronPort Anti-Spam engine, but is still scanned by Anti-Virus software.
Note: By default, the $TRUSTED mail flow policy has Anti-Virus enabled but Anti-Spam turned off.
Creating the Sender Group
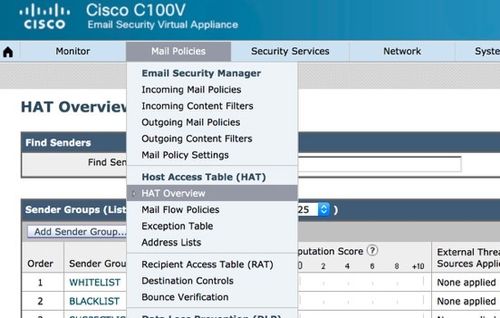
- Click the Mail Policies Tab.
- Under the Host Access Table section, select HAT Overview

- On the right, make sure your InboundMail listener is currently selected,
- From the Sender Group column below, click Add Sender Group…,

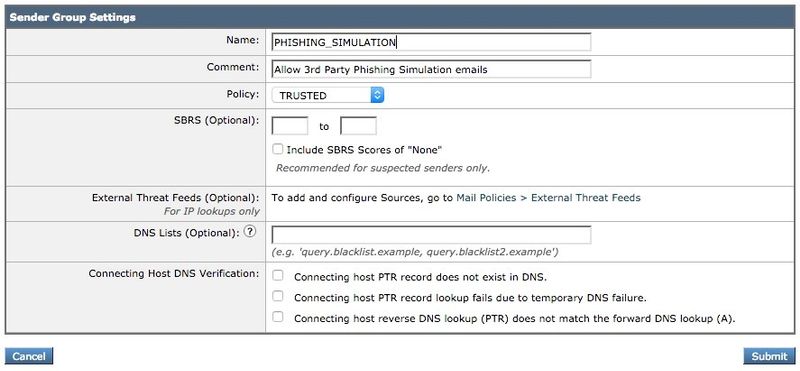
- Fill in the Name and Comment fields. Under the Policy dropdown, select ‘$TRUSTED’ and then click Submit and Add Senders >>.

- Enter the IP or Hostname you want to Whitelist in the first field. Your Phishing Simulation partner will provide you with Sender IP information.

When you finish adding entries, click the Submit button. Remember to click the Commit Changes button to save your changes.
Creating the Message Filter
After creating the Sender Group to allow the bypass of Anti-Spam and Anti-Virus, a Message Filter is required to skip the other security engines that may match the Phishing campaign/test.
- Connect to the CLI of the ESA.
- Run the command filters.
- Run the command new to create a new message filter.
- Copy and paste the following filter example, making edits for your actual sender group names if needed:
skip_amp_graymail_vof_for_phishing_campaigns:
if(sendergroup == "PHISHING_SIMULATION")
{
skip-ampcheck();
skip-marketingcheck();
skip-socialcheck();
skip-bulkcheck();
skip-vofcheck();
}
- Return to the main CLI prompt and press enter.
- Run commit to save the configuration.
Verify
Use the third-party resource to send a Phishing campaign/test and verify the results on the message tracking logs to ensure all engines were skipped and the email was delivered.


 Feedback