Introduction
Uncontrolled high-volume email delivery can overwhelm recipient domains. AsyncOS gives you full control of message delivery by defining the number of connections your Email Security service will open or the number of messages that will send to each destination domain.
In this document, we will cover:
- Setting up Bounce Verification to protect your organization from Bounce Attacks
- Using Destination Control Table to practice good neighbor policies
- Deploying SMTP DNS-based Authentication of Named Entities (DANE) to provide secure delivery of messages
Bounce Verification
Enabling Bounce Verification is a very good way to combat backscatter/bounce attacks. The concept behind bounce verification is simple. First, mark up messages leaving your ESA. Look for that markup on any bounce messages, if the markup is present, it means that this is a bounce of a message that originated in your environment. If the markup is missing, the bounce is fraudulent and can be rejected or dropped.
For example, MAIL FROM: joe@example.com becomes MAIL FROM: prvs=joe=123ABCDEFG@example.com. The 123... string in the example is the bounce verification tag that is added to the Envelope Sender as it is sent by your ESA appliance. If the message bounces, the Envelope Recipient address in the bounced message will include the bounce verification tag, which lets the ESA know that it is a legitimate bounced message.
You can enable or disable bounce verification tagging system-wide as a default. You can also enable or disable bounce verification tagging for specific domains. In most deployments, it is enabled by default for all domains.
ESA Configuration
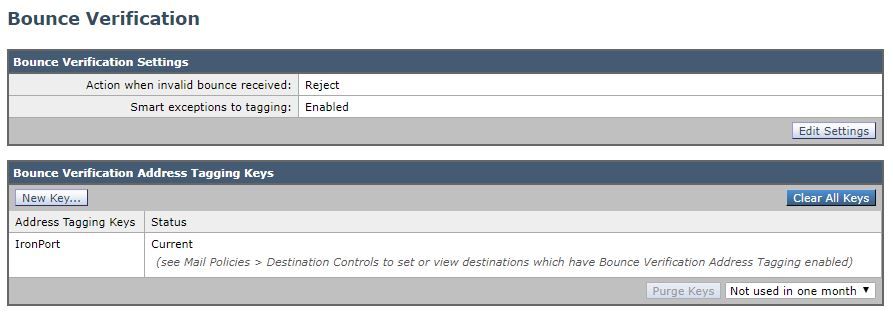
- Navigate to Mail Policies > Bounce Verification and click New Key

- Enter any arbitrary text to be used as the key in encoding and decoding address tags. For example, “Cisco_key”.

- Click Submit and verify the new Address Tagging Key

Now, let's enable Bounce Verification for our "Default" domain:
- Navigate to Mail Policies > Destination Controls and click on the Default.
- Configure Bounce Verification: Perform address tagging: Yes

- Click Submit and Commit changes. Note that Bounce Verification is now on for the default domain.
Using Destination Control Table
Uncontrolled email delivery can overwhelm recipient domains. The ESA gives you full control of message delivery by defining the number of connections your appliance will open or the number of messages your appliance will send to each destination domain. The destination controls table provides settings for connection and message rates when the ESA is delivering to remote destinations. It also provides settings for attempting or enforcing the use of TLS to these destinations. The ESA is configured with a default configuration for the Destination Control Table.
What we will cover in this document is how we can manage and configure control over destinations where the default is not a fit. For instance, Google has a set of receiving rules that Gmail users should follow or they risk sending back an SMTP 4XX response code and a message saying you are sending too quickly, or the recipient’s mailbox has exceeded its storage limit. We will add the Gmail domain to the destination control table limiting the amount of message sent to a Gmail recipient below.
Adding a new Domain to the Destination Control Table
As mentioned, Google has limitations for senders sending to Gmail. Receiving limits can be verified by looking at the Gmail sender limitations published here - https://support.google.com/a/answer/1366776?hl=en
Let’s set up the destination domain for Gmail as an example of good neighbor policies.
- Navigate to Mail Policies > Destination Controls and click Add Destination and create a new profile using the following parameters:
- Destination: gmail.com
- IP Address Preference: IPv4 Preferred
- Concurrent Connections: Max of 20
- Max Messages Per Connection: 5
- Recipients: Max of 180 per 1 minute
- Bounce Verification: Perform address tagging: Default (Yes)

- Click Submit and Commit changes. This is what our Destination Control Table looks like after the addition of the domain.
Note "Destination Limits" and "Bounce Verification" changes in the image below:

Deploying SMTP DNS-based Authentication of Named Entities (DANE)
The SMTP DNS-based Authentication of Named Entities (DANE) protocol validates your X.509 certificates with DNS names using a Domain Name System Security (DNSSEC) extension configured on your DNS server and a DNS resource record, also known as a TLSA record.
The TLSA record is added in the certificate that contains details about either the Certificate Authority (CA), the end-entity certificate, or the trust anchor used for the DNS name described in RFC 6698. The Domain Name System Security (DNSSEC) extensions provide added security on the DNS by addressing vulnerabilities in DNS security. DNSSEC using cryptographic keys and digital signatures ensures that the lookup data is correct and connects to legitimate servers.
The following are the benefits of using SMTP DANE for outgoing TLS connections:
- Provides secure delivery of messages by preventing Man-in-the-Middle (MITM) downgrade attacks, eavesdropping and DNS cache poisoning attacks.
- Provides authenticity of TLS certificates and DNS information, when secured by DNSSEC.
ESA Configuration
Before you start setting up DANE on the ESA, please ensure that the envelope sender and the TLSA resource record is DNSSEC verified and that the receiving domain is DANE protected. You can do this on the ESA using the CLI command daneverify.
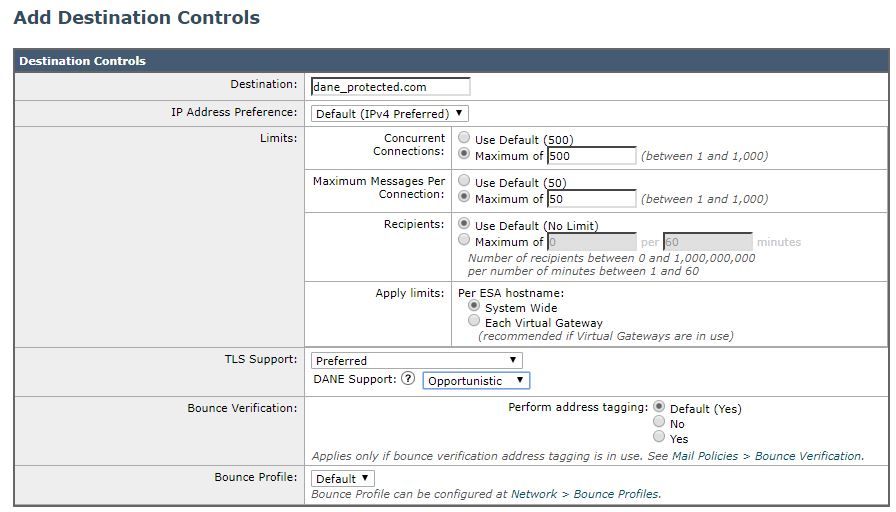
- Navigate to Mail Policies > Destination Controls and click Add Destination and create a new profile using the following parameters:
- Destination: dane_protected.com
- TLS Support: Preferred
- DANE Support: Opportunistic

- Click Submit and Commit changes.


 Feedback