Overview
The vast majority of threats, attacks, and nuisances faced by an organization through email come in the form of spam, malware, and blended attacks. Cisco’s Email Security Appliance (ESA) includes several different technologies and features to cut these threats off at the gateway before they enter the organization. This document will describe the best practice approaches to configure Anti-Spam, Anti-Virus, Graymail and Outbreak Filters, on both the inbound and outbound email flow.
Anti-Spam
Anti-Spam protection addresses a full range of known threats including spam, phishing and zombie attacks, as well as hard-to-detect low volume, short-lived email threats such as “419” scams. In addition, Anti-Spam protection identifies new and evolving blended threats such as spam attacks distributing malicious content through a download URL or an executable.
Cisco Email Security offers the following anti-spam solutions:
- IronPort Anti-Spam Filtering (IPAS)
- Cisco Intelligent Multi-Scan Filtering (IMS)
You can license and enable both solutions on your ESA but only can use one in a particular mail policy. For the purpose of this best practice document, we are going to use the IMS feature.
Verify feature key
- On the ESA, navigate to System Administration > Feature Keys
- Look for the Intelligent Multi-Scan license and make sure it is active.
Enable Intelligent Multi-Scan (IMS) globally
- On the ESA, navigate to Security Services> IMS and Graymail
- Click the Enablebutton on IMS Global Settings:

- Look for Common Global Settings and click Edit Global Settings
- Here you can configure multiple settings. The recommended settings are shown in the image below:

- Click Submitand Commit your changes.
If you do not have an IMS license subscription:
- Navigate to Security Services > IronPort Anti-Spam
- Click the Enablebutton on IronPort Anti-Spam Overview
- Click Edit Global Settings
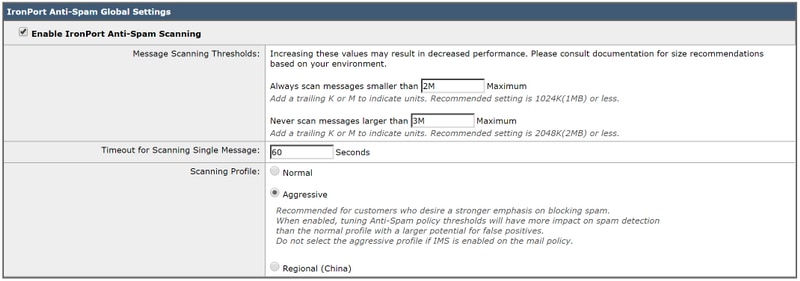
- Here you can configure multiple settings. The recommended settings are shown in the image below:

- Cisco recommends selecting Aggressive Scanning Profile for a customer who desires a strong emphasis on blocking spam.
- Click Submitand Commit your changes
Enable centralized spam quarantine
Since Anti-Spam has the option to be sent to quarantine, it is important to ensure that the spam quarantine is set up:
- Navigate to Security Services > Spam Quarantine
- Clicking the Configurebutton will take you to the following page.
- Here you can enable the quarantine by checking the enablebox and point the quarantine to be centralized on a SecurityManagement Appliance (SMA) byfilling in the SMANameand IP address. The recommended settings are shown below:
- Click Submitand Commit your changes
For more information on setting up and centralized quarantines, please refer to the Best Practices document:
Configure Anti-Spam in policies
Once Intelligent Multi-Scan has been configured globally, you can now apply Intelligent Multi-Scan to mail policies:
- Navigate to Mail Policies > Incoming Mail Policies
- The Incoming Mail Policies use IronPort Anti-Spam settings by default.
- Clicking the blue link under Anti-Spam will allow for that particular policy to use customized Anti-Spam settings.
- Below you will see an example that shows the Default Policy using customized Anti-Spam settings:

Customize Anti-Spam settings for an Incoming Mail Policy by clicking the blue link under Anti-Spam for the policy you wish to customize.
Here you can select the Anti-Spam Scanning option you wish to enable for this policy.
- For the purposes of this best practice document, click the radio button next to Use IronPort Intelligent Multi-Scan:

The next two sections include Positively-Identified Spam Settings and Suspected Spam Settings:
- The recommended best practice is to configure Quarantine action on Positively-Identified Spam setting with the prepended text [SPAM] added to the subject and;
- Apply to Deliver as the action for Suspected Spam Settings with the prepended text [SUSPECTED SPAM] added to the subject:

- Spam Threshold setting can be changed, and the recommended settings are to customize the Positively-Identified Spam score to 90 and the Suspected Spam score to 43:

- Click Submitand Commit your changes
Anti-Virus
Anti-Virus protection is provided through two third party engines – Sophos and McAfee. These engines will filter all known malicious threats, dropping, cleaning or quarantining them as configured.
Verify feature keys
To check that both feature keys are enabled and active:
- Go to System Administration > Feature Keys
- Make sure both Sophos Anti-Virus and McAfee licenses are active.
Enable Anti-Virus scanning
- Navigate to Security Services> Anti-Virus - Sophos
- Click the Enablebutton.
- Make sure Automatic Update is Enabled and the Sophos Anti-Virus files update is working fine. If necessary, click Update Now to initiate the file update immediately:

- Click Submitand Commit your changes.
If McAfee license is active as well, navigate to Security Services> Anti-Virus - McAfee
- Click the Enablebutton.
- Make sure Automatic Update is Enabled and the McAfee Anti-Virus files update is working fine. If necessary, click Update Now to initiate the file update immediately.
- Click Submitand Commit your changes
Configure Anti-Virus in mail policies
On an Incoming Mail Policy, the following is recommended:
- Navigate to Mail Policies > Incoming Mail Policies
- Customize Anti-Virus settings for an Incoming Mail Policy by clicking the blue link under Anti-Virus for the policy you wish to customize.
- Here you can select the Anti-Virus Scanning option you wish to enable for this policy.
- For the purposes of this best practice document, select both McAfee and Sophos Anti-Virus:

- We do not attempt to repair a file, so the message scanning remains Scan for Viruses only:

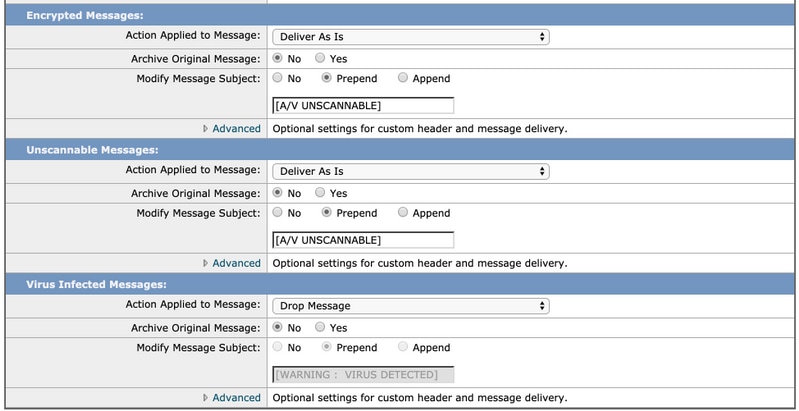
- The recommended action for both Encrypted and Unscannable Messages is to Deliver As-Is with a modified subject line for their attention.
- The recommended policy for Antivirus is Drop all Virus-Infected Messages as shown in the image below:

- Click Submitand Commit your changes
A similar policy is recommended for Outgoing mail policies, however, we do not recommend modifying the subject line on outbound email.
Graymail
The graymail management solution in the Email Security appliance comprises of two components: an integrated graymail scanning engine and a cloud-based Unsubscribe Service. The graymail management solution allows organizations to identify graymail using the integrated graymail engine and apply appropriate policy controls and provide an easy mechanism for end-users to unsubscribe from unwanted messages using Unsubscribe Service.
Graymail categories include marketing email, social network email and bulk email. Advanced options include adding a custom header, sending to an alternate host and archiving the message. For this best practice, we will enable Graymail’s Safe Unsubscribe feature for the default mail policy.
Verify feature key
- On the ESA, navigate to System Administration > Feature Keys
- Look for Graymail Safe Unsubscription and make sure it is active.
Enable Graymail and Safe Unsubscribe services
- On the ESA, navigate to Security Services> IMS and Graymail
- Click the Edit Graymail Settingsbutton on Graymail Global Settings
- Select all options - Enable Graymail Detection, Enable Safe Unsubscribe and Enable Automatic Updates:

- Click Submitand Commit your changes
Configure Graymail and Safe Unsubscribe in policies
Once Graymail and Safe Unsubscribe has been configured globally, you can now apply these services to mail policies.
- Navigate to Mail Policies > Incoming Mail Policies
- Clicking the blue link under Graymail will allow for that particular policy to use customized Graymail settings.
- Here you can select the Graymailoptions you wish to enable for this policy.
- For the purposes of this best practice document, click the radio button next to Enable Graymail Detection for This Policy and Enable Graymail Unsubscribing for This Policy:

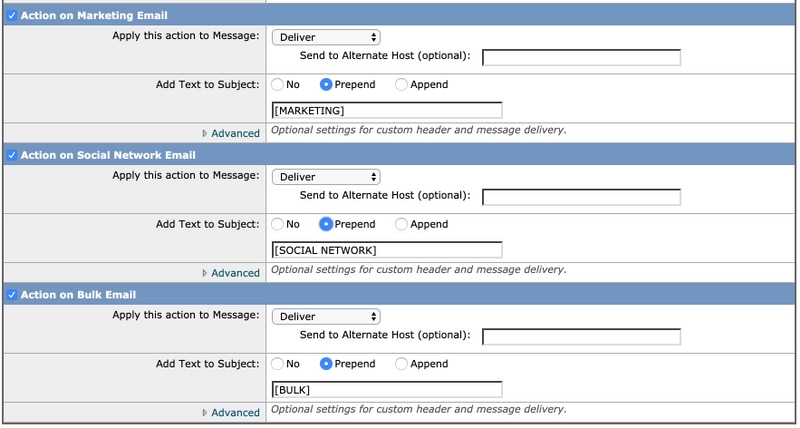
The next three sections include Action on Marketing Email Settings, Action on Social Network Email Settings and Action on Bulk Email Settings.
- The recommended best practice is to enable all of them and remain the action as Deliver with prepended text added to the subject in respect to the categories as shown below:

- Click Submitand Commit your changes
Outgoing Mail Policy should have Graymail remain in Disabled condition.
Outbreak Filters
Outbreak Filters combine triggers in the Anti-Spam engine, URL scanning and detection technologies and more to correctly tag items that fall outside the true spam category – for example, phishing emails and scam emails and handles them appropriately with user notifications or quarantine.
Verify feature key
- On the ESA, navigate to System Administration > Feature Keys
- Look for Outbreak Filters and make sure it is active.
Enable Outbreak Filters service
- On the ESA, navigate to Security Services> Outbreak Filters
- Click the Enablebutton on Outbreak Filters Overview
- Here you can configure multiple settings. The recommended settings are shown in the image below:

- Click Submitand Commit your changes.
Configure Outbreak Filters in policies
Once Outbreak Filtershas been configured globally, you can now apply this feature tomail policies.
- Navigate to Mail Policies > Incoming Mail Policies
- Clicking the blue link under Outbreak Filters will allow for that particular policy to use customized Outbreak Filters settings.
- For the purposes of this best practice document, we keep the Outbreak Filter Settings with default values:

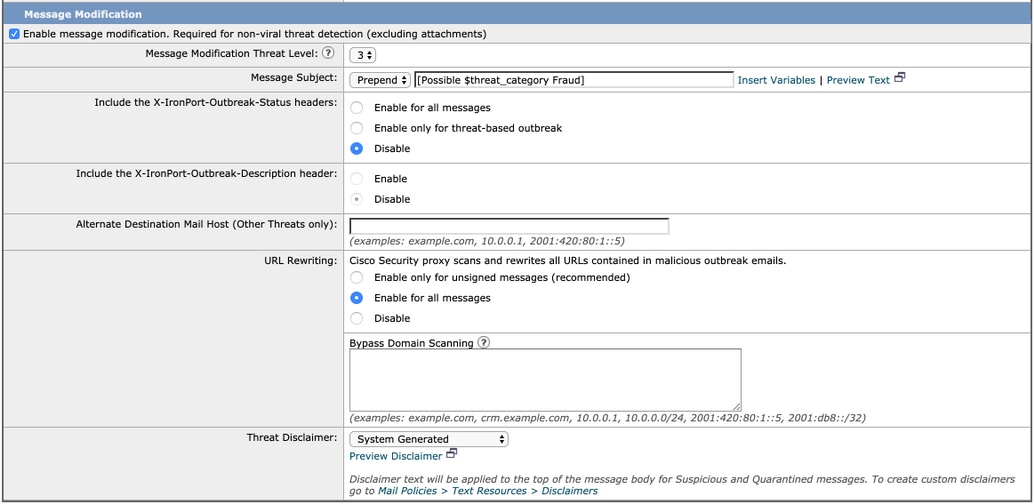
- Outbreak Filters can rewrite URLs if they are deemed malicious, suspect, or phish. Select Enable message modification to detect and rewrite URL based threats.
- Make sure the URL Rewriting option is Enable for all messages as following shown:

- Click Submitand Commit your changes
Outgoing Mail Policy should have Outbreak Filters remain in Disabled condition.
Conclusion
This document aimed to describe the default, or best practice configurations for Anti-Spam, Anti-Virus, Graymail and Outbreak Filters in the Email Security Appliance (ESA). All of these filters are available on both the inbound and outbound email policies, and configuration and filtering are recommended on both – while the bulk of the protection is for inbound, filtering the outbound flow provides protection against relayed emails or internal malicious attacks.


 Feedback