Best Practices Guide for Data Loss Prevention and Encryption
Available Languages
Download Options
Bias-Free Language
The documentation set for this product strives to use bias-free language. For the purposes of this documentation set, bias-free is defined as language that does not imply discrimination based on age, disability, gender, racial identity, ethnic identity, sexual orientation, socioeconomic status, and intersectionality. Exceptions may be present in the documentation due to language that is hardcoded in the user interfaces of the product software, language used based on RFP documentation, or language that is used by a referenced third-party product. Learn more about how Cisco is using Inclusive Language.
Contents
Introduction
This document describes best practices for Data Loss Prevention (DLP) and encryption for Cisco Email Security.
This document discusses the setup of message encryption using the Cisco Email Security Appliance (ESA) and the cloud-based Cisco Registered Envelope Service (RES). Customers can use message encryption to send individual messages securely over the public Internet, using various types of policies including content filtering and DLP. The creation of these policies will be discussed in other documents within this series. This document focuses on getting the ESA prepared to send encrypted mail so that policies can use encryption as an action.
Prerequisites
Requirements
There are no specific requirements for this document.
Components Used
This document is not restricted to specific software and hardware versions.
The information in this document was created from the devices in a specific lab environment. All of the devices used in this document started with a cleared (default) configuration. If your network is live, ensure that you understand the potential impact of any command.
Background Information
This document will discuss the following steps:
- Enabling Cisco IronPort Email Encryption
- Register your ESA(s) and your organization with RES
- Creating Encryption Profiles
- Enabling DLP
- Creating DLP Message Actions
- Creating DLP Policies
- Applying DLP Policies to an Outgoing Email Policy
Once these steps are completed successfully, the ESA administrator can successfully create a policy that will use encryption as an action.
Cisco IronPort Email Encryption is also referred to as RES Encryption. RES is the name that we use for the “key servers” in the Cisco Cloud. The RES encryption solution uses symmetric key encryption — which means the key used to encrypt the message is the same key used to decrypt the message. Every encrypted message uses a unique key, which allows the sender to have granular control over a message after it is sent – for example, to lock or expire it so the recipient can no longer open it – without affecting any other messages. When encrypting a message, the ESA stores the encryption key and metadata in CRES about each encrypted message.
The ESA can decide to encrypt a message in many ways — via “flag” (like Subject content), via Content Filter matching, or via DLP Policy, for example. Once the ESA decides to encrypt a message, it does so with a specified “Encryption Profile” created in “Security Services > Cisco IronPort Email Encryption” — the table named “Email Encryption Profiles”. By default, there are no Encryption Profiles. This will be discussed in 3. Creating Encryption Profiles.
Best Practice Guide for Data Loss Prevention and Encryption Best Practices
1. Enable Cisco IronPort Email Encryption on the ESA(s)
Note: If you have multiple ESAs in a cluster, then Step #1 step should only need to be performed once since these settings are typically managed at the cluster level. If you have multiple machines that are not clustered, or if you are managing these settings at the machine level, then Step #1 should be performed on each ESA.
- From the ESA UI, navigate to Security Services > Cisco IronPort Email Encryption.
- Check the box to enable Cisco IronPort Email Encryption.
- Accept the End User License Agreement (EULA), Cisco IronPort Email Encryption License Agreement.
- In the Email Encryption Global Settings, click Edit Settings...
- Specify the email address for the administrator/person who is the primary RES Admin for the account. This email account will be associated with the administration of the RES environment for the company.
- Optional: The default maximum message size to encrypt is 10M. You may increase/decrease the size at this time if you wish.
- Optional: If you have a proxy that the ESA will need to go through to connect to RES via HTTPS, add the necessary proxy and authentication settings for allowing it to go through the proxy.
- Submit and Commit your configuration changes.
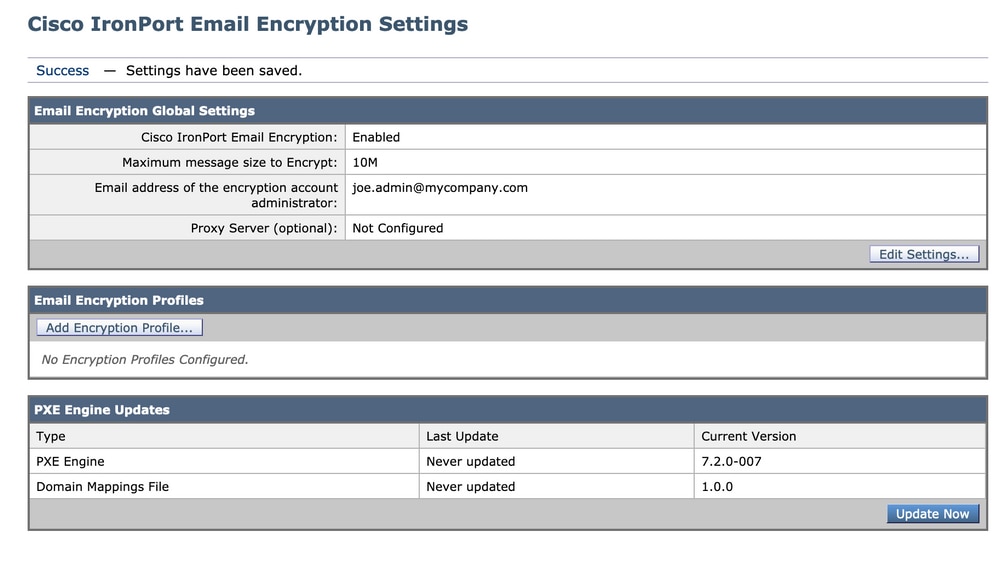
At this point you should see the “Email Encryption Global Settings” set to something like this, however with no profiles listed yet:

2. Register your ESA(s) and your organization with RES
Step #2 primarily takes part outside of the ESA administration console.
Note: ESA registration information is also found in the following TechNote: Cisco RES: Account Provisioning for Virtual, Hosted, and Hardware ESA Configuration Example
Please send an email direct to RES: stg-cres-provisioning@cisco.com.
In order to provision a CRES account for your ESA's Encryption Profile(s), please provide us with the following information:
- Name of account (Please specify the exact company name, as you require this to be listed.)
- For Cloud Email Security(CES)/Hosted customer accounts, please notate your account name to end as "<Account Name> HOSTED"
- Email address(es) to be used for the Account Admin (Please specify the corresponding admin email address)
- Complete appliance serial number(s)
- An appliance serial number can be located from the ESA GUI (System Administration > Feature Keys), or ESA CLI via the 'version' command. Providing a virtual license number (VLN) or product activitation key (PAK) license is not acceptable, as a complete appliance serial number is required for CRES account administration.
- Domain names that should be mapped to the CRES account for administration purposes
Note: If you already have a CRES account, please provide the company name or existing CRES account number. This will assure that any new appliance serial numbers are added to the correct account, and avoid any duplication of company information and provisioning.
Please be assured, if you are emailing in regarding provisioning a CRES account, we will respond with-in one (1) business day. If you need immediate support and assistance, please open a support request with Cisco TAC. This can be done via Support Case Manager (https://mycase.cloudapps.cisco.com/case) or by calling by phone (https://www.cisco.com/c/en/us/support/web/tsd-cisco-worldwide-contacts.html).
Note: After you have emailed this request, it may take a day for your Company RES account to be created (if it was not already created) and the S/Ns to be added. The “Provision” task, in Step #3, will not work until this is completed.
3. Create Encryption Profiles on the ESA(s)
Note: If you have multiple ESAs in a cluster, then Step #1 step should only need to be performed once since these settings are typically managed at the cluster level. If you have multiple machines that are not clustered, or if you are managing these settings at the machine level, then Step #1 should be performed on each ESA.
An encryption profile specifies how encrypted messages should be sent. For example, an organization may need to send High-Security envelopes for one segment of its recipients, such as those that they know they will frequently be sending highly sensitive data to. The same organization may have other segments of their recipient community who receive less sensitive information, and who are also perhaps less patient with having to provide user id and password to receive encrypted mail. Those recipients would be good candidates for a Low-Security type of envelope. Having multiple encryption profiles allows the organization to tailor the encrypted message format to the audience. On the other hand, many organizations may be fine with just one Encryption Profile.
For this document, we will show an example of creating three Encryption Profiles named “CRES_HIGH”, “CRES_MED”, and “CRES_LOW”.
- From the ESA UI, navigate to Security Services > Cisco IronPort Email Encryption.
- Click “Add Encryption Profile...”
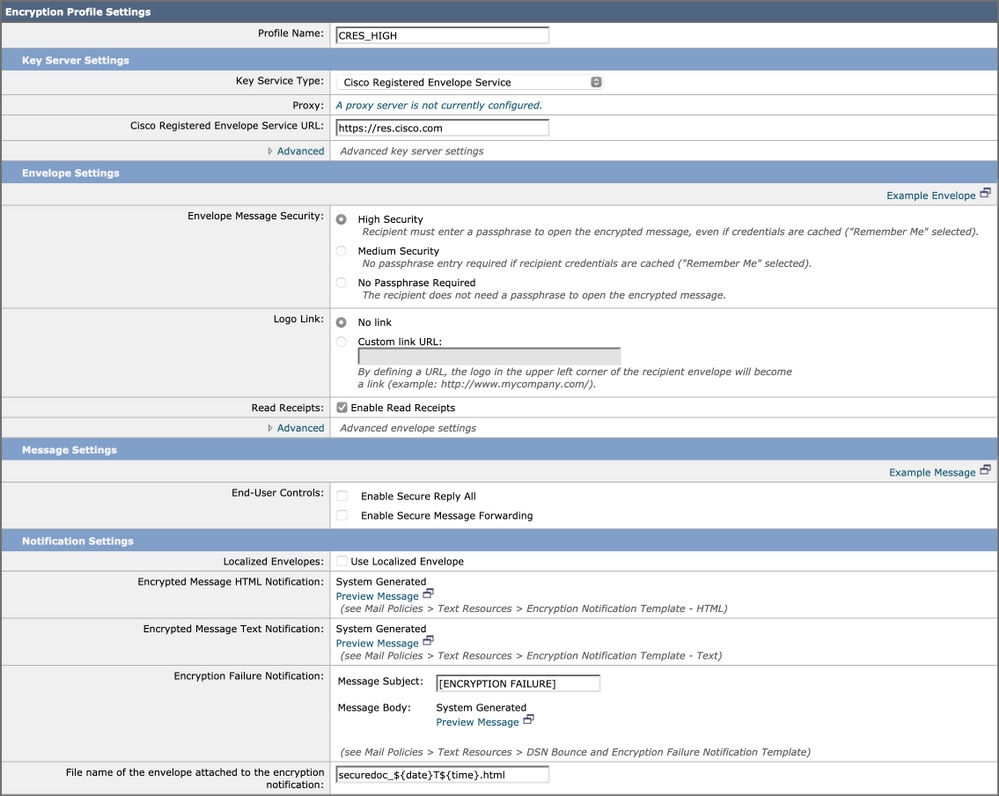
- The Encryption Profile menu will open, and you can name your first encryption profile “CRES_HIGH”.
- Select "High Security" for the Envelope Message Security, if not already selected.
- Click Submit to save this profile.

Next, repeat steps 2-5 to create "CRES_MED" and "CRES_LOW" — just change the radio button for the Envelope Message Security for each profile.
- For the CRES_HIGH profile, choose the “High Security” radio button.
- For the CRES_MED profile, choose the “Medium Security” radio button.
- For the CRES_LOW profile, choose the “No Password Required” radio button
You will notice there are options to Enable Read Receipts, Enable Secure Reply All, and Enable Secure Message Forwarding. In Envelope Settings, if you click the “Advanced” link, you can select one of three symmetric encryption algorithms, as well as specify that the envelope is sent without the Java encryption applet.
To the right of Envelope Settings, you will see the “Example Message” hypertext link. If clicked, this will show you an example of the Secure Message Envelope — what the recipient will see in their email after they open the HTML attachment.
Read Receipts means that the Sender of the encrypted message will receive an email from CRES when the Recipient opens the Secure Message (meaning the recipient pulled down the symmetric key and decrypted the message).
To the right of the Message Settings, you will see the "Example Message" hypertext link. If clicked, this will show you what the opened message will look like — what the recipient will see once they have provided the necessary information in the envelope, and have opened the encrypted message.
Always remember to click Submit and commit changes.
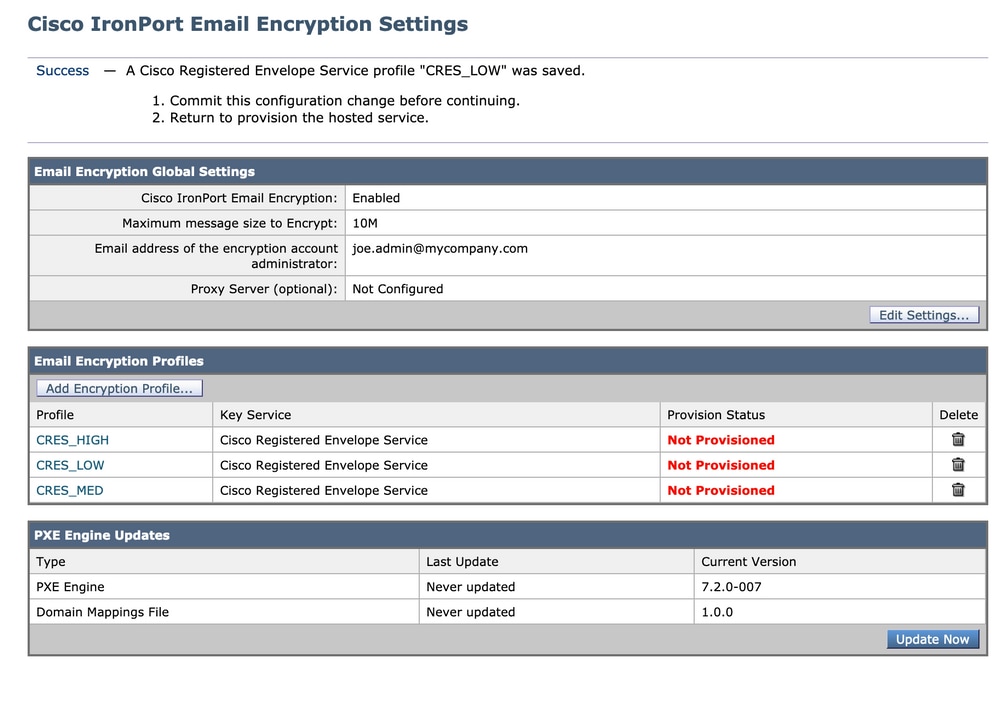
The row in the table will then show a “Provision” button. The Provision button will not appear until after you Commit changes.

Click the Provision button again, this will only work after your company RES account has been created and the appliance S/Ns have been added to your account. If the RES account is linked to the ESA, the provisioning process will happen relatively quickly. If it is not, that process will have to complete first.
Once provisioning is completed, your Cisco IronPort Email Encryption page will show the profile as provisioned.
4. Enabling Data Loss Prevention (DLP)
- From the ESA UI, navigate to Security Services > Data Loss Prevention.
- Click Enable... to enable DLP.
- Accept the EULA, Data Loss Prevention License Agreement.
- Click the checkbox for Enable matched content logging.
- Click the checkbox for Enable automatic updates.
- Click Submit.

Updates for the DLP engine and predefined content matching classifiers on your appliance are independent of updates for other security services. The 3-5 minute regular Talos signature updates are different and do not include updating DLP policies and dictionaries. Updates must be enabled here.
When “Matched Content Logging” is Enabled, it allows Message Tracking to show the content of the email that caused the violation. Here is an example of Message Tracking showing the email content that caused the DLP violation. In this way, an admin can know exactly which data triggered a specific DLP policy.
 Data Loss Prevention Violation
5. Creating Data Loss Prevention Message Actions
Create DLP Quarantines
If you’d like to keep a copy of messages violating DLP policies you can create individual Policy quarantines for each type of policy violation. This is especially useful when running a ‘transparent’ POV, where Outbound messages violating DLP policies are logged and delivered but no action is taken on the messages.
- On the SMA, navigate to Email > Message Quarantine > Policy, Virus, and Outbreak Quarantines
- This is what the Quarantines table should look like before we start:
 Policy Virus and Outbreak Quarantine
 - Click the “Add Policy Quarantine” button and create a quarantine to be used by the DLP policies.
Below is an example quarantine made for a medium DLP violation. Segmentation of quarantines is possible and may be desired for multiple DLP rules:
 Example DLP Quarantine
About DLP Message Actions
DLP message actions describe what actions that the ESA will take when it detects a DLP violation in an outgoing email. You can specify primary and secondary DLP Actions and different actions can be assigned for different violation types and severities.
Primary actions include:
- Deliver
- Drop
- Quarantine
For a read-only state where DLP violations are logged and reported but the messages are not stopped/quarantined or encrypted, the Deliver action is most often used.
Secondary actions include:
- Sending a copy to any custom quarantine or the ‘Policy’ quarantine.
- Encrypt the message. The appliance only encrypts the message body. It does not encrypt the message headers.
- Altering the Subject header.
- Adding disclaimer text/HTML to the message.
- Sending the message to an alternate destination mailhost.
- Sending bcc copies of the message.
- Sending DLP violation notification to the sender and/or other contacts.
These actions are not mutually exclusive — you can combine some of them within different DLP policies for various processing needs for different user groups.
We are going to implement the following DLP Actions: Encrypt
These actions assume that Encryption is licensed and configured on the ESA and three profiles have been created for High, Medium, and Low security as was done in the earlier sections:
- CRES_HIGH
- CRES_MED
- CRES_LOW
Create the DLP Message Actions
- Go to Mail Policies > DLP Message Customizations.
- Click the “Add Message Action” button and add the following DLP Actions. Make sure to commit the change after submitting your message action
 Message Action
6. Creating Data Loss Prevention Policies
A DLP policy includes:
- A set of conditions that determine whether an outgoing message contains sensitive data
- The actions to be taken when a message contains such data.
- Navigate to: Mail Policies > DLP Policy Manager
- Click ‘Add DLP Policy’
- Open the “Regulatory Compliance” disclosure triangle.
 DLP Policy Template
4. For PCI policy click the "Add" button to the left of PCI-DSS.
 PCI-DSS Example DLP rule
5. For the Critical Severity Incident select "Encrypt Medium and Deliver" action we previously configured. We could change the lower severity incidents but for now, let's have them inherit our critical severity incident. Submit and then commit the change.
7. Applying DLP Policies to an Outgoing Email Policy
- Navigate to: Mail Policies > Outgoing Mail Policies
- Click on the control cell for DLP for the Default Policy. It will read “Disabled” if you have not enabled it yet.
- Change the pulldown button from Disable DLP to Enable DLP and you will immediately be presented with the DLP policy you just created.
- Click the “Enable All” checkbox. Submit and then Commit the changes.
Conclusion
In summary, we have shown the necessary steps to prepare a Cisco Email Security Appliance for sending an encrypted email:
- Enabling Cisco IronPort Email Encryption
-
Register your ESA(s) and your organization with RES
-
Creating Encryption Profiles
- Enabling DLP
- Creating DLP Message Actions
- Creating DLP Policies
- Applying DLP Policies to an Outgoing Email Policy
Additional detail is available in the ESA User Guide corresponding to your ESA software release. User guides are available at the following link:
http://www.cisco.com/c/en/us/support/security/email-security-appliance/products-user-guide-list.html
Related Information
Contributed by Cisco Engineers
- Greg BarnesTechnical Marketing Engineer Cisco Email Security
Contact Cisco
- Open a Support Case

- (Requires a Cisco Service Contract)
 Feedback