Introduction
This document describes the processes with examples for the reimage procedure of a Cisco FireSIGHT Management Center (FMC) and FirePOWER appliances.
Prerequisites
Requirements
There are no specific requirements for this document.
Components Used
The information in this document is based on these software and hardware versions:
|
Managed Device
|
FireSIGHT Management Center
|
Software Versions Available for Reimage
|
Cisco FirePOWER 7000 Series
Cisco FirePOWER 7100 Series
Cisco FirePOWER 8100 Series
Cisco FirePOWER 8200 Series
|
FS 750
FS 1500
FS 3500
|
5.2 or later
|
|
Firepower 8300 Series
Cisco AMP 7150
Cisco AMP 8150
|
|
5.3 or later
|
The information in this document was created from the devices in a specific lab environment. All of the devices used in this document started with a cleared (default) configuration. If your network is live, ensure that you understand the potential impact of any command.
Reimage Process
Caution: Do not insert a USB storage device or plug a Keyboard, Video, and Mouse (KVM) switch when you upgrade or reimage a FireSIGHT Management Center or a FirePOWER appliance.
Before You Begin
-
If you plan to reimage a Management Center or stand-alone Firepower device, it is recommended to back up your appliance before you proceed.
-
Identify the model of your sensor and use the list of models in the Components Used section in order to verify that this guide is appropriate.
-
Download the appropriate installation guide and disk image for your desired software version from the Cisco Support site.
Note: Do not rename an .iso file
Serve the image: The .iso file must be copied to a host that runs an SSH server reachable from the management network of the appliance to be reimaged.
Note: If no other SSH server is available, an FMC can be used for this process.
Verify the integrity of the iso: The md5sum of the files are provided on the right-hand side of the page for verification with an md5sum utility.
-
The installation guides contain step-by-step reimage instructions and also outlines several methods for the reimage process. The images provided in this document can be used for reference.
Overview of the Reimage Process
Note: The 5.3 version was used to capture the images shown in this article. The reimage process is identical for other 5.x versions except for the version numbers that appear in the images shown.

Figure 1
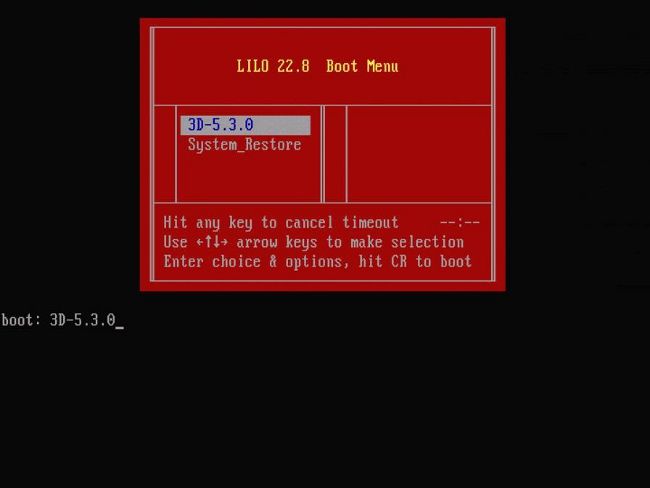
Figure 2 - When the system reboots, press an arrow key on the keyboard in order to halt the countdown to choose the System_Restore option for the screen depicted next.
Note: If the System_Restore prompt does not display, you must change the boot order to boot directly to the Restore partition (DOM). For more information, see System_Restore LILO menu option is missing.
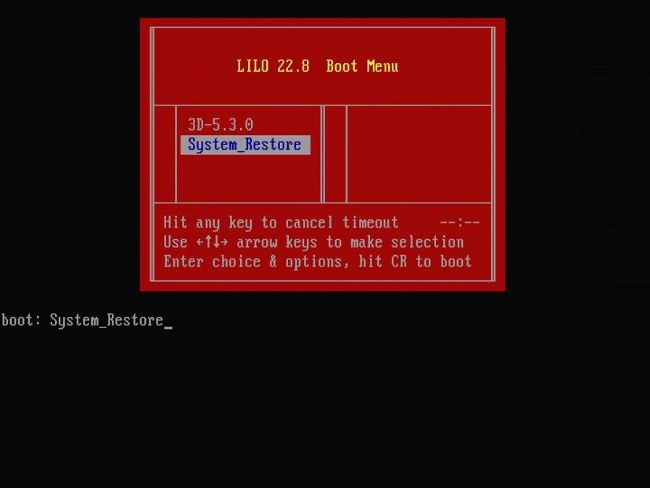
Figure 3
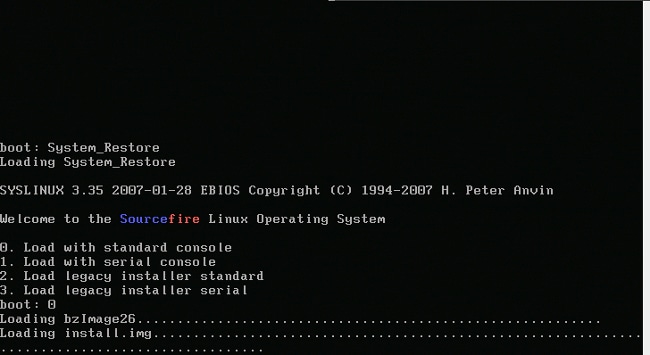
Figure 4 - Choose option 0 if you use a keyboard and monitor.
Note: Sometimes it has been seen that the menu for the Restore option is only shown when only the Console is connected (with the Keyboard unplugged). As soon the Recovery option is selected, the keyboard can be connected back again

Figure 5
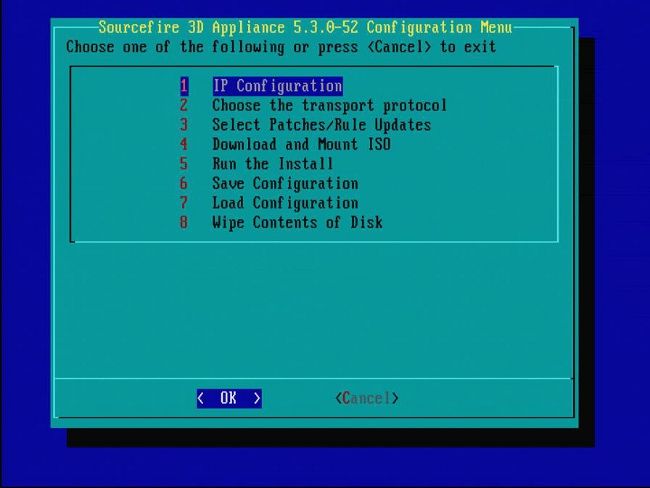
Figure 6

Figure 7 - In order to select the network device, press the spacebar.

Figure 8
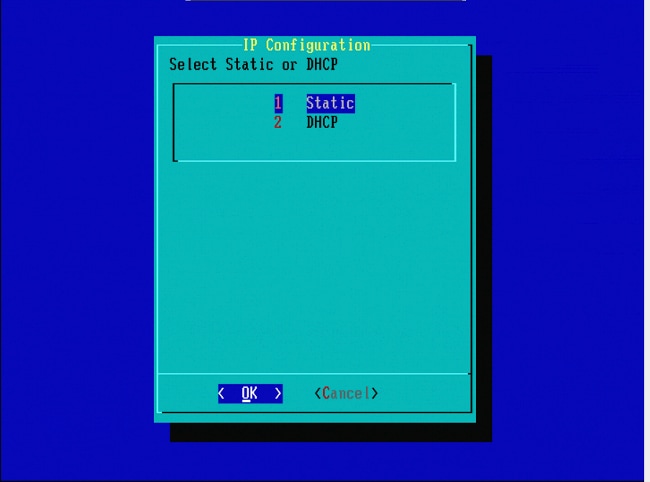
Figure 9

Figure 10

Figure 11
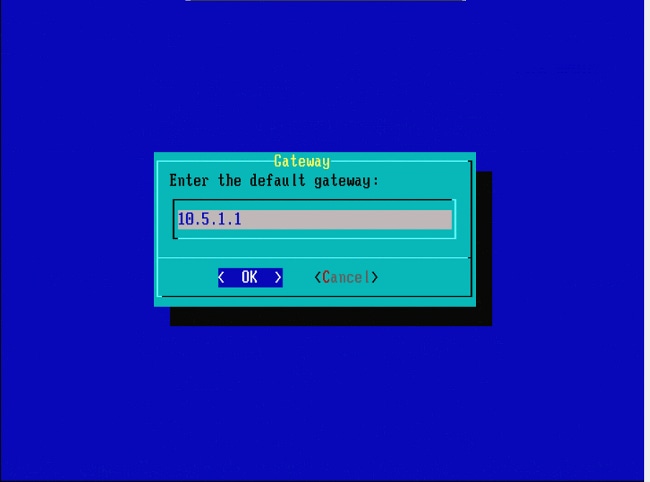
Figure 12

Figure 13
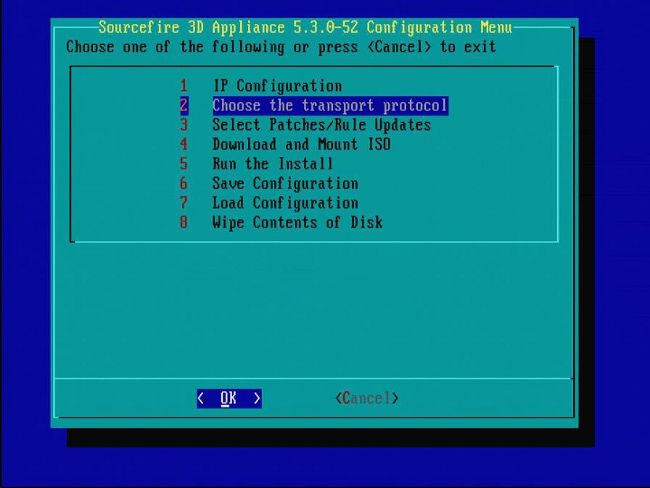
Figure 14
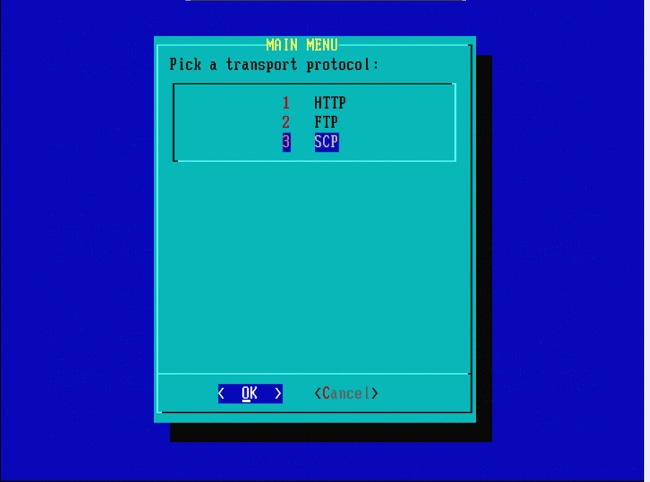
Figure 15 - Cisco Support recommends that you use the Secure Copy (SCP) protocol.
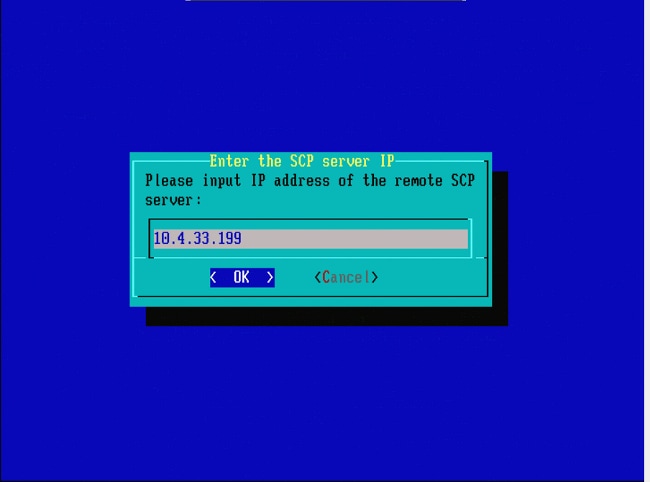
Figure 16 - It is possible to use a FireSIGHT Management Center as the SCP server for this step. Continue with this procedure and use the IP address and credentials for the Management Center in order to populate the fields in the System Restore menu. More details in
A Secure Copy (SCP) server is used to transfer files securely. If necessary, a Sourcefire Defense Center (DC) can be used as an SCP server to transfer files to another Sourcefire device. This can be useful when an iso image needs to be transferred to a Sourcefire device for reimage purposes, but the regular SCP server is unreachable or unavailable.
Step 1. Download an appropriate .iso file to your desktop from the Sourcefire Support Portal.
Step 2. Use an SCP client, copy the file from the desktop to the Defense Center.
Tip: An SCP client is usually available in a Linux or Mac Operating System. However, in Windows operating system, you can have to install a third-party SCP client software. Sourcefire does not provide recommendations or support to install any specific SCP client software.
The next example demonstrates how to copy a Sourcefire .iso image file from the Downloads directory of a Linux system to the /var/tmpdirectory of the Sourcefire Defense Center:
LinuxSystem:~$ cd Downloads
LinuxSystem:~/Downloads$ scp Sourcefire_3D_Sensor_S3-4.10.2-Restore.iso user_name@IP_Address_of_Defense_Center:/var/tmp
Caution: Do not change the name of the .iso file. It can create an issue with the detection of the file during a reimage.
Now the file is copied to the Defense Center. You can proceed with the reimage process of Sourcefire devices. At the reimage, when necessary, you can provide the IP address and user name of the DC and the path where you copied the image file with the previous instructions.
Warning: After completes the reimage, you must remove the .iso file from the /var/tmp directory of the Defense Center to reduce the utilization of the disk space.

Figure 17

Figure 18
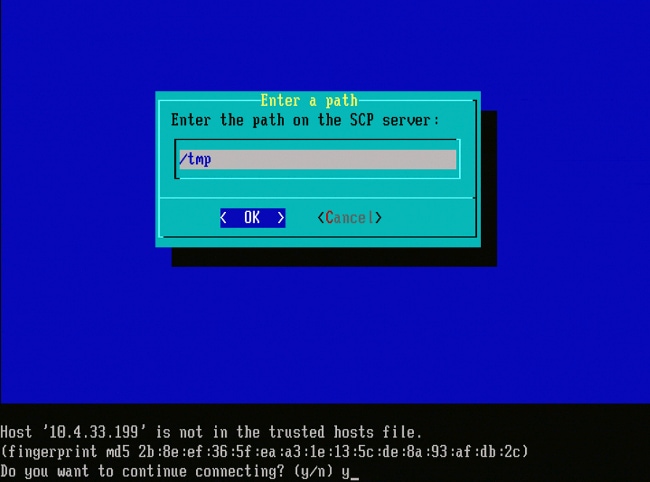
Figure 19
Note: If you receive a connectivity error at this point instead of the expected message, verify your connection to the SSH server.
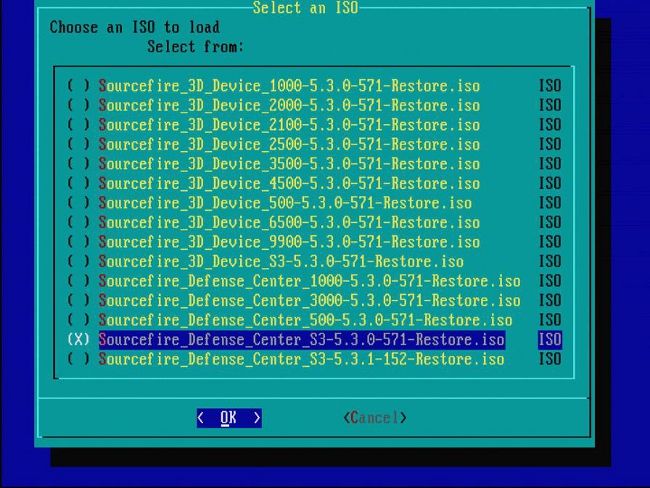
Figure 20 - In order to select the .iso image, press the spacebar.
Note: It is required to use the default filenames for the .iso files or the files are possibly undetected at this step.
Error: No ISO Image Were Found
In Version 6.3 the ISO name convention have changed from Sourcefire_3D_Device_S3-<ver>-<build>-Restore.iso to Cisco_Firepower_NGIPS_Appliance-<ver>-<build>-Restore.iso. If you encounter "No ISO Image Were Found", rename the ISO file to the legacy filename. This normally happens when a re-image of 6.2.x or older version to 6.3.0 or later version.
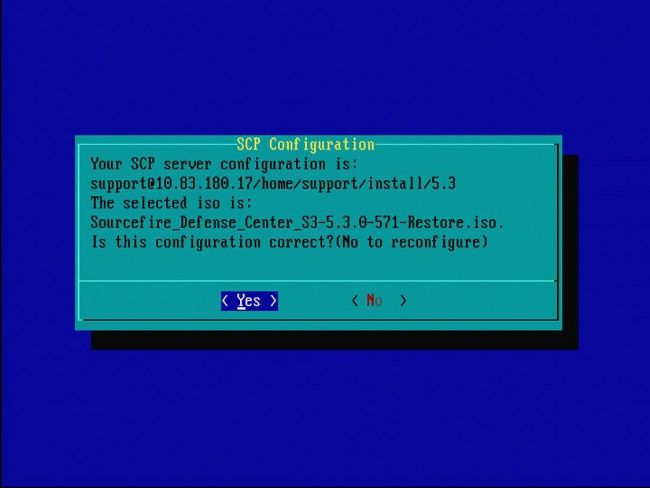
Figure 21
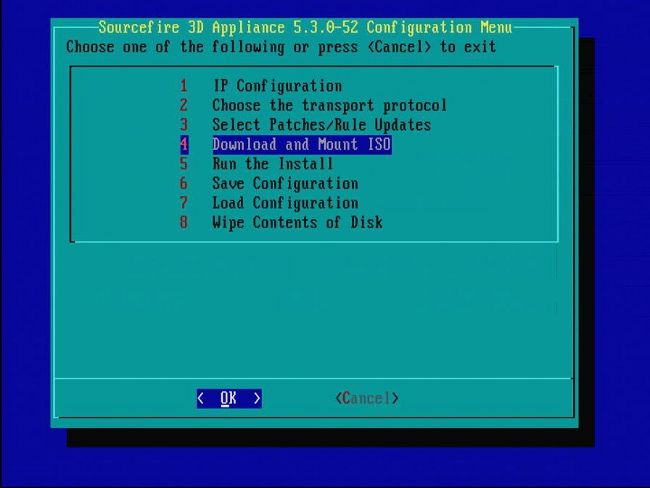
Figure 22 - Cisco Support recommends to skip step 3 in this process. Patches and Snort Rule Updates (SRUs) can be installed after the reimage is complete.
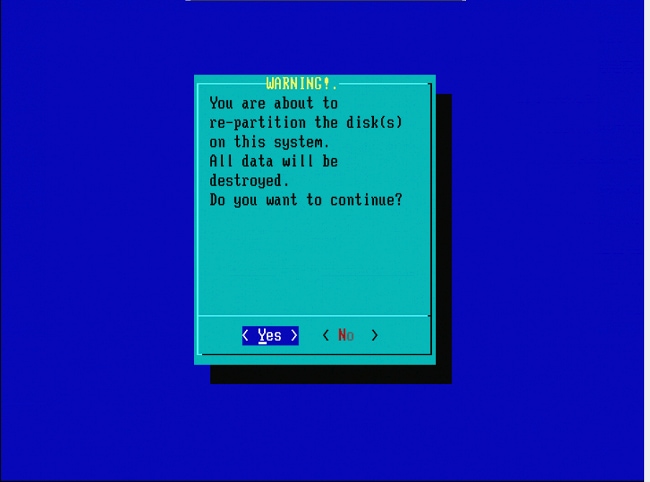
Figure 23
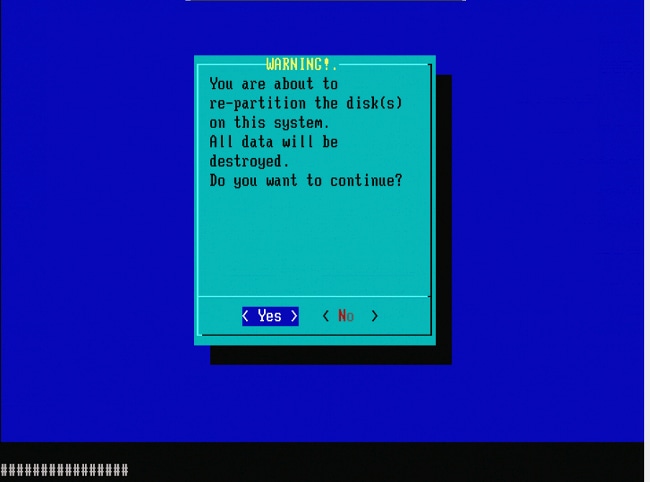
Figure 24
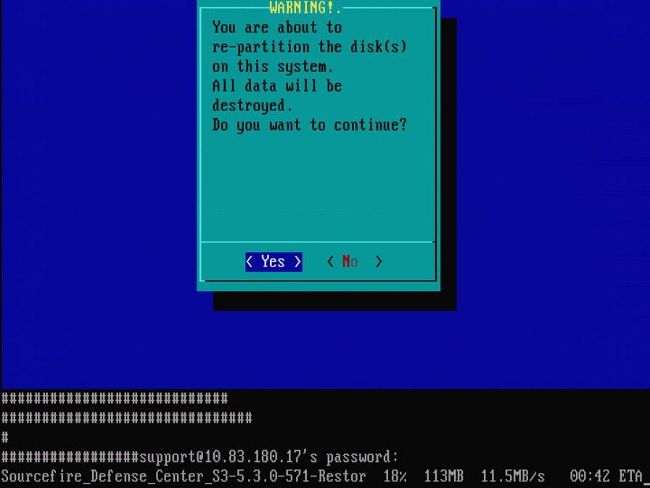
Figure 25
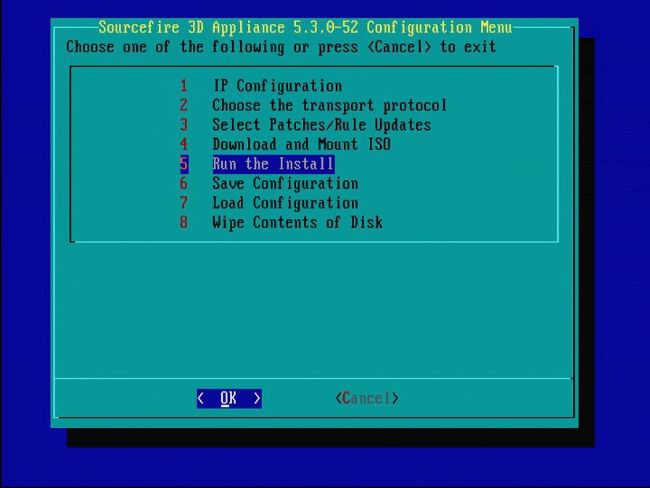
Figure 26
Important note in regards to a reimage from a different major software version: If you attempt to reimage a device that previously ran a different major software version, such as if you reimage 5.1 > 5.2, 5.2 > 5.3, 5.3 > 5.2, and so on, you must complete the steps depicted in Figures 1 - 26 twice.
- After you choose OK on the prompt as shown in the image 26, the System Restore partition is flashed to the new version and the appliance reboots.
- After the reboot, you must begin the reimage process again from the start and continue through the process depicted in Figures 27b through 31.
If this is the first reimage from a different major software version, you see the screen as shown in the image 27a, and then Figures 31 and 32.
Caution: If you see this screen, there is a possible delay with no visible output after "Checking Hardware" and before "The USB device...". Do not press any keys at this time, or the device reboots into an unusable state and needs to be reimaged once more.
If this is not the case, you can see the screens in Figure 27b through Figure 32.
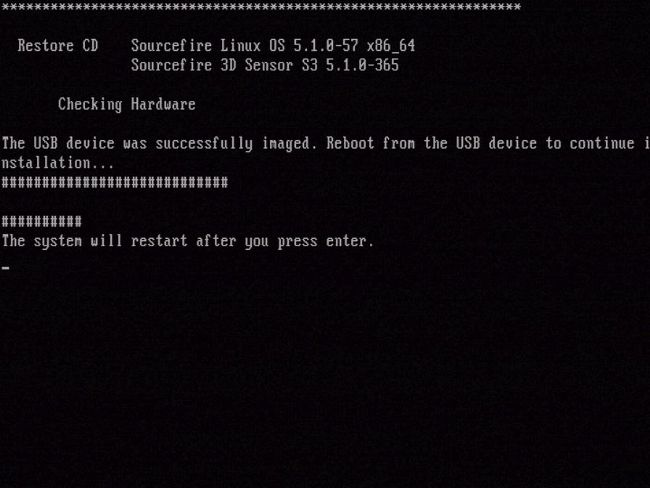
Figure 27a
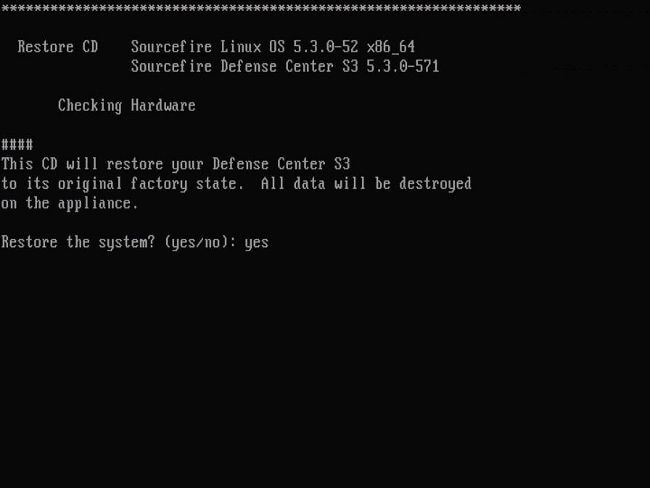
Figure 27b
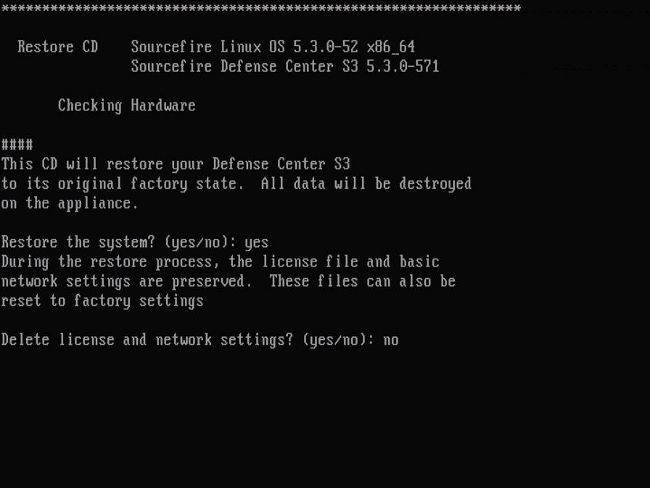
Figure 28
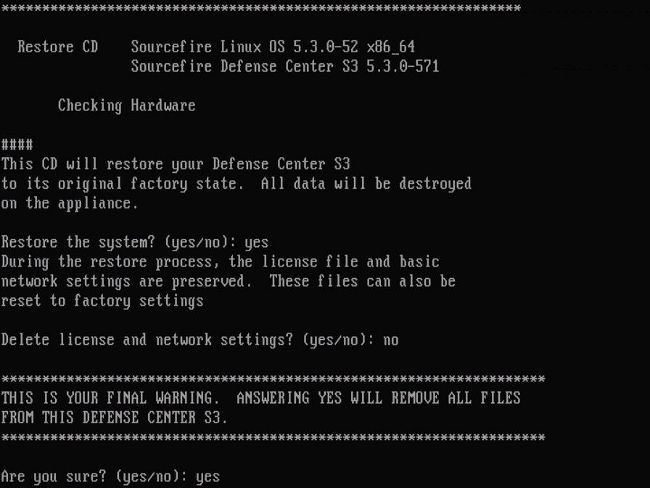
Figure 29
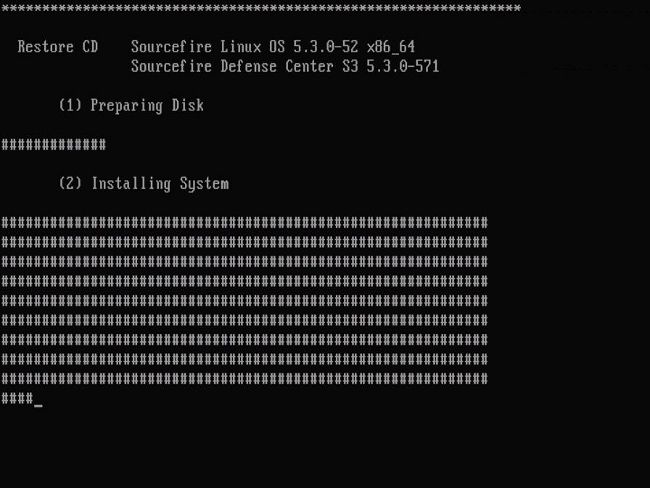
Figure 30

Figure 31
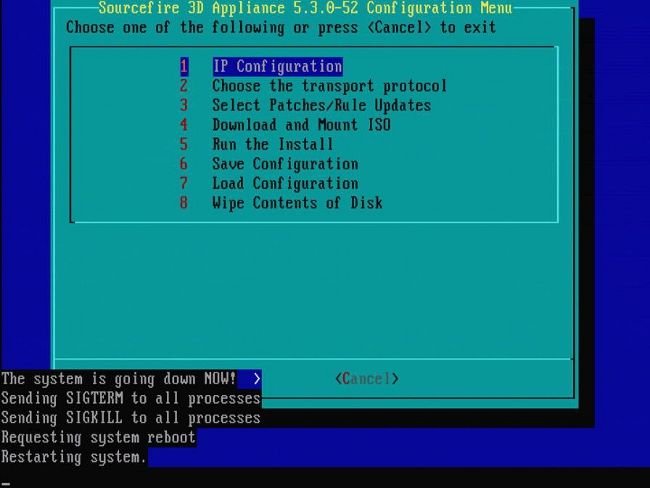
Figure 32
Cisco Firepower Management Center 1000, 2500, and 4500
On FMC 1000, 2500, and 4500 the options are different. Use a KVM switch or the CIMC and while the device starts, you are presented with these options:
1 - Cisco Firepower Management Console VGA Mode
2 - Cisco Firepower Management Console Serial
3 - Cisco Firepower Management Console System Restore Mode
4 - Cisco Firepower Management Console Password Restore Mode
If you want to enter the Restore Mode with UI select the option 'Cisco Firepower Management Console System Restor Mode' (option 3) and then 'Cisco Firepower Management Console System Restore VGA Mode' (option 1
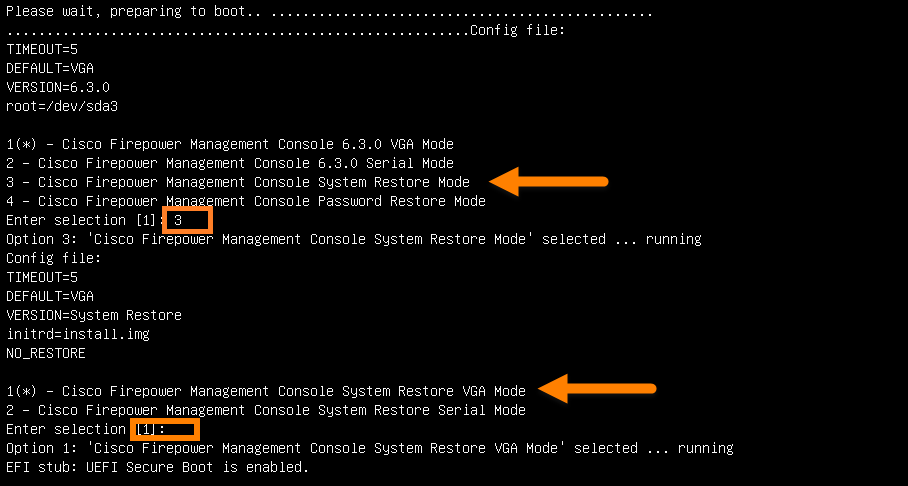
Figure 33
The rest of the process is the same as on other FMC appliances.
Troubleshoot
System_Restore LILO Menu Option is Not Listed
The FireSIGHT Management Center and the FirePOWER 7000 and 8000 series appliances have an integrated flash drive which contains the reimage system. If the "System_Restore" option is not listed in the LILO (Linux Loader) boot menu, it is still possible to access this drive in order to complete the reimage.
7010, 7020, and 7030 Devices
If you use a 70XX Series device, complete these steps in order to select the boot device:
- Power off the appliance gracefully.
- Power on the appliance and press the Delete key repeatedly while the appliance boots up in order to access the boot device selection screen. See the image here:
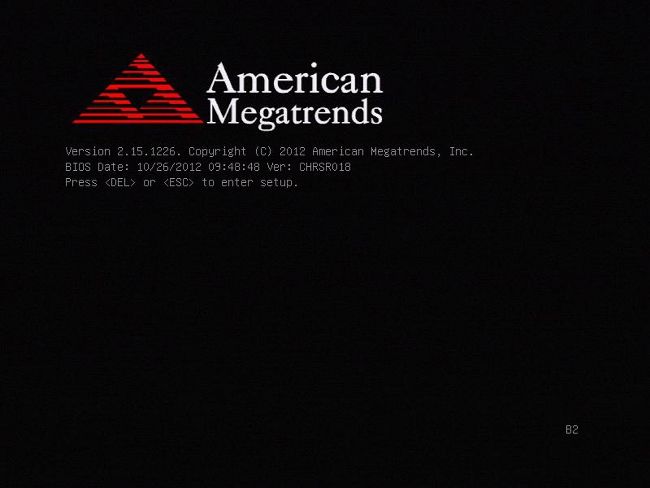
Figure A1
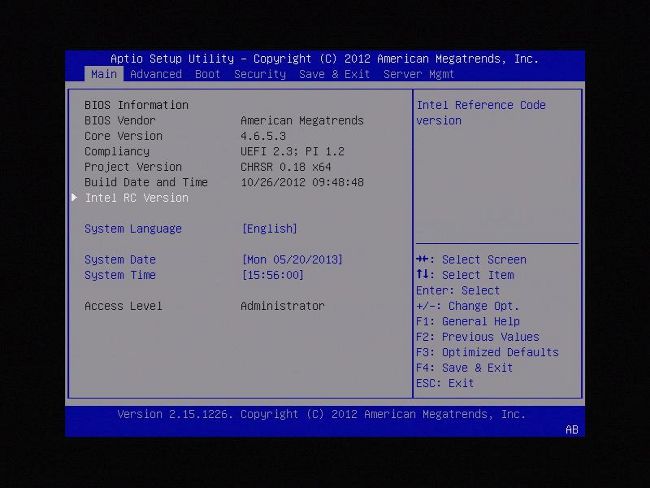
Figure A2
- Use the right arrow key in order to select the Save & Exit tab. On this tab use the down arrow key in order to select SATA SM: InnoDisk. - InnoLite and press the Enter key.
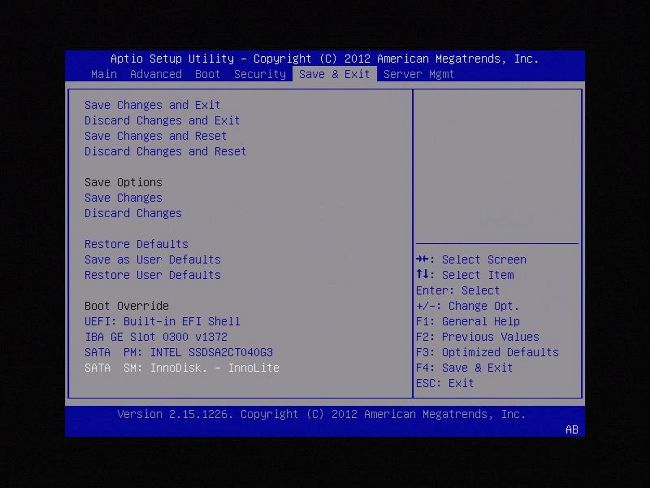
Figure A3
- Choose option 0 if you use a keyboard and monitor.
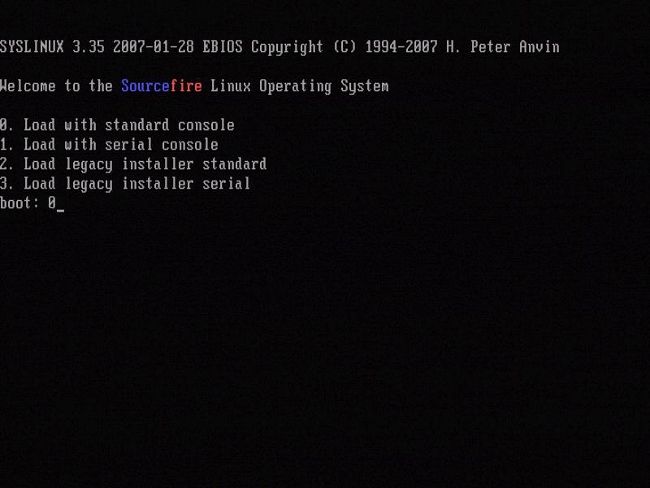
Figure A4
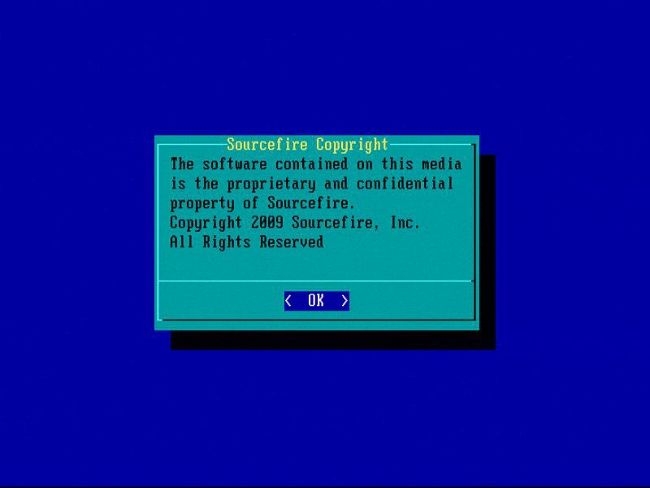
Figure A5
7110 and 7120 Devices
If you use a 71XX Series device, complete these steps in order to select the boot device:
- Power off the appliance gracefully.
- Power on the appliance and press the F11 key repeatedly while the appliance boots up in order to access the boot device selection screen. See the image shown here:
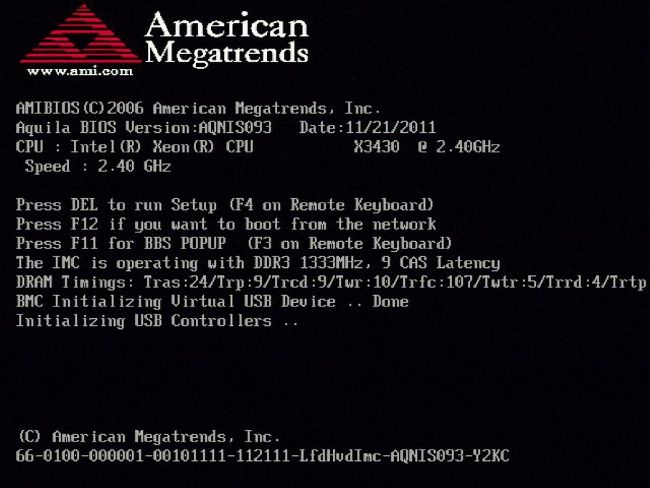
Figure B1
- Select option HDD:P1-SATADOM and press Enter in order to boot to the System_Restore partition.
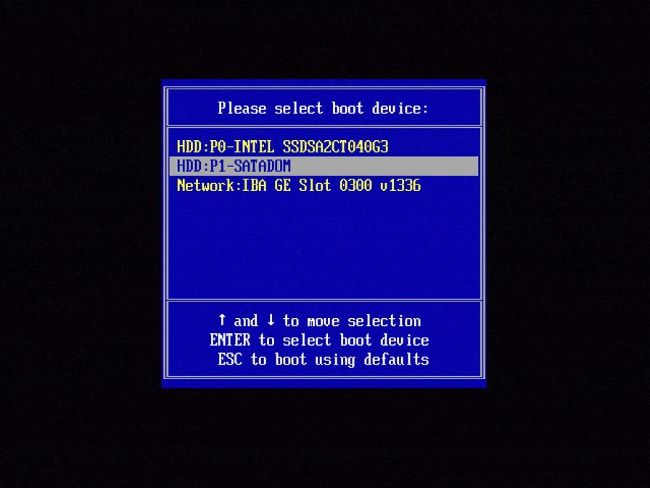
Figure B2

Figure B3
8000 Series Devices or Management Center Models FS750, FS1500 or FS3500
If you use a 8000 Series device or Management Center model FS750, FS1500, or FS3500, complete these steps in order to select the boot device:
- Power off the appliance gracefully.
- Power on the appliance and press the F6 key repeatedly while the appliance boots up in order to access the boot device selection screen. See the image shown here:
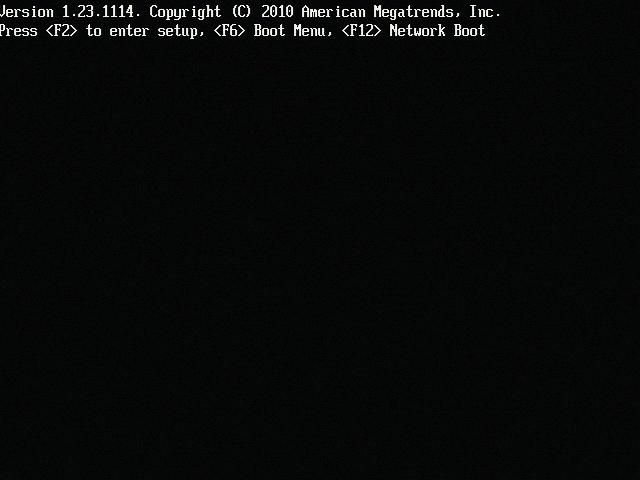
Figure C1
- Select the USB option.
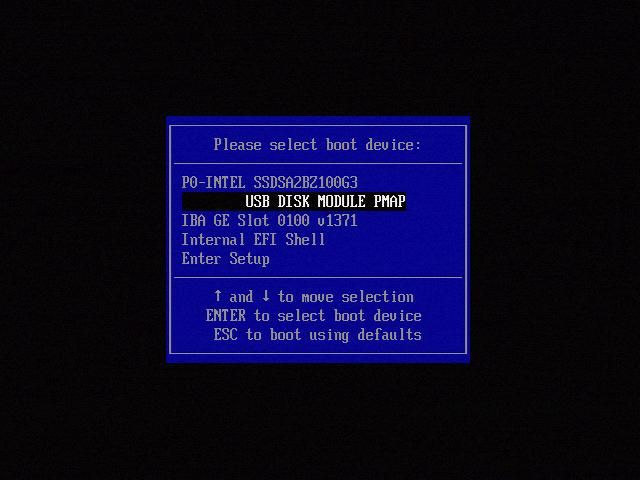
Figure C2
- The appliance boots from the System_Restore partition and displays the System_Restore menu.

Figure C3
System restore for models FMC1000, FMC2500, FMC4500 (M4-Based FMCs)
Note: For FMC4500 this model has a different boot menu, further details are in the next link
The prompt to select system restore appears differently for these models: FMC1000, FMC2500, FMC4500
- During boot, you can see this screen for 5 seconds:

Figure D1
- Select the System Restore option (#3 in this case).

Figure D2
- Select the display method for the system restore (#1 for VGA in this case)

Figure D3
- You then arrive at the prompt seen in figure 5, and the process continues as normal.
Boot Option Not Listed
It is possible that the option to boot to the reimage partition is not listed in the BIOS or the boot menu. If this is the case, the drive that contains the reimage system is possibly missing or damaged. An RMA is probably necessary.


 Feedback