Introduction
This document describes the steps required to configure external two-factor authentication for management access on Firepower Management Center (FMC).
Prerequisites
Requirements
Cisco recommends that you have knowledge of these topics:
- Firepower Management Center (FMC) object configuration
- Identity Services Engine (ISE) administration
Components Used
- Cisco Firepower Management Center (FMC) running version 6.3.0
- Cisco Identity Services Engine (ISE) running version 2.6.0.156
- Supported version of Windows (https://duo.com/docs/authproxy-reference#new-proxy-install) with connectivity to FMC, ISE, and the Internet to act as the Duo Authentication proxy server
- Windows Machine in order to access FMC, ISE and Duo Administration Portal
- Duo web account
The information in this document was created from the devices in a specific lab environment. All of the devices used in this document started with a cleared (default) configuration. If your network is live, ensure that you understand the potential impact of any command.
Background Information
The FMC administrator authenticates against the ISE server, and an additional authentication in the form of push notification is sent by Duo Authentication Proxy server to the administrator's mobile device.
Authentication Flow
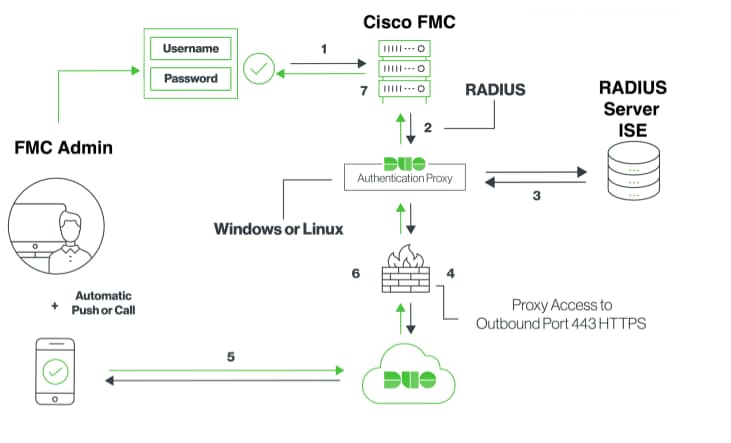
Authentication Flow Explained
- Primary authentication initiated to Cisco FMC.
- Cisco FMC sends an authentication request to the Duo Authentication Proxy.
- Primary authentication must use Active Directory or RADIUS.
- Duo Authentication Proxy connection established to Duo Security over TCP port 443.
- Secondary authentication via Duo Security’s service.
- Duo authentication proxy receives the authentication response.
- Cisco FMC GUI access is granted.
Configure
In order to complete the configuration, take into consideration these sections:
Configuration Steps on FMC
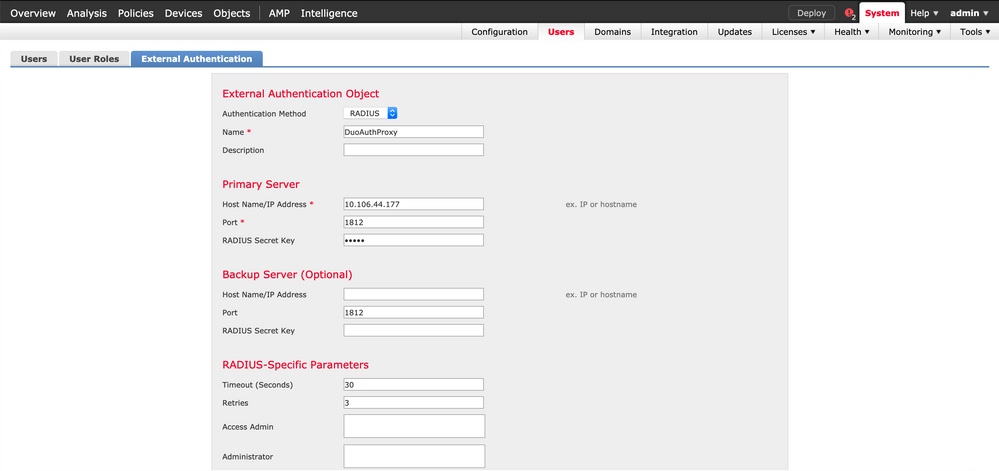
Step 1. Navigate to System > Users > External Authentication. Create an External Authentication Object and set the Authentication Method as RADIUS. Ensure Administrator is selected under Default User Role as shown in the image:
Note: 10.106.44.177 is the sample IP address of the Duo Authentication Proxy server.
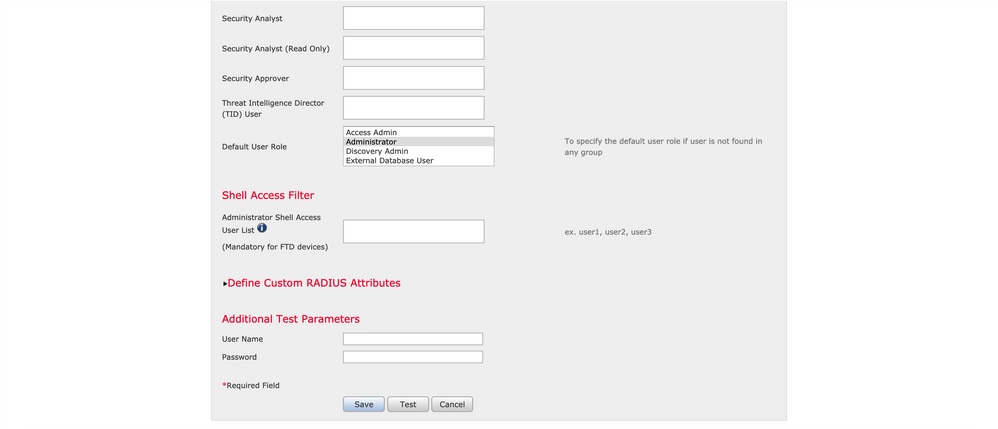
Click Save and Apply. Ignore the warning as shown in the image:

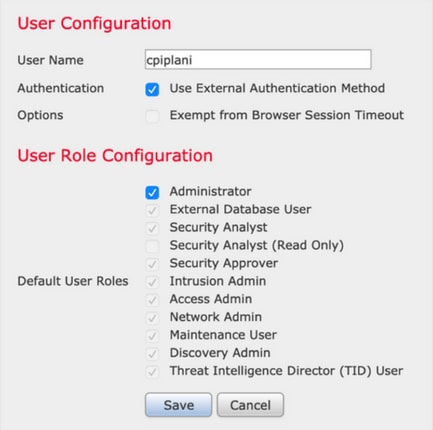
Step 2. Navigate to System > Users > Users. Create a User, and check the Authentication Method as External as shown in the image:
Step 1. Download and Install Duo Authentication Proxy Server.
Log in to the Windows machine and install the Duo Authentication Proxy Server
It is recommended to use a system with at least 1 CPU, 200 MB disk space, and 4 GB RAM
Note: This machine must have access to FMC, RADIUS server (ISE in our case) and Duo Cloud (Internet)
Step 2. Configure the authproxy.cfg file.
Open this file in a text editor such as Notepad++ or WordPad.
Note: The default location is found at C:\Program Files (x86)\Duo Security Authentication Proxy\conf\authproxy.cfg
Edit the authproxy.cfg file and add this configuration:
[radius_client]
host=10.197.223.23                 Sample IP Address of the ISE server
secret=cisco                       Password configured on the ISE server in order to register the network device
The IP address of the FMC must be configured along with the RADIUS secret key.
[radius_server_auto]
ikey=xxxxxxxxxxxxxxx
skey=xxxxxxxxxxxxxxxxxxxxxxxxxxx
api_host=api-xxxxxxxx.duosecurity.com
radius_ip_1=10.197.223.76           IP of FMC
radius_secret_1=cisco               Radius secret key used on the FMC
failmode=safe
client=radius_client
port=1812
api_timeout=
Ensure to configure the ikey, skey, and api_host parameters. In order to obtain these values, log in to your Duo account (Duo Admin Login) and navigate to Applications > Protect an Application. Next, select RADIUS authentication application as shown in the image:
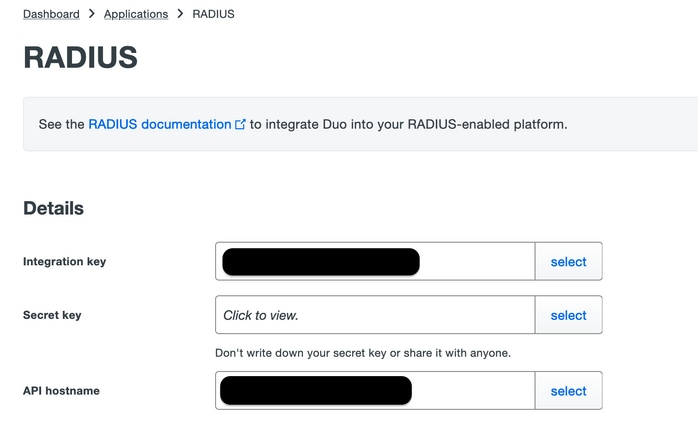
Integration key = ikey
secret key = skey
API hostname = api_host
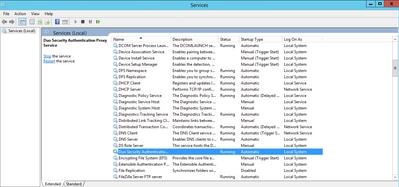
Step 3. Restart the Duo Security Authentication Proxy Service. Save the file and Restart the Duo service on the windows machine.
Open the Windows Services console (services.msc). Locate Duo Security Authentication Proxy Service in the list of services, and click Restart as shown in the image:
Configuration Steps on ISE
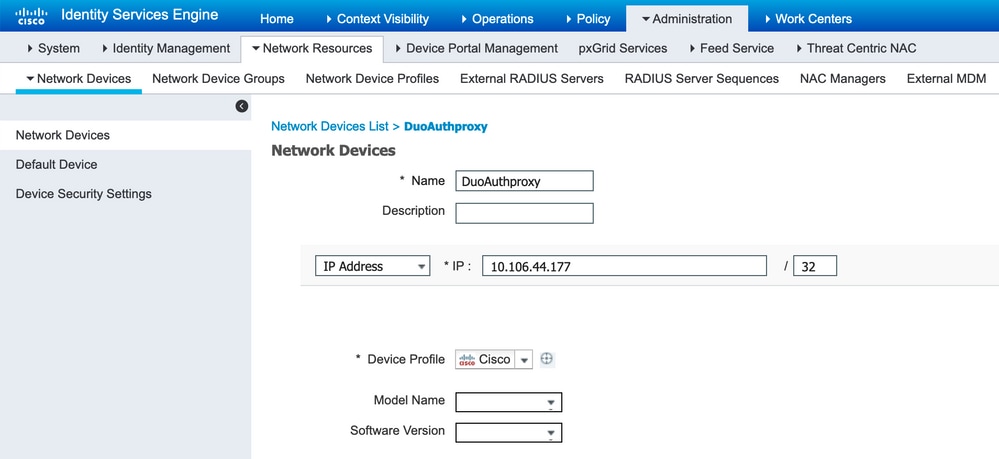
Step 1. Navigate to Administration > Network Devices, Click Add in order to configure the Network device as shown in the image:
Note: 10.106.44.177 is the sample IP address of the Duo Authentication Proxy server.
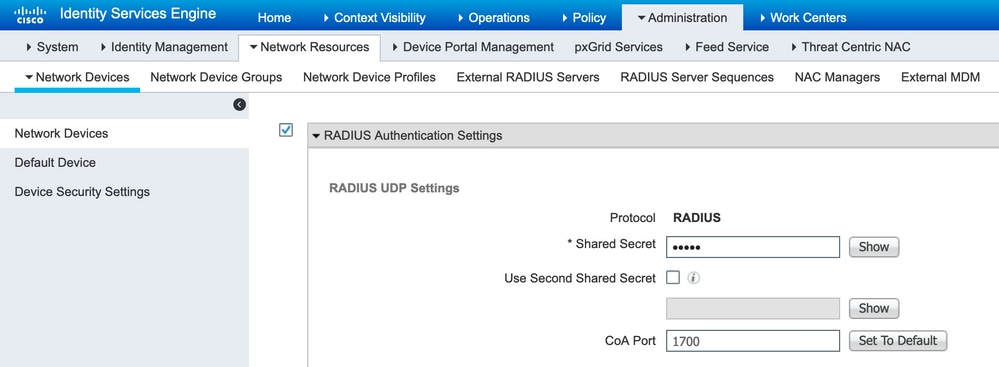
Configure the Shared Secret as mentioned in the authproxy.cfg in secret as shown in the image:
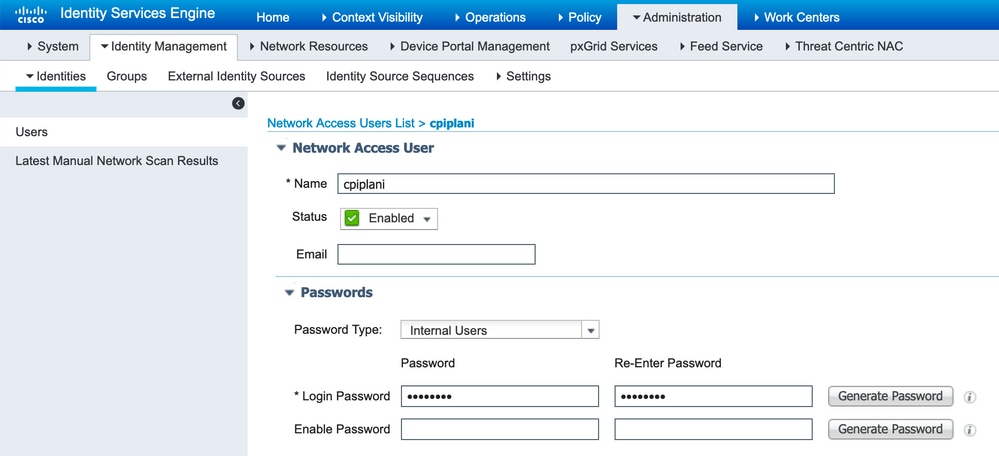
Step 2. Navigate to Administration > Identities. Click Add in order to configure the Identity user as shown in the image:
Configuration Steps on Duo Administration Portal
Step 1. Create a username and activate Duo Mobile on the end device.
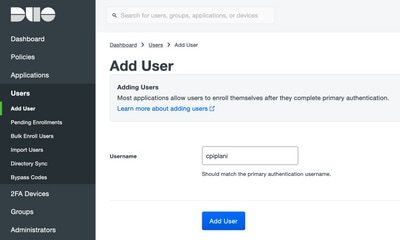
Add the user on the Duo cloud administration webpage. Navigate to Users > Add users as shown in the image:
Note: Ensure the end-user has the Duo app installed.
Manual Installation of Duo Application for IOS Devices
Manual Installation of Duo Application for Android Devices
Step 2. Automatic generation of code.
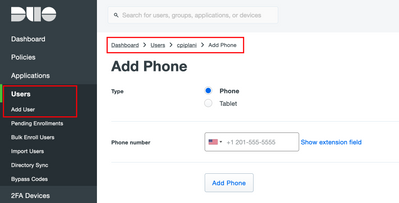
Add the user's phone number as shown in the image:

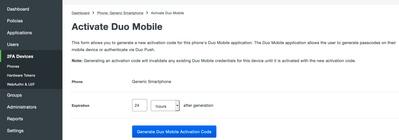
Choose Activate Duo Mobile as shown in the image:

Choose Generate Duo Mobile Activation Code as shown in the image:
Choose Send Instructions by SMS as shown in the image:
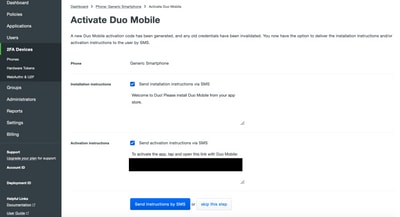
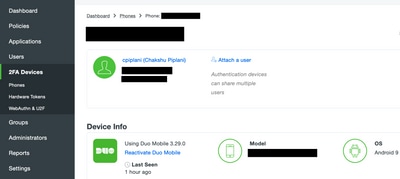
Click the link in the SMS, and Duo app gets linked to the user account in the Device Info section, as shown in the image:
Verify
Use this section to confirm that your configuration works properly.
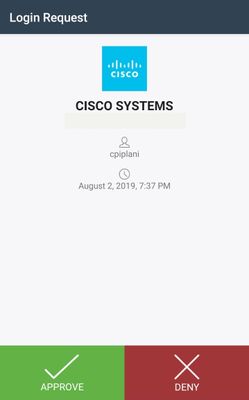
Log in to the FMC using your user credentials that were added on ISE user identity page. You must get a Duo PUSH notification on your endpoint for Two Factor Authentication (2FA), approve it, and FMC would log in as shown in the image:
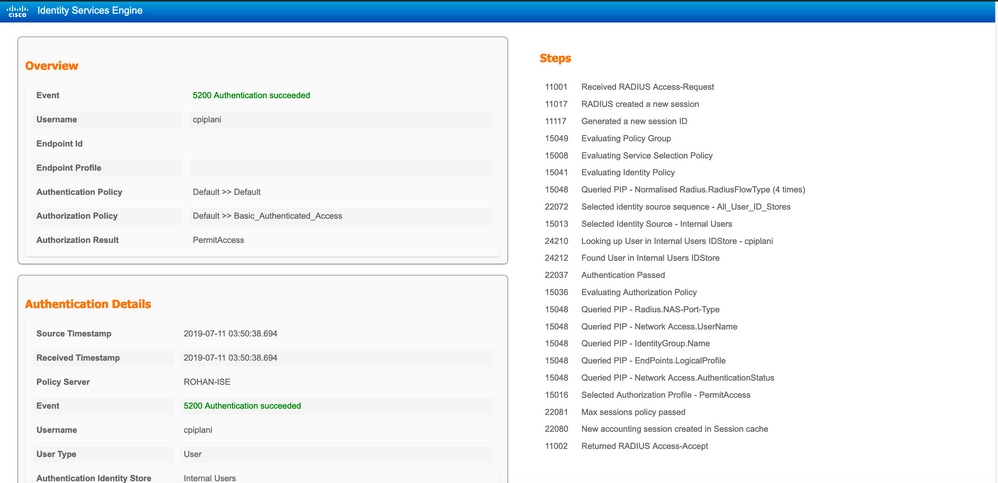
On ISE server, navigate to Operations > RADIUS > Live Logs. Find the username used for authentication on FMC, and select the detail authentication report under the detail column. In here, you must verify if the authentication is succeeded as shown in the image:
Troubleshoot
This section provides the information you can use in order to troubleshoot your configuration.
- Check the debugs on Duo Authentication Proxy Server. The logs are located under this location:
C:\Program Files (x86)\Duo Security Authentication Proxy\log
Open the file authproxy.log in a text editor such as Notepad++ or WordPad.
Log snippets when Incorrect credentials are entered and authentication is rejected by the ISE server.
2019-08-04T18:54:17+0530 [DuoForwardServer (UDP)] Sending request from 10.197.223.76 to radius_server_auto        10.197.223.76 is the IP of the FMC
2019-08-04T18:54:17+0530 [DuoForwardServer (UDP)] Received new request id 4 from ('10.197.223.76', 34524)
2019-08-04T18:54:17+0530 [DuoForwardServer (UDP)] (('10.197.223.76', 34524), 4): login attempt for username u'cpiplani'
2019-08-04T18:54:17+0530 [DuoForwardServer (UDP)] Sending request for user u'cpiplani' to ('10.197.223.23', 1812) with id 199
2019-08-04T18:54:17+0530 [RadiusClient (UDP)] Got response for id 199 from ('10.197.223.23', 1812); code 3         10.197.223.23 is the IP of the ISE Server.
2019-08-04T18:54:17+0530 [RadiusClient (UDP)] (('10.197.223.76', 34524), 4): Primary credentials rejected - No reply message in packet
2019-08-04T18:54:17+0530 [RadiusClient (UDP)] (('10.197.223.76', 34524), 4): Returning response code 3: AccessReject
2019-08-04T18:54:17+0530 [RadiusClient (UDP)] (('10.197.223.76', 34524), 4): Sending response
- On ISE, navigate to Operations > RADIUS > Live Logs to verify the authentication details.
Log snippets of successful authentication with ISE and Duo:
2019-08-04T18:56:16+0530 [DuoForwardServer (UDP)] Sending request from 10.197.223.76 to radius_server_auto
2019-08-04T18:56:16+0530 [DuoForwardServer (UDP)] Received new request id 5 from ('10.197.223.76', 34095)
2019-08-04T18:56:16+0530 [DuoForwardServer (UDP)] (('10.197.223.76', 34095), 5): login attempt for username u'cpiplani'
2019-08-04T18:56:16+0530 [DuoForwardServer (UDP)] Sending request for user u'cpiplani' to ('10.197.223.23', 1812) with id 137
2019-08-04T18:56:16+0530 [RadiusClient (UDP)] Got response for id 137 from ('10.197.223.23', 1812); code 2                         <<<< At this point we have got successful authentication from ISE Server.
2019-08-04T18:56:16+0530 [RadiusClient (UDP)] http POST to https://api-f754c261.duosecurity.com:443/rest/v1/preauth
2019-08-04T18:56:16+0530 [duoauthproxy.lib.http._DuoHTTPClientFactory#info] Starting factory <_DuoHTTPClientFactory: https://api-f754c261.duosecurity.com:443/rest/v1/preauth>
2019-08-04T18:56:17+0530 [HTTPPageGetter (TLSMemoryBIOProtocol),client] (('10.197.223.76', 34095), 5): Got preauth result for: u'auth'
2019-08-04T18:56:17+0530 [HTTPPageGetter (TLSMemoryBIOProtocol),client] Invalid ip. Ip was None
2019-08-04T18:56:17+0530 [HTTPPageGetter (TLSMemoryBIOProtocol),client] http POST to https://api-f754c261.duosecurity.com:443/rest/v1/auth
2019-08-04T18:56:17+0530 [duoauthproxy.lib.http._DuoHTTPClientFactory#info] Starting factory <_DuoHTTPClientFactory: https://api-f754c261.duosecurity.com:443/rest/v1/auth>
2019-08-04T18:56:17+0530 [duoauthproxy.lib.http._DuoHTTPClientFactory#info] Stopping factory <_DuoHTTPClientFactory: https://api-f754c261.duosecurity.com:443/rest/v1/preauth>
2019-08-04T18:56:30+0530 [HTTPPageGetter (TLSMemoryBIOProtocol),client] (('10.197.223.76', 34095), 5): Duo authentication returned 'allow': 'Success. Logging you in...'
2019-08-04T18:56:30+0530 [HTTPPageGetter (TLSMemoryBIOProtocol),client] (('10.197.223.76', 34095), 5): Returning response code 2: AccessAccept             <<<< At this point, user has hit the approve button and the authentication is successful.
2019-08-04T18:56:30+0530 [HTTPPageGetter (TLSMemoryBIOProtocol),client] (('10.197.223.76', 34095), 5): Sending response
2019-08-04T18:56:30+0530 [duoauthproxy.lib.http._DuoHTTPClientFactory#info] Stopping factory <_DuoHTTPClientFactory: https://api-f754c261.duosecurity.com:443/rest/v1/auth>
Related Information


 Feedback