Introduction
This document describes the procedure to add a Domain Name System (DNS) List to a DNS Policy so that you can apply it with Security Intelligence (SI).
Prerequisites
Requirements
Cisco recommends that you have knowledge of these topics:
- Cisco ASA55XX Threat Defense configuration
- Cisco Firepower Management Center configuration
Components Used
- Cisco ASA5506W-X Threat Defense (75) Version 6.2.3.4 (Build 42)
- Cisco Firepower Management Center for VMWare
- Software Version: 6.2.3.4 (build 42)
- OS: Cisco Fire Linux OS 6.2.3 (build13)
The information in this document was created from the devices in a specific lab environment. All of the devices used in this document started with a cleared (default) configuration. If your network is live, ensure that you understand the potential impact of any command.
Background Information
Security Intelligence works by blocking traffic to or from IP addresses, URLs, or domain names that have a known bad reputation. In this document, the main focus is domain name blacklisting.
The example used blocks 1 domain:
You could use URL filtering to block some of these sites, but the problem is that the URL must be an exact match. On the other hand, DNS blacklisting with SI can focus on domains like “cisco.com” without the need to worry about any sub-domains or changes in URL.
At the end of this document, an optional Sinkhole configuration is also demonstrated.
Network Diagram

Configure
Configure a custom DNS List with the domains we want to block and upload the list to FMC
Step 1. Create a .txt file with the domains that you would like to block. Save the .txt file on your computer:

Step 2. In FMC navigate to Object >> Object Management >> DNS Lists and Feeds >> Add DNS List and Feeds.


Step 3. Create a list called “BlackList-Domains”, the type should be list and the .txt file with the domains in question should be uploaded as seen in the images:


*Notice that when you upload the .txt file, the Number of DNS entries should read all domains. In this example, a total of 1:

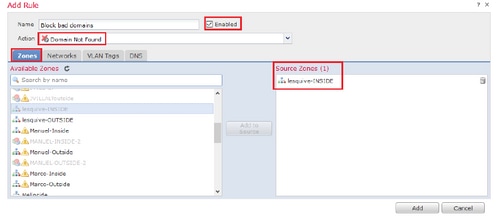
Add a new DNS Policy with the 'action configured to 'domain not found'
*Ensure you add a source zone, source network, and DNS List.
Step 1. Navigate to Policies >> Access Control >> DNS >> Add DNS Policy:


Step 2. Add A DNS rule as seen in the image:


Important information on rule order:
- The Global Whitelist is always first and takes precedence over all other rules.
- The Descendant DNS Whitelists rule only appears in multi-domain deployments, in non-leaf domains. It is always second and takes precedence over all other rules except the Global Whitelist.
- The Whitelist section precedes the Blacklist section; whitelist rules always take precedence over other rules.
- The Global Blacklist is always first in the Blacklist section and takes precedence over all other Monitor and blacklist rules.
- The Descendant DNS Blacklists rule only appears in multi-domain deployments, in non-leaf domains. It is always second in the Blacklist section and takes precedence over all other Monitor and blacklist rules except the Global Blacklist.
- The Blacklist section contains Monitor and blacklist rules.
- When you first create a DNS rule, the system position sit last in the Whitelist section if you assign a Whitelist action, or last in the Blacklist section if you assign any other action
Assign the DNS Policy to your Access Control Policy
Go to Policies >> Access Control >> The Policy for your FTD >> Security Intelligence >> DNS Policy and add the Policy you created.


Ensure you deploy all changes when finished.
Verify
Before the DNS Policy is Applied
Step 1. Check the DNS server and IP address information on your host machine as seen in the image:

Step 2. Confirm you can navigate to cisco.com as seen in the image:

Step 3. Confirm with packet captures that DNS is resolved correctly:


After the DNS Policy is Applied
Step 1. Clear DNS cache on your host with the command ipconfig /flushdns.

Step 2. Navigate to the domain in question with a web browser. It should be unreachable:

Step 3. Try to issue nslookup on the domain cisco.com. The name resolution fails.

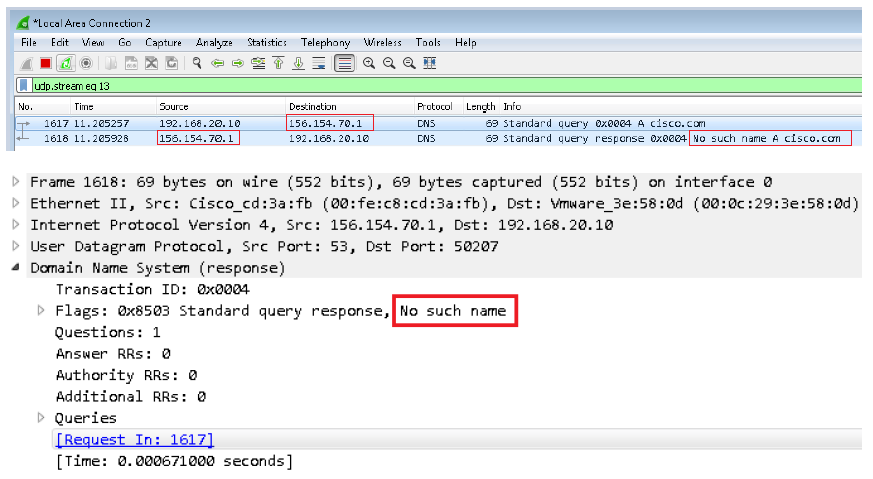
Step 4. Packet captures show a response from the FTD, instead of the DNS server.

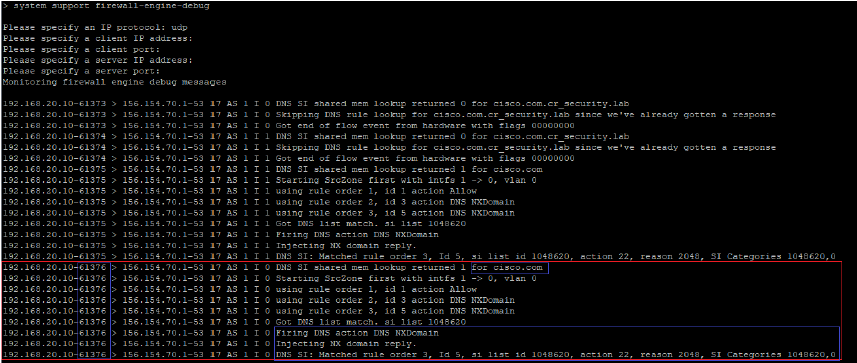
Step 5. Run debugs in FTD CLI: system support firewall-engine-debug and specify UDP protocol.

*Debugs when cisco.com is matched:

Optional Sinkhole Configuration
A DNS sinkhole is a DNS server that provides false information. Instead of returning a “No such name” DNS response to DNS queries on domains you’re blocking, it returns a fake IP address.
Step 1. Navigate to Objects >> Object Management >> Sinkhole >> Add Sinkhole and create the fake IP address information.

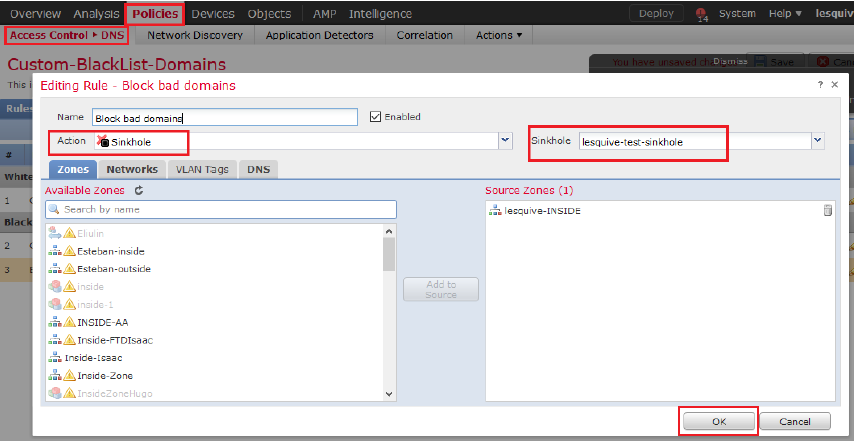
Step 2. Apply the sinkhole to your DNS Policy and deploy changes to FTD.


Verify Sinkhole is working


Troubleshoot
Navigate to Analysis >> Connections >> Security Intelligence Events to track all the events that are triggered by SI as long as you have enabled logging in the DNS Policy:

You can also use system support firewall-engine-debug command on the FTD that is managed by the FMC.

Packet captures can be helpful to confirm that DNS requests are making it to the FTD server. Don’t forget to clear the cache on your local host when testing.

