Introduction
This document describes the configuration of management access to a Firepower Threat Defense (FTD) (HTTPS and SSH) via Firesight Management Center (FMC).
Prerequisites
Requirements
Cisco recommends that you have knowledge of these topics:
- Knowledge of Firepower technology
- Basic Knowledge of ASA (Adaptive Security Appliance)
- Knowledge of Management Access on ASA via HTTPS and SSH (Secure Shell)
Components Used
The information in this document is based on these software and hardware versions:
- Adaptive Security Appliance (ASA) Firepower Threat Defense Image for ASA (5506X/5506H-X/5506W-X, ASA 5508-X, ASA 5516-X ), which runs on the software version 6.0.1 and higher.
- ASA Firepower Threat Defense Image for ASA (5515-X, ASA 5525-X, ASA 5545-X, ASA 5555-X, ASA 5585-X), which runs on the software version 6.0.1 and higher.
- Firepower Management Center (FMC) version 6.0.1 and higher.
The information in this document was created from the devices in a specific lab environment. All of the devices used in this document started with a cleared (default) configuration. If your network is live, ensure that you understand the potential impact of any command.
Background Information
With the onset of Firepower Threat Defense (FTD), the entire ASA related configuration is done on GUI.
On FTD devices that run software version 6.0.1, the ASA diagnostic CLI is accessed as you enter the system support diagnostic-cli. However, on FTD devices that run software version 6.1.0, the CLI is converged, and entire ASA commands are configured on the CLISH.

In order to gain management access directly from an external network, you must configure management access via HTTPS or SSH. This document provides the necessary configuration required to gain management access over SSH or HTTPS externally.
Note: On FTD devices that run software version 6.0.1, the CLI cannot be accessed by a local user, an external authentication must be configured in order to authenticate the users. However, on FTD devices that run software version 6.1.0, the CLI is accessed by the local admin user while an external authentication is required for all other users.
Note: On FTD devices that run software version 6.0.1, the diagnostic CLI is not directly accessible over the IP that is configured for br1 of the FTD. However, on FTD devices that run software version 6.1.0,the converged CLI is accessible over any interface configured for management access, however, the interface must be configured with an IP address.
Configure
All Management Access related configuration is configured as you navigate to the Platform Settings tab in Devices, as shown in the image:

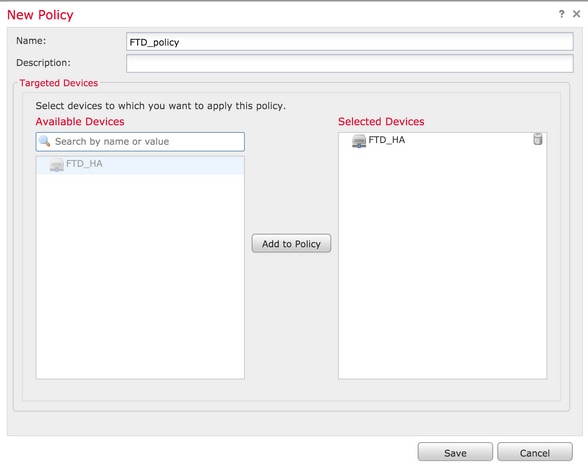
Either edit the policy which exists as you click on the pencil icon or create a new FTD policy as you click the New Policy button and select type as Threat Defense Settings, as shown in the image:

Select the FTD appliance to apply this policy and click Save, as shown in the image:
Configure Management Access
These are the four major steps taken to configure the Management Access.
Step 1. Configure IP on FTD Interface via FMC GUI.
Configure an IP on the interface over which the FTD is accessible via SSH or HTTPS. Edit the interfaces which exist as you navigate to the Interfaces tab of the FTD.
Note: On FTD devices that run software version 6.0.1, the default management interface on the FTD is the diagnostic0/0 interface. However, on FTD devices that run software version 6.1.0, all interfaces support management access except the diagnostic interface.
There are six steps to configure the diagnostic interface.
Step 1. Navigate to Device > Device Management.
Step 2. Select the Device or FTD HA Cluster.
Step 3. Navigate to the Interfaces tab.
Step 4. Click the pencil icon to configure/edit the interface to gain the management access, as shown in the image:

Step 5. Select the enable checkbox to enable the interfaces. Navigate to the Ipv4 tab, choose the IP Type as static or DHCP. Now enter an IP address for the Interface and click OK, as shown in the image:
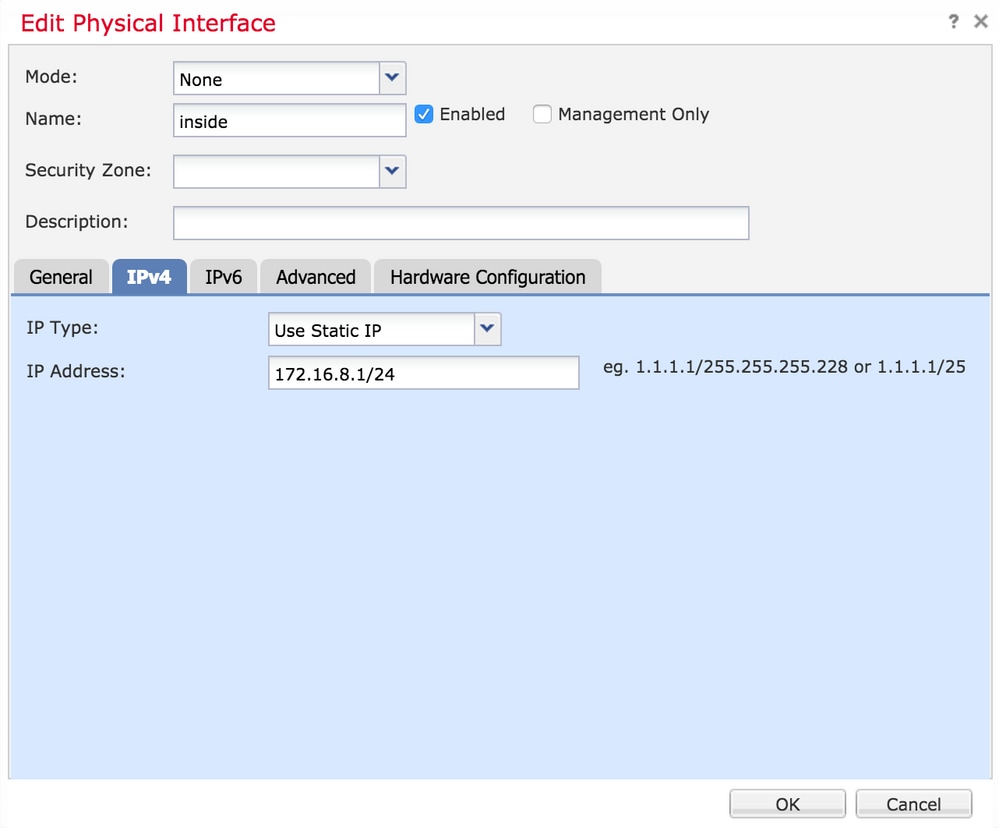
Step 6. Click Save and then deploy the policy to the FTD.
Note: The Diagnostic interface cannot be used to access the Converged CLI over SSH on devices with software version 6.1.0
Step 2. Configure External Authentication.
External authentication facilitates the integration of the FTD to an Active Directory or RADIUS Server for user authentication. This is a necessary step because locally configured users do not have direct access to the diagnostic CLI. The diagnostic CLI and the GUI are accessed only by users that are authenticated via Lightweight Directory Access Protocol (LDAP) or RADIUS.
There are 6 steps to configure External Authentication.
Step 1. Navigate to Devices > Platform Settings.
Step 2. Either edit the policy which exists as you click on the pencil icon or create a new FTD policy as you click the New Policy button and select type as Threat Defense Settings.
Step 3. Navigate to the External Authentication tab, as shown in the image:

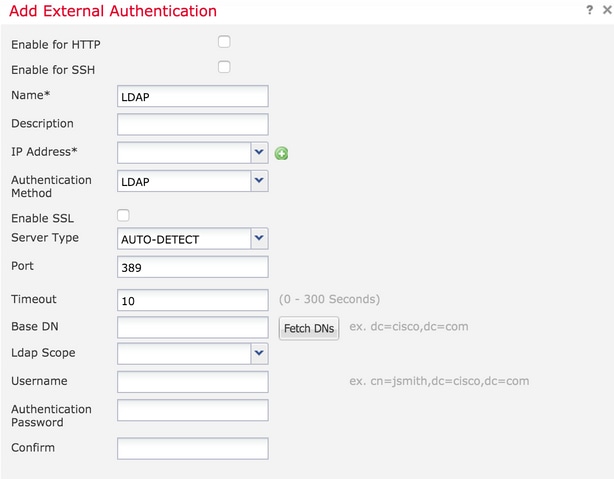
Step 4. As you click on Add, a dialogue box appears as shown in the image:
- Enable for HTTP- Enable this option to provide access the FTD over HTTPS.
- Enable for SSH- Enable this option to provide access the FTD over SSH.
- Name- Enter the name for LDAP connection.
- Description- Enter an optional description for the External Authentication object.
- IP address- Enter a network object which stores the IP of the External Authentication Server. If there is no network object configured, create a new one. Click on the (+) icon.
- Authentication Method-Select RADIUS or LDAP protocol for authentication.
- Enable SSL-Enable this option to encrypt the Authentication traffic.
- Server Type- Select the Server type. The well-known server types are MS Active Directory, Sun, OpenLDAP and Novell. By default, the option is set to auto-detect the server type.
- Port- Enter the port over which the authentication takes place.
- Timeout- Enter a timeout value for the authentication requests.
- Base DN- Enter a base DN to provide a scope within which the user can be present.
- LDAP Scope- Select the LDAP scope to look. The scope is within the same level or to look within the subtree.
- Username- Enter a username to bind to the LDAP directory.
- Authentication password-Enter the password for this user.
- Confirm- Re-enter the password.
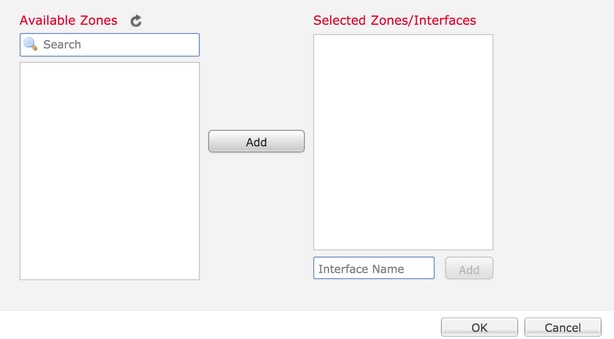
- Available Interfaces- A list of available interfaces on the FTD is displayed.
- Selected zones and interfaces- This shows a list of interfaces over which the authentication server is accessed from.
For RADIUS authentication, there is no server type Base DN or LDAP Scope. The port is the RADIUS port 1645.
Secret- Enter the secret key for RADIUS.
Step 5. Once the configuration is done, click OK.
Step 6. Save the policy and Deploy it to the Firepower Threat Defense device.
Note: External Authentication cannot be used to access the Converged CLI over SSH on devices with software version 6.1.0
Step 3. Configure SSH Access.
SSH provides direct access to the converged CLI. Use this option to directly access the CLI and run debug commands.This section describes how to configure SSH in order to access the FTD CLI.
Note: On FTD devices that run software version 6.0.1, the SSH configuration on Platform Settings provides access to the diagnostic CLI directly and not the CLISH. You need to connect to the IP address configured on br1 to access the CLISH. However, on FTD devices that run software version 6.1.0, all interfaces navigate to the converged CLI when accessed over SSH
There are 6 steps to configure SSH on the ASA
On 6.0.1 devices only:
These steps are performed on FTD devices with software version less than 6.1.0 and greater than 6.0.1. On 6.1.0 devices these parameters are inherited from the OS.
Step 1. Navigate to Devices>Platform Settings.
Step 2. Either edit the policy which exists as you click on the pencil icon or create a new Firepower Threat Defense policy as you click the New Policy button and select type as Threat Defense Settings.
Step 3. Navigate to the Secure Shell Section. A page appears, as shown in the image:
SSH version: Select the SSH version to enable on the ASA. There are three options:
- 1: Enable only SSH version 1
- 2: Enable only SSH version 2
- 1 and 2: Enable both SSH version 1 and 2
Timeout: Enter the desired SSH timeout in minutes.
Enable Secure Copy- Enable this option to configure the device to allow Secure Copy(SCP) connections and act as an SCP server.
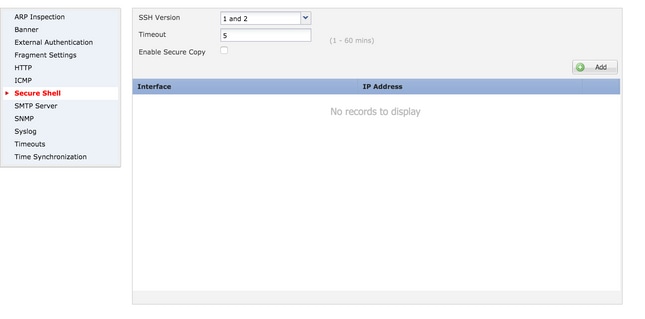
On 6.0.1 and 6.1.0 devices:
These steps are configured to limit the management access via SSH to specific interfaces and to specific IP addresses.
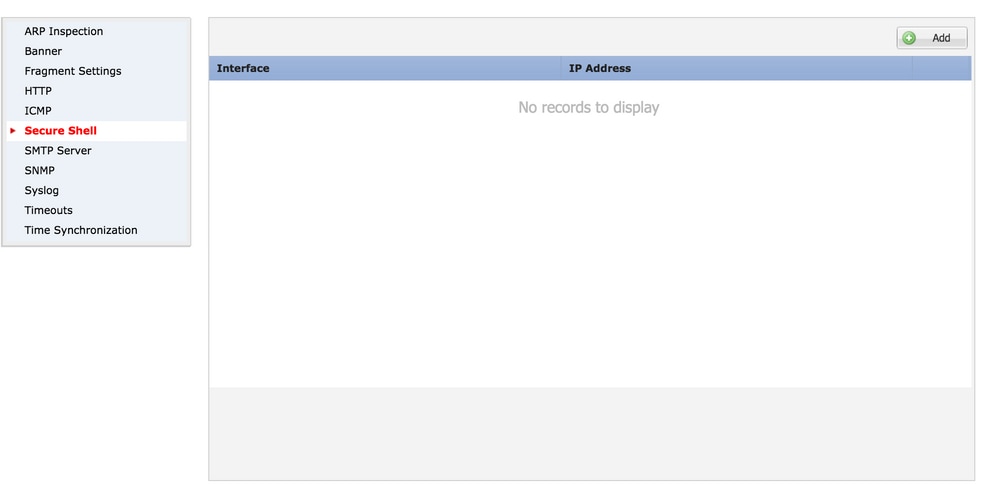
Step 1. Click Add and configure these options:
IP address: Select a network object which contains the subnets which are allowed to access the CLI over SSH. If a network object is not present, create one as you click on the (+) icon.
Selected Zones/interfaces: Select the zones or interfaces over which the SSH server is accessed from.
Step 2. Click OK, as shown in the image:
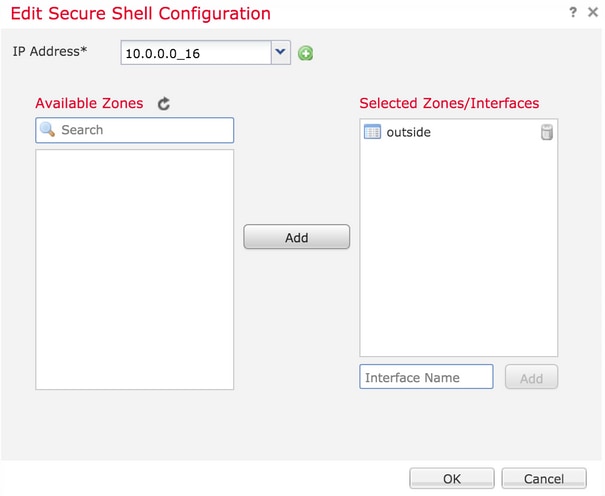
Configuration for SSH is viewed in the converged CLI (ASA Diagnostic CLI in 6.0.1 devices) with use of this command.
> show running-config ssh
ssh 172.16.8.0 255.255.255.0 inside
Step 3. Once the SSH configuration is done, click Save and then deploy the policy to the FTD.
Step 4. Configure HTTPS access.
In order to enable HTTPS access to one or more interfaces, navigate to the HTTP section in platform settings. HTTPS access is specifically useful to download the packet captures from the diagnostic secure web interface directly for the analysis.
There are 6 steps to configure HTTPS access.
Step 1. Navigate to Devices > Platform Settings
Step 2. Either edit the platform settings policy which exists as you click the pencil icon beside the policy or create a new FTD policy as you click New Policy. Select the type as Firepower Threat Defense.
Step 3. As you navigate to the HTTP section, a page appears as shown in the image.
Enable HTTP server: Enable this option to make to enable HTTP server on the FTD.
Port: Select the port on which the FTD accepts management connections.
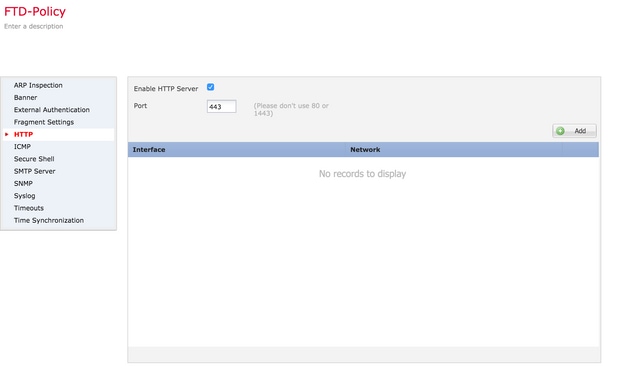
Step 4.Click Add and apage appears as shown in the image:
IP address- Enter the subnets that are allowed to have HTTPS access to the diagnostic interface. If a network object is not present create one and use the (+) option.
Selected zones/Interfaces- Similar to SSH, HTTPS configuration needs to have an interface configured over which it is accessible via HTTPS. Select the zones or interface over which the FTD is to be accessed via HTTPS.
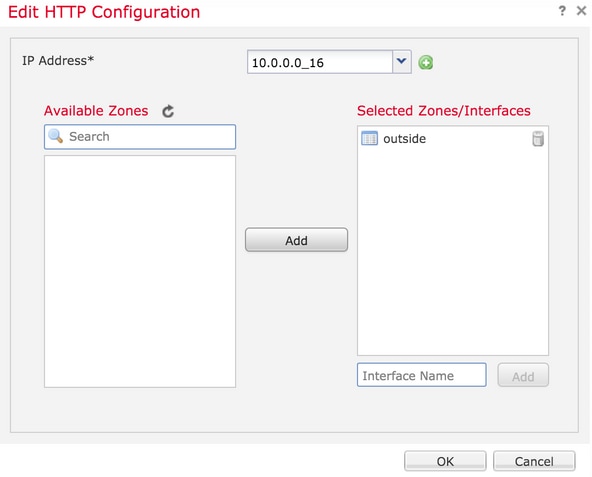
Configuration for HTTPS is viewed in the converged CLI (ASA Diagnostic CLI in 6.0.1 devices) and uses this command.
> show running-config http
http 172.16.8.0 255.255.255.0 inside
Step 5. Once the necessary configuration is done select OK.
Step 6. Once all the required information has been entered click Save and then deploy the policy to the device.
Verify
There is currently no verification procedure available for this configuration.
Troubleshoot
These are the basic steps to troubleshoot management access issue on the FTD.
Step 1. Ensure that the interface is enabled and is configured with an IP address.
Step 2. Ensure that an External Authentication works as configured and its reachability from the appropriate interface specified in the External Authentication section of the Platform Settings.
Step 3. Ensure routing on the FTD is accurate. In FTD software version 6.0.1, navigate to system support diagnostic-cli. Run the commands show route and show route management-only to see the routes for the FTD and the management interfaces respectively.
In FTD software version 6.1.0, run the commands directly in the converged CLI.
Related Information


 Feedback