Grant Minimum Permission to an Active Directory User Account Used by the Sourcefire User Agent
Available Languages
Introduction
This document describes how to provide an Active Directory (AD) user with the minimal permissions needed to query the AD domain controller. The Sourcefire User Agent uses an AD user in order to query the AD domain controller. In order to perform a query, an AD user does not require any additional permissions.
Prerequisites
Requirements
Cisco requires that you install the Sourcefire User Agent on a Microsoft Windows system and provide access to the AD domain controller.
Components Used
This document is not restricted to specific software and hardware versions.
The information in this document was created from the devices in a specific lab environment. All of the devices used in this document started with a cleared (default) configuration. If your network is live, make sure that you understand the potential impact of any command.
Configure
First, an administrator must create a new AD user specifically for User Agent access. If this new user is not a member of the domain administrators group (and they should not be), the user might have to be explicitly granted permission to access the Windows Management Instrumentation (WMI) security logs. In order to grant permission, complete these steps:
- Open the WMI Control Console:
- On the AD server, choose the Start menu.
- Click Run and enter wmimgmt.msc.
- Click OK. The WMI Control Console appears.
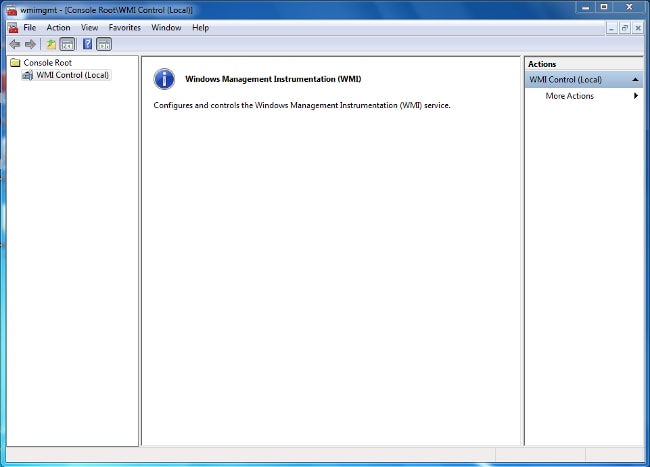
- On the AD server, choose the Start menu.
- On the WMI console tree, right-click WMI Control and then click Properties.
- Click the Security tab.
- Select the namespace for which you want to give a user or group access (
Root\CIMV2), and then click Security.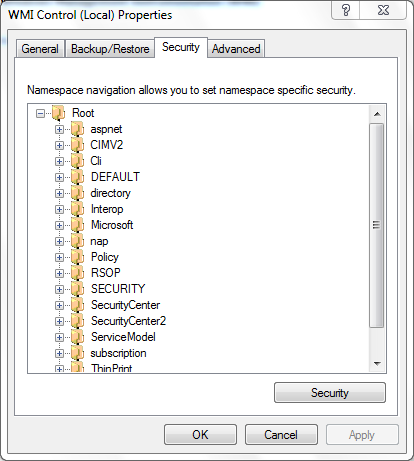
- In the Security dialog box, click Add.
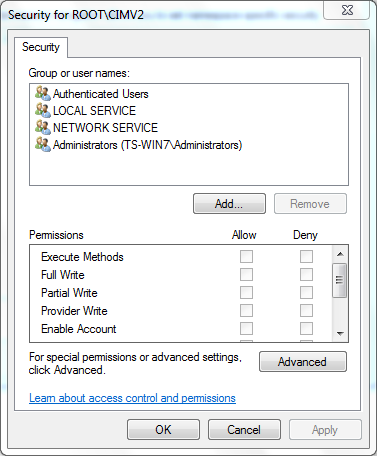
- In the Select Users, Computers, or Groups dialog box, enter the name of the object (user or group) that you want to add. Click Check Names in order to verify your entry and then click OK. You might have to change the location or click Advanced in order to query for objects. See the Context-sensitive help (?) for more detail.
- In the Security dialog box, in the Permissions section, choose Allow or Deny in order to grant permissions to the new user or group (easiest to give all permissions). The user must be given at least the Remote Enable permission.
- Click Apply in order to save changes. Close the window.
Verify
There is currently no verification procedure available for this configuration.
Troubleshoot
This section provides information you can use to troubleshoot your configuration.
If an issue persists after the configuration changes, update the Distributed Component Object Model (DCOM) settings in order to allow remote access:
- Choose the Start menu.
- Click Run and enter DCOMCNFG.
- Click OK. The Component Services dialog box appears.
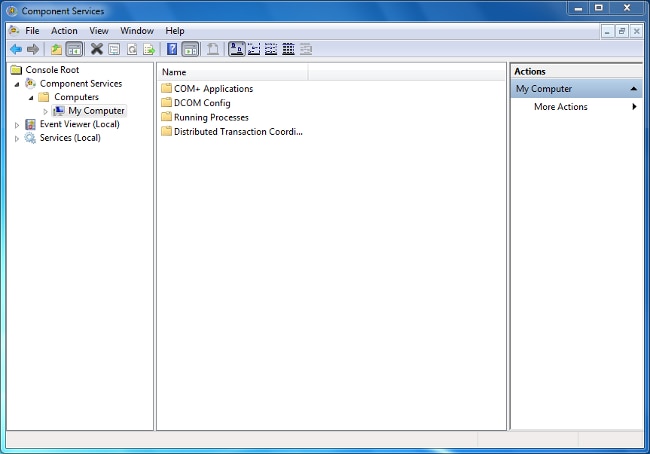
- In the Component Services dialog box, expand Component Services, expand Computers, and then right-click My Computer and choose Properties.
- In the My Computer Properties dialog box, click the COM Security tab.
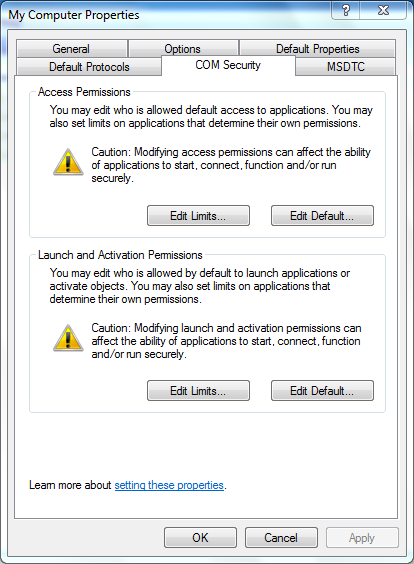
- Under Launch and Activation Permissions, click Edit Limits.
- In the Launch and Activation Permission dialog box, complete these steps if your name or your group does not appear in the Groups or user names list:
- In the Launch and Activation Permission dialog box, click Add.
- In the Select Users, Computers, or Groups dialog box, enter your name and the group in the Enter the object names to select field, and then click OK.
- In the Launch and Activation Permission dialog box, click Add.
- In the Launch and Activation Permission dialog box, select your user and group in the Group or user names section.
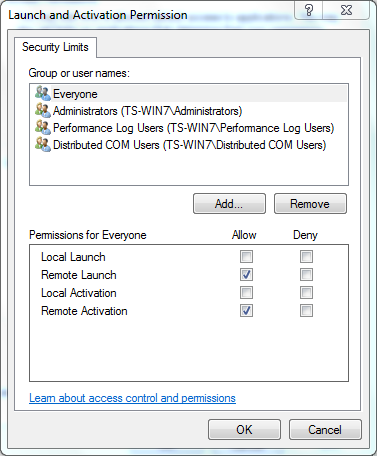
- In the Allow column under Permissions for User, check the Remote Launch and Remote Activation check boxes, and then click OK.
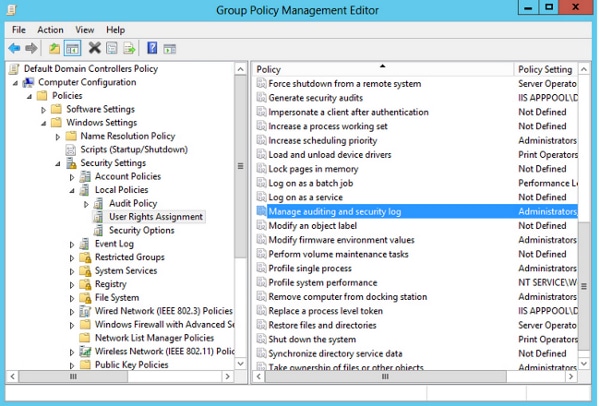
- If the problem persists, on the Domain Controller try to add the user in the Manage auditing and security log policy. In order to add the user, complete these steps:
- Choose the Group Policy Management Editor.
- Choose Computer Configuration > Windows Settings > Security Settings > Local Policies > User Rights Assignment.
- Choose Manage auditing and security log.
- Add the user.
- Choose the Group Policy Management Editor.
Revision History
| Revision | Publish Date | Comments |
|---|---|---|
1.0 |
05-Jun-2015 |
Initial Release |
Contact Cisco
- Open a Support Case

- (Requires a Cisco Service Contract)


 Feedback