FlexVPN Deployment: AnyConnect IKEv2 Remote Access with EAP-MD5
Available Languages
Contents
Introduction
This document provides a sample configuration of how to set up Remote Access on IOS using the FlexVPN toolkit.
Remote Access VPN allows end-clients using various Operating Systems to securely connect to their Corporate or Home networks through non-secure medium such as the Internet. In the presented scenario, VPN tunnel is being terminated on a Cisco IOS Router using IKEv2 protocol.
This document shows how to authenticate and authorize users using Access Control Server (ACS) through EAP-MD5 method.
Prerequisites
Network Diagram
Cisco IOS Router has two interfaces - one towards ACS 5.3:

Requirements
There are no specific requirements for this document.
Components Used
The information in this document is based on these software and hardware versions:
-
ACS 5.3 with patch 6
-
IOS Router with 15.2(4)M software
-
Windows 7 PC with AnyConnect 3.1.01065
Conventions
Refer to the Cisco Technical Tips Conventions for more information on document conventions.
Background
In IKEv1 XAUTH is used in phase 1.5, you can do authentication of users locally on an IOS router and remotely using RADIUS/TACACS+. IKEv2 does not support XAUTH and phase 1.5 any more. It contains built-in EAP support, which is done in phase IKE_AUTH. The biggest advantage of this is in IKEv2 design and EAP is a well-known standard.
EAP supports two modes:
-
Tunneling—EAP-TLS,EAP/PSK, EAP-PEAP etc.
-
Non-tunneling—EAP-MSCHAPv2, EAP-GTC, EAP-MD5 etc.
In this example, EAP-MD5 in non-tunneling mode is used because it is EAP outer authentication method supported currently in ACS 5.3.
EAP can be only used to authentication initiator (client) to responder (IOS in this case).
IOS Initial Configuration
IOS - CA
First of all you need to create Certificate Authority (CA) and create an identity certificate for the IOS Router. The client will verify the router's identity based on that Certificate.
Configuration of CA on IOS looks like:
crypto pki server CA
grant auto
hash sha1
eku server-auth client-auth
You need to remember about Extended Key Usage (Server-Auth needed for EAP, for RSA-SIG you also need Client-Auth).
Enable CA using the no shutdown command in crypto pki server CA.
IOS - Identity certificate
Next, enable Simple Certificate Enrollment Protocol (SCEP) for certificate and configure trustpoint.
ip http server
crypto pki trustpoint CA-self
enrollment url http://10.1.1.2:80
fqdn 10.1.1.2
ip-address 10.1.1.2
subject-name cn=10.1.1.2,ou=TAC
revocation-check none
eku request server-auth client-auth
Then, authenticate and enroll the certificate:
(config)#crypto pki authenticate CA-self
Certificate has the following attributes:
       Fingerprint MD5: 741C671C 3202B3AE 6E05161C 694CA53E
      Fingerprint SHA1: 8C99513C 2198470F 7CB58FA2 32D8AA8D FC31D1ED
% Do you accept this certificate? [yes/no]: yes
Trustpoint CA certificate accepted.

R1(config)#crypto pki enroll CA-self
%
% Start certificate enrollment ..
% Create a challenge password. You will need to verbally provide this
   password to the CA Administrator in order to revoke your certificate.
   For security reasons your password will not be saved in the configuration.
   Please make a note of it.
Password:
Re-enter password:
% The subject name in the certificate will include: cn=10.1.1.2,ou=TAC
% The subject name in the certificate will include: 10.1.1.2
% Include the router serial number in the subject name? [yes/no]: no
% The IP address in the certificate is 10.1.1.2
Request certificate from CA? [yes/no]: yes
% Certificate request sent to Certificate Authority
% The 'show crypto pki certificate verbose CA-self' command
will show the fingerprint.
R1(config)#
*Dec  2 10:57:44.141: CRYPTO_PKI:  Certificate Request Fingerprint MD5:
BF8EF4B6 87FA8162 9079F917 698A5F36
*Dec  2 10:57:44.141: CRYPTO_PKI:  Certificate Request Fingerprint SHA1:
AC13FEA3 295F7AE6 7014EF60 784E33AF FD94C41D
R1(config)#
*Dec  2 10:57:44.198: %PKI-6-CERTRET: Certificate received from
Certificate Authority
If you do not want to have prompt messages in AnyConnect remember that cn needs to be equal to hostname/IP addresses configured in the AnyConnect profile.
In this example, cn=10.1.1.2. Therefore, in AnyConnect 10.1.1.2 is entered as IP address of the server in the AnyConnect xml profile.
IOS - AAA and Radius configuration
You need to configure Radius and AAA authentication and authorization:
aaa new-model
radius-server host 192.168.56.202 key cisco
aaa group server radius SERV
server 192.168.56.202
aaa authentication login eap-list group SERV
aaa authorization network eap-list group SERV
ACS Initial configuration
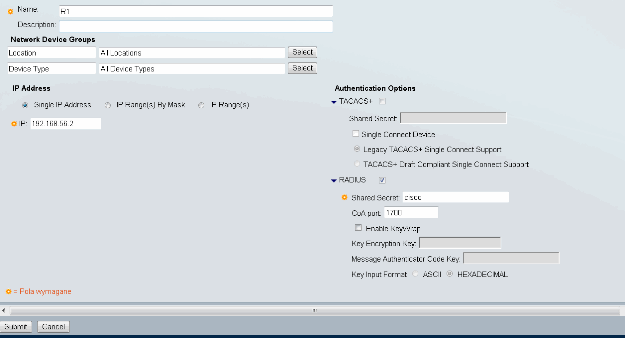
First, add the new Network Device in ACS (Network Resources > Network Devices and AAA Clients > Create):
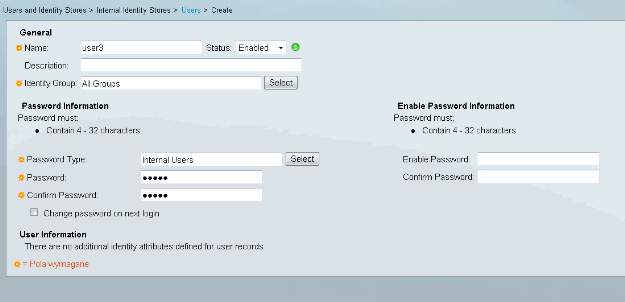
Add a user (Users and Identity Stores > Internal Identity Stores > Users > Create):
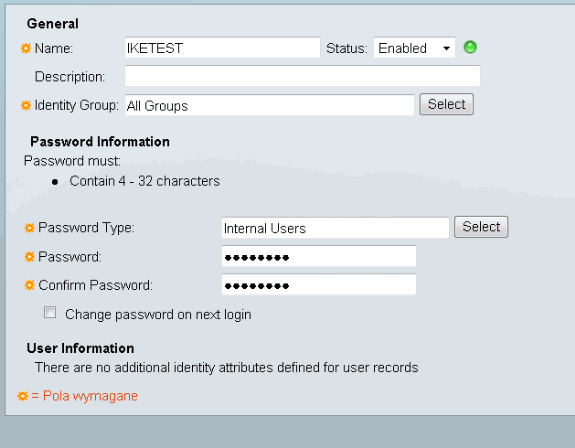
Add a user for authorization. In this example, it is IKETEST. The password needs to be "cisco" because it is the default sent by IOS.
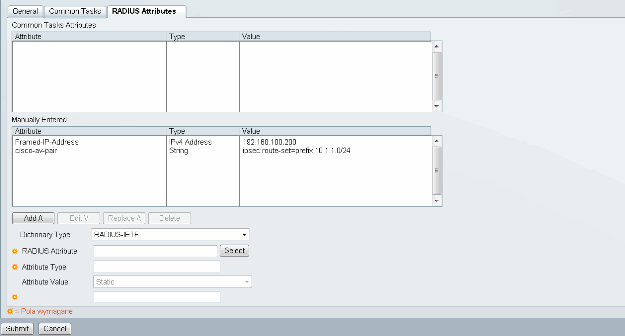
Next, create an Authorization profile for the users (Policy elements > Authorization and Permissions > Network Access > Authorization Profiles > Create).
In this example, it is called POOL. In this example, Split-Tunnel AV Pair (as a prefix) is entered and Framed-IP-Address as IP address that is going to be assigned to the connected client. The list of all supported AV Pairs can be found here: http://www.cisco.com/en/US/docs/ios-xml/ios/sec_conn_ike2vpn/configuration/15-2mt/sec-apx-flex-rad.html
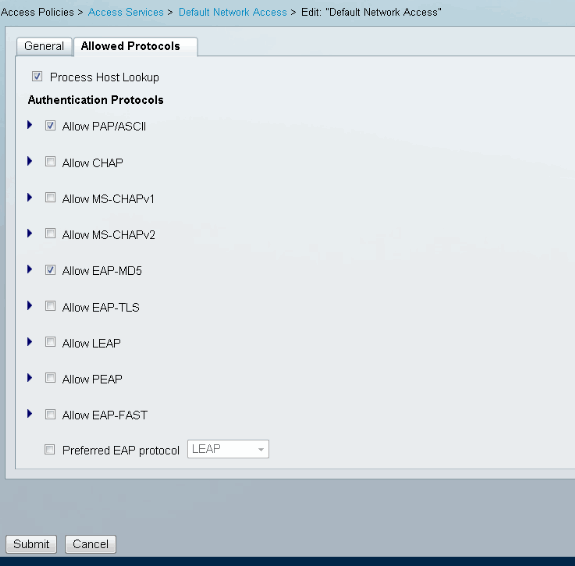
Then, you need to turn on support of EAP-MD5 (for authentication) and PAP/ASCII (for authorization) in Access Policy. The default is used in this example (Access Policies > Default Network Access):
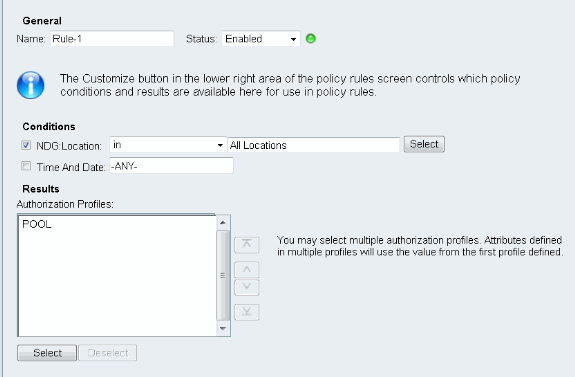
Create a condition for in Access Policy and assign the authorization profile that was created. In this case a condition for NDG:Location in All Locations is created, thus for all of Radius Authorizations request will provide POOL Authorization Profile (Access Policies > Access Services > Default Network Access):
You should be able to test on an IOS router if the user can authenticate properly:
R1#test aaa group SERV user3 Cisco123 new-code
User successfully authenticated

USER ATTRIBUTES
username             0   "user3"
addr                 0   192.168.100.200
route-set            0   "prefix 10.1.1.0/24"
IOS FlexVPN configuration
You need to create IKEv2 proposal and policy (you might not have to, refer to CSCtn59317 ). Policy is created only for one of the IP addresses (10.1.1.2) in this example.
crypto ikev2 proposal PROP
encryption 3des
integrity sha1
group 2

crypto ikev2 policy 5
match address local 10.1.1.2
proposal PROP
Then, create an IKEV2 profile and IPsec profile that will bind to Virtual-Template.
Make sure you are turning off http-url cert, as advised in the configuration guide.
crypto ikev2 profile PROF
match identity remote address 0.0.0.0
match identity remote key-id IKETEST
authentication remote eap query-identity
authentication local rsa-sig
pki trustpoint CA-self
aaa authentication eap eap-list
aaa authorization user eap list eap-list IKETEST
virtual-template 1

no crypto ikev2 http-url cert
crypto ipsec transform-set transform1 esp-3des esp-sha-hmac
crypto ipsec profile PROF
set transform-set transform1
set ikev2-profile PROF
interface Virtual-Template1 type tunnel
ip unnumbered Ethernet0/0
tunnel mode ipsec ipv4
tunnel protection ipsec profile PROF
In this example, authorization is set up based on user IKETEST, which was created in the ACS configuration.
Windows configuration
Importing CA to Windows Trusts
Export the CA certificate on IOS (make sure to export identity certificate and take only the first part):
R1(config)#crypto pki export CA-self pem terminal
% CA certificate:
-----BEGIN CERTIFICATE-----
MIIB8zCCAVygAwIBAgIBATANBgkqhkiG9w0BAQUFADANMQswCQYDVQQDEwJDQTAe
Fw0xMjExMjYxNzMzMzlaFw0xNTExMjYxNzMzMzlaMA0xCzAJBgNVBAMTAkNBMIGf
MA0GCSqGSIb3DQEBAQUAA4GNADCBiQKBgQCvDR4lHOcrj42QfHpRuNu4EyFrLR8H
TbPanXYV+GdCBmu53pDILE00ASEHByD6DYBx01EZuDsiolJ7t2MPTguB+YZe6V4O
JbtayyxtZGmF7+eDqRegQHHC394adQQWl2ojgQiuTHeRDTqDJR8i5gN2Ee+KOsr3
+OjnHjUmXb/I6QIDAQABo2MwYTAPBgNVHRMBAf8EBTADAQH/MA4GA1UdDwEB/wQE
AwIBhjAfBgNVHSMEGDAWgBTH5Sdh69q4HAJulLQYLbYH0Nk9zzAdBgNVHQ4EFgQU
x+UnYevauBwCbpS0GC22B9DZPc8wDQYJKoZIhvcNAQEFBQADgYEADtBLiNXnl+LC
PIgJ0nl/jH5p2IwVlzwbPbZcOsZ9mn54QaqrhmhbHnmqKQJl/20+JPE6p+4noICq
VBrxoiX2KYQ1OwmEScPpQ2XJ9vhGqtQ4Xcx3g20HhxxFDfp2XuW7hwU0W8dTCmZw
4vodj47qEXKI6pGuzauw9MN1xhkNarc=
-----END CERTIFICATE-----
Copy the part between BEGIN CERTIFICATE and END CERTIFICATE and paste it to Notepad in Windows and save as a file CA.crt.
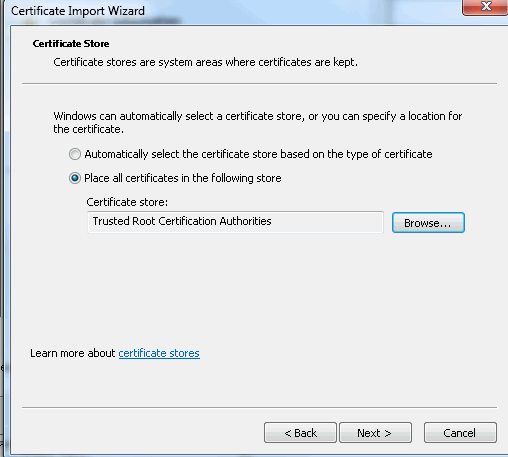
You need to install it as in Trusted Root Authorities (double click on file > Install Certificate > Place all certificates in the following store > Trusted Root Certification Authorities):
Configuring AnyConnect XML Profile
In C:\ProgramData\Cisco\Cisco AnyConnect Secure Mobility Client\Profile create a file "whatever.xml" and paste this:
<?xml version="1.0" encoding="UTF-8"?>
<AnyConnectProfile xmlns="http://schemas.xmlsoap.org/encoding/"
 xmlns:xsi="http://www.w3.org/2001/XMLSchema-instance"
 xsi:schemaLocation="http://schemas.xmlsoap.org/encoding/ AnyConnectProfile.xsd">
    <ClientInitialization>
        <UseStartBeforeLogon UserControllable="true">false</UseStartBeforeLogon>
        <AutomaticCertSelection UserControllable="true">
         false</AutomaticCertSelection>
        <ShowPreConnectMessage>false</ShowPreConnectMessage>
        <CertificateStore>All</CertificateStore>
        <CertificateStoreOverride>false</CertificateStoreOverride>
        <ProxySettings>Native</ProxySettings>
        <AllowLocalProxyConnections>true</AllowLocalProxyConnections>
        <AuthenticationTimeout>12</AuthenticationTimeout>
        <AutoConnectOnStart UserControllable="true">false</AutoConnectOnStart>
        <MinimizeOnConnect UserControllable="true">true</MinimizeOnConnect>
        <LocalLanAccess UserControllable="true">false</LocalLanAccess>
        <ClearSmartcardPin UserControllable="true">true</ClearSmartcardPin>
        <IPProtocolSupport>IPv4,IPv6</IPProtocolSupport>
        <AutoReconnect UserControllable="false">true
            <AutoReconnectBehavior UserControllable="false">DisconnectOnSuspend
            </AutoReconnectBehavior>
        </AutoReconnect>
        <AutoUpdate UserControllable="false">true</AutoUpdate>
        <RSASecurIDIntegration UserControllable="false">
         Automatic</RSASecurIDIntegration>
        <WindowsLogonEnforcement>SingleLocalLogon</WindowsLogonEnforcement>
        <WindowsVPNEstablishment>LocalUsersOnly</WindowsVPNEstablishment>
        <AutomaticVPNPolicy>false</AutomaticVPNPolicy>
        <PPPExclusion UserControllable="false">Disable
            <PPPExclusionServerIP UserControllable="false"></PPPExclusionServerIP>
        </PPPExclusion>
        <EnableScripting UserControllable="false">false</EnableScripting>
        <EnableAutomaticServerSelection UserControllable="false">false
            <AutoServerSelectionImprovement>20</AutoServerSelectionImprovement>
            <AutoServerSelectionSuspendTime>4</AutoServerSelectionSuspendTime>
        </EnableAutomaticServerSelection>
        <RetainVpnOnLogoff>false
        </RetainVpnOnLogoff>
    </ClientInitialization>
    <ServerList>
           <HostEntry>
            <HostName>IOSEAP-MD5</HostName>
            <HostAddress>10.1.1.2</HostAddress>
            <PrimaryProtocol>IPsec
                <StandardAuthenticationOnly>true
                    <AuthMethodDuringIKENegotiation>EAP-MD5</AuthMethodDuringIKENegotiation>
                    <IKEIdentity>IKETEST</IKEIdentity>
                </StandardAuthenticationOnly>
            </PrimaryProtocol>
        </HostEntry>
     </ServerList>
</AnyConnectProfile>
Make sure that the 10.1.1.2 entry is exactly the same as CN=10.1.1.2 that was entered for the identity certificate.
Tests
In this scenario SSL VPN is not used, so make sure the HTTP server is disabled on IOS (no ip http server). Otherwise, you receive an error message in AnyConnect that states, "Use a browser to gain access".
When connecting in AnyConnect, you should be prompted for a password. In this example, it is User3 that was created
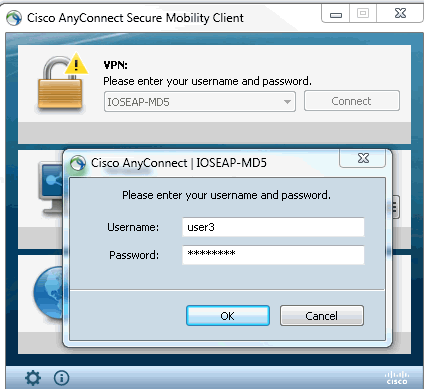
After that, the user is connected.
Verification
IOS Router
R1#show ip inter brief | i Virtual
Virtual-Access1    10.1.1.2  YES unset  up  up
Virtual-Template1  10.1.1.2  YES unset  up down
R1# show ip route 192.168.100.200
Routing entry for 192.168.100.200/32
  Known via "static", distance 1, metric 0 (connected)
  Routing Descriptor Blocks:
  * directly connected, via Virtual-Access1
      Route metric is 0, traffic share count is 1
R1#show crypto ikev2 sa
IPv4 Crypto IKEv2  SA
Tunnel-id Local  Remote  fvrf/ivrf  Status
1  10.1.1.2/4500  110.1.1.100/61021  none/none  READY
      Encr: 3DES, Hash: SHA96, DH Grp:2, Auth sign: RSA, Auth verify: EAP
      Life/Active Time: 86400/94 sec
IPv6 Crypto IKEv2  SA
R1#show crypto session detail
Crypto session current status
Code: C - IKE Configuration mode, D - Dead Peer Detection
K - Keepalives, N - NAT-traversal, T - cTCP encapsulation
X - IKE Extended Authentication, F - IKE Fragmentation
Interface: Virtual-Access1
Uptime: 00:04:06
Session status: UP-ACTIVE
Peer: 192.168.56.1 port 61021 fvrf: (none) ivrf: (none)
      Phase1_id: IKETEST
      Desc: (none)
  IKEv2 SA: local 10.1.1.2/4500 remote 10.1.1.100/61021 Active
          Capabilities:(none) connid:1 lifetime:23:55:54
  IPSEC FLOW: permit ip 0.0.0.0/0.0.0.0 host 192.168.100.200
        Active SAs: 2, origin: crypto map
        Inbound:  #pkts dec'ed 1 drop 0 life (KB/Sec) 4160122/3353
        Outbound: #pkts enc'ed 0 drop 0 life (KB/Sec) 4160123/3353
You can perform a debug (debug crypto ikev2).
Windows
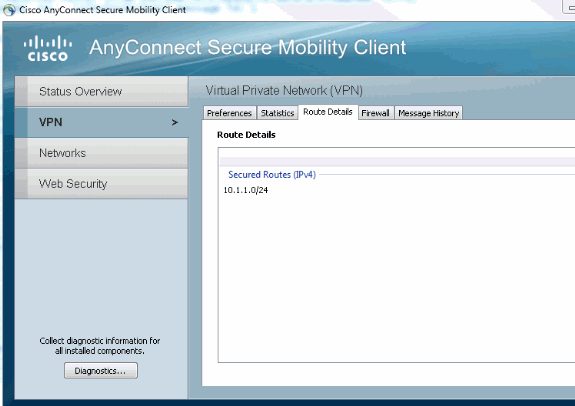
In the Advanced options of AnyConnect in VPN you can check Route Details to see the Split Tunneling networks:
Known caveats and issues
-
Remember when having SHA1 in signature hash and in integrity policy in IKEv2 (refer to Cisco bug ID CSCtn59317 (registered customers only) ).
-
CN in IOS identity certificate has to be equal hostname in the ACS XML profile.
-
If you want to use Radius AV pairs passed during authentication and not use authorization of the group at all, you can use this in IKEv2 profile:
aaa authorization user eap cached
-
Authorization is always using password "cisco" for group/users authorization. This might be confusing while using
aaa authorization user eap list SERV (without any paramaters)
because it will try to authorize using the user passed in AnyConnect as user and password "cisco", which is probably not the password for the user.
-
In case of any issues these are outputs that you can analyze and provide to Cisco TAC:
-
debug crypto ikev2
-
debug crypto ikev2 internal
-
DART outputs
-
-
If not using SSL VPN remember to disable ip http server (no ip http server). Otherwise, AnyConnect will try to connect to the HTTP server and receive the result, "Use a browser to gain access".
Next Generation Cryptography
The above configuration is provided for reference to show a minimalistic working configuration.
Cisco recommends using Next Generation Cryptography (NGC) where possible.
Current recommendations for migration can be found here: http://www.cisco.com/web/about/security/intelligence/nextgen_crypto.html
When choosing NGC configuration, make sure that both client software and headend hardware support it. ISR generation 2 and ASR 1000 routers are recommended as headends because of their hardware support for NGC.
On the AnyConnect side, as of the AnyConnect 3.1 version, NSA's Suite B algorythm suite is supported.
Related Information
Revision History
| Revision | Publish Date | Comments |
|---|---|---|
1.0 |
14-Jan-2013 |
Initial Release |
Contact Cisco
- Open a Support Case

- (Requires a Cisco Service Contract)
 Feedback