Configure AnyConnect Flexvpn with EAP and DUO Authentication
Available Languages
Download Options
Bias-Free Language
The documentation set for this product strives to use bias-free language. For the purposes of this documentation set, bias-free is defined as language that does not imply discrimination based on age, disability, gender, racial identity, ethnic identity, sexual orientation, socioeconomic status, and intersectionality. Exceptions may be present in the documentation due to language that is hardcoded in the user interfaces of the product software, language used based on RFP documentation, or language that is used by a referenced third-party product. Learn more about how Cisco is using Inclusive Language.
Contents
Introduction
This document describes how to configure external two-factor authentication for AnyConnect IPSec connection to a Cisco IOS® XE router.
Contributed by Sadhana K S and Rishabh Aggarwal Cisco TAC Engineers.
Prerequisites
Requirements
Cisco recommends that you have knowledge of these topics:
- Experience with RA VPN configuration on a router
- Identity Services Engine (ISE) administration
Components Used
The information in this document is based on these software and hardware versions:
- Cisco Catalyst 8000V (C8000V) running version 17.10.01a
- Cisco AnyConnect Secure Mobility Client version 4.10.04071
- Cisco ISE running version 3.1.0
- Duo Authentication proxy server (windows 10 or any Linux PC)
- Duo web account
- Client PC with AnyConnnect installed
The information in this document was created from the devices in a specific lab environment. All of the devices used in this document started with a cleared (default) configuration. If your network is live, ensure that you understand the potential impact of any command.
Authentication Flow
AnyConnect user authenticates with a username and password on the ISE server. The Duo Authentication Proxy server also sends an additional authentication in the form of a push notification to the mobile device of the user.
Flow Diagram
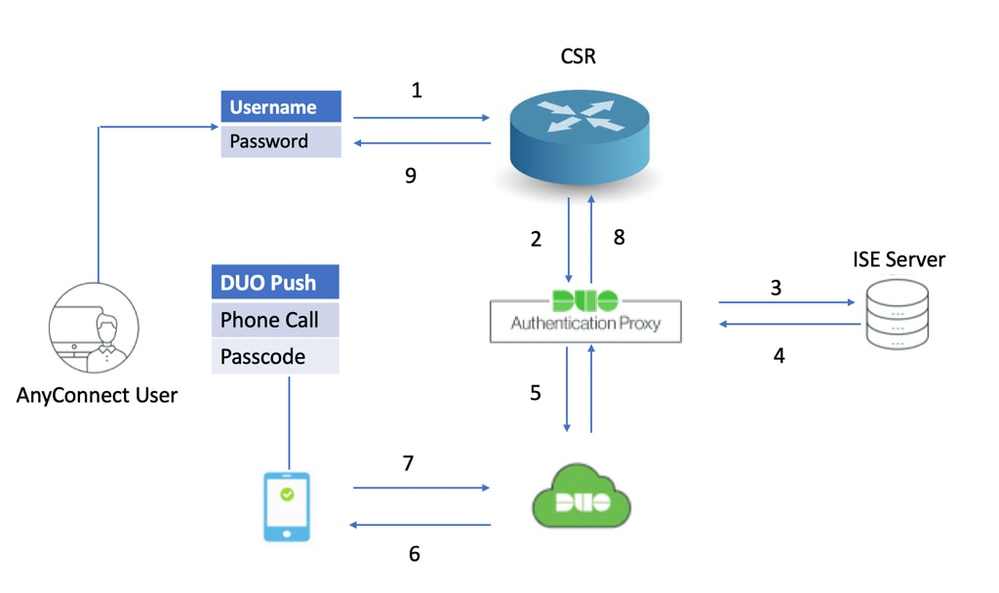 Authentication Flow Diagram
Communication Process
- The user initiates a RAVPN connection to the C8000V and provides a username and password for Primary Authentication.
- The C8000V sends an authentication request to the Duo Authentication Proxy.
- Duo Authentication Proxy then sends the primary request to the Active Directory or RADIUS server.
- The authentication response is sent back to the Authentication Proxy.
- Once the primary authentication is successful then the Duo authentication proxy requests secondary authentication via the Duo server.
- The Duo service then authenticates the user, depending on the secondary authentication method (push, phone call, passcode).
- Duo authentication proxy receives the authentication response.
- The response is sent to the C8000V.
- If successful, the AnyConnect connection is established.
Configure
In order to complete the configuration, take into consideration these sections.
Configuration Steps on C8000V (VPN Headend)
1. Configure the RADIUS server. The IP address of the RADIUS server must be the IP of the Duo Authentication Proxy.
radius server rad_server
 address ipv4 10.197.243.97 auth-port 1812 acct-port 1813
 timeout 120
 key cisco
2. Configure the RADIUS server as aaa authentication and authorization as local.
aaa new-model
aaa group server radius FlexVPN_auth_server
 server name rad_server
aaa authentication login FlexVPN_auth group FlexVPN_auth_server
aaa authorization network FlexVPN_authz local
3. Create a Trustpoint in order to install the identity certificate, if not already present for local authentication. You can refer to Certificate Enrollment for a PKI for more details on the certificate creation.
crypto pki trustpoint TP_AnyConnect
enrollment url http://x.x.x.x:80/certsrv/mscep/mscep.dll
usage ike
serial-number none
fqdn flexvpn-C8000V.cisco.com
ip-address none
subject-name cn=flexvpn-C8000V.cisco.com
revocation-check none
rsakeypair AnyConnect
4. (Optional) Configure a standard access list to be used for the split tunnel. This access list consists of the destination networks that can be accessed through the VPN tunnel. By default, all the traffic passes through the VPN tunnel if the split tunnel is not configured.
ip access-list standard split-tunnel-acl
 10 permit 192.168.11.0 0.0.0.255
 20 permit 192.168.12.0 0.0.0.255
5. Create an IPv4 address pool.
ip local pool SSLVPN_POOL 192.168.13.1 192.168.13.10 The IP address pool created assigns an IPv4 address to the AnyConnect client during a successful AnyConnect connection.
6. Configure an authorization policy.
crypto ikev2 authorization policy ikev2-authz-policy
 pool SSLVPN_POOL
 dns 10.106.60.12
 route set access-list split-tunnel-acl
The IP pool, DNS, split-tunnel list, and so on, are specified under the authorization policy.

Note: If the custom IKEv2 authorization policy is not configured, then the default authorization policy called 'default' is used for authorization. The attributes specified under the IKEv2 authorization policy can also be pushed via the RADIUS server.
7. Configure an IKEv2 proposal and policy.
crypto ikev2 proposal FlexVPN_IKEv2_Proposal
 encryption aes-cbc-128
 integrity sha384
 group 19

crypto ikev2 policy FlexVPN_IKEv2_Policy
match fvrf any
proposal FlexVPN_IKEv2_Proposal
8. Upload the AnyConnect client profile to the bootflash of the router and define the profile as given:
crypto vpn anyconnect profile Client_Profile bootflash:/Client_Profile.xml
9. Disable HTTP secure server.
no ip http secure-server
10. Configure the SSL policy and specify the WAN IP of the router as the local address for downloading the profile.
crypto ssl policy ssl-server
  pki trustpoint TP_AnyConnect sign
  ip address local <wan ip> port 443
11. Configure a Virtual template from which the virtual-access interfaces are cloned
interface Virtual-Template20 type tunnel
 ip unnumbered GigabitEthernet1
The unnumbered command gets the IP address from the interface configured (GigabitEthernet1).
13. Configure an IKEv2 profile that contains all the connection-related information.
crypto ikev2 profile Flexvpn_ikev2_Profile
 match identity remote any
 authentication local rsa-sig
 authentication remote eap query-identity
 pki trustpoint TP_AnyConnect
 dpd 60 2 on-demand
 aaa authentication eap FlexVPN_auth
 aaa authorization group eap list FlexVPN_authz ikev2-authz-policy
 aaa authorization user eap cached
 virtual-template 20 mode auto
 anyconnect profile Client_Profile
These are used in the IKEv2 profile:
match identity remote any- Refers to the identity of the client. Here 'any' is configured so that any client with the right credentials can connectauthentication remote- Mentions that EAP protocol must be used for client authenticationauthentication local- Mentions that certificates must be used for local authenticationaaa authentication eap- During EAP authentication, the RADIUS serverFlexVPN_authis usedaaa authorization group eap list- During the authorization, the network listFlexVPN_authzis used with the authorization policyikev2-authz-policyaaa authorization user eap cached- Enables implicit user authorizationvirtual-template 20 mode auto- Defines which virtual template to cloneanyconnect profile Client_Profile- The client profile defined in Step 8. is applied here to this IKEv2 profile
14. Configure a transform set and an IPSec profile.
crypto ipsec transform-set TS esp-gcm 256
 mode tunnel

crypto ipsec profile Flexvpn_IPsec_Profile
 set transform-set TS
 set ikev2-profile Flexvpn_ikev2_Profile
15. Add the IPSec profile to the Virtual template.
interface Virtual-Template20 type tunnel
 tunnel mode ipsec ipv4
 tunnel protection ipsec profile Flexvpn_IPsec_Profile
Snippet of the Client Profile (XML Profile)
Prior to Cisco IOS XE 16.9.1, automatic profile downloads from the headend is not available. Post 16.9.1, it is possible to download the profile from the headend.
!
!
<ClientInitialization>
<UseStartBeforeLogon UserControllable="true">false</UseStartBeforeLogon>
<AutomaticCertSelection UserControllable="true">true</AutomaticCertSelection>
<ShowPreConnectMessage>false</ShowPreConnectMessage>
<CertificateStore>All</CertificateStore>
<CertificateStoreMac>All</CertificateStoreMac>
<CertificateStoreOverride>false</CertificateStoreOverride>
<ProxySettings>Native</ProxySettings>
<AllowLocalProxyConnections>false</AllowLocalProxyConnections>
<AuthenticationTimeout>30</AuthenticationTimeout>
<AutoConnectOnStart UserControllable="true">false</AutoConnectOnStart>
<MinimizeOnConnect UserControllable="true">true</MinimizeOnConnect>
<LocalLanAccess UserControllable="true">false</LocalLanAccess>
<DisableCaptivePortalDetection UserControllable="false">false</DisableCaptivePortalDetection>
<ClearSmartcardPin UserControllable="true">true</ClearSmartcardPin>
<IPProtocolSupport>IPv4,IPv6</IPProtocolSupport>
<AutoReconnect UserControllable="false">true
<AutoReconnectBehavior UserControllable="false">ReconnectAfterResume</AutoReconnectBehavior>
</AutoReconnect>
<SuspendOnConnectedStandby>false</SuspendOnConnectedStandby>
<AutoUpdate UserControllable="false">true</AutoUpdate>
<RSASecurIDIntegration UserControllable="false">Automatic</RSASecurIDIntegration>
<WindowsLogonEnforcement>SingleLocalLogon</WindowsLogonEnforcement>
<LinuxLogonEnforcement>SingleLocalLogon</LinuxLogonEnforcement>
<WindowsVPNEstablishment>AllowRemoteUsers</WindowsVPNEstablishment>
<LinuxVPNEstablishment>LocalUsersOnly</LinuxVPNEstablishment>
<AutomaticVPNPolicy>false</AutomaticVPNPolicy>
<PPPExclusion UserControllable="false">Automatic
<PPPExclusionServerIP UserControllable="false"></PPPExclusionServerIP>
</PPPExclusion>
<EnableScripting UserControllable="false">false</EnableScripting>
<EnableAutomaticServerSelection UserControllable="true">false
<AutoServerSelectionImprovement>20</AutoServerSelectionImprovement>
<AutoServerSelectionSuspendTime>4</AutoServerSelectionSuspendTime>
</EnableAutomaticServerSelection>
<RetainVpnOnLogoff>false
</RetainVpnOnLogoff>
<CaptivePortalRemediationBrowserFailover>false</CaptivePortalRemediationBrowserFailover>
<AllowManualHostInput>true</AllowManualHostInput>
</ClientInitialization>
<ServerList>
<HostEntry>
<HostName>FlexVPN</HostName>
<HostAddress>flexvpn-csr.cisco.com</HostAddress>
<PrimaryProtocol>IPsec
<StandardAuthenticationOnly>true
<AuthMethodDuringIKENegotiation>EAP-MD5</AuthMethodDuringIKENegotiation>
</StandardAuthenticationOnly>
</PrimaryProtocol>
</HostEntry>
</ServerList>
Configuration Steps on DUO Authentication Proxy

Note: Duo Authentication Proxy supports MS-CHAPv2 only with RADIUS authentication.
Step 1. Download and Install Duo Authentication Proxy Server.
Log in to the Windows machine and install the Duo Authentication Proxy server.
It is recommended to use a system with at least 1 CPU, 200 MB disk space, and 4 GB RAM.
Step 2. Navigate to C:\Program Files\Duo Security Authentication Proxy\conf\ and open authproxy.cfg in order to configure the authentication proxy with the appropriate details.
[radius_client]
host=10.197.243.116
secret=cisco

Note: Here '10.197.243.116' is the IP address of the ISE server and 'cisco' is the password configured in order to validate the primary authentication.
Once you have made these changes, save the file.
Step 3. Open Windows Services console (services.msc). And restart Duo Security Authentication Proxy Service.
 Duo Security Authentication Proxy Service
Configuration Steps on ISE
Step 1. Navigate to Administration > Network Devices, and clickAdd in order to configure the network device.

Note: Replace x.x.x.x with the IP address of your Duo Authentication Proxy server.
 ISE - Network Devices
Step 2. Configure the Shared Secret as mentioned in the authproxy.cfg in secret:
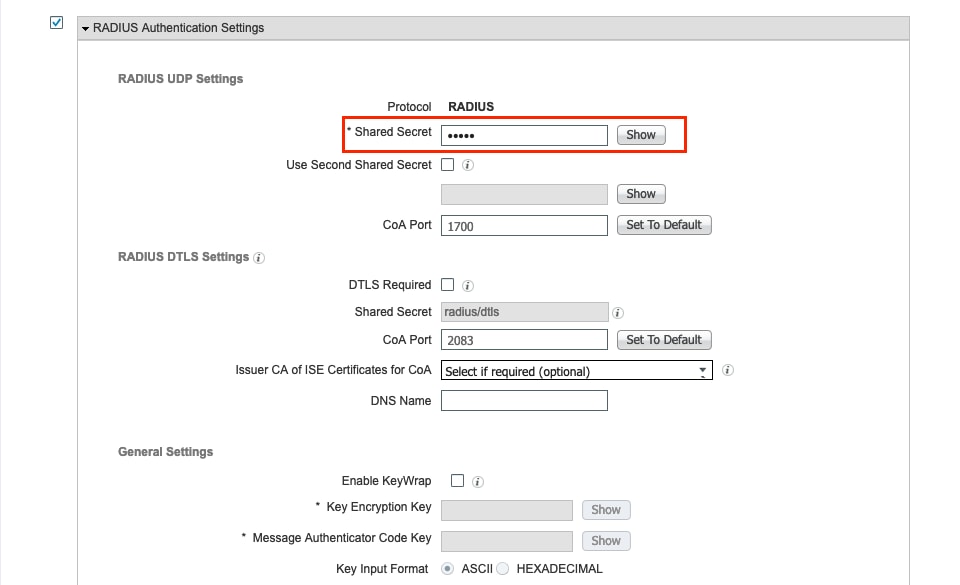 ISE - Shared Secret
Step 3. Navigate to Administration > Identities > Users.Choose Addin order to configure the Identity user for AnyConnect Primary authentication:
 ISE - Users
Configuration Steps on DUO Administration Portal
Step 1. Login to your Duo account.
Navigate to Applications > Protect an Application. Click Protect for the application you want to use. (RADIUS in this case)
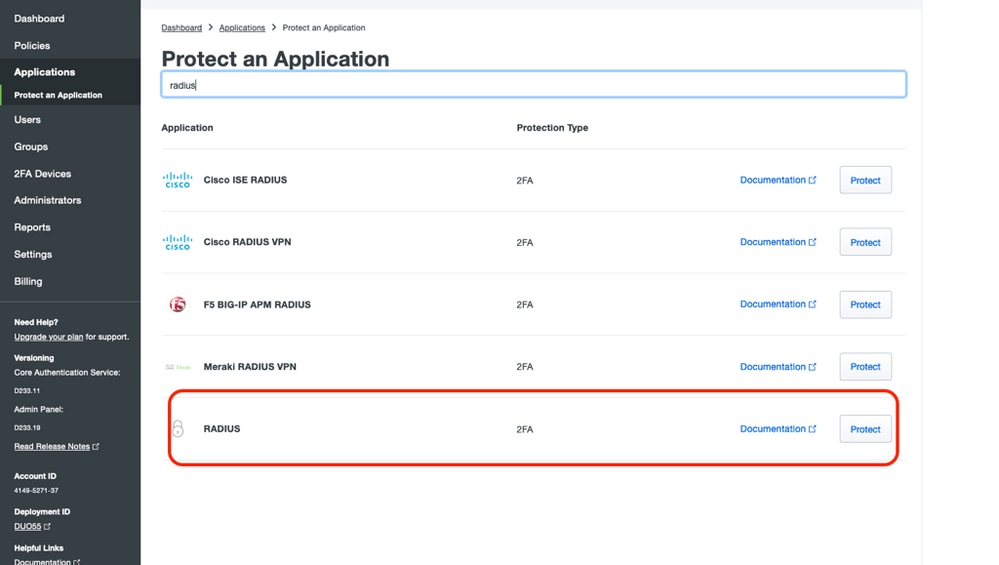 DUO - Application
Step 2. Click Protect for the application you want to use. (RADIUS in this case)
Copy the Integration Key, Secret Key, and API hostname and paste it on the authproxy.cfgof the Duo Authentication proxy.
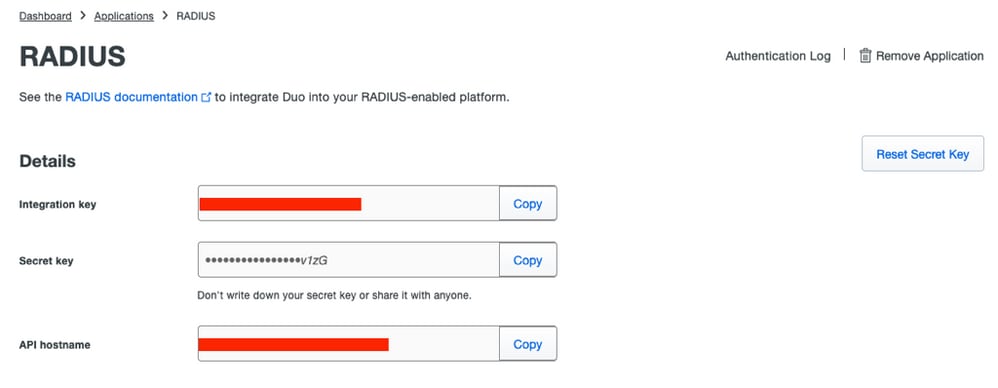 DUO - RADIUS
Copy these values and navigate back to the DUO authentication proxy and open the authproxy.cfgand paste the values as shown:
Integration key = ikey
secret key = skey
API hostname = api_host
[radius_server_auto]
ikey=xxxxxxxx
skey=xxxxxxxv1zG
api_host=xxxxxxxx
radius_ip_1=10.106.54.143
radius_secret_1=cisco
failmode=safe
client=radius_client
port=1812

Note: The ikey, skey, and api_host must be copied from the Duo server when you configure the server, and '10.106.54.143' is the IP address of the C8000V router, and 'cisco' is the key configured on the router under the radius server configuration.
Once you have made these changes, save the file again and restart Duo Security Authentication Proxy Service (in services.msc).
Step 3. Create Users on DUO for Secondary Authentication.
Navigate to Users > Add Userand type the username.

Note: The username must match the primary authentication username.
Click Add User. Once created, under Phones, click Add Phone, enter the Phone number, and click Add Phone.
 DUO - Add Phone
Choose the Type of authentication.
 DUO - Device Info
Choose Generate Duo Mobile Activation Code.
 DUO - Phone Activate
Choose Send Instructions by SMS.
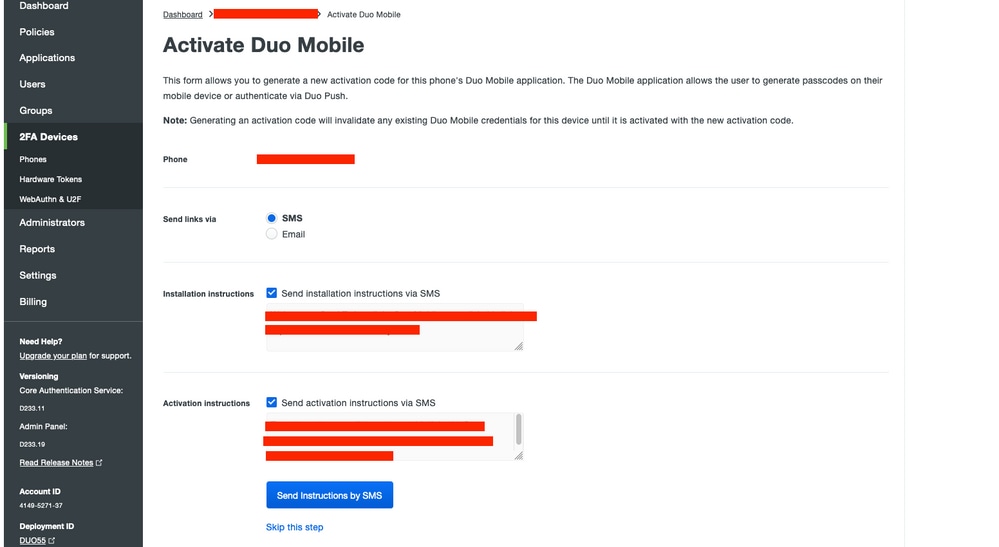 DUO - Send SMS
Click the link sent to the phone and the DUO app gets linked to the user account in the Device Info section, as shown in the image:
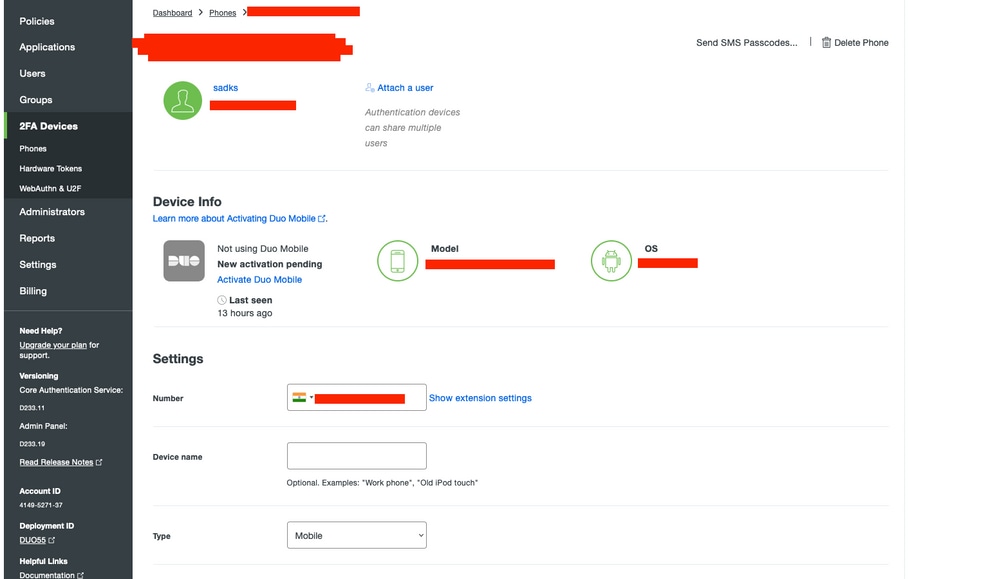 DUO - Device Linked
Verify
In order to test the authentication, connect to the C8000V from the PC of the user through AnyConnect.
Type in the username and password for the primary authentication.
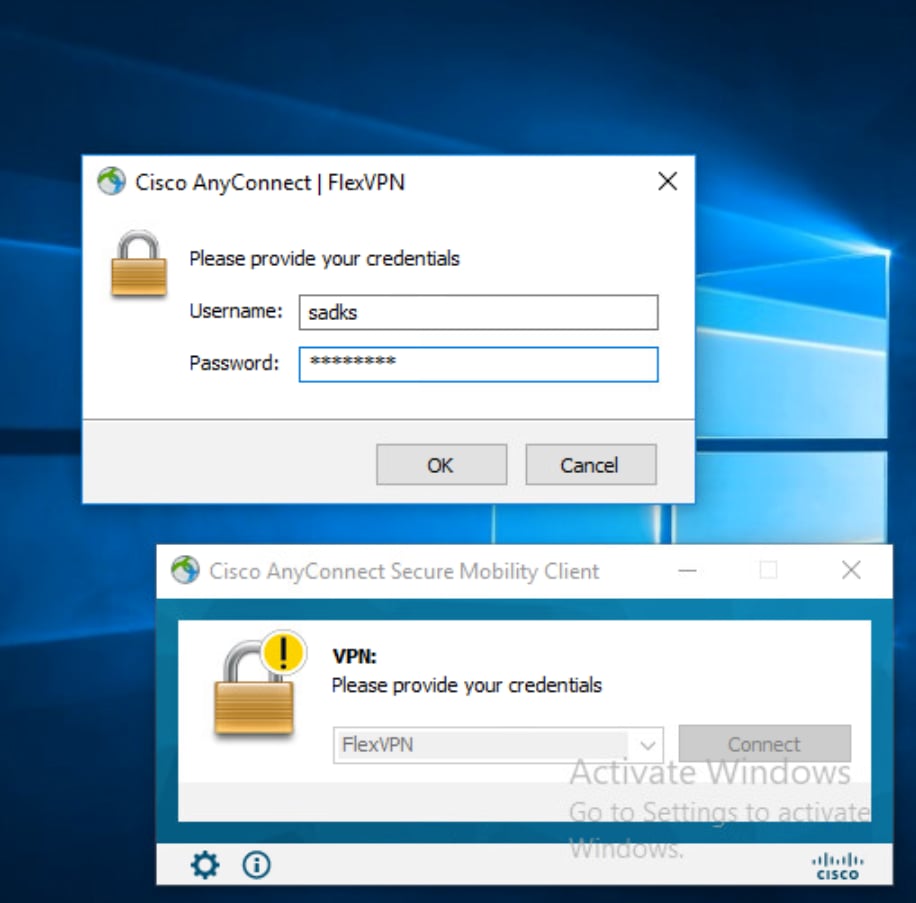 AnyConnect Connection
Then, accept the DUO pushes on the mobile.
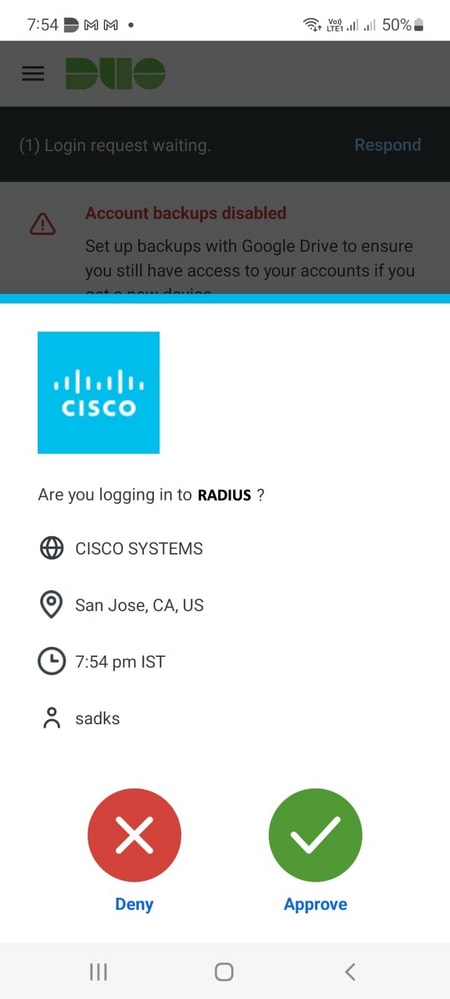 DUO Push
The connection is established.
You can verify this on the VPN headend:
1. IKEv2 parameters
R1#sh crypto ikev2 sa detailed
 IPv4 Crypto IKEv2  SA

Tunnel-id Local                 Remote                fvrf/ivrf            Status
1         10.106.54.143/4500    10.197.243.98/54198   none/none            READY
      Encr: AES-CBC, keysize: 256, PRF: SHA384, Hash: SHA384, DH Grp:19, Auth sign: RSA, Auth verify: FlexVPN-ikev2_Profile
      Life/Active Time: 86400/147 sec
      CE id: 1108, Session-id: 15
      Status Description: Negotiation done
      Local spi: 81094D322A295C92       Remote spi: 802F3CC9E1C33C2F
      Local id: 10.106.54.143
      Remote id: cisco.com
      Remote EAP id: sadks                                                                                           //AnyConnect username
      Local req msg id:  0              Remote req msg id:  10
      Local next msg id: 0              Remote next msg id: 10
      Local req queued:  0              Remote req queued:  10
      Local window:      5              Remote window:      1
      DPD configured for 60 seconds, retry 2
      Fragmentation not  configured.
      Dynamic Route Update: disabled
      Extended Authentication not configured.
      NAT-T is detected  outside
      Cisco Trust Security SGT is disabled
      Assigned host addr: 192.168.13.5                                                                            //Assigned IP address from the address pool
      Initiator of SA : No
2. Crypto session detail for the vpn session
R1#sh crypto session  detail
Crypto session current status
Code: C - IKE Configuration mode, D - Dead Peer Detection
K - Keepalives, N - NAT-traversal, T - cTCP encapsulation
X - IKE Extended Authentication, F - IKE Fragmentation
R - IKE Auto Reconnect, U - IKE Dynamic Route Update
S - SIP VPN

Interface: Virtual-Access2
Profile: FlexVPN-ikev2_Profile
Uptime: 00:01:07
Session status: UP-ACTIVE
Peer: 10.197.243.97 port 54198 fvrf: (none) ivrf: (none)
      Phase1_id: cisco.com
      Desc: (none)
  Session ID: 114
  IKEv2 SA: local 10.106.54.143/4500 remote 10.197.243.98/54198 Active
          Capabilities:DN connid:1 lifetime:23:58:53
  IPSEC FLOW: permit ip 0.0.0.0/0.0.0.0 host 192.168.13.5
        Active SAs: 2, origin: crypto map
        Inbound:  #pkts dec'ed 3 drop 0 life (KB/Sec) 4607998/3532
        Outbound: #pkts enc'ed 0 drop 0 life (KB/Sec) 4608000/3532
3.Verification on ISE live logs
Navigate to Operations > Live Logs in ISE. You can view the authentication report for the primary authentication.
 ISE - Live Logs
4. Verification on DUO authentication proxy
Navigate to ths file on DUO Authentication Proxy; C:\Program Files\Duo Security Authentication Proxy\log
2022-02-08T23:24:50.080854+0530 [duoauthproxy.lib.log#info] Sending request from 10.106.54.143 to radius_server_auto                                                                                              //10.106.54.143 IP address of C8000V
2022-02-08T23:24:50.080854+0530 [duoauthproxy.lib.log#info] Received new request id 163 from ('10.106.54.143', 1645)
2022-02-08T23:24:50.080854+0530 [duoauthproxy.lib.log#info] (('10.106.54.143', 1645), sadks, 163): login attempt for username 'sadks'
2022-02-08T23:24:50.080854+0530 [duoauthproxy.lib.log#info] Sending request for user 'sadks' to ('10.197.243.116', 1812) with id 191                                                                        //Primary auth sent to ISE 10.197.243.116
2022-02-08T23:24:50.174606+0530 [duoauthproxy.lib.log#info] Got response for id 191 from ('10.197.243.116', 1812); code 2                                                                                      //ISE auth successful
2022-02-08T23:24:50.174606+0530 [duoauthproxy.lib.log#info] http POST to https://api-xxxx[.]duosecurity[.]com:443/rest/v1/preauth
2022-02-08T23:24:50.174606+0530 [duoauthproxy.lib.http._DuoHTTPClientFactory#info] Starting factory <_DuoHTTPClientFactory: b'https://api-xxxx[.]duosecurity[.]com:443/rest/v1/preauth '>
2022-02-08T23:24:51.753590+0530 [duoauthproxy.lib.log#info] (('10.106.54.143', 1645), sadks, 163): Got preauth result for: 'auth'
2022-02-08T23:24:51.753590+0530 [duoauthproxy.lib.log#info] http POST to https://api-xxxx[.]duosecurity[.]com:443/rest/v1/auth                                                                             // Proxy is sending secondary auth request to DUO server
2022-02-08T23:24:51.753590+0530 [duoauthproxy.lib.http._DuoHTTPClientFactory#info] Starting factory <_DuoHTTPClientFactory: b'https://api-xxxx[.]duosecurity[.]com:443/rest/v1/auth '>
2022-02-08T23:24:51.753590+0530 [duoauthproxy.lib.http._DuoHTTPClientFactory#info] Stopping factory <_DuoHTTPClientFactory: b'https://api-xxxx[.]duosecurity[.]com:443/rest/v1/preauth '>
2022-02-08T23:24:59.357413+0530 [duoauthproxy.lib.log#info] (('10.106.54.143', 1645), sadks, 163): Duo authentication returned 'allow': 'Success. Logging you in...'
2022-02-08T23:24:59.357413+0530 [duoauthproxy.lib.log#info] (('10.106.54.143', 1645), sadks, 163): Returning response code 2: AccessAccept                                                                 //DUO push successful
2022-02-08T23:24:59.357413+0530 [duoauthproxy.lib.log#info] (('10.106.54.143', 1645), sadks, 163): Sending response
2022-02-08T23:24:59.357413+0530 [duoauthproxy.lib.http._DuoHTTPClientFactory#info] Stopping factory <_DuoHTTPClientFactory: b'https://api-xxxx[.]duosecurity[.]com:443/rest/v1/auth '>
Troubleshoot
- Debugs on C8000V.
For IKEv2:
debug crypto ikev2debug crypto ikev2 client flexvpndebug crypto ikev2 internaldebug crypto ikev2 packetdebug crypto ikev2 error
For IPSec:
debug crypto ipsecdebug crypto ipsec error
2. For the DUO Authentication Proxy, check the log file proxy-related logs. (C:\Program Files\Duo Security Authentication Proxy\log)
The snippet for an error log where ISE is rejecting the primary authentication is shown:
2022-02-07T13:01:39.589679+0530 [duoauthproxy.lib.log#info] Sending proxied request for id 26 to ('10.197.243.116', 1812) with id 18
2022-02-07T13:01:39.589679+0530 [duoauthproxy.lib.log#info] Got response for id 18 from ('10.197.243.116', 1812); code 3
2022-02-07T13:01:39.589679+0530 [duoauthproxy.lib.log#info] (('10.106.54.143', 1645), sadks, 26): Primary credentials rejected - No reply message in packet
2022-02-07T13:01:39.589679+0530 [duoauthproxy.lib.log#info] (('10.106.54.143', 1645), sadks, 26): Returning response code 3: AccessReject
Revision History
| Revision | Publish Date | Comments |
|---|---|---|
1.0 |
26-Jun-2023 |
Initial Release |
Contributed by Cisco Engineers
- Sadhana K SCisco TAC Engineer
- Rishabh AggarwalCisco TAC Engineer
Contact Cisco
- Open a Support Case

- (Requires a Cisco Service Contract)
 Feedback