Introduction
This document describes the configuration of Terminal Access Controller Access-Control System Plus (TACACS+) authentication on Unified Compute System Manager (UCSM). TACACS+ is a network protocol that is used for Authentication, Authorization and Accountability services (AAA) , it provides a centralized method to manage Network Access Devices (NAD) where you can administer and create rules through a server, in this use case scenario we will use Identity Services Engine (ISE).
Prerequisites
Requirements
Cisco recommends that you have knowledge of these topics:
- Cisco UCS Manager (UCSM)
- Terminal Access Controller Access-Control System Plus (TACACS+)
- Identity Services Engine (ISE)
Components Used
The information in this document is based on these software and hardware versions:
- UCSM 4.2(3d)
- Cisco Identity Services Engine (ISE) version 3.2
The information in this document was created from the devices in a specific lab environment. All of the devices used in this document started with a cleared (default) configuration. If your network is live, ensure that you understand the potential impact of any command.
Configuration
TACACS+ Configuration on ISE
Setup of TACACS+ on ISE
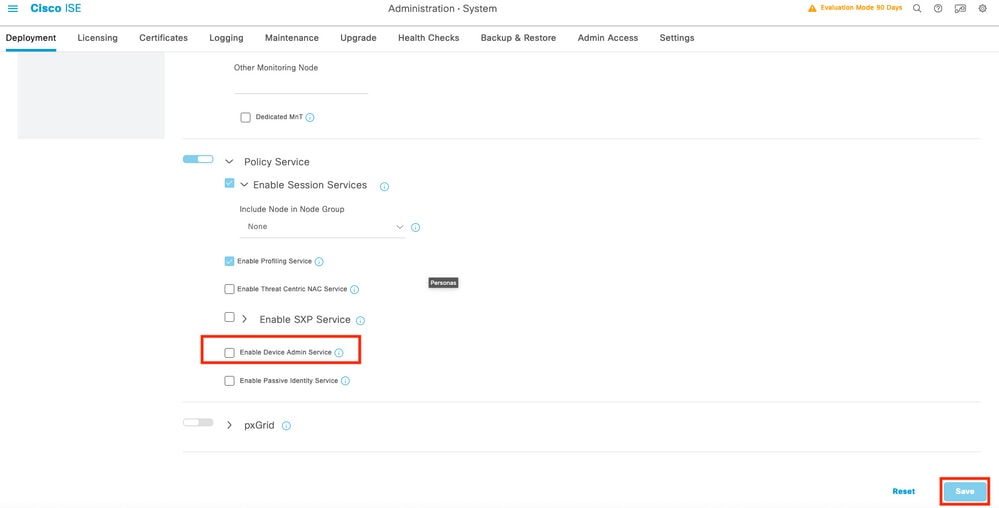
Step 1. The first task is to review if the ISE has the correct capabilities to handle TACACS+ authentications for such you need to check if within the Policy Service Node (PSN) desired you have the feature for Device Admin Service, browse through the menu Administration > System > Deployment, select the node where the ISE will perform TACACS+ and then select the button edit.

Step 2. Scroll down until you see the corresponding feature called Device Administration Service (notice that for this feature to be enabled you need first to have Policy Server persona enabled on the node and moreover have licenses for TACACS+ available in your deployment), select that checkbox, and then save the configuration:
Step 3. Configure the Network Access Device (NAD) that will use the ISE as TACACS+ as server, navigate to the menu Administration > Network Resources > Network Devices then select the button +Add.

Step 4. In this section configure :
- A name for the UCSM to be the TACACS+ client.
- The IP addresses that the UCSM use to send request to ISE.
- TACACS+ Shared Secret , this is the password that will be used to encrypt the packets between the UCSM and ISE
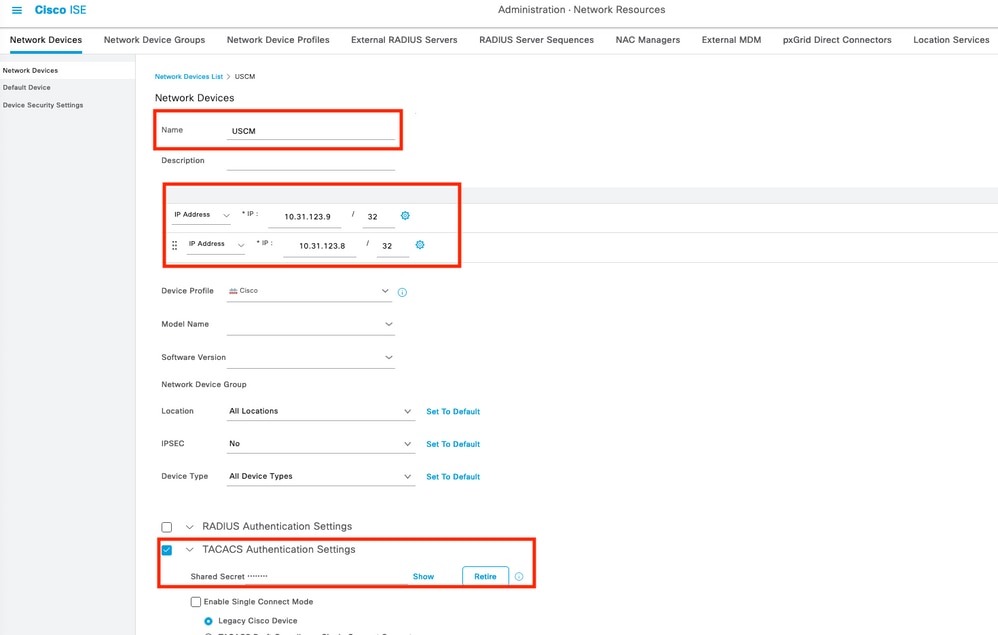

Note: For a cluster configuration, add the management port IP addresses for both fabric interconnects. This configuration ensures that remote users can continue to log in if the first fabric interconnect fails and the system fails over to the second fabric interconnect. All login requests are sourced from these IP addresses, not the virtual IP address used by Cisco UCS Manager.
Configure the attributes and rules on ISE
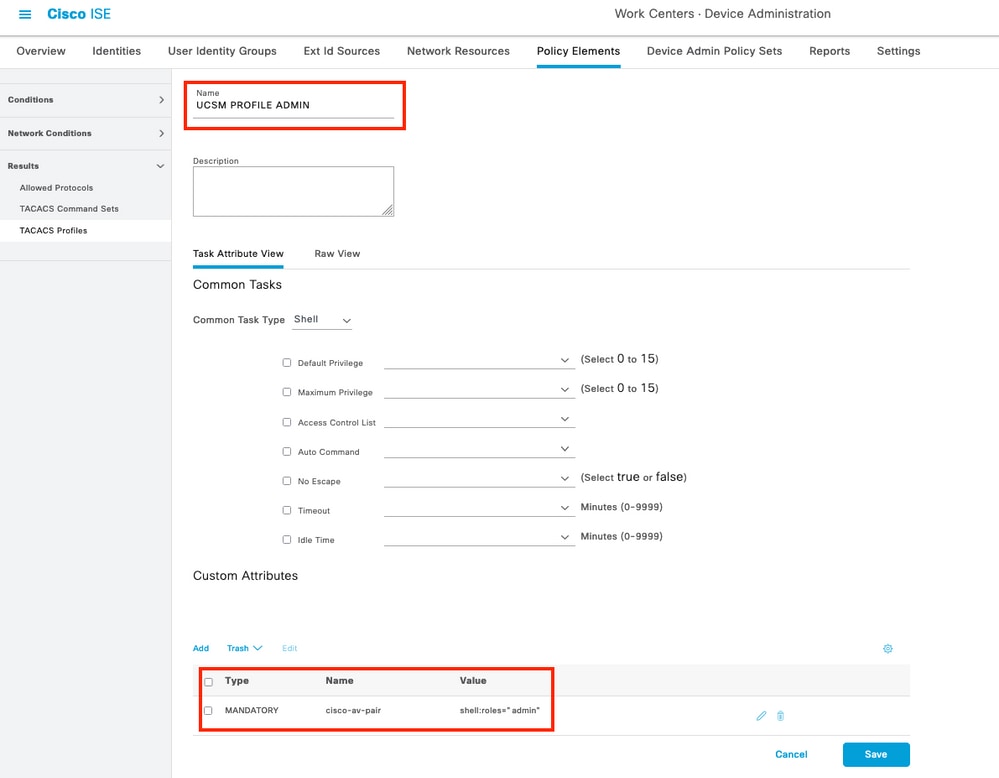
Step 1. Create a TACACS+ profile, navigate to the menu Work Centers > Device Administration > Policy Elements > Results > TACACS Profiles , then select Add

Step 2. In this section configure the profile with a name and in the Custom Attributes section, select Add , next create a one attribute of characteristic MANDATORY , name it as cisco-av-pair and in the value select one of the roles available within the UCSM and input that as a shell role , in this example it will be used the role admin and the input selected needs to be shell:roles=”admin” as it shown below,
In the same menu if you select the Raw View for the TACACS Profile, you can verify the corresponding configuration of the attribute that will be sent through ISE.
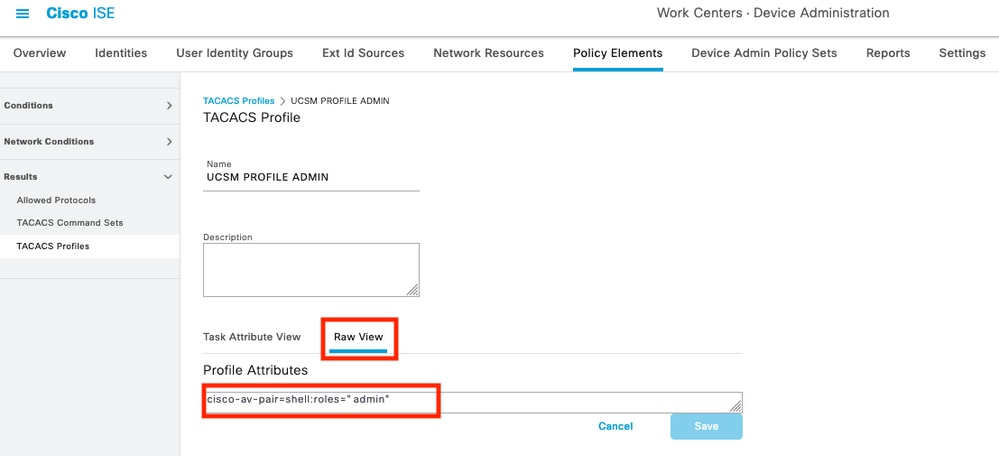

Note: The cisco-av-pair name is the string that provides the attribute ID for the TACACS+ provider.
Step 3. Select on the tick and save your configuration.
Step 4. Create a Device Admin Policy Set to be used for your UCSM, navigate the menu Work Centers > Device Administration > Device Admin Policy Sets, then from an existent policy set select the gear icon to then select Insert new row above

Step 5. Name this new Policy Set, add conditions depending upon the characteristics of the TACACS+ authentications that will be ongoing from the UCSM server, and select as Allowed Protocols > Default Device Admin, save your configuration.

Step 6. Select in the > view option and select in the Authentication Policy section, the external identity source from where the ISE will query the username and credentials that will be input in the UCSM, in this example the credentials correspond to Internal Users stored within ISE.

Step 7. Scroll down until the section named Authorization Policy until the Default policy, select the gear icon, and then insert one rule above.
Step 8. Name the new Authorization Rule, add conditions concerning the user that will be authenticated already as group membership, and in the Shell Profiles section add the TACACS profile that you configured previously, save the configuration.

TACACS+ Configuration on UCSM
Log intoCisco UCS ManagerGUI with a user with administrator privileges.
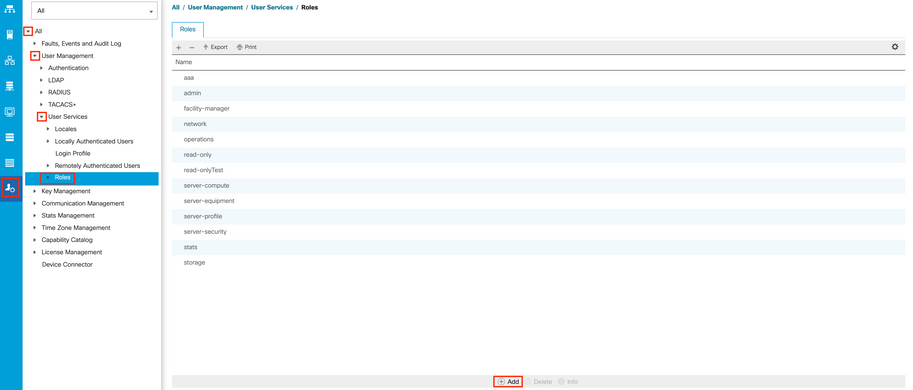
Create roles for users
Step 1. In the Navigation pane, select the Admin tab.
Step 2. On the Admin tab, expand All > User Management >User Services > Roles.
Step 3. In theWorkpane, select theGeneraltab.
Step 4. Select Add for custom roles. This sample use default Roles.
Step 5. Verify name role matchs with name configured previosly on TACACS profile.
Create a TACACS+ Provider
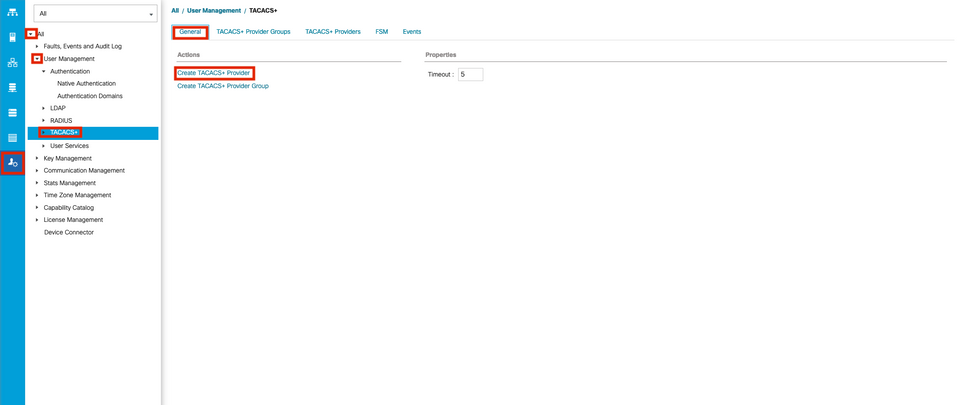
Step 1. In the Navigation pane, select the Admin tab.
Step 2. On the Admin tab, expand All > User Management > TACACS+.
Step 3. In theWorkpane, select theGeneral tab.
Step 4. In theActionsarea, selectCreate TACACS+ Provider.
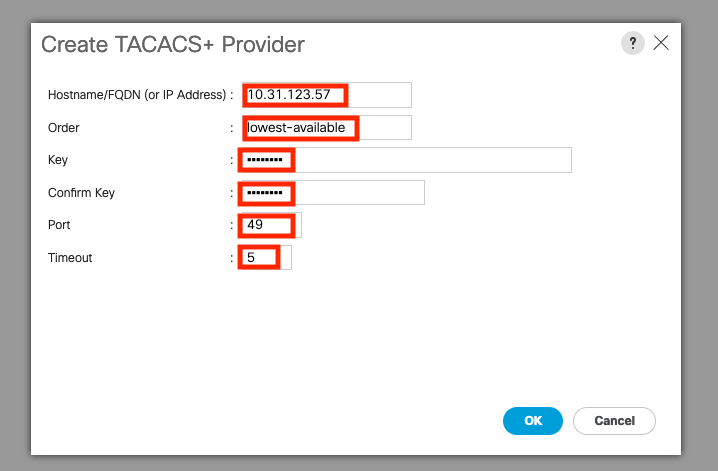
Step 5. In theCreate TACACS+ Providerwizard, input the appropriate information.
- In the Hostname field, type the IP addresss or hostname of TACACS+ Server.
- In the Order field, The order in which Cisco UCS uses this provider to authenticate users.
Enter an integer between 1 and 16, or enter lowest-available or 0 (zero) if you want Cisco UCS to assign the next available order based on the other providers defined in this Cisco UCS instance.
- In the Key field, The SSL encryption key for the database.
-
In the Confirm Key field, The SSL encryption key repeated for confirmation purposes.
- In the Port field, The port through which Cisco UCS communicate with the TACACS+ database(Port 49 default port).
-
In the Timeout field, The length of time in seconds the system spend trying to contact the TACACS+ database before it times out.
Step 6. Select Ok.

Note: If you use a hostname rather than an IP address, you must configure a DNS server in Cisco UCS Manager.
Create a TACAC+ Provider Group
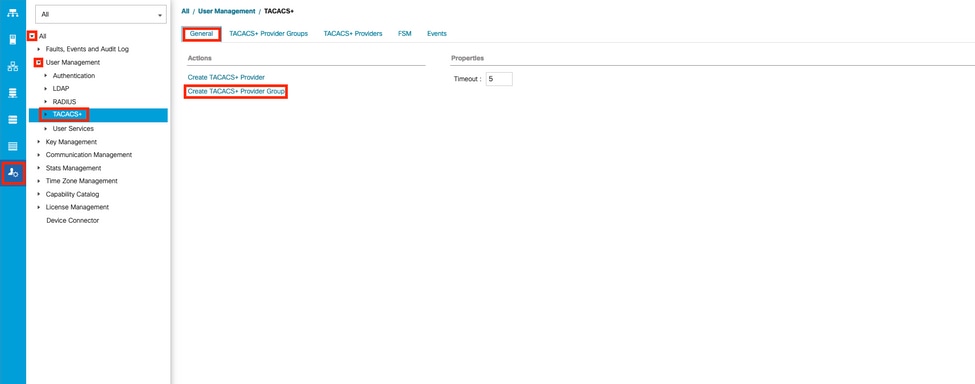
Step 1.In theNavigationpane, select the Admin tab.
Step 2. On theAdmintab, expand All > User Management > TACACS+.
Step 3. In theWorkpane, select the General tab.
Step 4. In theActionsarea, selectCreate TACACS+ ProviderGroup.
Step 5. In the Create TACACS+ Provider Group dialog box, enter the infromation requested.
- In the Name field, enter a unique name for the group.
- In the TACACS+ Providers table, choose the providers to include in the group.
- Select the >> button to add the providers to the Included Providers table.
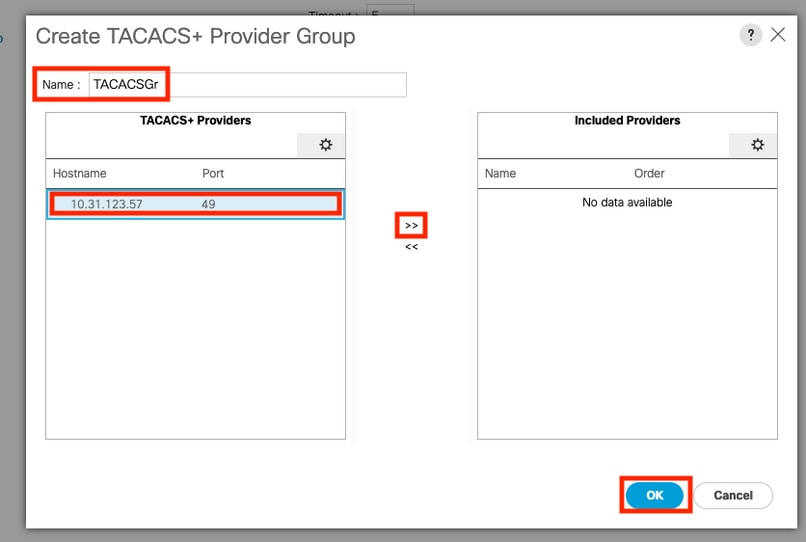
Step 6. Select Ok.
Create an Authentication Domain
Step 1. In the Navigation pane, select the Admin tab.
Step 2. On the Admin tab, expand All > User Management > Authentication
Step 3. In theWorkpane, select the General tab.
Step 4. In theActionsarea, selectCreate a Domain.

Step 5. In the Create Domain dialog box, enter the infromation requested.
- In the Name field, enter a unique name for the domain.
- In the Realm, select the Tacacs option.
- From the Provider Group drop-down list, select the TACACS+ provider group previously created and select OK
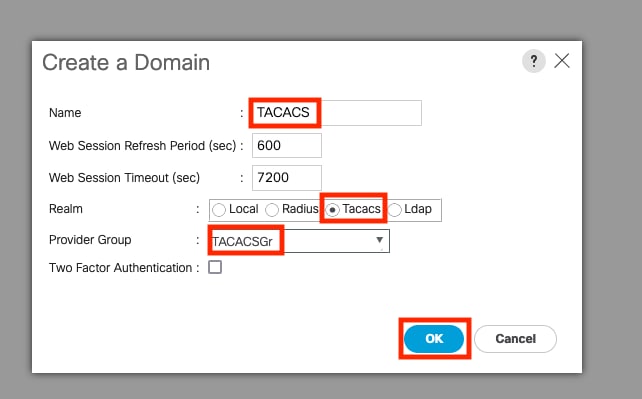
Troubleshoot
Common TACACS+ Issues on UCSM
- Wrong key or invalid characters.
- Wrong port.
- No communication with our provider due to a Firewall or Proxy rule.
- FSM is not 100%.
Verify UCSM TACACS+ configuration:
You must ensure that the UCSM has implemented the configuration checking the the status of the Finite State Machine (FSM) is shown as 100% complete.
Verify the configuration from the UCSM command line
UCS-A# scope security
UCS-A /security # scope tacacs
UCS-A /security/tacacs # show configuration
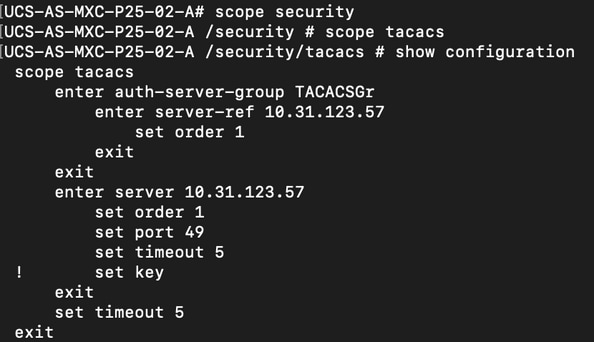
UCS-A /security/tacacs # show fsm status
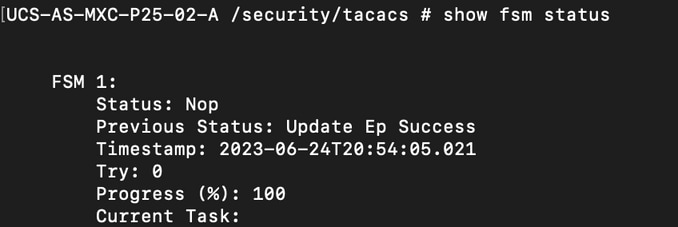
Verify the Tacacs configuration from the NXOS:
UCS-A# connect nxos
UCS-A(nx-os)# show tacacs-server
UCS-A(nx-os)# show tacacs-server groups
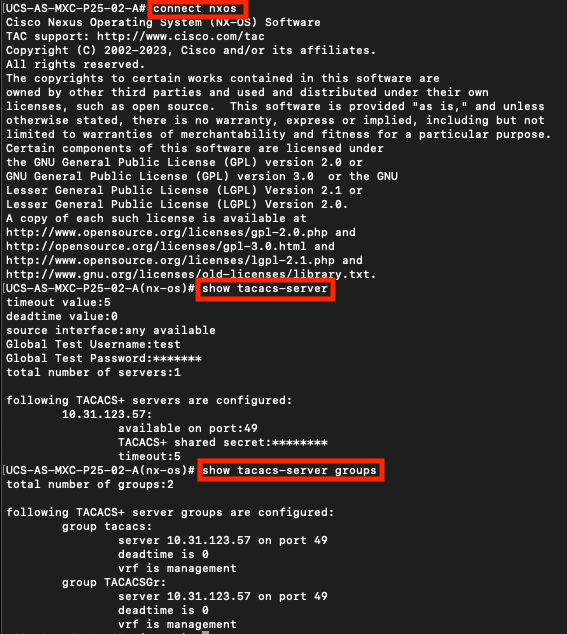
In order to test authentication from NX-OS, use thetest aaacommand (only available from NXOS).
Validate the configuration of our server:
UCS-A(nx-os)# test aaa server tacacs+ <TACACS+-server-IP-address or FQDN> <username> <password>
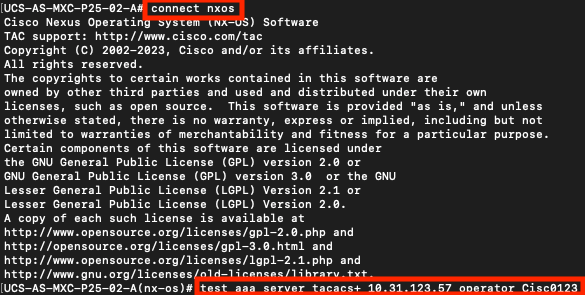
UCSM Review
Reachability verification
UCS-A# connect local-mgmt
UCS-A(local-mgmt)# ping <TACACS+-server-IP-address or FQDN>
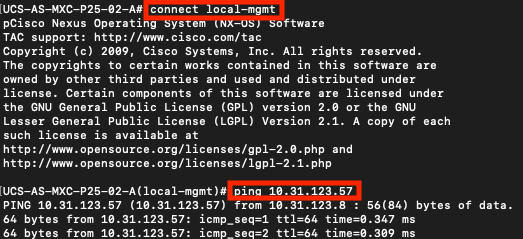
Port verification
UCS-A# connect local-mgmt
UCS-A(local-mgmt)# telnet <TACACS+-server-IP-address or FQDN> <Port>
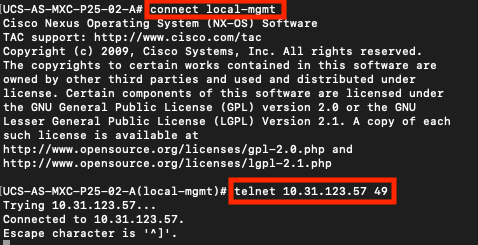
The most effective method to see errors is to enable the NXOS debug, with this output you can see the groups, the connection, and the error message that causes miscommunication.
- Open an SSH session to UCSM and log in with with any privileged user with admin permissions(preferably a local user), change to NX-OS CLI context and start the terminal monitor.
UCS-A# connect nxos
UCS-A(nx-os)# terminal monitor
- Enable debug flags and verify the SSH session output to the log file.
UCS-A(nx-os)# debug aaa all
UCS-A(nx-os)# debug aaa aaa-request
UCS-A(nx-os)# debug tacacs+ aaa-request
UCS-A(nx-os)# debug tacacs+ aaa-request-lowlevel
UCS-A(nx-os)# debug tacacs+ all
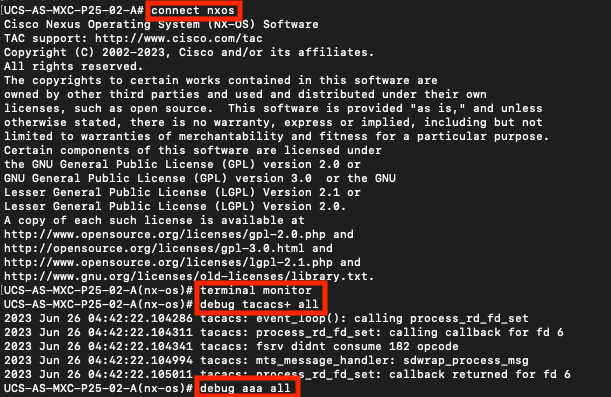
- Now open a new GUI or CLI session and attempt to log in as a remote user (TACACS+).
- Once you received a login failure message, turn off the debugs closing the session or with below command.
UCS-A(nx-os)# undebug all
Common TACACs Issues on ISE

This error is due to the following bug https://bst.cloudapps.cisco.com/bugsearch/bug/CSCwc91917 , please ensure that you have where this defect has been addressed.
ISE Review
Step 1. Review if the TACACS+ serviceability is running, this can be checked in:
- GUI: Review if you have the node listed with the service DEVICE ADMIN in Administration > System > Deployment.
- CLI: Run the command show ports | include 49 to confirm that there are connections in the TCP port that belong to TACACS+
ise32/admin#show ports | include 49
tcp: 169.254.4.1:49, 169.254.2.1:49, 169.254.4.1:49, 10.31.123.57:49
Step 2. Confirm if there are livelogs concerning TACACS+ authentications attemps : this can be checked in the menu Operations > TACACS > Live logs ,
Depending upon the failure reason you can adjust your configuration or address the cause of failure.

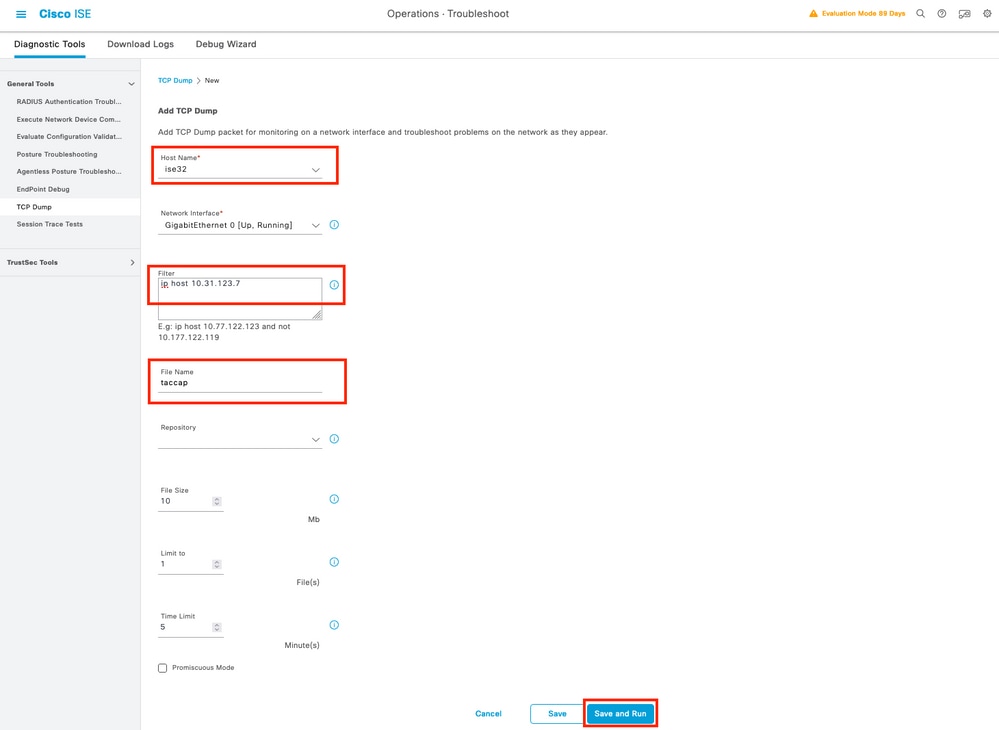
Step 3. In case you don’t see any livelog, proceed to take a packet capture navigate to the menu Operations > Troubleshoot > Diagnostic Tools > General Tools > TCP Dump , select on add

Select the Policy Service node from where the UCSM is sending the authentication and then in filters proceed to input ip host X.X.X.X corresponding the IP of the UCSM from where the authentication is being sent, name the capture and scroll down to save, run the capture and log in from the UCSM .
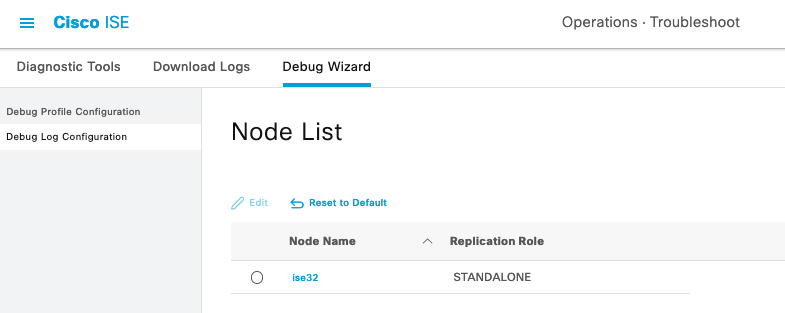
Step 4. Enable the component runtime-AAA in debug within the PSN from where the authentication is being performed in Operations > Troubleshoot > Debug Wizard > Debug log configuration, select PSN node , select then next in edit button .
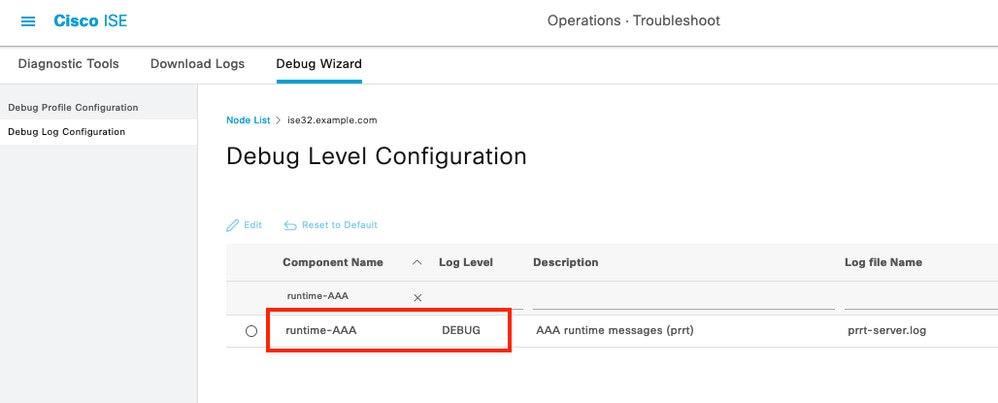
Look for the component runtime-AAA and change its level to debug to then reproduce the issue again, and proceed to analyze the logs .
Related Information
Cisco UCS Manager Administration Management Guide
Cisco UCS CIMC Configuration Guide TACACS+


 Feedback