Introduction
This document describes how to configure Cisco Identity Service Engine 3.3 pxGrid Direct Connector with external REST APIs to get endpoints data.
Prerequisites
Requirements
Cisco recommends that you have knowledge of these topics:
Components Used
The information in this document is based on these software and hardware versions:
- Cisco ISE 3.3
- REST API Server that provided JSON data for endpoints attributes
The information in this document was created from the devices in a specific lab environment. All of the devices used in this document started with a cleared (default) configuration. If your network is live, ensure that you understand the potential impact of any command.
Background Information
Cisco pxGrid Direct helps to evaluate and authorize the endpoints faster by enabling you to connect to external REST APIs that provide JSON data for endpoint attributes and fetch this data into the Cisco ISE database. This feature eliminates the need to query for endpoint attribute data each time an endpoint must be authorized. You can then use the fetched data in authorization policies.
pxGrid Direct helps collect data based on the attributes you specify in your pxGrid Direct configurations. Two mandatory fields called Unique Identifier and Correlation Identifier are used to fetch relevant data. If a connector does not contain values for either of these fields, the fetching and saving of data from a connector can be erroneous.
Configure pxGrid Direct Connectors
Step 1. Add a new pxGrid Direct Connector
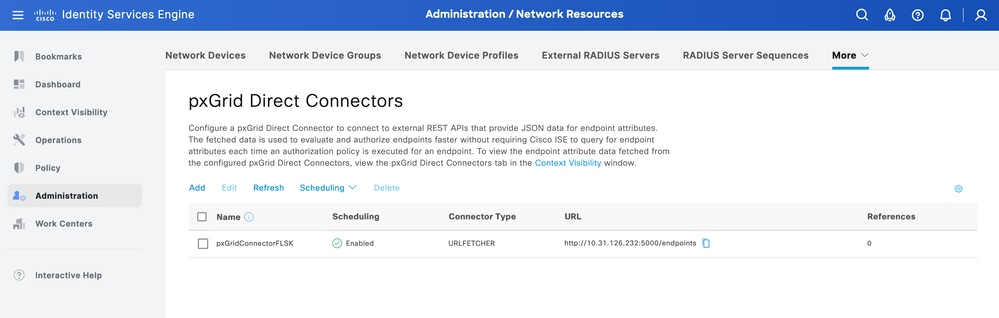
In order to configure pxGrid Direct Connector, from ISE navigate to Administration > Network Resources > pxGrid Direct Connectors. Click Add.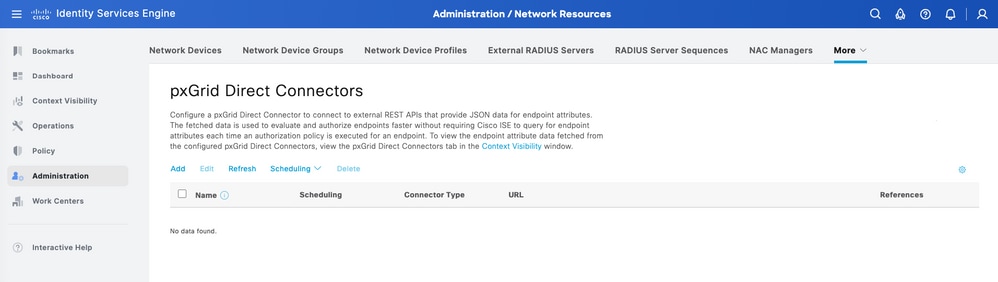
Once the Welcome page for the pxGrid Direct Connect Wizard is open click 

Step 2. Define the pxGrid Direct Connector
Give a name to the connector, and a description, if needed. Click Next.
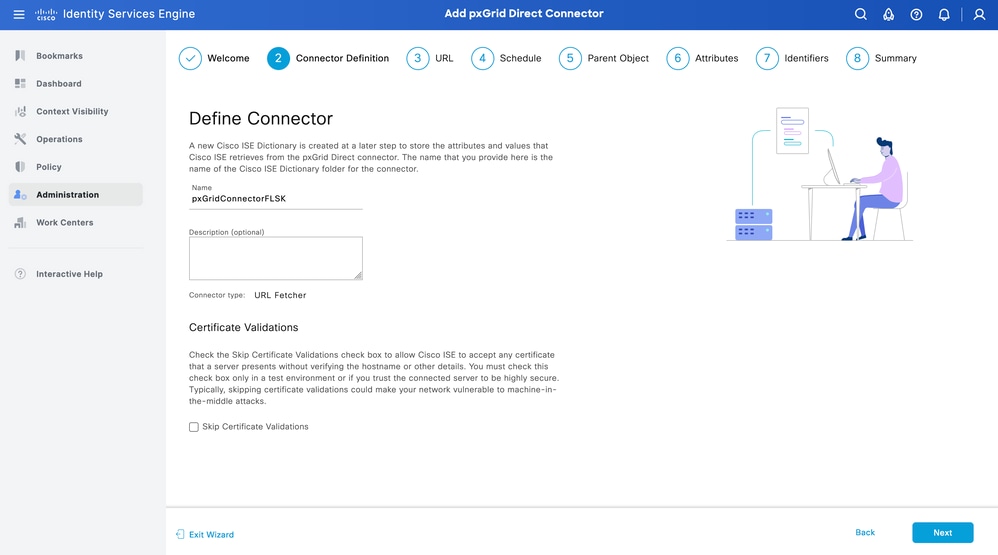

Warning: Check the Skip Certificate Validations check box to allow Cisco ISE to accept any certificate that a server presents without verifying the hostname or other details. You must check this check box only in a test environment or if you trust the connected server to be highly secure. Typically, skipping certificate validations could make your network vulnerable to machine-in-the-middle attacks.
Step 3. URL
- Type the URL of the external REST API that provides JSON data for endpoints attribute.
- Under Authentication, enter the username and password of the external REST API server.
- Select Test Connection, wait for the Successful message, then Click Next.
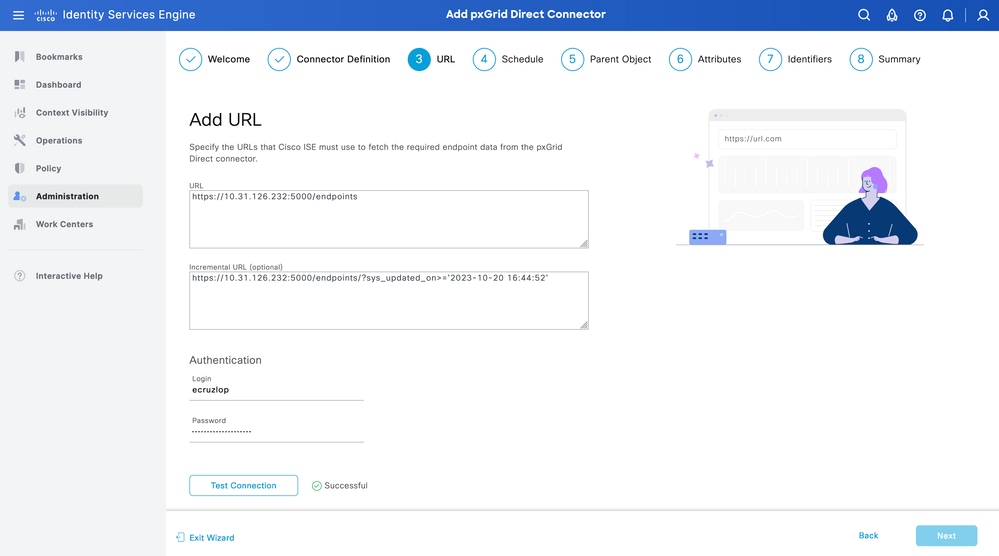

Tip: The Incremental URL is optional for the configuration. In case the External REST API has Request Arguments, these can be used to get the latest information by filtering with the specific argument instead of requesting all the data. Ensure the Request Argument exist with the documentation of the External REST API server.
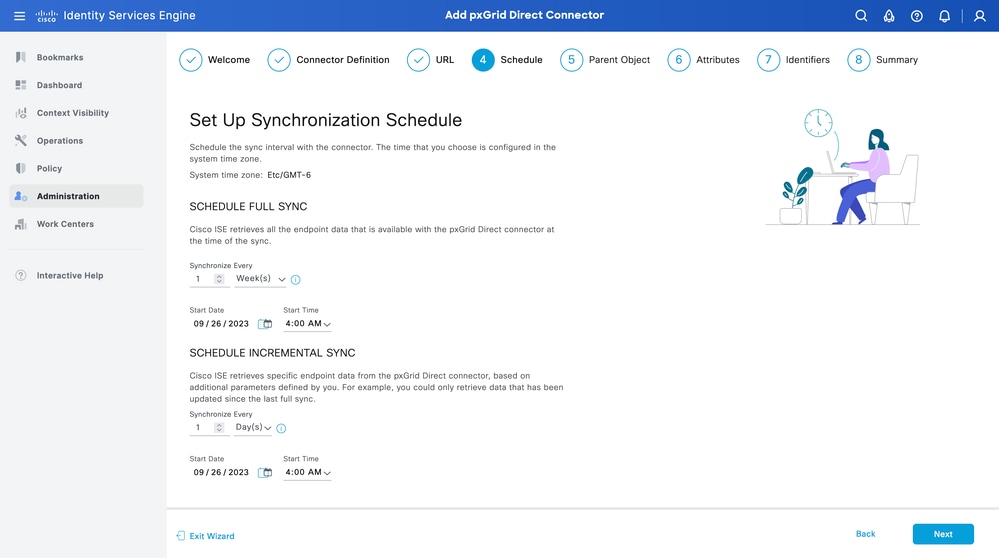
Step 4. Schedule
Select the Schedule for a FULL SYNC.
- Default value - 1 week
- Minimum value - 12 hours
- Maximum value - 1 month
Select the Schedule for INCREMENTAL SYNC. This option only appears if it was configured in Step 3.
- Default value - 1 day
- Minimum value - 1 hour
- Maximum value - 1 week
Click Next.
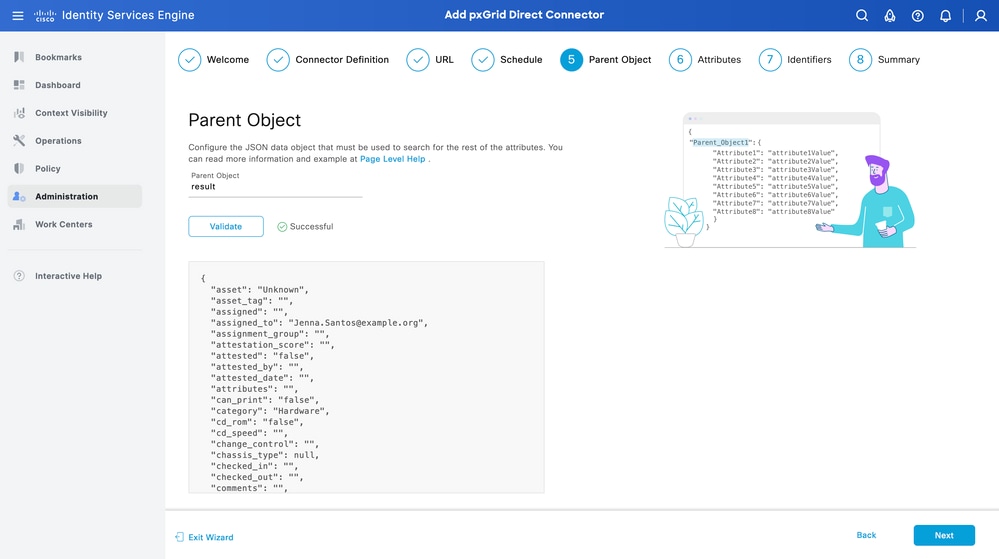
Step 5. Parent Object
You must type the JSON key to search for attributes.
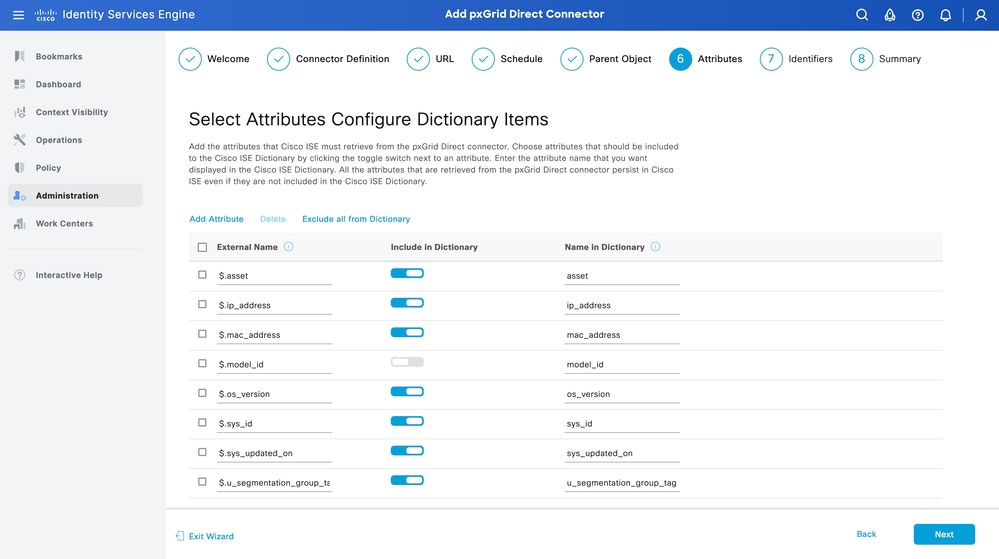
Step 6. Attributes
Select the Attributes of the JSON to configure Dictionary Items that can be used for policies.
In this scenario, the attributes included in Dictionary are:
- asset
- ip_address
- mac_address
- os_version
- sys_id
- sys_update
- u_segmentation_group_tag
Click Next.
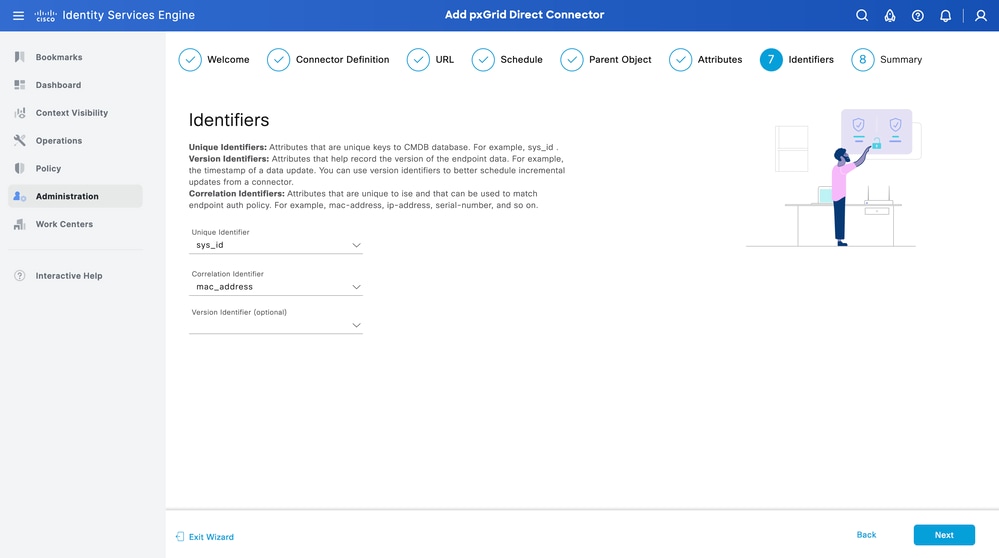
Step 7. Identifiers
- Select the Unique Identifier attributes that are unique to an endpoint from the CMDB database and where the External REST API server obtains the JSON.
- Select the Correlation Identifier attributes that are unique to ISE and that can match an endpoint to an authorization policy.
Click Next.
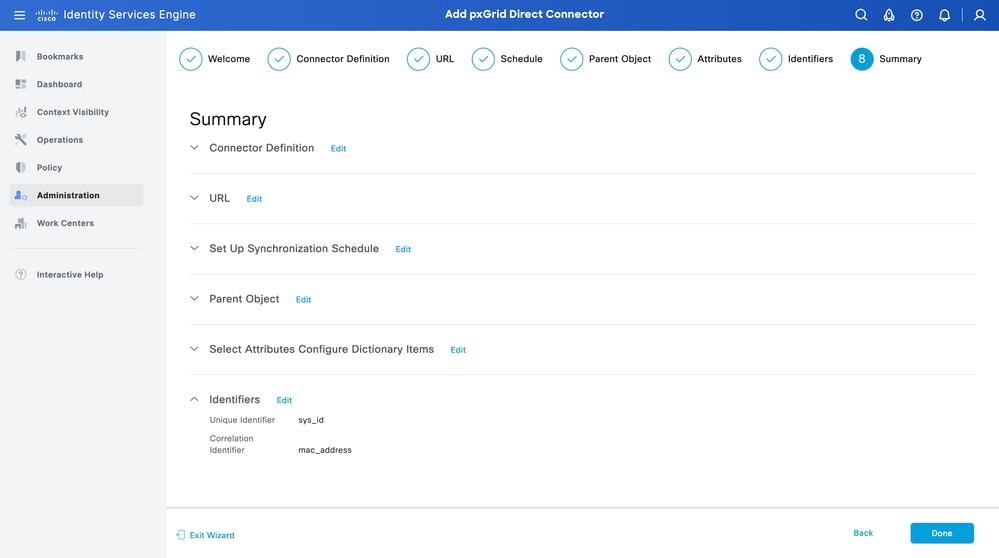
Step 8. Summary
Ensure the pxGrid Direct Connector is configured properly. Click Done.
Once the connector is done, it appears under the pxGrid Direct Connectors page.
Step 9. Verification
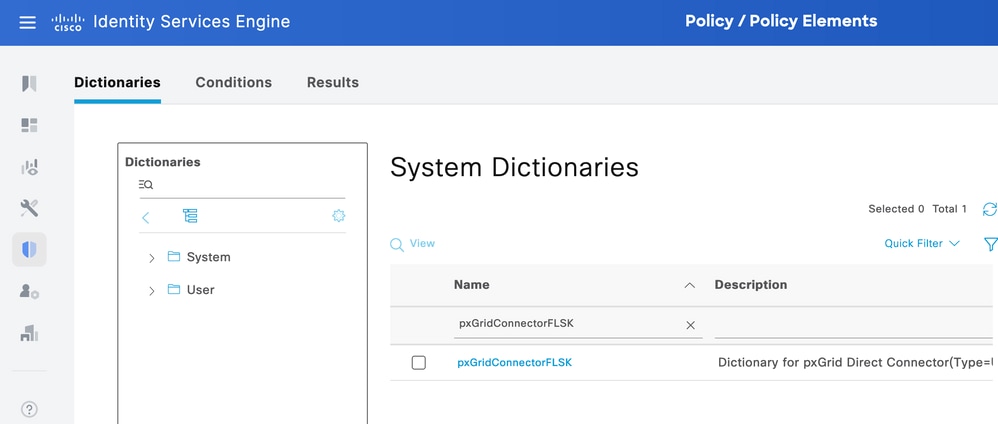
From ISE, navigate to Policy > Policy Elements > Dictionary > System Dictionaries. Filter by the name of your pxGrid Direct Connector. Select it and click View.
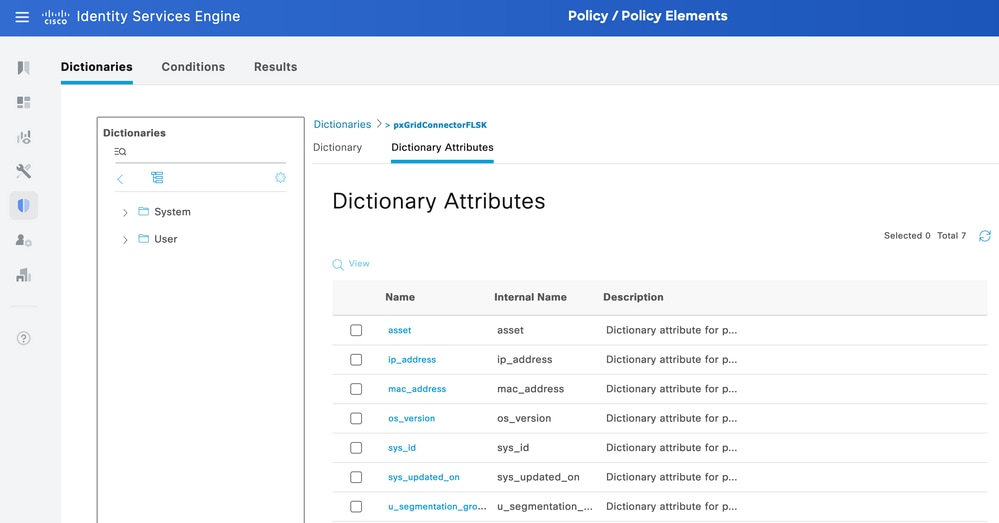
Navigate to Dictionary Attributes and see the list of attributes configured as Dictionary Items under step 6.
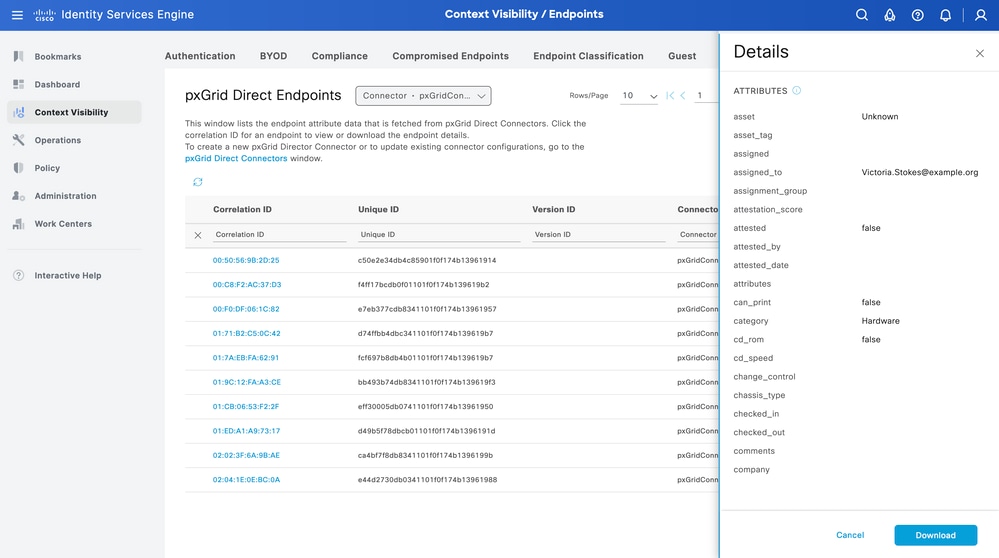
Context Visibility pxGrid Direct Dashboard
From ISE, navigate to Context Visibility > Endpoints > More > pxGrid Direct Endpoints. A list appears of the endpoints with the values selected for Correlation and Unique Identifiers.
Click the Correlation ID to view the Details, or Download the attributes of an specific endpoint.
Authorization Policy Configuration with pxGrid Direct Dictionary
From ISE, navigate to Policy > Policy Sets > Select a Policy Set > Authorization Policy. Click the gear icon in any of the Authorization Policies and Select Insert.
Give a name to the rule and add a new condition to open the Condition Studio.
Click to add a new attribute, navigate to Unclassified, and under Dictionary filter by the name of the pxGrid Direct Connector.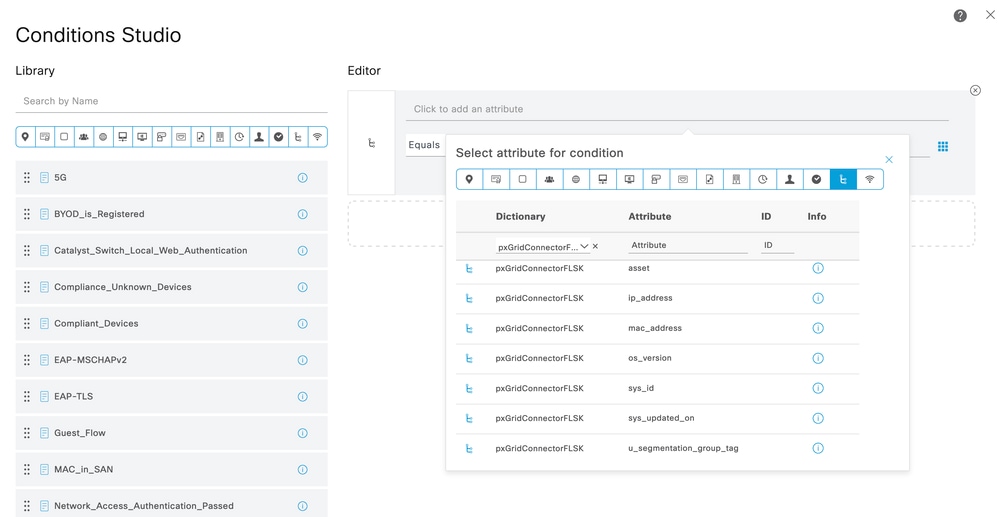
Select an attibute that can be proccessed under an Authorization Policy, and set the vaule. Click Use.
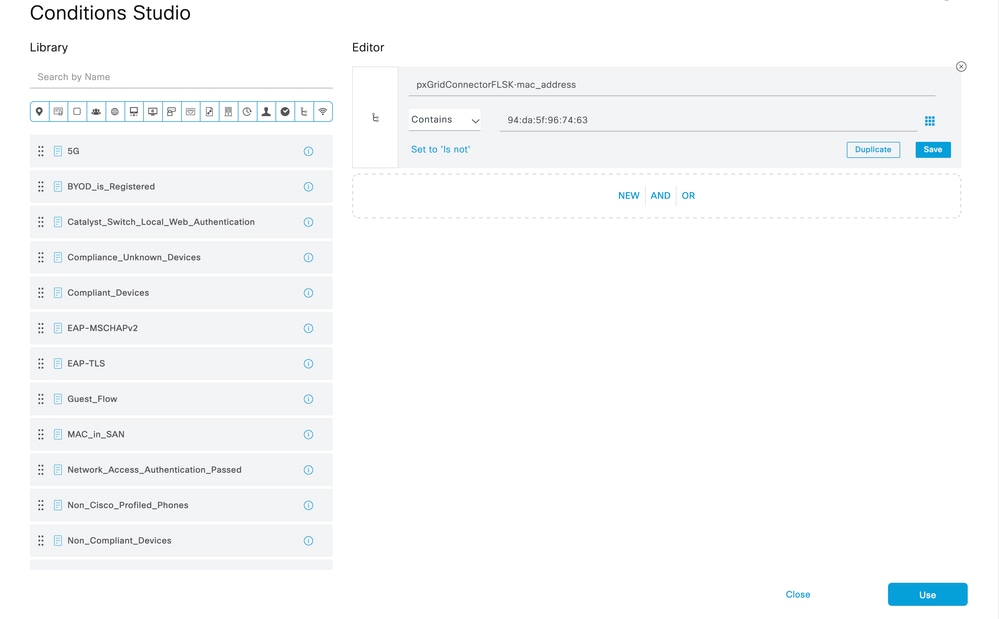
Select the Profile as the result of the condition. Click Save.
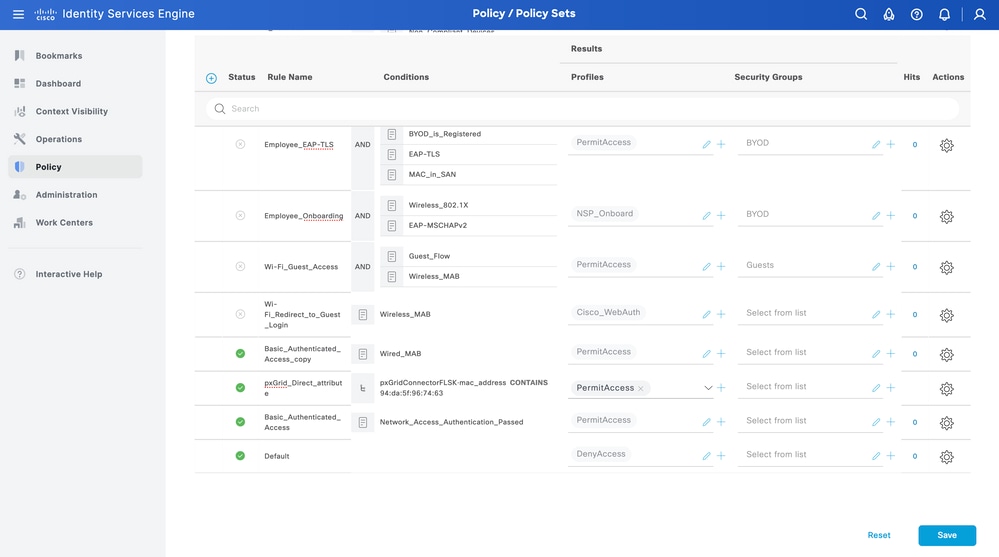
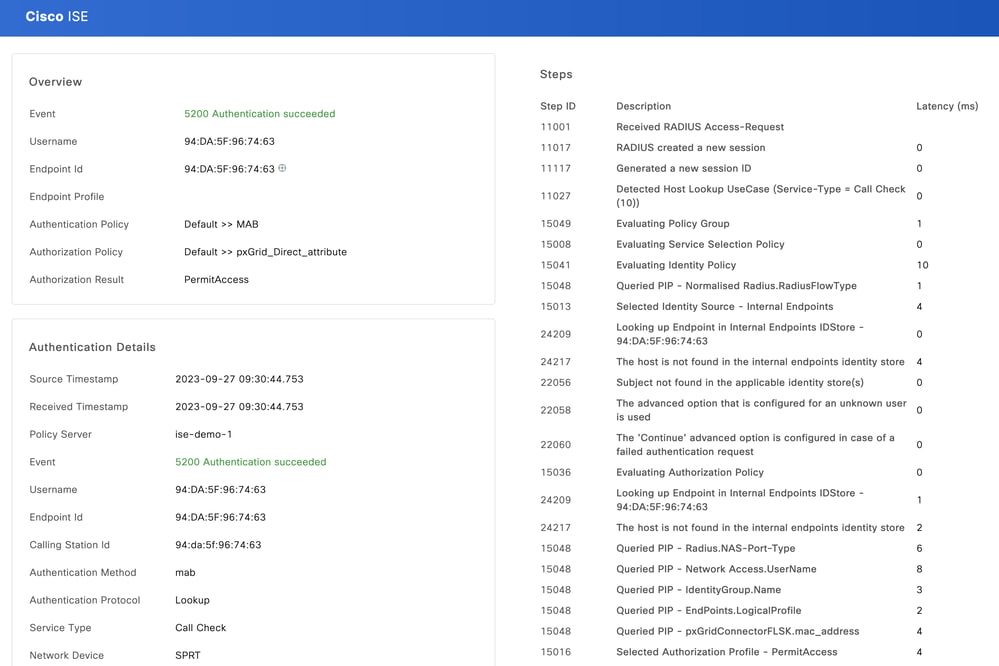
Test the new rule. Ensure the RADIUS Live Log Details of the endpoint and the value of Authorization Policy is the same as the Rule Name with the pxGrid Direct Connector attributes.
Troubleshoot
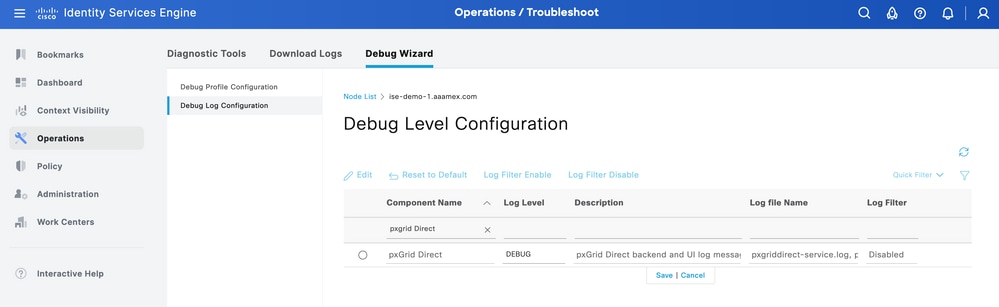
From ISE, navigate to Operation > Troubleshoot > Debug Wizard > Debug Log Configuration. Select your Primary Admin Node (PAN) and click Edit.
Filter the Component Name by pxGrid Direct and select the Log Level needed. Click Save.
- On ISE PAN CLI, the logs are found at:
admin#show logging application pxgriddirect-service.log
admin#show logging application pxgriddirect-connector.log
- On ISE GUI, navigate to Operations > Troubleshoot > Download Logs > Select ISE PAN > Debug log > Debug Log Type > Application Logs. Download the zip files for pxgriddirect-service.log and pxgriddirect-connector.log.

Note:
The logs for pxgriddirect-service contain information related to whether fetched endpoint data has been received and saved to the Cisco ISE database.
The logs for pxgriddirect-connector contain information that indicate whether a pxGrid Directed connector is successfully added to Cisco ISE.
 Feedback