Configure Linux VPN Posture with ISE 3.3
Available Languages
Download Options
Bias-Free Language
The documentation set for this product strives to use bias-free language. For the purposes of this documentation set, bias-free is defined as language that does not imply discrimination based on age, disability, gender, racial identity, ethnic identity, sexual orientation, socioeconomic status, and intersectionality. Exceptions may be present in the documentation due to language that is hardcoded in the user interfaces of the product software, language used based on RFP documentation, or language that is used by a referenced third-party product. Learn more about how Cisco is using Inclusive Language.
Introduction
This document describes how to configure Linux VPN posture with Identity Services Engine (ISE) and Firepower Threat Defense (FTD).
Prerequisites
Requirements
Cisco recommends that you have knowledge of these topics:
- Cisco Secure Client
- Remote Access VPN on Firepower Threat Defense (FTD)
- Identity Services Engine (ISE)
Components Used
The information in this document is based on these software versions:
- Ubuntu 22.04
- Cisco Secure Client 5.1.3.62
- Cisco Firepower Threat Defense (FTD) 7.4.1
- Cisco Firepower Management Center (FMC) 7.4.1
- Cisco Identity Services Engine (ISE) 3.3
The information in this document was created from the devices in a specific lab environment. All of the devices used in this document started with a cleared (default) configuration. If your network is live, ensure that you understand the potential impact of any command.
Configure
Network Diagram
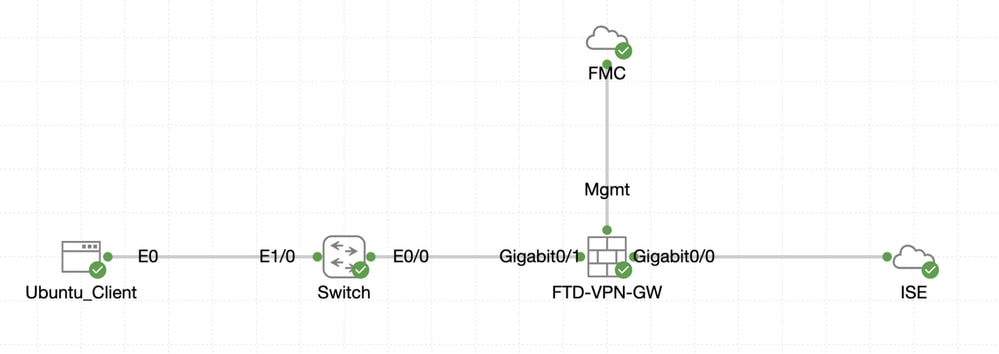 Topology
Configurations on FMC/FTD
Step 1. Connectivity among the client, FTD, FMC, and ISE has been successfully configured. As enroll.cisco.com is used for endpoints doing probe for redirection (refer to posture flow CCO documentsISE Posture Style Comparison for Pre and Post 2.2 for details). Ensure the route for traffic to enroll.cisco.com on FTD is configured correctly.
Step 2. Download the package name cisco-secure-client-linux64-5.1.3.62-webdeploy-k9.pkg from Cisco Software Download and ensure the file is good after download by confirming md5 checksum of the downloaded file is the same as the Cisco Software Download page.
Step 3. Navigate to Objects > Object Management > VPN > Secure Client File. Click Add Secure Client File, provide the name, browse File Name to select cisco-secure-client-linux64-5.1.3.62-webdeploy-k9.pkg, select Secure Client Image in File Type drop-down list. Then click Save.
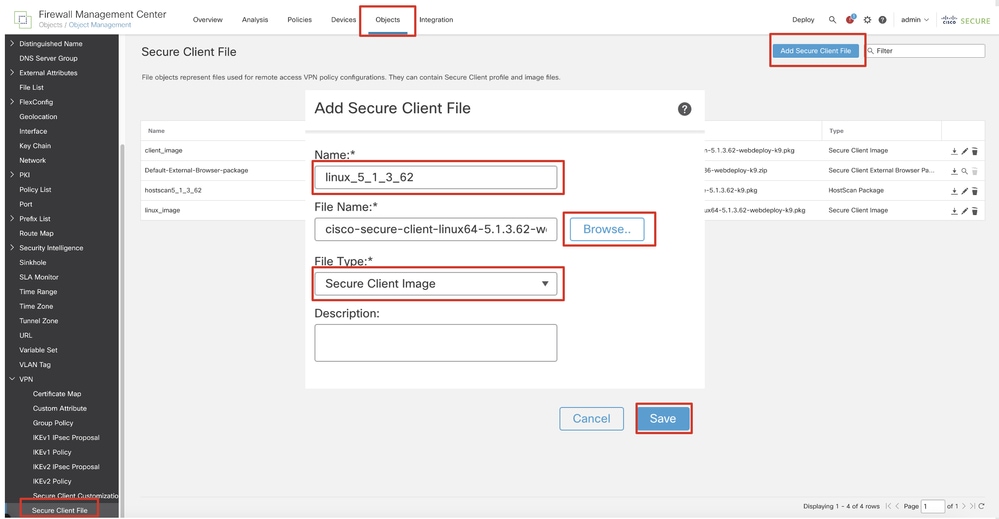 FMC_Upload_Secure_Client_Image
Step 4. Navigate to Objects > Object Management > Network.
Step 4.1. Create an object for the DNS server. Click Add Object, provide the name and available DNS IP address. Click Save.
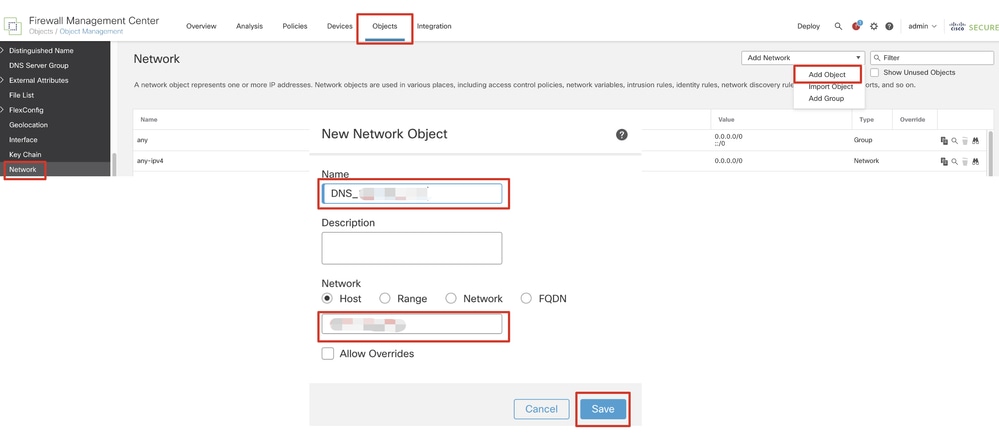 FMC_Add_Object_DNS

Note: DNS server configured here is to be used for VPN users.
Step 4.2. Create an object for ISE PSN. Click Add Object, provide the name and available ISE PSN IP address. Click Save.
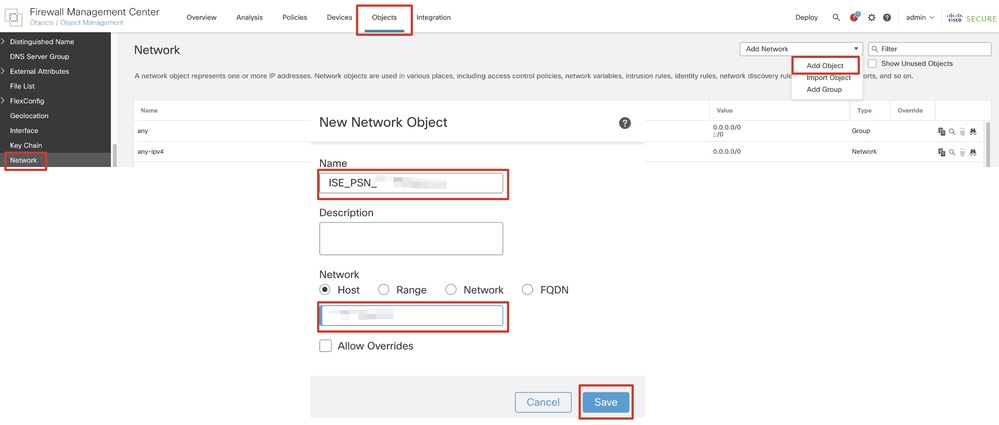 FMC_Add_Object_ISE
Step 5. Navigate to Objects > Object Management > VPN > Group Policy. Click Add Group Policy. Click DNS/WINS, select the object of the DNS server in Primary DNS Server. Then click Save.
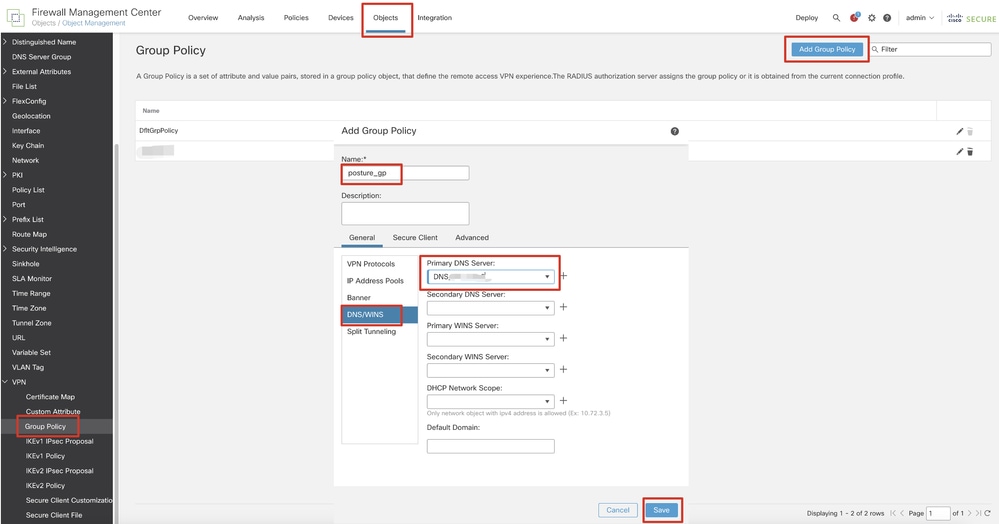 FMC_Add_Group_Policy

Note: Ensure the DNS server used in the VPN group policy can resolve ISE client provisioning portal FQDN and enroll.cisco.com.
Step 6. Navigate to Objects > Object Management > Access List > Extended. Click Add Extended Access List.
 FMC_Add_Redirect_ACL
Step 6.1. Provide the name of the redirect ACL. This name must be the same as in the ISE authorization profile. Click Add.
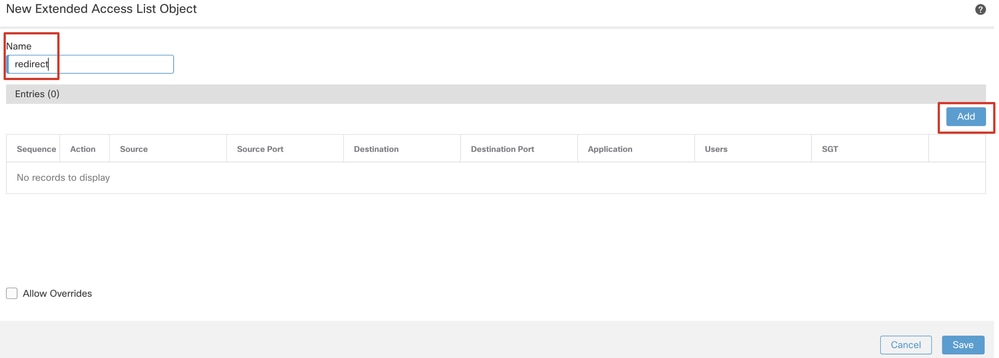 FMC_Add_Redirect_ACL_Part_1
Step 6.2. Block DNS traffic, traffic to ISE PSN IP address, and the remediation servers to exclude them from redirection. Allow the rest of the traffic. This triggers redirection. Click Save.
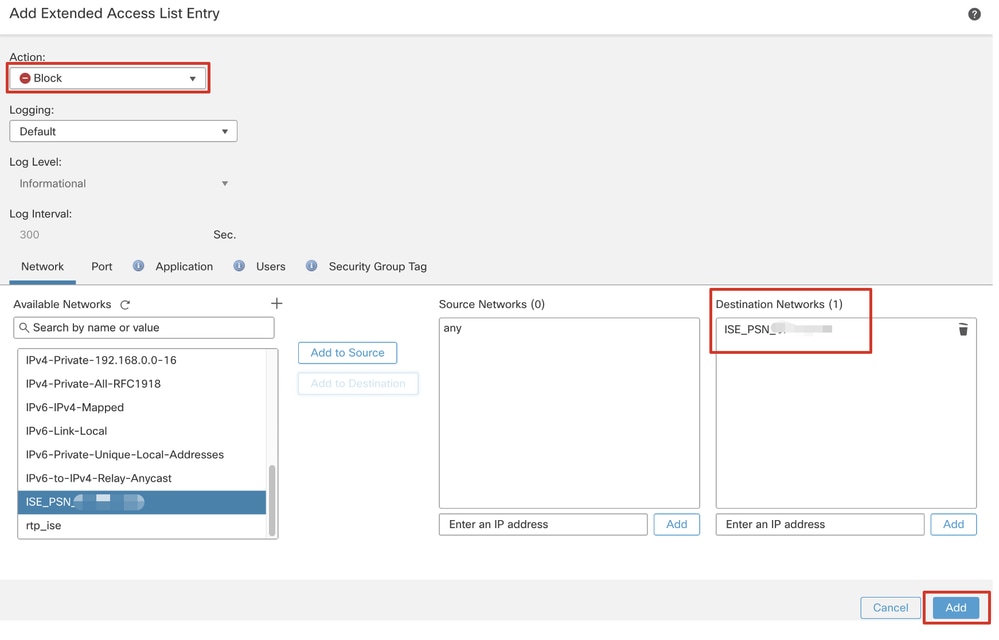 FMC_Add_Redirect_ACL_Part_2
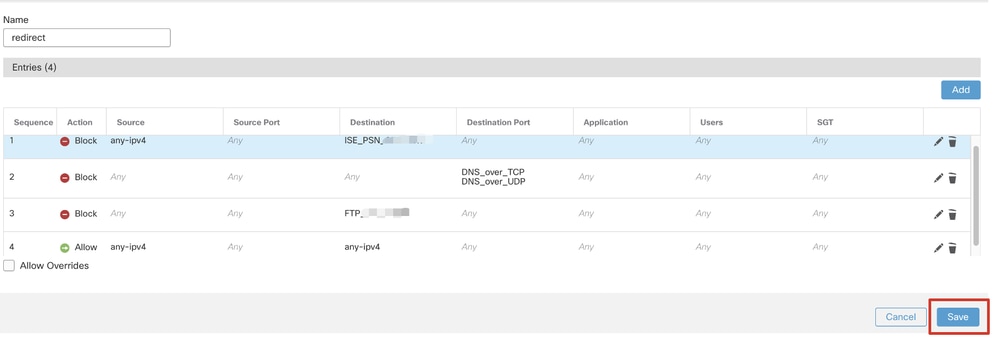 FMC_Add_Redirect_ACL_Part_3

Note: Destination FTP in this redirect ACL example is used as the remediation server example.
Step 7. Navigate to Objects > Object Management > RADIUS Server Group. Click Add RADIUS Server Group.
 FMC_Add_New_Radius_Server_Group
Step 7.1. Provide name, check Enable authorize only, check Enable interim account update, check Enable dynamic authorization.
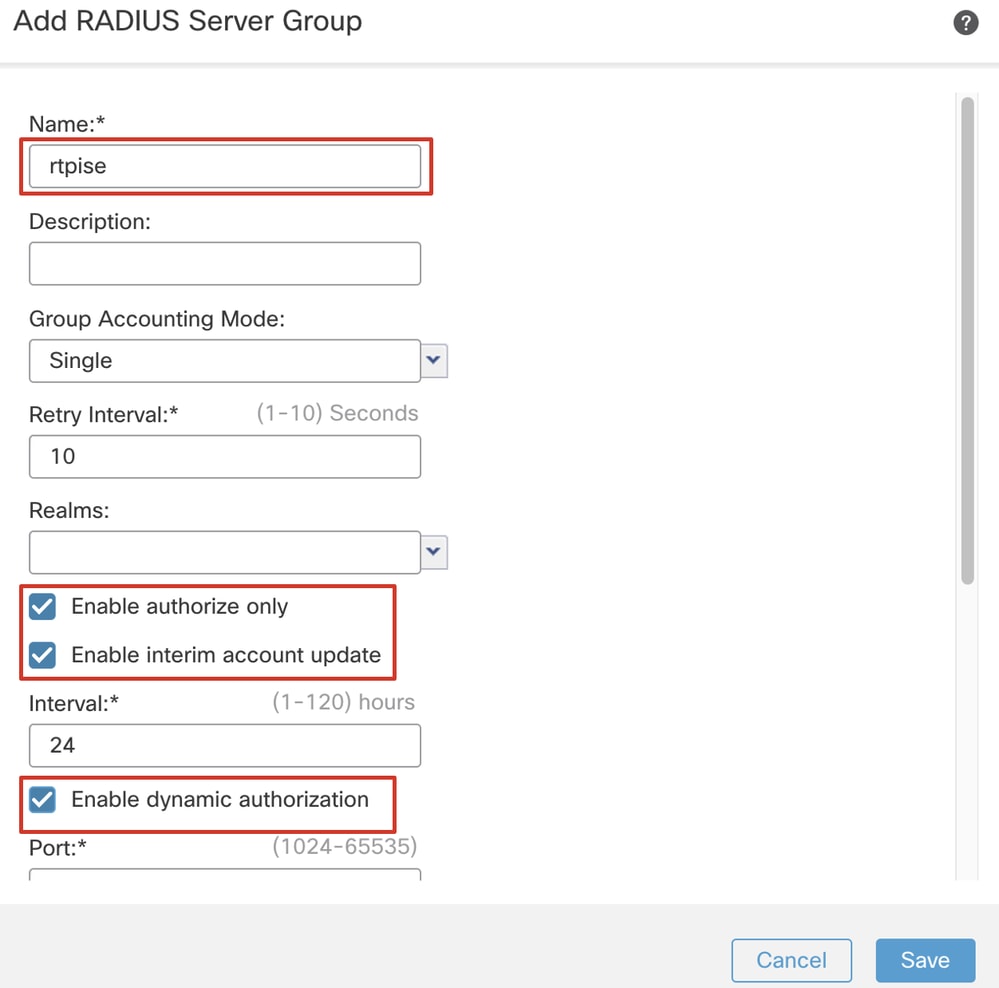 FMC_Add_New_Radius_Server_Group_Part_1
Step 7.2. Click the iconPlus to add a new radius server. Provide the ISE PSN IP Address/Hostname, Key. Select the specific interface for connecting. Select the Redirect ACL. Then click Saveto save the new radius server. Then click Save again to save the new radius server group.
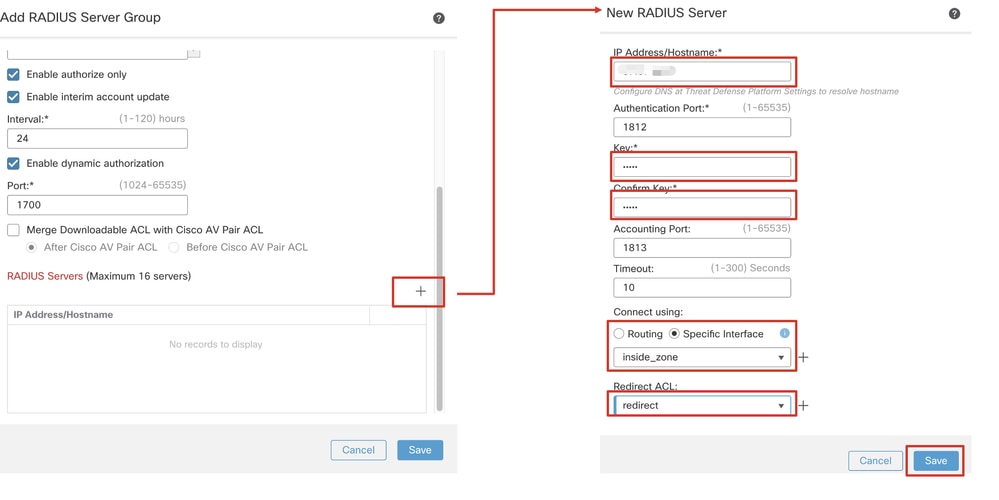 FMC_Add_New_Radius_Server_Group_Part_2
Step 8. Navigate to Objects > Object Management > Address Pools > IPv4 Pools. Click Add IPv4 Pools and provide the Name, IPv4 Address Rangeand Mask. Then click Save.
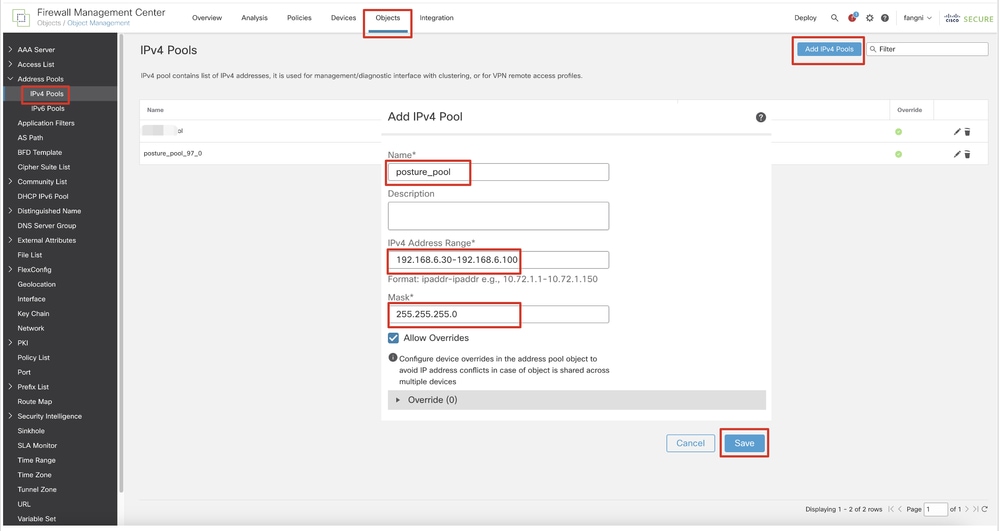 FMC_Add_New_Pool
Step 9. Navigate to Certificate Objects > Object Management > PKI > Cert Enrollment. Click Add Cert Enrollment, provide a name, and select Self Signed Certificatein Enrollment Type. Click the Certificate Parameters tab and provide Common Name and Country Code. Then click Save.
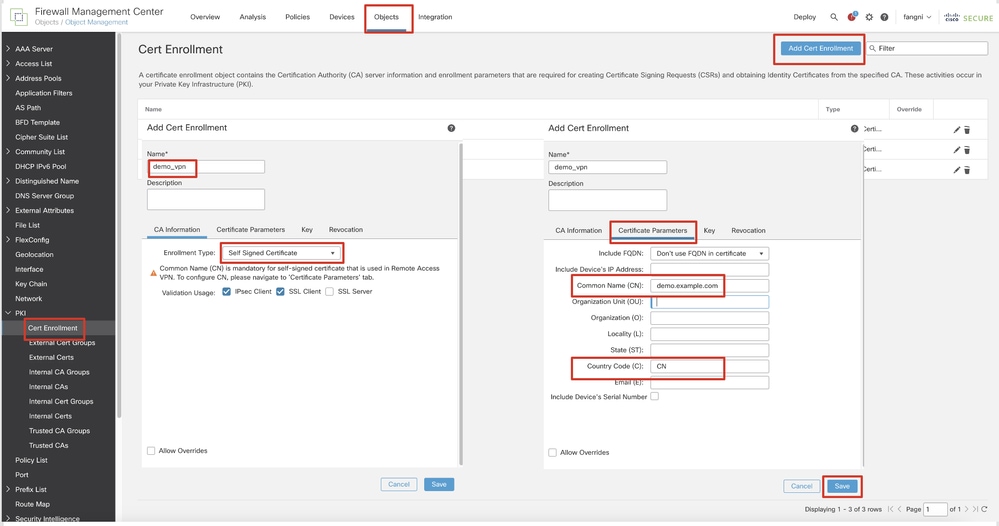 FMC_Add_New_Cert_Enroll
Step 10. Navigate to Devices > Certificates. Click Add, select the FTD name under Device, select previous configured enrollment under Cert Enrollment. Click Add.
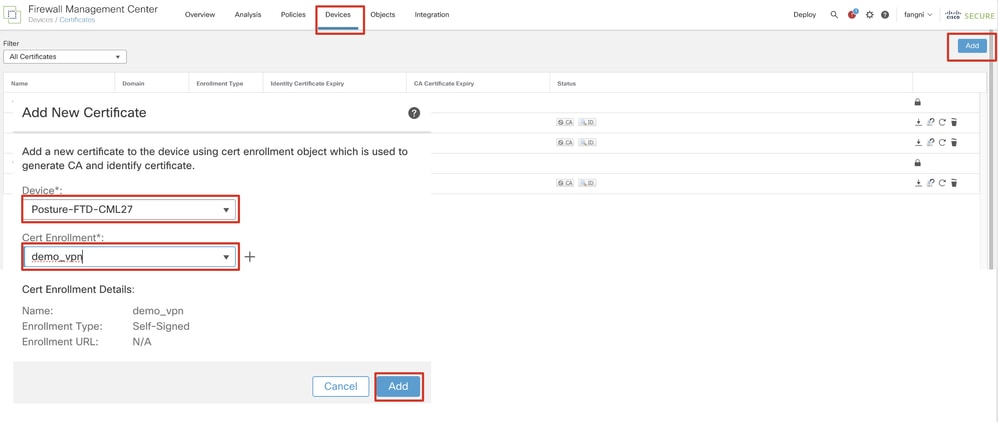 FMC_Add_New_Cert_To_FTD
Step 11. Navigate to Devices > VPN > Remote Access. Click Add.
Step 11.1. Provide the name, and add the FTD to Selected Devices. Click Next.
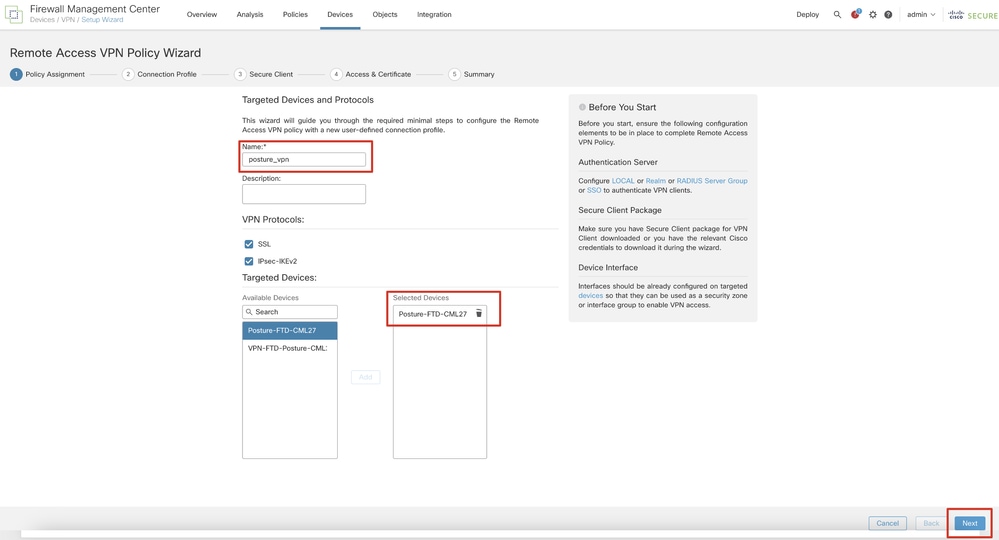 FMC_New_RAVPN_Wizard_1
Step 11.2. Select previously configured radius server group in the Authentication Server, Authorization Server, Accounting Server. Scroll down the page.
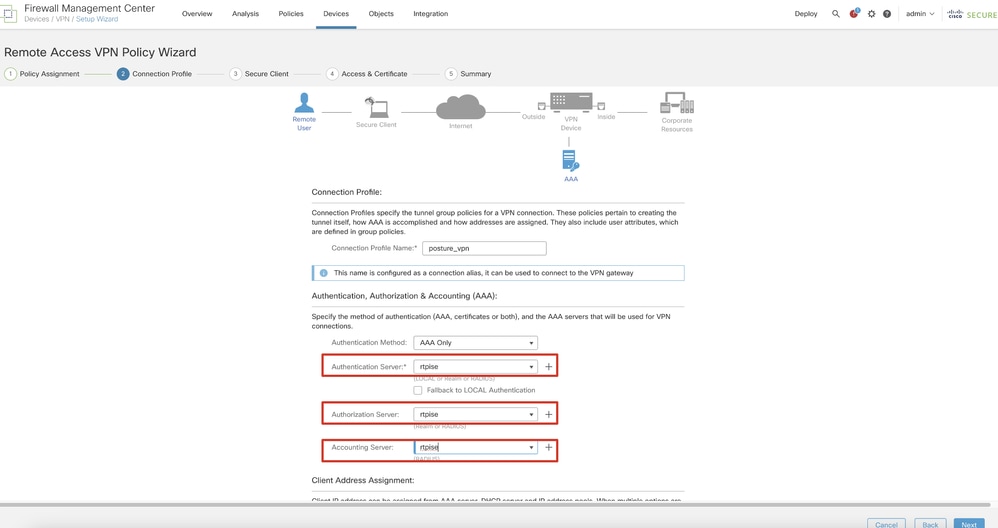 FMC_New_RAVPN_Wizard_2
Step 11.3. Select the previously configured pool name in IPv4 Address Pools. Select previously configured group policy in Group Policy. Click Next.
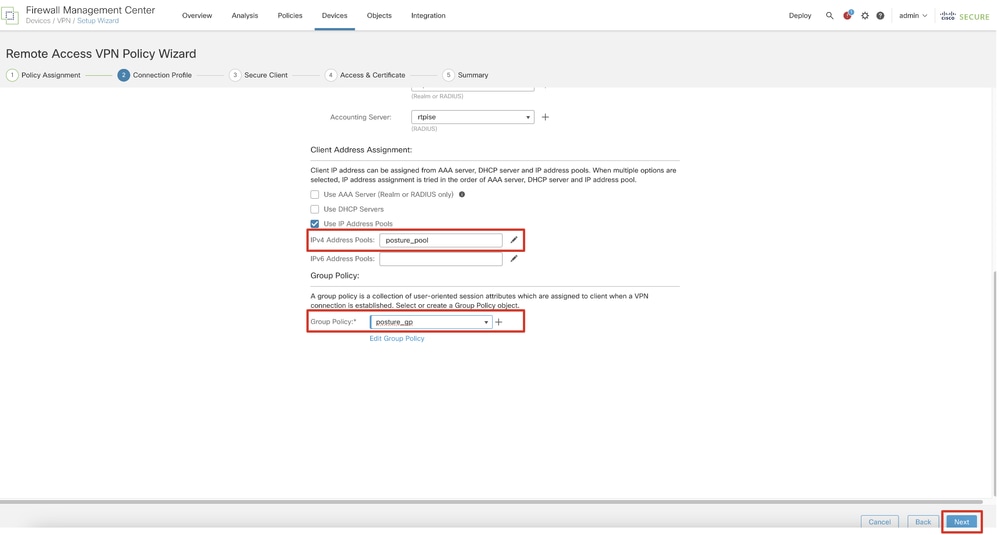 FMC_New_RAVPN_Wizard_3
Step 11.4. Check the checkbox of Linux image. Click Next.
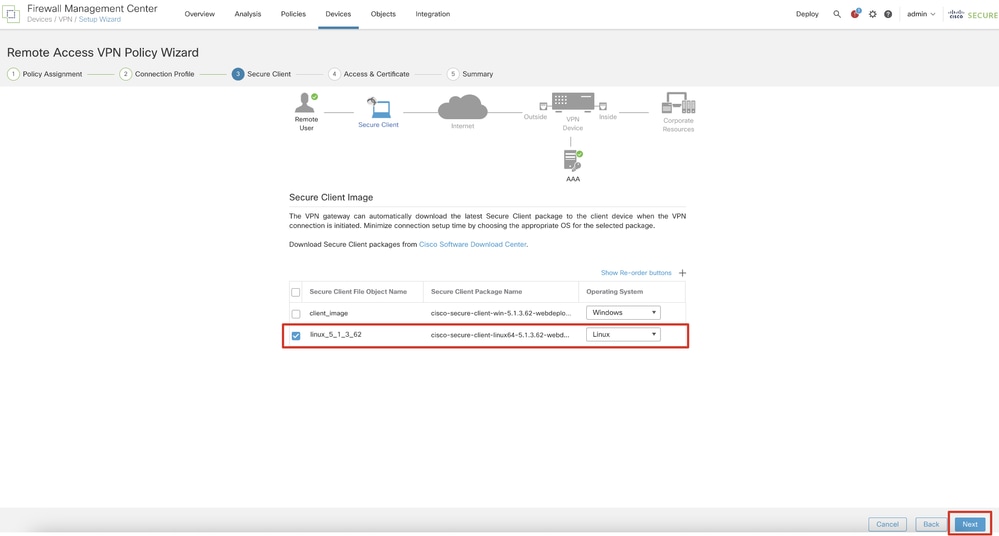 FMC_New_RAVPN_Wizard_4
Step 11.5. Select the interface of VPN interface. Select the cert enrollment that enrolled on FTD in step 9. Click Next.
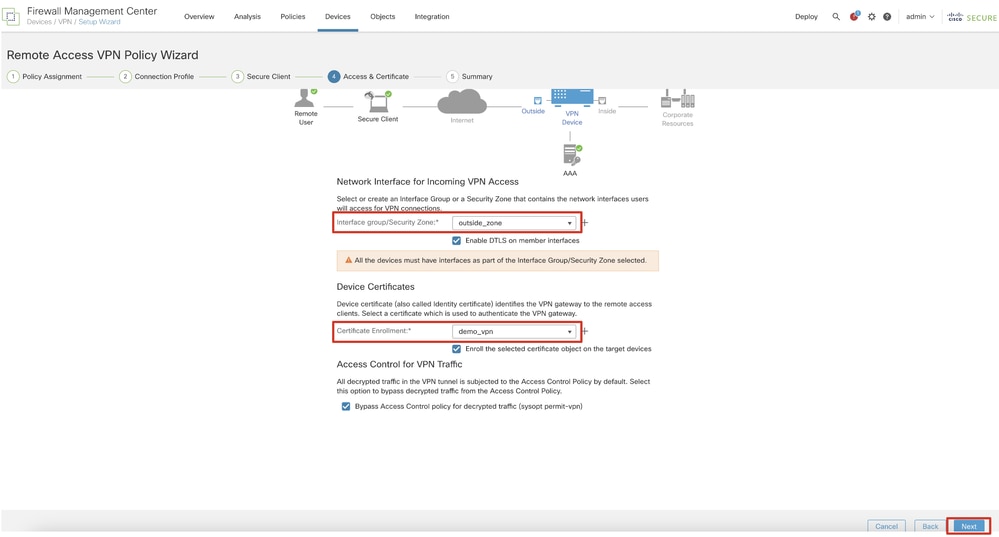 FMC_New_RAVPN_Wizard_5
Step 11.6. Double confirm the related information on summary page. If everything is good, click Finish. If anything needs to be modified, click Back.
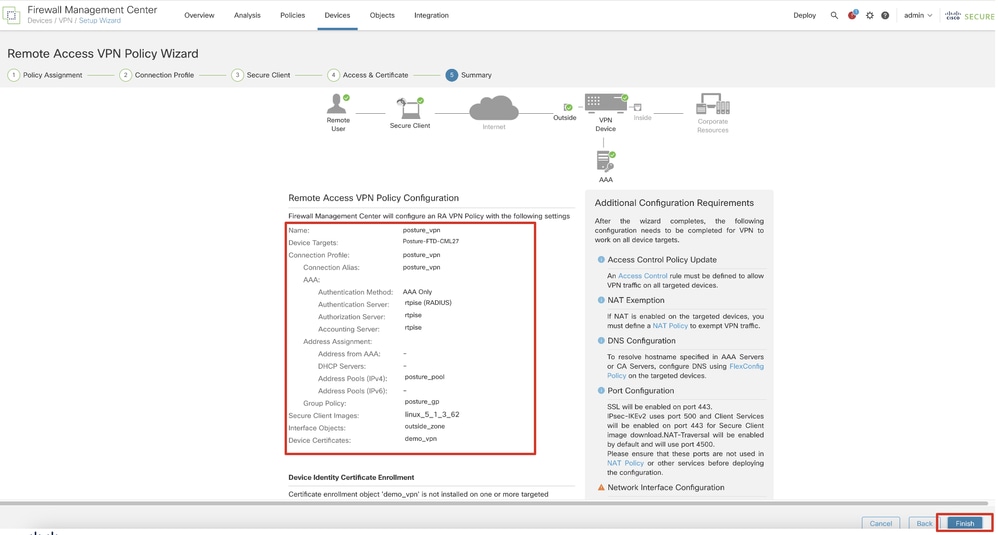 FMC_New_RAVPN_Wizard_6
Step 12. Deploy the new configuration to FTD to complete the remote access VPN configuration.
 FMC_Deploy_FTD
Configurations on ISE
Step 13. Navigate to Work Centers > Posture > Network Devices. Click Add.
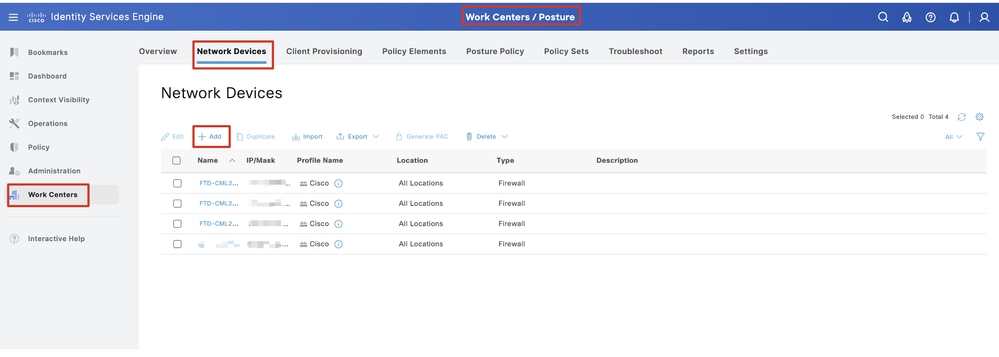 ISE_Add_New_Devices
Step 13.1. Provide the Name, IP Addressand scroll down the page.
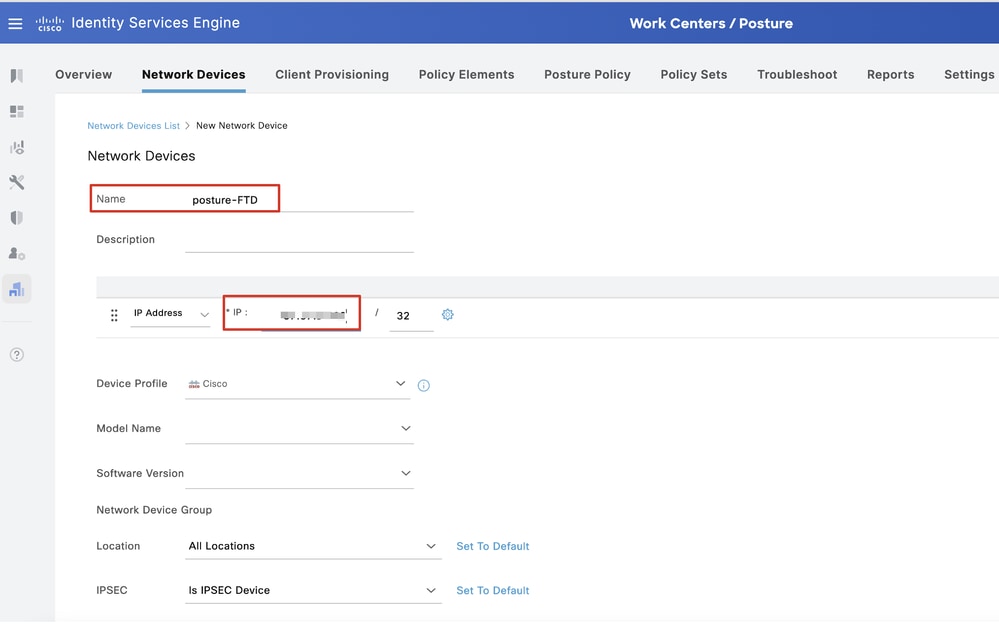 ISE_Add_New_Devices_1
Step 13.2. Check the checkbox of RADIUS Authentication Settings. Provide the Shared Secret. Click Submit.
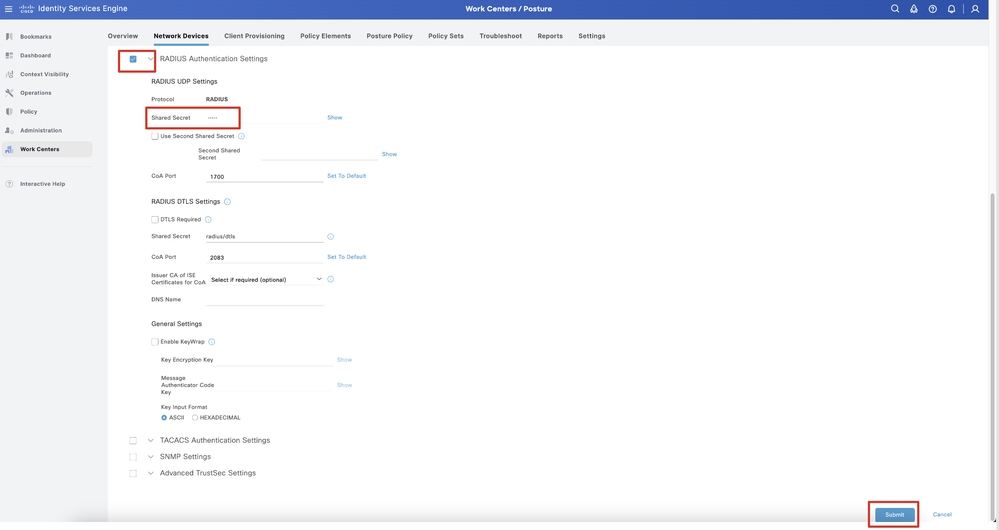 ISE_Add_New_Devices_2
Step 14. Download the package name cisco-secure-client-linux64-4.3.3139.0-isecompliance-webdeploy-k9.pkg from Cisco Software Download and ensure the file is good by confirming md5 checksum of downloaded file is the same as Cisco Software Download page. Package name cisco-secure-client-linux64-5.1.3.62-webdeploy-k9.pkg has been downloaded successfully in Step 1.
Step 15. Navigate to Work Centers > Posture > Client Provisioning > Resources. Click Add. Select Agent resources from local disk.
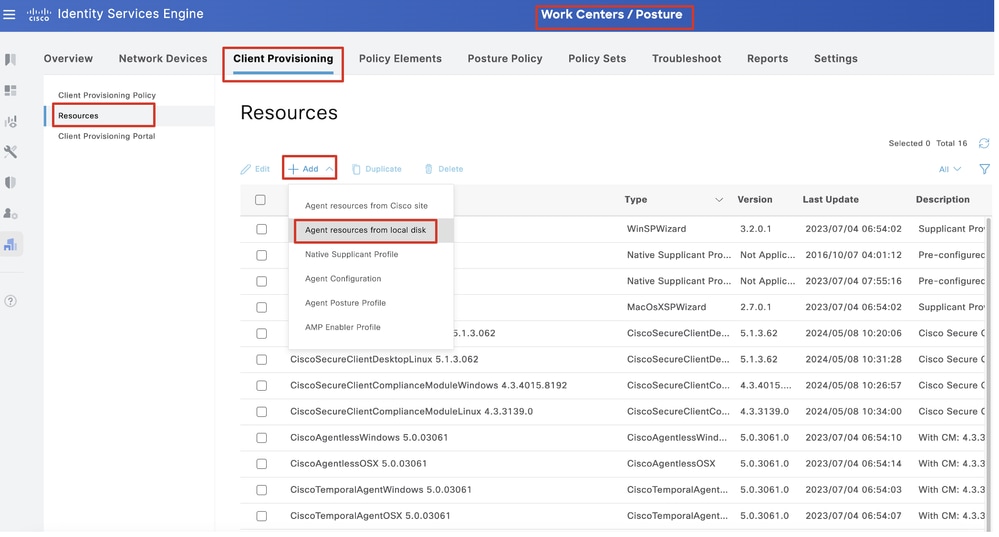 ISE_Upload_Resource
Step 15.1. Select Cisco Provided Package. Click Choose File to upload cisco-secure-client-linux64-5.1.3.62-webdeploy-k9.pkg. Click Submit.
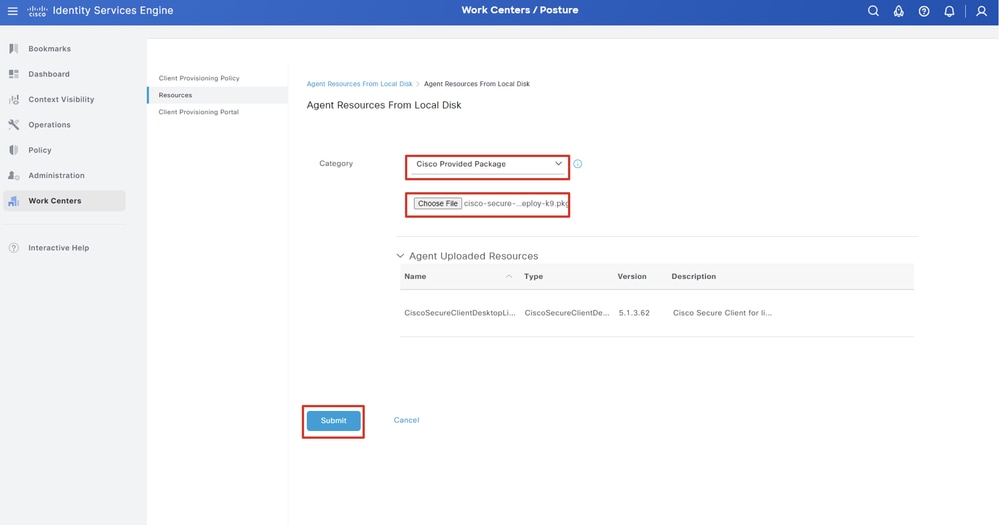 ISE_Upload_Resources_1

Note: Repeat the Step 14. to upload cisco-secure-client-linux64-4.3.3139.0-isecompliance-webdeploy-k9.pkg .
Step 16. Navigate to Work Centers > Posture > Client Provisioning > Resources. Click Add. Select Agent Posture Profile.
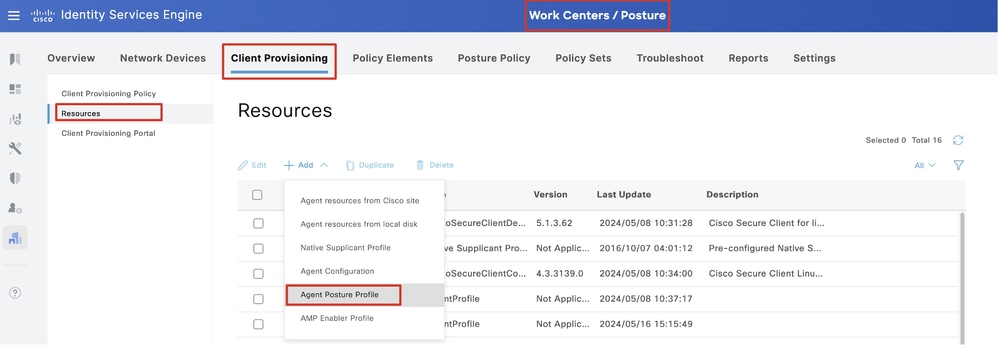 ISE_Add_Agent_Posture_Profile
Step 16.1. Provide the Name, Server name rules and keep the rest as default. Click Save.
Name: linux_agent_profile
Server name rules: *.example.com
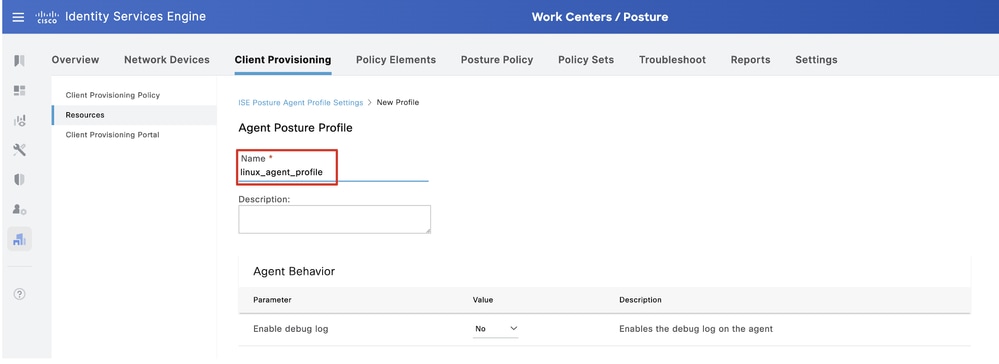 ISE_Add_Agent_Posture_Profile_1
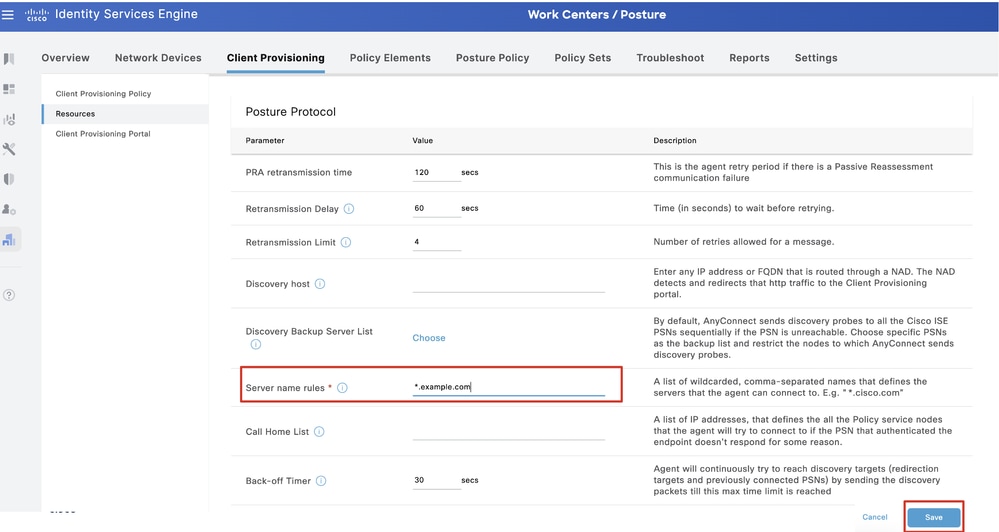 ISE_Add_Agent_Posture_Profile_2
Step 17. Navigate to Work Centers > Posture > Client Provisioning > Resources. Click Add. Select Agent Configuration.
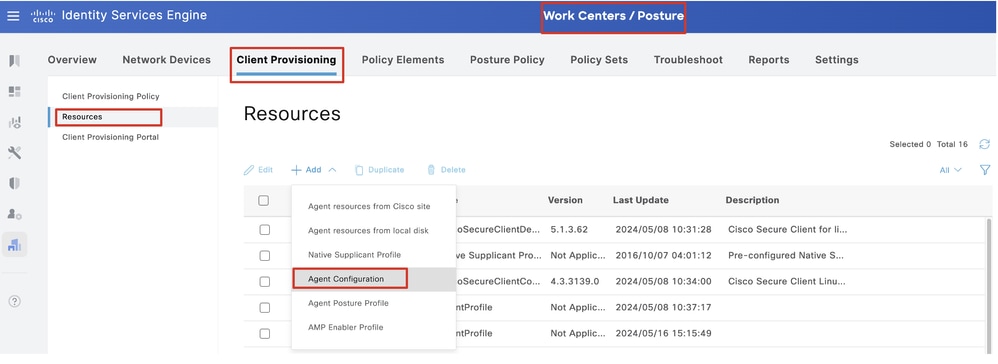 ISE_Add_Agent_Configuration
Step 17.2. Configure the details:
Select Agent Package: CiscoSecureClientDesktopLinux 5.1.3.062
Name: linux_agent_config
Compliance module: CiscoSecureClientComplianceModuleLinux 4.3.3139.0
Check the checkbox of VPN, Diagnostic and Reporting Tool
Profile Selection ISE Posture: linux_agent_profile
Click Submit.
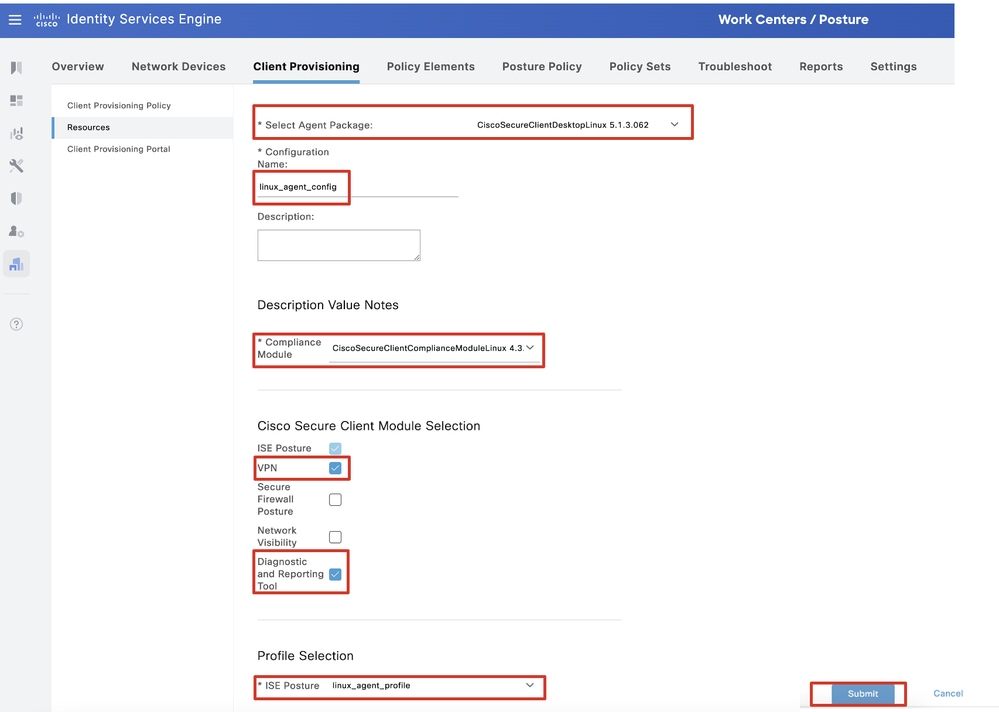 ISE_Add_Agent_Configuration_1
Step 18. Navigate to Work Centers > Posture > Client Provisioning > Client Provisioning Policy. Click Edit at the end of any rule name. Select Insert new policy below.
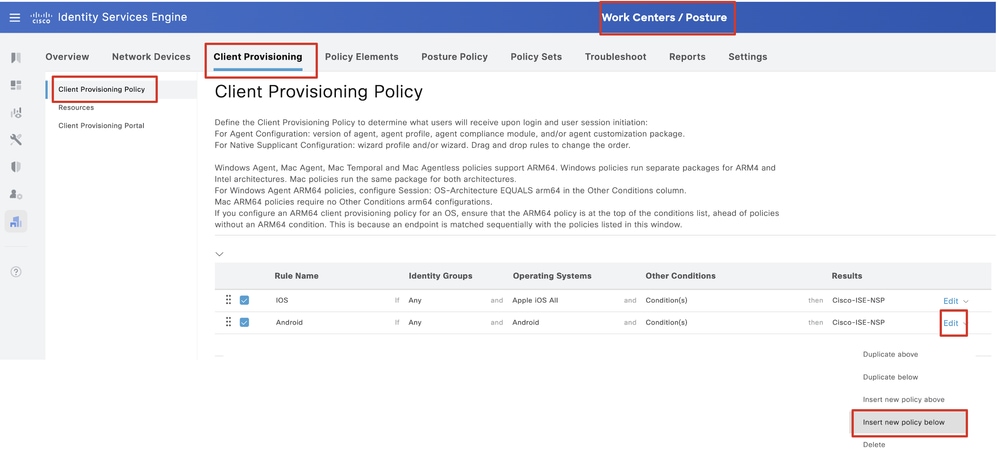 ISE_Add_New_Provisioning_Policy
Step 18.1. Configure the details:
Rule Name: Linux
Operating Systems: Linux All
Results: linux_agent_config
Click Done and Save.
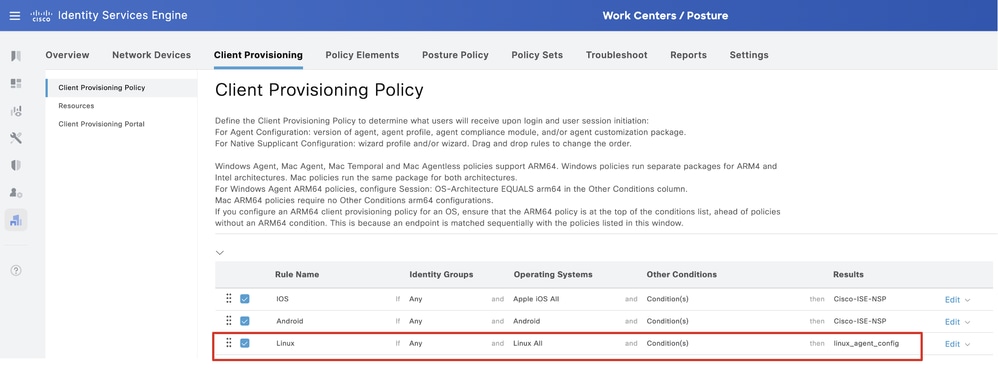 ISE_Add_New_Provisioning_Policy_1
Step 19. Navigate to Work Centers > Posture > Policy Elements > Conditions > File. Click Add.
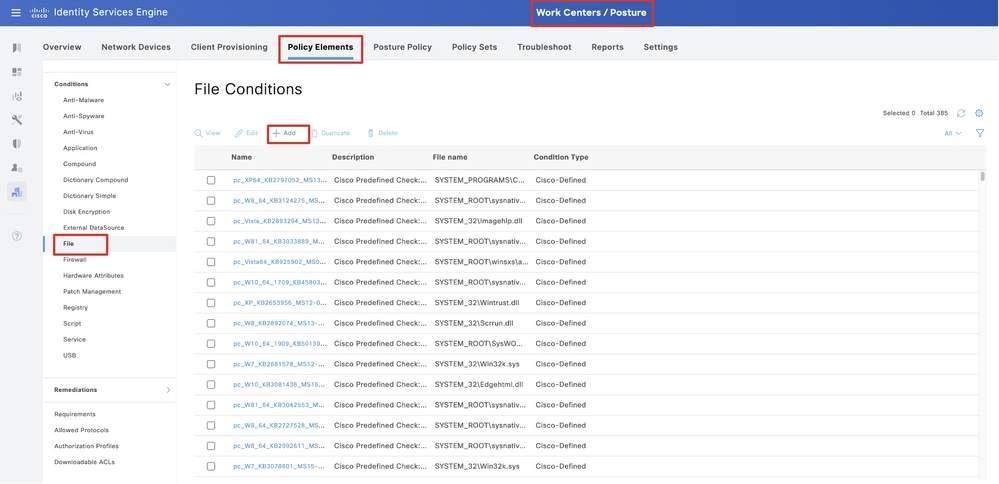 ISE_Add_New_File_Condition
Step 19.1. Configure the details:
Name: linux_demo_file_exist
Operating Systems: Linux All
File Type: FileExistence
File Path: home, Desktop/test.txt
File Operator: Exists
Click Submit.
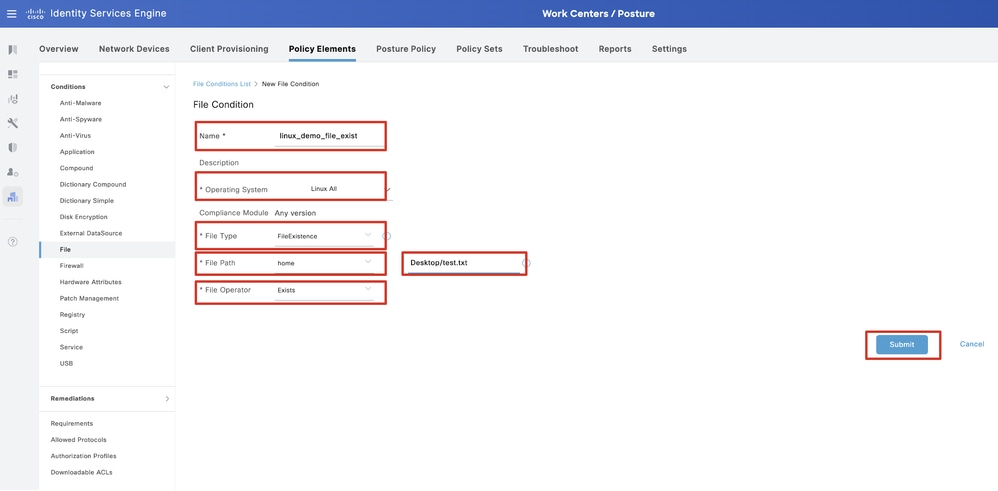 ISE_Add_New_File_Condition_1
Step 20. Navigate to Work Centers > Posture > Policy Elements > Requirements. Click Edit at the end of any rule name. Select Insert new Requirement.
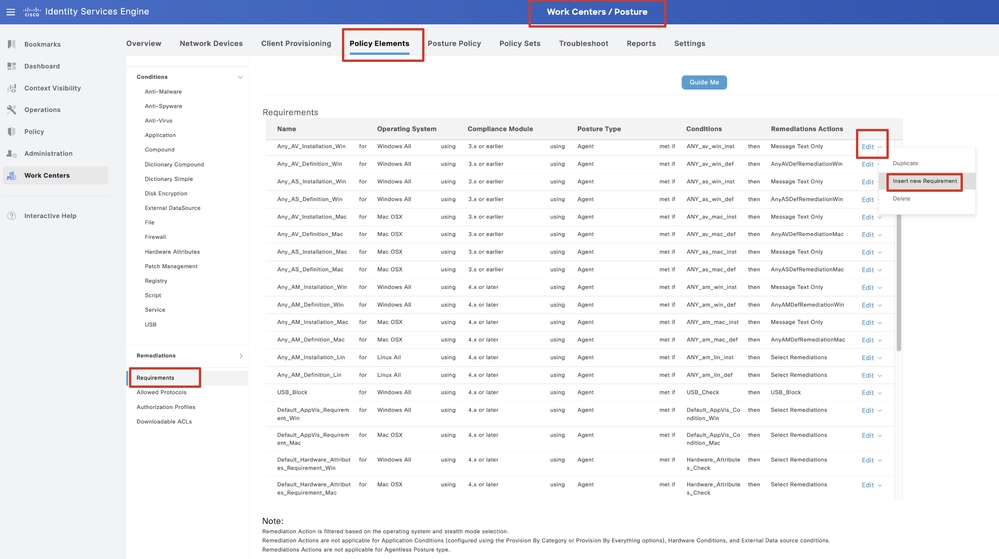 ISE_Add_New_Posture_Requirement
Step 20.1. Configure the details:
Name: Test_exist_linux
Operating Systems: Linux All
Compliance Module: 4.x or later
Posture Type: Agent
Conditions: linux_demo_file_exist
Click Done and Save.
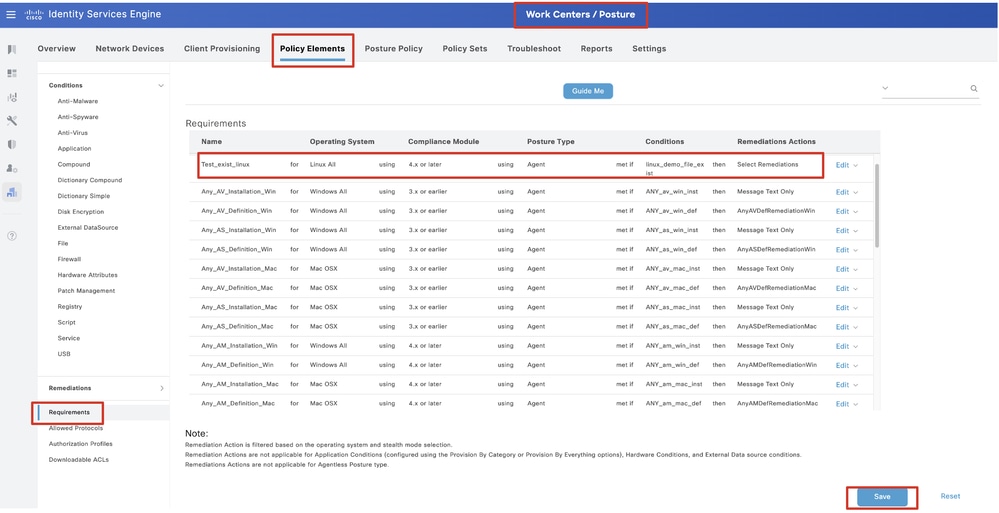 ISE_Add_New_Posture_Requirement_1

Note: As of now, only shell scripts are supported for Linux agents as remediation.
Step 21. Navigate to Work Centers > Posture > Policy Elements > Authorization Profiles. Click Add.
Step 21.1. Configure the details:
Name: unknown_redirect
Check the checkbox of Web Redirection(CWA,MDM,NSP,CPP)
Select Client Provisioning(Posture)
ACL: redirect
Value: Client Provisioning Portal(default)
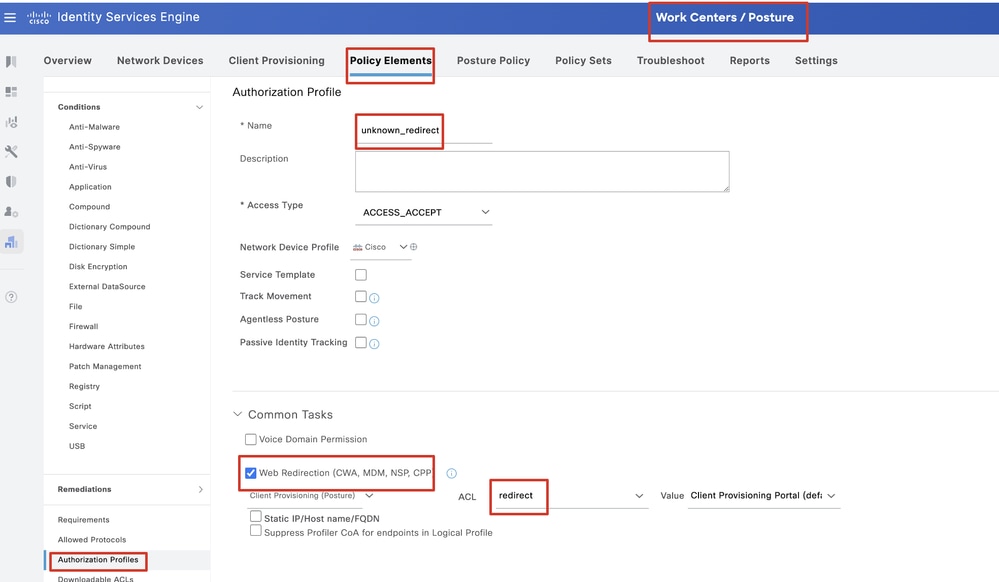 ISE_Add_New_Authorization_Profile_Redirect_1

Note: This ACL name redirect must match the corresponding ACL name configured on FTD.
Step 21.2. Repeat the Add to create another two authorization profiles for non-compliant and compliant endpoints with the details.
Name: non_compliant_profile
DACL Name: DENY_ALL_IPv4_TRAFFIC
Name: compliant_profile
DACL Name: PERMIT_ALL_IPv4_TRAFFIC

Note: The DACL for compliant or non-compliant endpoints needs to be configured according to the actual requirements.
Step 22. Navigate to Work Centers > Posture > Posture Policy. Click Edit at the end of any rules. Select Insert new policy.
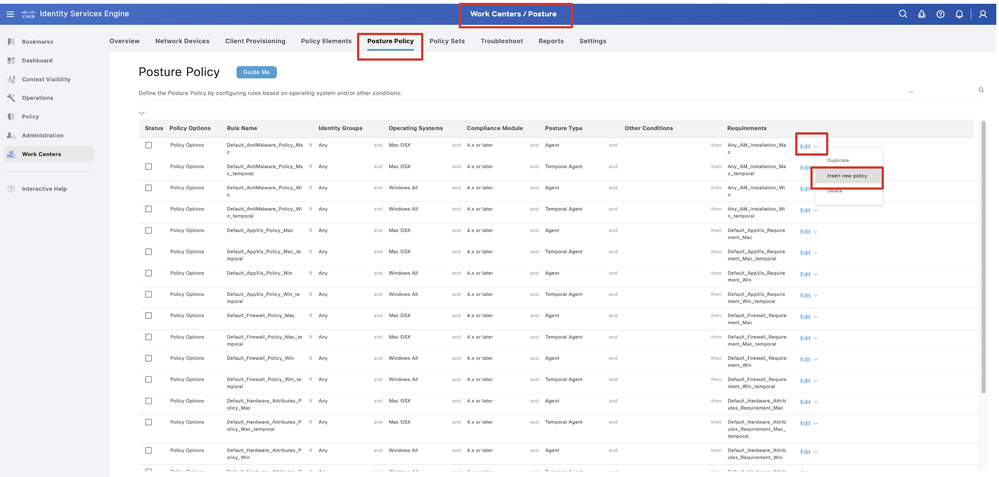 ISE_Add_New_Posture_Policy
Step 22.1. Configure the details:
Rule Name: Demo_test_exist_linux
Identity Groups: Any
Operating Systems: Linux All
Compliance Module: 4.x or later
Posture Type: Agent
Requirements: Test_exist_linux
Click Done and Save.
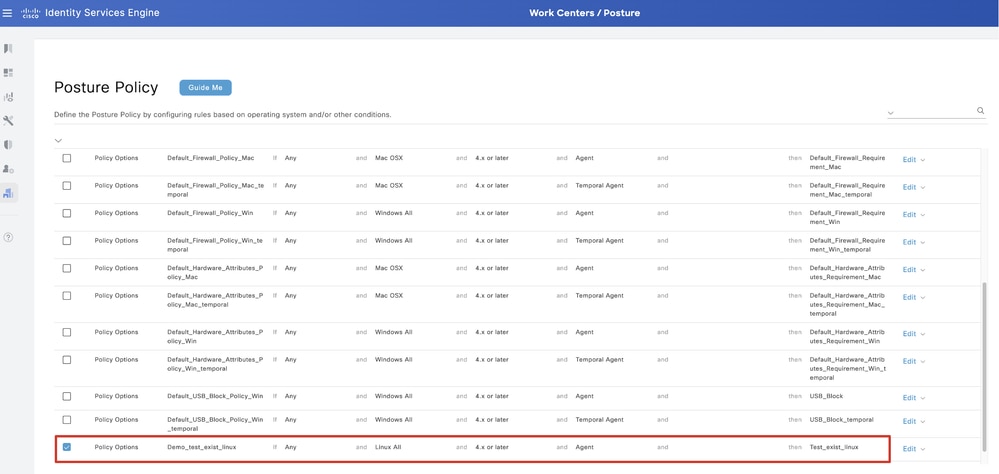 ISE_Add_New_Posture_Policy_1
Step 23. Navigate to Work Centers > Posture > Policy Sets. Click to Insert new row above.
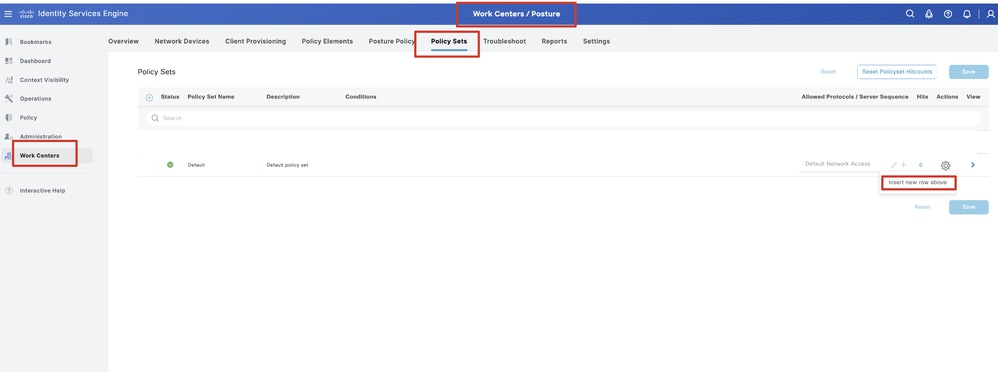 ISE_Add_New_Policy_Set
Step 23.1. Configure the details:
Policy Set Name: Firewall Posture
Conditions: Network Access Device IP Address EQUALs [FTD IP Address]
Click Save .
 ISE_Add_New_Policy_Set_1
Step 23.2. Click > to enter the policy set. Create new authorization rules for posture compliant, non-compliant, and unknown status. Click Save.
Compliant with compliant_profile
NonCompliant with non_compliant_profile
Unknown with unknown_redirect
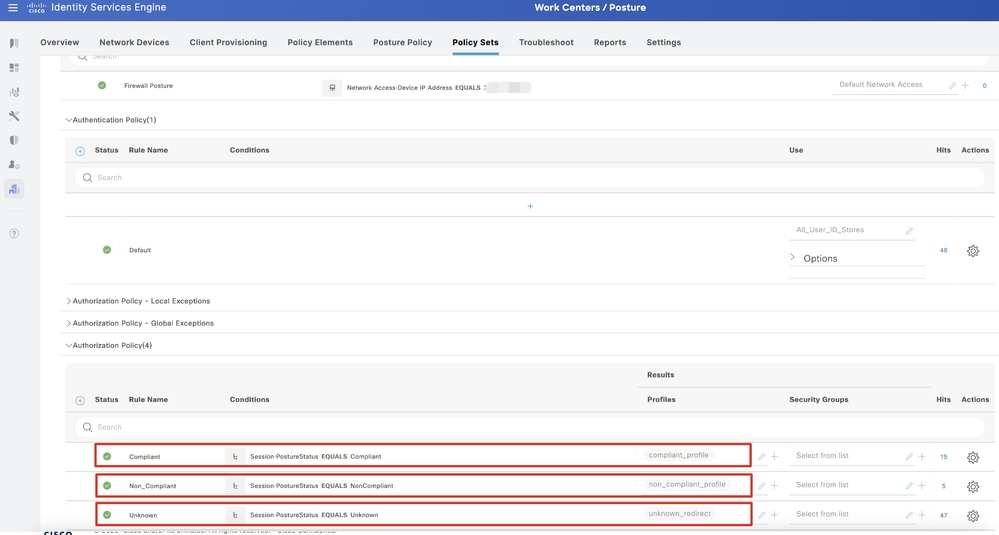 ISE_Add_New_Policy_Set_2
Configurations on Ubuntu
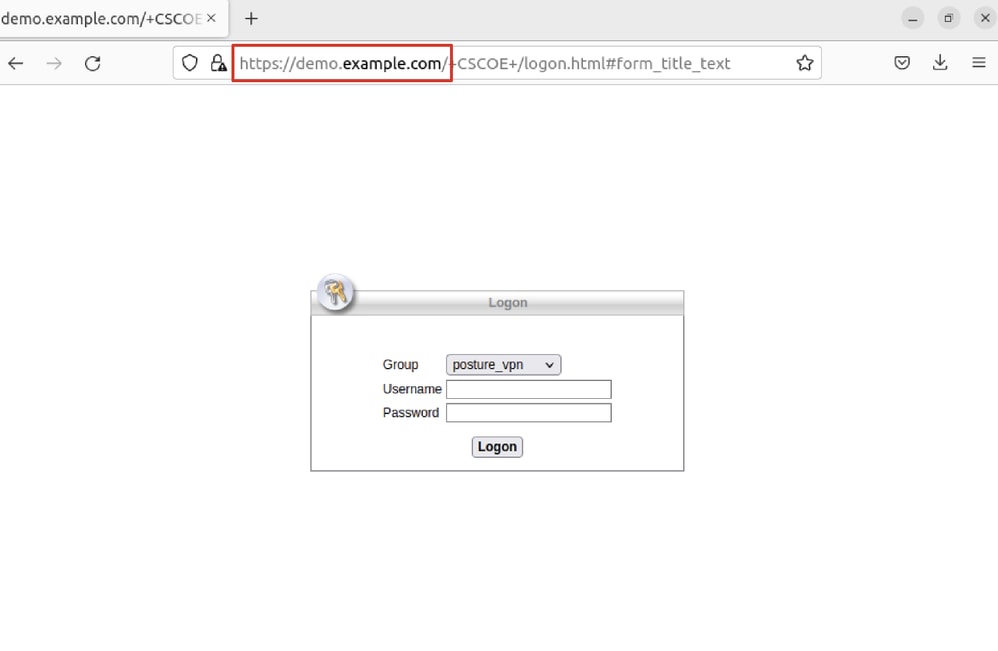
Step 24. Login to Ubuntu client via GUI. Open the browser to login the VPN portal. In this example, it is demo.example.com.
 Ubuntu_Browser_VPN_Login
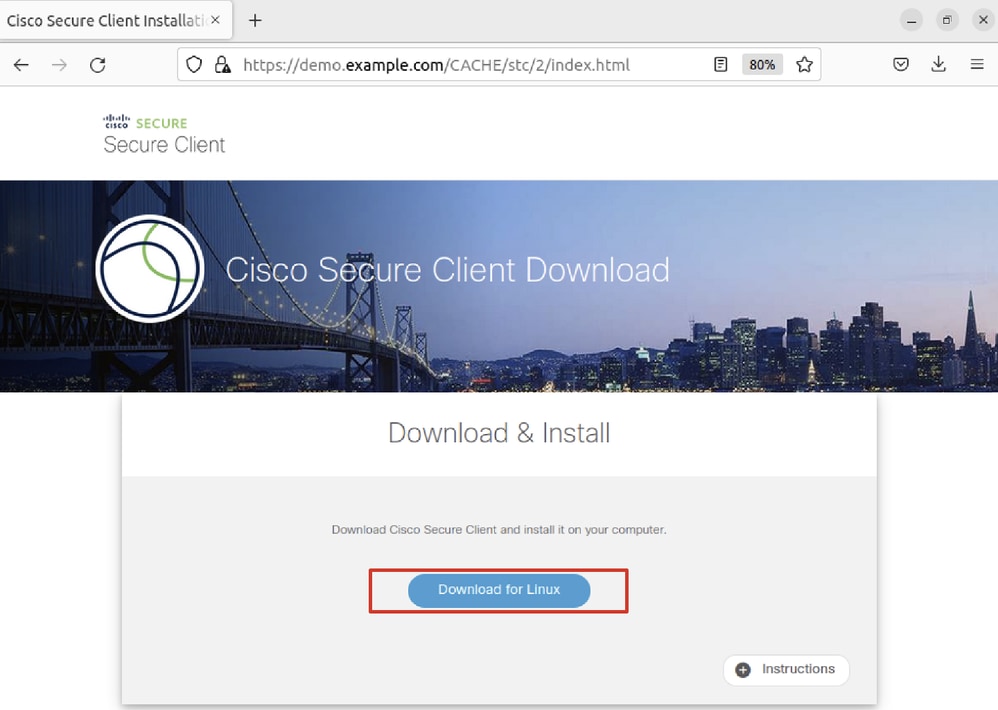
Step 25. Click Download for Linux.
 Ubuntu_Browser_VPN_Download_1
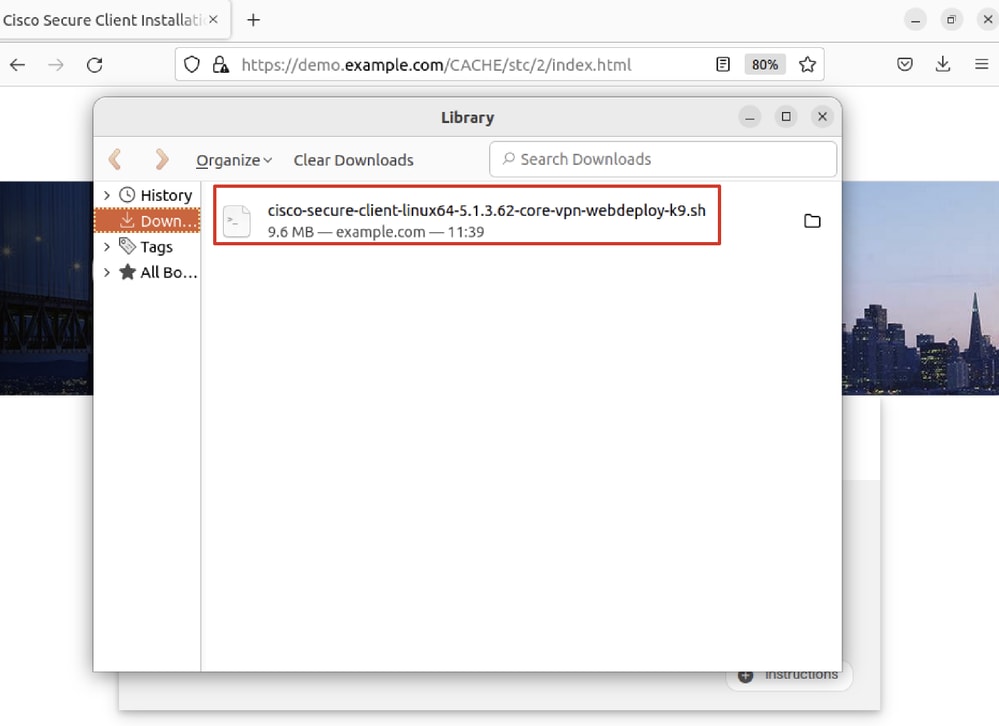
The downloaded file name is cisco-secure-client-linux64-5.1.3.62-core-vpn-webdeploy-k9.sh.
 Ubuntu_Browser_VPN_Download_2
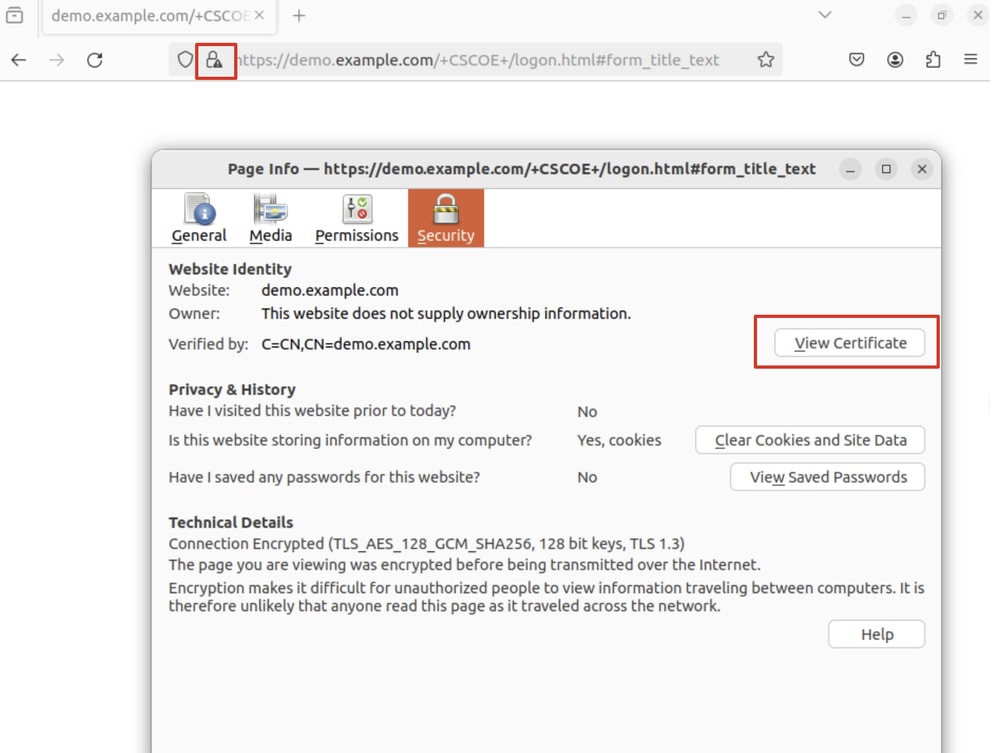
Step 26. Download VPN certificate through the browser and rename the file to <certificate>.crt. This is the example of using firefox to download the certificate.
 Ubuntu_Browser_VPN_Cert_Download
Step 27. Open the terminal on the Ubuntu client. Navigate to path home/user/Downloads/ to install Cisco Secure Client.
user@ubuntu22-desktop:~$ cd Downloads/
user@ubuntu22-desktop:~/Downloads$ ls
cisco-secure-client-linux64-5.1.3.62-core-vpn-webdeploy-k9.sh    demo-example-com.crt

user@ubuntu22-desktop:~/Downloads$ chmod +x cisco-secure-client-linux64-5.1.3.62-core-vpn-webdeploy-k9.sh

user@ubuntu22-desktop:~/Downloads$ sudo ./cisco-secure-client-linux64-5.1.3.62-core-vpn-webdeploy-k9.sh
[sudo] password for user:
Installing Cisco Secure Client...
Migrating /opt/cisco/anyconnect directory to /opt/cisco/secureclient directory
Extracting installation files to /tmp/vpn.zaeAZd/vpninst959732303.tgz...
Unarchiving installation files to /tmp/vpn.zaeAZd...
Starting Cisco Secure Client Agent...
Done!
Exiting now.
user@ubuntu22-desktop:~/Downloads$
Step 28. Trust the VPN portal certificate on the Ubuntu client.
user@ubuntu22-desktop:~$ cd Downloads/
user@ubuntu22-desktop:~/Downloads$ ls
cisco-secure-client-linux64-5.1.3.62-core-vpn-webdeploy-k9.sh   demo-example-com.crt

user@ubuntu22-desktop:~/Downloads$ openssl verify demo-example-com.crt
CN = demo.example.com, C = CN
error 18 at 0 depth lookup: self-signed certificate
Error demo-example-com.crt: verification failed

user@ubuntu22-desktop:~/Downloads$ sudo cp demo-example-com.crt /usr/local/share/ca-certificates/
user@ubuntu22-desktop:~/Downloads$ sudo update-ca-certificates
Updating certificates in /etc/ssl/certs...
rehash: warning: skipping ca-certificates.crt,it does not contain exactly one certificate or CRL
1 added, 0 removed; done.
Running hooks in /etc/ca-certificates/update.d...
done.

user@ubuntu22-desktop:~/Downloads$ openssl verify demo-example-com.crt
demo-example-com.crt: OK
Step 29. Open Cisco Secure Client on Ubuntu client, and connect VPN to demo.example.com successfully.
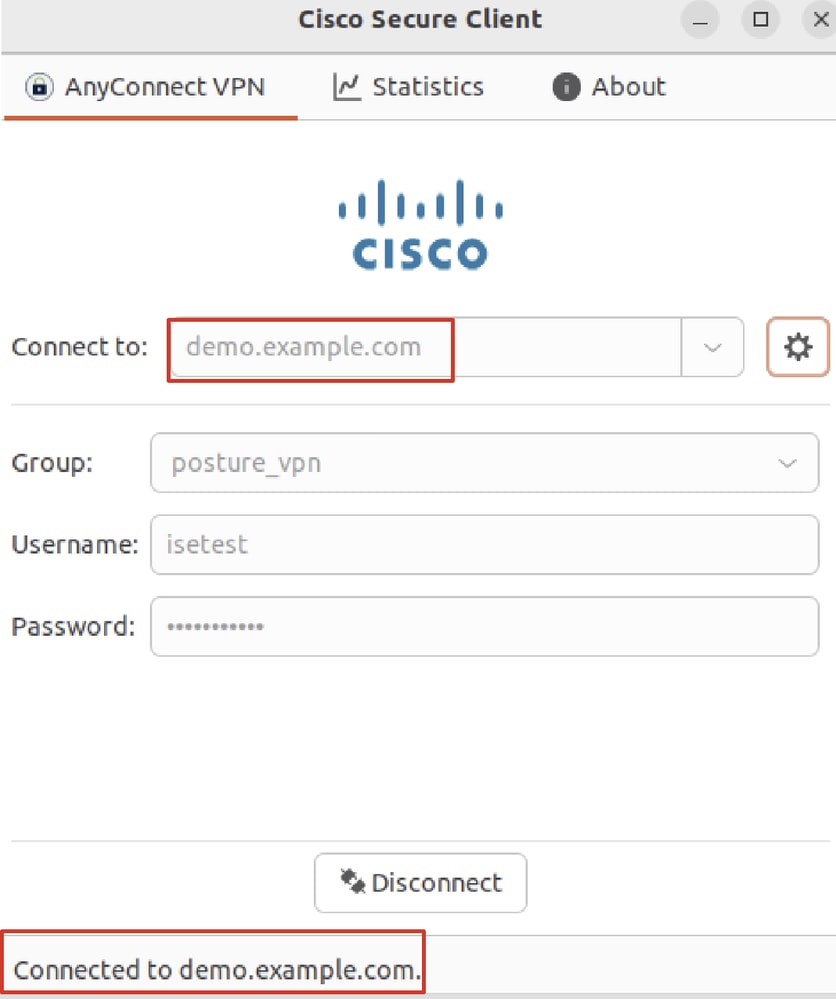 Ubuntu_Secure_Client_Connected
Step 30. Open the browser to access any website triggering the redirection to the ISE CPP portal. Download the certificate from the ISE CPP portal and rename the file to <certificate>.crt. This is an example of using Firefox for downloading.
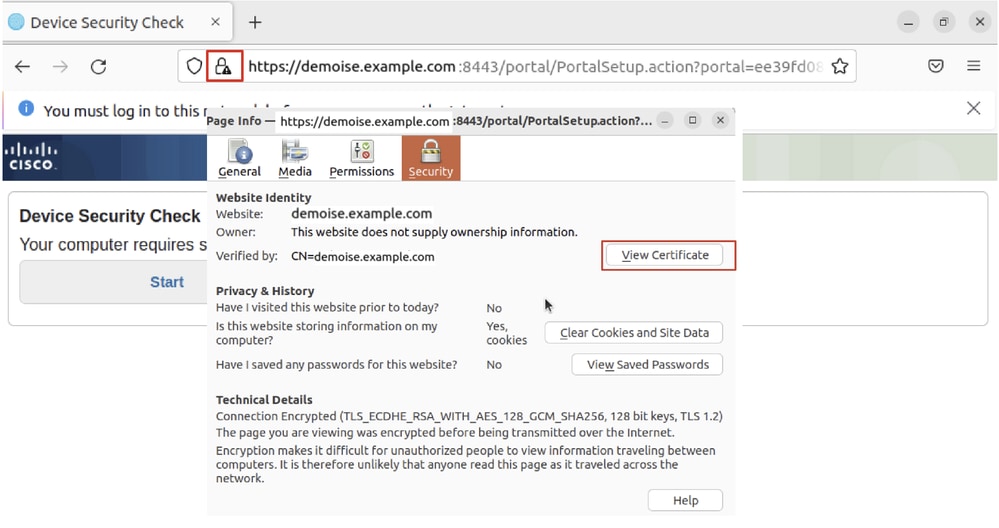 Ubuntu_Browser_CPP_Cert_Download
Step 30.1. Trust the ISE CPP portal certificate on the Ubuntu client.
user@ubuntu22-desktop:~/Downloads$ ls
cisco-secure-client-linux64-5.1.3.62-core-vpn-webdeploy-k9.sh
demo-example-com.crt
ise-cert.crt

user@ubuntu22-desktop:~/Downloads$ sudo cp ise-cert.crt /usr/local/share/ca-certificates/
user@ubuntu22-desktop:~/Downloads$ sudo update-ca-certificates
Updating certificates in /etc/ssl/certs...
rehash: warning: skipping ca-certificates.crt,it does not contain exactly one certificate or CRL
1 added, 0 removed; done.
Running hooks in /etc/ca-certificates/update.d...
done.
Step 31. Click Start on the ISE CPP portal.
 Ubuntu_Browser_CPP_Start
Step 32. Click here to download and install Agent.
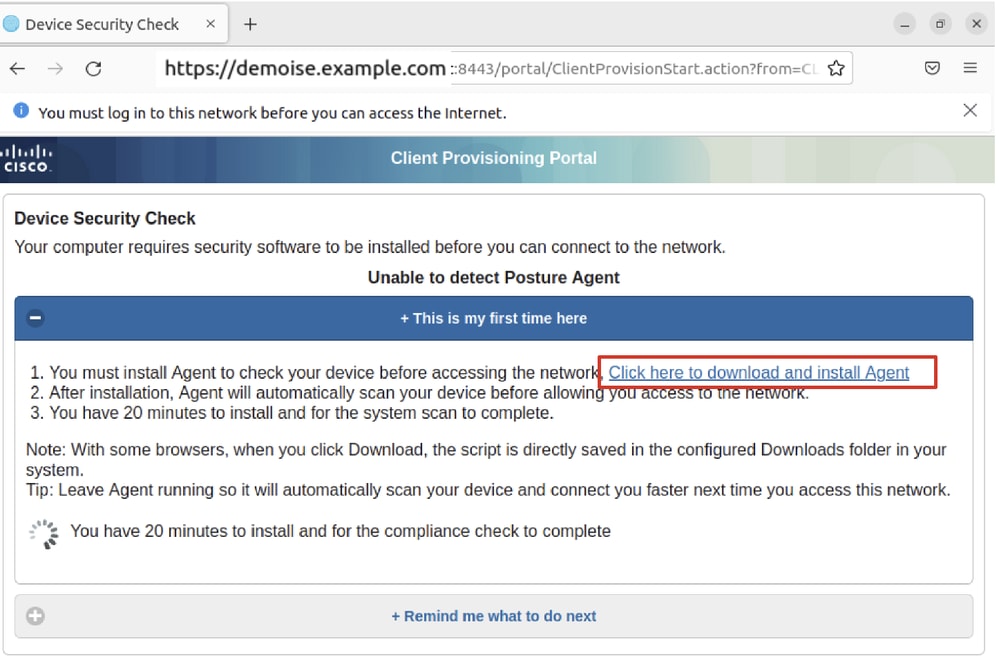 Ubuntu_Browser_CPP_Download_Posture
Step 33. Open the terminal on the Ubuntu client. Navigate to path home/user/Downloads/ to install the posture module.
user@ubuntu22-desktop:~/Downloads$ ls
cisco-secure-client-ise-network-assistant-linux64-5.1.3.62_demoise.example.com_8443_0NcLgcMURfyZmR6HoLmLZg.sh
cisco-secure-client-linux64-5.1.3.62-core-vpn-webdeploy-k9.sh
demo-example-com.crt
ise-cert.crt

user@ubuntu22-desktop:~/Downloads$ chmod +x cisco-secure-client-ise-network-assistant-linux64-5.1.3.62_demoise.example.com_8443_0NcLgcMURfyZmR6HoLmLZg.sh
user@ubuntu22-desktop:~/Downloads$
user@ubuntu22-desktop:~/Downloads$
user@ubuntu22-desktop:~/Downloads$ ./cisco-secure-client-ise-network-assistant-linux64-5.1.3.62_demoise.example.com_8443_0NcLgcMURfyZmR6HoLmLZg.sh
Cisco Network Setup Assistant
(c) 2022-2024 Cisco Systems, Inc. Cisco, Cisco Systems and Cisco Systems logo are registered trademarks of Cisco Systems, Inc and/or its affiliates in the U.S. and certain other countries.
Cisco ISE Network Setup Assistant started. Version - 5.1.3.62
Trusted and Secure Connection
You are connected to

demoise.example.com

whose identity has been certified. Your connection to this website is encrypted.
Downloading Cisco Secure Client...
Downloading remote package...
Running Cisco Secure Client - Downloader...
Installation is completed.
Step 34. On Ubuntu client UI, quit the Cisco Secure Client and reopen it. The ISE Posture module is installed and run successfully.
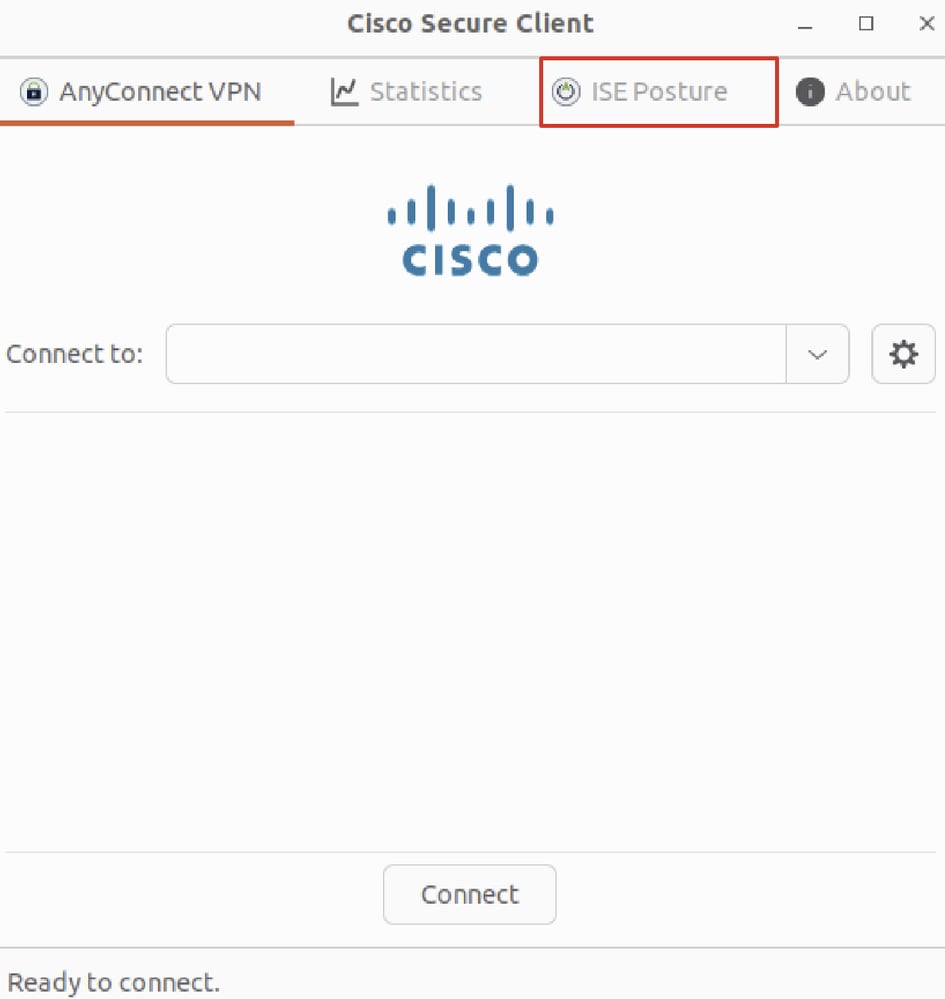 Ubuntu_Secure_Client_ISE_Posture_Installed
Step 35. Open the terminal on the Ubuntu client. Navigate to path home/user/Desktop , create a test.txt file to meet the file condition configured on ISE.
user@ubuntu22-desktop:~$ cd Desktop/
user@ubuntu22-desktop:~/Desktop$ echo test > test.txt
Verify
Use this section in order to confirm that your configuration works properly.
Step 1. Connect VPN to demo.example.com on Ubuntu client.
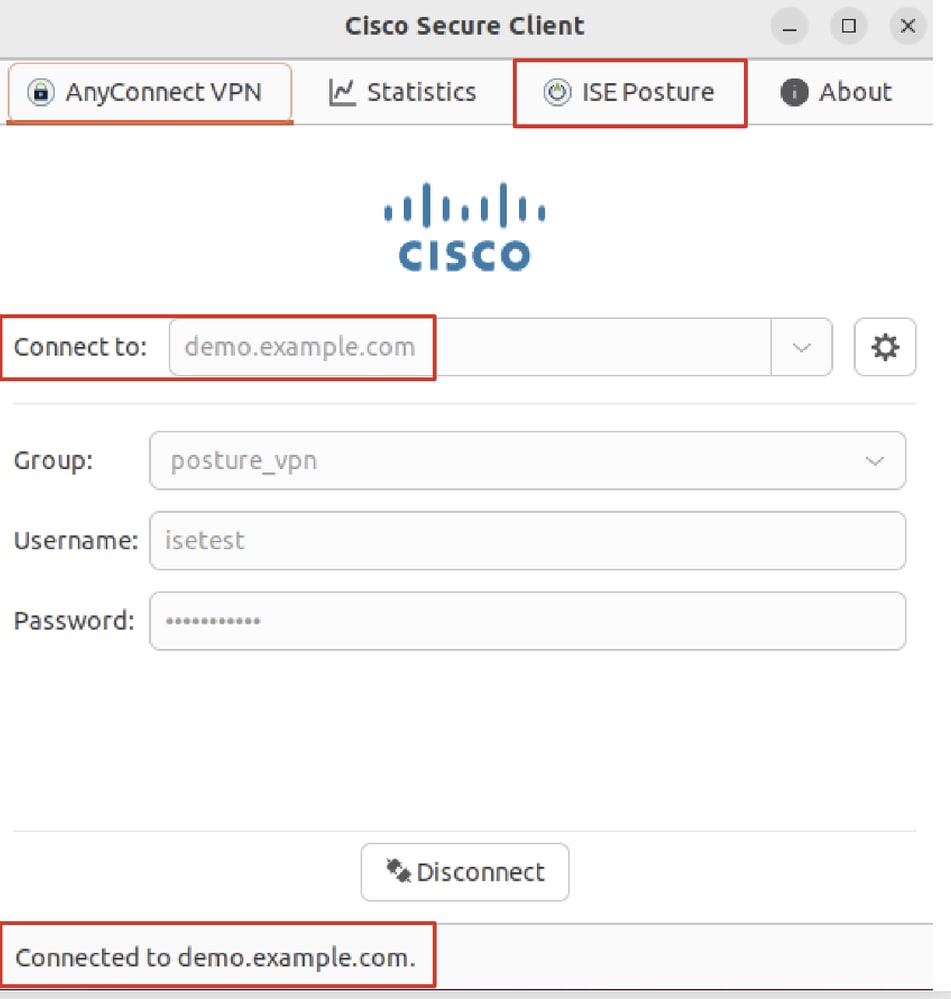 Verify_Ubuntu_Secure_Client_Connected
Step 2. Check the ISE Posture status on the Ubuntu client.
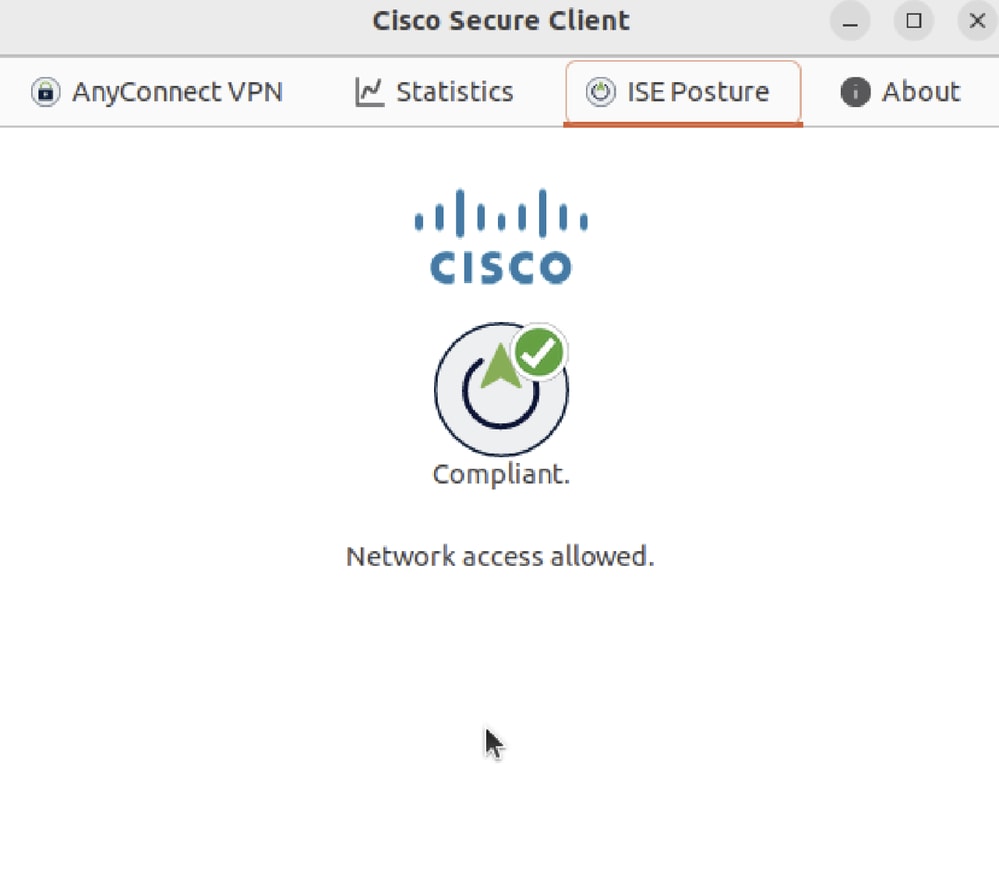 Verify_Ubuntu_Secure_Client_Compliant
Step 3. Check Radius Live Log on ISE. Navigate to Operations > RADIUS Live Log.
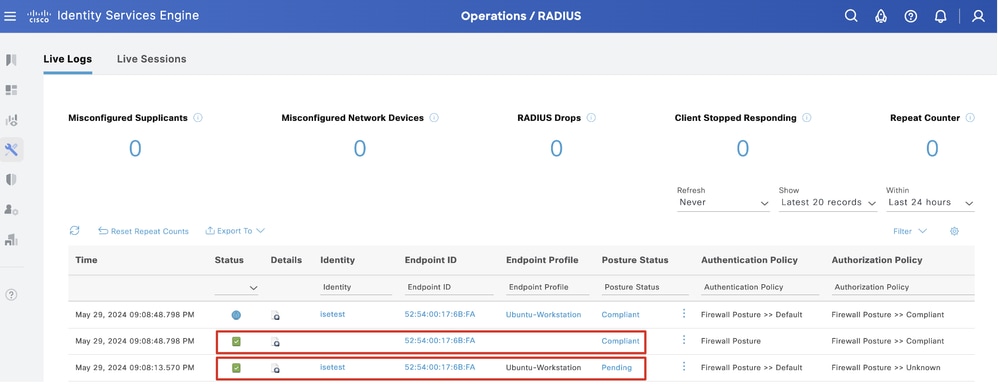 Verify_ISE_LiveLog
Step 4. Navigate to FTD CLI via SSH or console.
>
> system support diagnostic-cli
Attaching to Diagnostic CLI ... Press 'Ctrl+a then d' to detach.
Type help or '?' for a list of available commands.

ftdv741> enable
Password:
ftdv741#
ftdv741# show vpn-sessiondb detail anyconnect

Session Type: AnyConnect Detailed

Username : isetest Index : 33
Assigned IP : 192.168.6.30 Public IP : 192.168.10.13
Protocol : AnyConnect-Parent SSL-Tunnel DTLS-Tunnel
License : AnyConnect Premium
Encryption : AnyConnect-Parent: (1)none SSL-Tunnel: (1)AES-GCM-128 DTLS-Tunnel: (1)AES-GCM-256
Hashing : AnyConnect-Parent: (1)none SSL-Tunnel: (1)SHA256 DTLS-Tunnel: (1)SHA384
Bytes Tx : 51596 Bytes Rx : 17606
Pkts Tx : 107 Pkts Rx : 136
Pkts Tx Drop : 0 Pkts Rx Drop : 0
Group Policy : posture_gp Tunnel Group : posture_vpn
Login Time : 14:02:25 UTC Fri May 31 2024
Duration : 0h:00m:55s
Inactivity : 0h:00m:00s
VLAN Mapping : N/A VLAN : none
Audt Sess ID : cb007182000210006659d871
Security Grp : none Tunnel Zone : 0

AnyConnect-Parent Tunnels: 1
SSL-Tunnel Tunnels: 1
DTLS-Tunnel Tunnels: 1

AnyConnect-Parent:
Tunnel ID : 33.1
Public IP : 192.168.10.13
Encryption : none Hashing : none
TCP Src Port : 59180 TCP Dst Port : 443
Auth Mode : userPassword
Idle Time Out: 30 Minutes Idle TO Left : 29 Minutes
Client OS : linux-64
Client OS Ver: Ubuntu 22.04 LTS 22.04 (Jammy Jellyfish)
Client Type : AnyConnect
Client Ver : Cisco AnyConnect VPN Agent for Linux 5.1.3.62
Bytes Tx : 6364 Bytes Rx : 0
Pkts Tx : 1 Pkts Rx : 0
Pkts Tx Drop : 0 Pkts Rx Drop : 0

SSL-Tunnel:
Tunnel ID : 33.2
Assigned IP :192.168.6.30 Public IP : 192.168.10.13
Encryption : AES-GCM-128 Hashing : SHA256
Ciphersuite : TLS_AES_128_GCM_SHA256
Encapsulation: TLSv1.3 TCP Src Port : 59182
TCP Dst Port : 443 Auth Mode : userPassword
Idle Time Out: 30 Minutes Idle TO Left : 29 Minutes
Client OS : Linux_64
Client Type : SSL VPN Client
Client Ver : Cisco AnyConnect VPN Agent for Linux 5.1.3.62
Bytes Tx : 6364 Bytes Rx : 498
Pkts Tx : 1 Pkts Rx : 6
Pkts Tx Drop : 0 Pkts Rx Drop : 0
Filter Name : #ACSACL#-IP-PERMIT_ALL_IPV4_TRAFFIC-57f6b0d3

DTLS-Tunnel:
Tunnel ID : 33.3
Assigned IP :192.168.6.30 Public IP : 192.168.10.13
Encryption : AES-GCM-256 Hashing : SHA384
Ciphersuite : ECDHE-ECDSA-AES256-GCM-SHA384
Encapsulation: DTLSv1.2 UDP Src Port : 56078
UDP Dst Port : 443 Auth Mode : userPassword
Idle Time Out: 30 Minutes Idle TO Left : 29 Minutes
Client OS : Linux_64
Client Type : DTLS VPN Client
Client Ver : Cisco AnyConnect VPN Agent for Linux 5.1.3.62
Bytes Tx : 38868 Bytes Rx : 17108
Pkts Tx : 105 Pkts Rx : 130
Pkts Tx Drop : 0 Pkts Rx Drop : 0
Filter Name : #ACSACL#-IP-PERMIT_ALL_IPV4_TRAFFIC-57f6b0d3
Troubleshoot
This section provides information you can use in order to troubleshoot your configuration.
For posture flow and troubleshooting Cisco Secure Client and ISE, check the CCO documentsISE Posture Style Comparison for Pre and Post 2.2 and Troubleshoot ISE Session Management and Posture.
Related Information
Revision History
| Revision | Publish Date | Comments |
|---|---|---|
1.0 |
01-Jul-2024
|
Initial Release |
Contributed by Cisco Engineers
- Mark NiCisco Technical Leader
- Chao FengCisco Technical Leader
Contact Cisco
- Open a Support Case

- (Requires a Cisco Service Contract)
 Feedback