ISE Administrative Portal Access with AD Credentials Configuration Example
Available Languages
Contents
Introduction
This document describes a configuration example for the use of Microsoft Active Directory (AD) as an external identity store for administrative access to the Cisco Identity Services Engine (ISE) management GUI.
Prerequisites
Cisco recommends that you have knowledge of these topics:
- Configuration of Cisco ISE Versions 1.1.x or Later
- Microsoft AD
Componenets Used
The information in this document is based on these software and hardware versions:
- Cisco ISE Version 1.1.x
- Windows Server 2008 Release 2
The information in this document was created from the devices in a specific lab environment. All of the devices used in this document started with a cleared (default) configuration. If your network is live, make sure that you understand the potential impact of any command.
Configure
Use this section in order to configure for the use of Microsoft AD as an external identity store for administrative access to the Cisco ISE management GUI.
Join ISE to AD
- Navigate to Administration > Identity Management > External Identity Sources > Active Directory.
- Enter the AD Domain Name and Identity Store Name, and click Join.
- Enter the credentials of the AD account that can add and make changes to computer objects, and click Save Configuration.

Select Directory Groups
- Navigate to Administration > Identity Management > External Identity Sources > Active Directory > Groups > Add > Select groups form Directory.
- Import at least one AD Group to which your administrator belongs.

Enable Administrative Access for AD
Complete these steps in order to enable password-based authentication for AD:
- Navigate to Administration > System > Admin Access > Authentication.
- From the Authentication Method tab, select the Password Based option.
- Select AD from the Identity Source drop-down menu.
- Click Save Changes.

Configure the Admin Group to AD Group Mapping
Define a Cisco ISE Admin Group and map it to an AD group. This allows authorization to determine the Role Based Access Control (RBAC) permissions for the administrator based on group membership in AD.
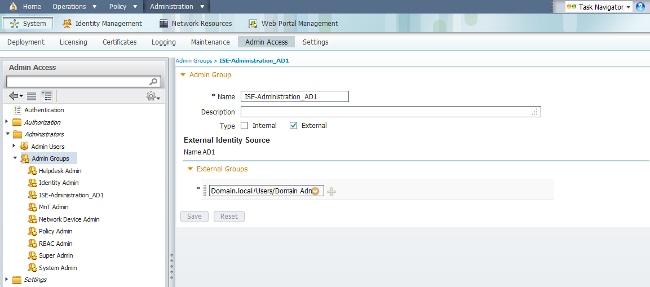
- Navigate to Administration > System > Admin Access > Administrators > Admin Groups.
- Click Add in the table header in order to view the new Admin Group configuration pane.
- Enter the name for the new Admin group.
- In the Type field, check the External check box.
- From the External Groups drop-down menu, select the AD group to which you want this Admin Group to map, as defined in the Select Directory Groups section.
- Click Save Changes.

Set RBAC Permissions for the Admin Group
Complete these steps in order to assign RBAC permissions to the Admin Groups created in the previous section:
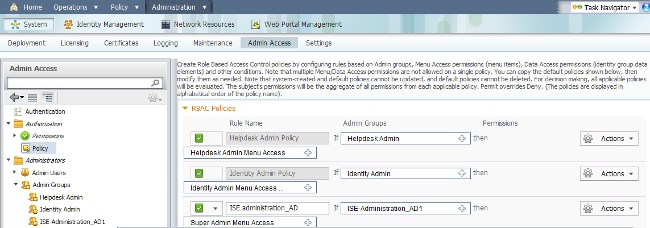
- Navigate to Administration > System > Admin Access > Authorization > Policy.
- From the Actions drop-down menu on the right, select Insert New Policy Below in order to add a new policy.
- Create a new rule called ISE_administration_AD, map it with the Admin Group defined in the Enable Administrative Access for AD section, and assign it permissions.
- Click Save Changes, and confirmation of the changes saved are displayed in the lower-right corner of the GUI.

Access ISE with AD Credentials
Complete these steps in order to access ISE with AD credentials:
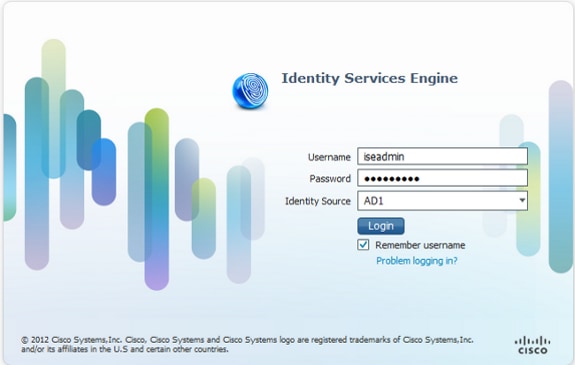
- Log out of the administrative GUI.
- Select AD1 from the Identity Source drop-down menu.
- Enter the username and password from the AD database, and log in.

Verify
In order to confirm that your configuration works properly, verify the authenticated username at the top-right corner of the ISE GUI.

Troubleshoot
There is currently no specific troubleshooting information available for this configuration.
Related Information
Revision History
| Revision | Publish Date | Comments |
|---|---|---|
1.0 |
09-Sep-2013 |
Initial Release |


 Feedback