Introduction
This document describes how to configure TACACS+ Authentication and Command Authorization based on Microsoft Active Directory (AD) group membership.
Background Information
To configure TACACS+ Authentication and Command Authorization based on Microsoft Active Directory (AD) group membership of a user with Identity Service Engine (ISE) 2.0 and later, ISE uses AD as an external identity store to store resources such as users, machines, groups, and attributes.
Prerequisites
Requirements
Cisco recommends that you have knowledge of these topics:
- Cisco IOS® Router is fully operational
- Connectivity between Router and ISE.
- ISE Server is bootstrapped and has connectivity to Microsoft AD
Components Used
The information in this document is based on these software and hardware versions:
- Cisco Identity Service Engine 2.0
- Cisco IOS® Software Release 15.4(3)M3
- Microsoft Windows Server 2012 R2
The information in this document was created from the devices in a specific lab environment. All of the devices used in this document started with a cleared (default) configuration. If your network is live, ensure that you understand the potential impact of any command.
Refer to Cisco Technical Tips Conventions for more information on document conventions.
Configure
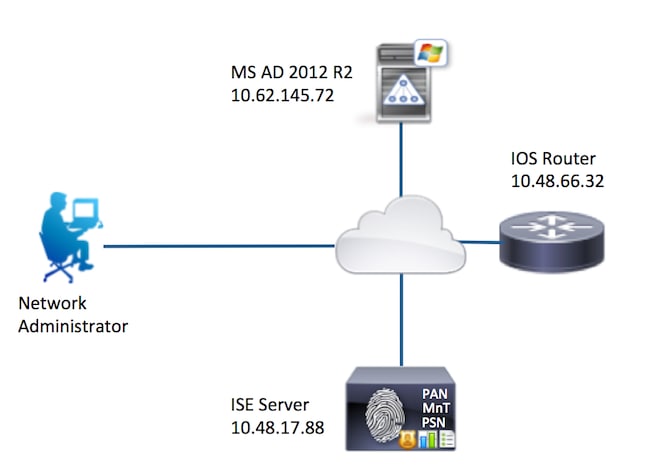
The aim of the configuration is to:
- Authenticate telnet user via AD
- Authorize telnet user so it is placed into privileged EXEC mode after the login
- Check and send every executed command to ISE for verification
Network Diagram

Configurations
Configure ISE for Authentication and Authorization
Join ISE 2.0 to Active Directory
1. Navigate to Administration > Identity Management > External Identity Stores > Active Directory > Add. Provide the Join Point Name, Active Directory Domain and click Submit.

2. When prompted to Join all ISE Nodes to this Active Directory Domain, click Yes.

3. Provide AD User Name and Password, click OK.

AD account required for domain access in ISE can have either of these:
- Add workstations to domain user right in respective domain
- Create Computer Objects or Delete Computer Objects permission on respective computers container where ISE machine's account is created before it joins ISE machine to the domain
Note: Cisco recommends to disable the lockout policy for the ISE account and configure the AD infrastructure to send alerts to the admin if a wrong password is used for that account. When the wrong password is entered, ISE does not create or modify its machine account when it is necessary and therefore possibly deny all authentications.
4. Review Operation Status. Node Status must show up as Completed. Click Close.

5. Status of AD is Operational.

6. Navigate to Groups > Add > Select Groups From Directory > Retrieve Groups. Select Network Admins AD Group and Network Maintenance Team AD Group checkboxes, as shown in this image.
Note: User admin is member of Network Admins AD Group. This user has full access privileges. This user is a member of Network Maintenance Team AD Group. This user is able to execute only show commands.

7. Click Save to save retrieved AD Groups.

Add Network Device
Navigate to Work Centers > Device Administration > Network Resources > Network Devices. Click Add. Provide Name, IP Address, select TACACS+ Authentication Settings checkbox and provide Shared Secret key.

Enable Device Admin Service
Navigate to Administration > System > Deployment. Choose required Node. Choose Enable Device Admin Service checkbox and click Save.

Note: For TACACS you need to have separate licenses installed.
Configure TACACS Command Sets
Two command sets are configured. First PermitAllCommands for the user admin which allows all commands on the device. Second PermitShowCommands for user user which allows only show commands.
1. Navigate to Work Centers > Device Administration > Policy Results > TACACS Command Sets. Click Add. Provide the Name PermitAllCommands, choose Permit any command checkbox that is not listed and click Submit.

2. Navigate to Work Centers > Device Administration > Policy Results > TACACS Command Sets. Click Add. Provide the Name PermitShowCommands, click Add and permit show and exit commands. By default if Arguments is left blank, all arguments are be included. Click Submit.

Configure TACACS Profile
Single TACACS Profile is configured. TACACS Profile is the same concept as Shell Profile on ACS. Actual command enforcement is done via command sets. Navigate to Work Centers > Device Administration > Policy Results > TACACS Profiles. Click Add. Provide Name ShellProfile, select Default Privilege checkbox and enter the value of 15. Click Submit.

Configure TACACS Authorization Policy
Authentication Policy by default points to All_User_ID_Stores, which includes AD, so it is left unchanged.
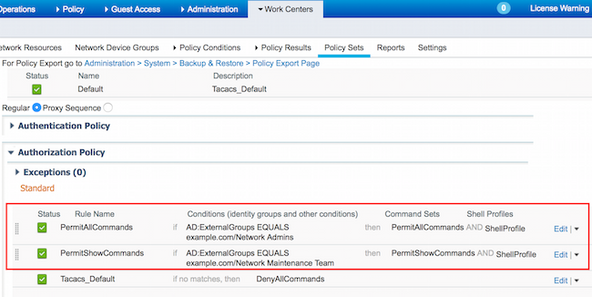
Navigate to Work Centers > Device Administration > Policy Sets > Default > Authorization Policy > Edit > Insert New Rule Above.

Two authorization rules are configured; first rule assigns TACACS profile ShellProfile and command Set PermitAllCommands based on Network Admins AD Group membership. Second rule assigns TACACS profile ShellProfile and command Set PermitShowCommands based on Network Maintenance Team AD Group membership.

Configure the Cisco IOS Router for Authentication and Authorization
Complete these steps in order to configure Cisco IOS Router for Authentication and Authorization.
1. Create a local user with full privilege for fallback with the username command as shown here.
username cisco privilege 15 password cisco
2. Enable aaa new-model. Define TACACS server ISE, and place it in the group ISE_GROUP.
aaa new-model
tacacs server ISE
 address ipv4 10.48.17.88
 key cisco
aaa group server tacacs+ ISE_GROUP
 server name ISE
Note: Server key matches the one defined on ISE Server earlier.
3. Test the TACACS server reachability with the test aaa command as shown.
Router#test aaa group tacacs+ admin Krakow123 legacy
Attempting authentication test to server-group tacacs+ using tacacs+
User was successfully authenticated.
The output of the previous command shows that the TACACS server is reachable and the user has been successfully authenticated.
4. Configure login and enable authentications and then use the exec and command authorizations as shown.
aaa authentication login AAA group ISE_GROUP local
aaa authentication enable default group ISE_GROUP enable
aaa authorization exec AAA group ISE_GROUP local
aaa authorization commands 0 AAA group ISE_GROUP local
aaa authorization commands 1 AAA group ISE_GROUP local
aaa authorization commands 15 AAA group ISE_GROUP local
aaa authorization config-commands
Note: Method list created is named AAA, which is used later, when it is assigned to line vty.
5. Assign method lists to line vty 0 4.
line vty 0 4
 authorization commands 0 AAA
 authorization commands 1 AAA
 authorization commands 15 AAA
 authorization exec AAA
 login authentication AAA
Verify
Cisco IOS Router Verification
1. Telnet to the Cisco IOS Router as admin who belongs to the full-access group in AD. Network Admins group is the group in AD which is mapped to ShellProfile and PermitAllCommands Command set on the ISE. Try to run any command to ensure full access.
Username:admin
Password:

Router#conf t
Enter configuration commands, one per line.  End with CNTL/Z.
Router(config)#crypto isakmp policy 10
Router(config-isakmp)#encryption aes
Router(config-isakmp)#exit
Router(config)#exit
Router#
2. Telnet to the Cisco IOS Router as user who belongs to the limited access group in AD. Network Maintenance Team group is the group in AD which is mapped to ShellProfile and PermitShowCommands Command set on the ISE. Try to run any command to ensure that only show commands can be issued.
Username:user
Password:

Router#show ip interface brief | exclude unassigned
Interface                  IP-Address      OK? Method Status                Protocol
GigabitEthernet0/0         10.48.66.32     YES NVRAM  up                    up

Router#ping 8.8.8.8
Command authorization failed.

Router#configure terminal
Command authorization failed.

Router#show running-config | include hostname
hostname Router
Router#
ISE 2.0 Verification
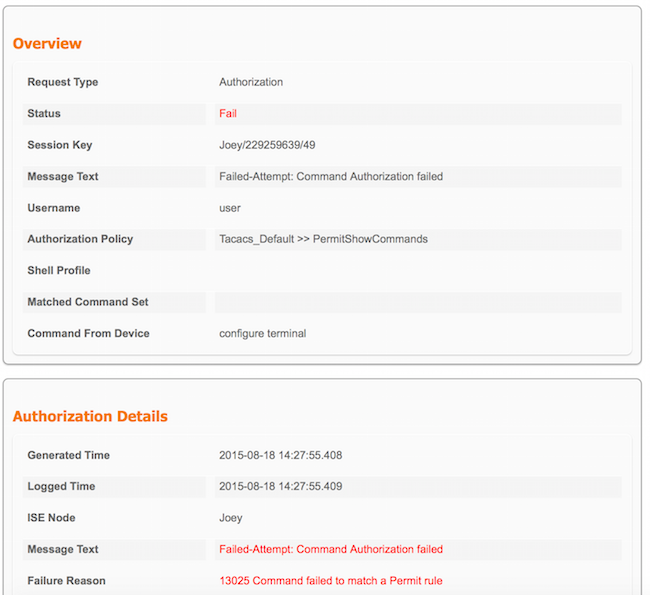
1. Navigate to Operations > TACACS Livelog. Ensure that the attempts done are seen.

2. Click the details of one of the red reports. Failed command executed earlier can be seen.

Troubleshoot
Error: 13025 Command failed to match a Permit rule
Check the SelectedCommandSet attributes to verify that the expected Command Sets were selected by the Authorization policy.
Related Information
Technical Support & Documentation - Cisco Systems
ISE 2.0 Release Notes
ISE 2.0 Hardware Installation Guide
ISE 2.0 Upgrade Guide
ACS to ISE Migration Tool Guide
ISE 2.0 Active Directory Integration Guide
ISE 2.0 Engine Administrator Guide


 Feedback