Prerequisites
Requirements
Cisco recommends that you have basic knowledge of these topics:
- ISE
- Certificates and certificate authority (CA) servers.
Components Used
The information in this document is based on these software and hardware versions:
- Identity Service Engine 2.0
- Windows 7 PC
The information in this document was created from the devices in a specific lab environment. All of the devices used in this document started with a cleared (default) configuration. If your network is live, ensure that you understand the potential impact of any command.
Background Information
The certificate provisioning portal is a new feature introduced in ISE 2.0 that can be used by end devices to enroll and download identity certificates from server. It issues certificates to devices that cannot go through the onboarding flow.
For example, devices such as point-of-sale terminals cannot undergo Bring Your Own Device (BYOD) flow and need to be issued certificates manually.
The Certificate Provisioning Portal allows a privileged set of users to upload a certificate request (CSR) for such devices; generate key pairs, and then download the certificate.
On ISE, you can create modified certificate templates and end-users can select a suitable certificate template to download a certificate. For these certificates, ISE acts as a Certificate Authority (CA) server and we can get the certificate signed by ISE internal CA.
ISE 2.0 certificate provisioning portal supports certificate download in these formats:
- PKCS12 format (including certificate chain; one file for both the certificate chain and key)
- PKCS12 format (one file for both certificate and key)
- Certificate (including chain) in Privacy Enhanced Electronic Mail (PEM) format, key in PKCS8 PEM format.
- Certificate in PEM format, key in PKCS8 PEM format:
Limitations
Currently ISE supports only these extensions in a CSR to sign a certificate.
- subjectDirectoryAttributes
- subjectAlternativeName
- keyUsage
- subjectKeyIdentifier
- auditIdentity
- extendedKeyUsage
- CERT_TEMPLATE_OID (this is a custom made OID to specify the template which is used usually in BYOD flow)
Note: ISE internal CA is designed to support features that use certificates such as BYOD and hence the capabilities are limited. Using ISE as an Enterprise CA is not recommended by Cisco.
Configure
In order to use the feature of certificate provisioning in network, the ISE internal CA service must be enabled and a certificate provisioning portal should be configured.
Step 1.On ISE GUI, navigate to Administration > System > Certificates > Certificate Authority > Internal CA and to enable the internal CA settings on the ISE node, click Enable Certificate Authority.

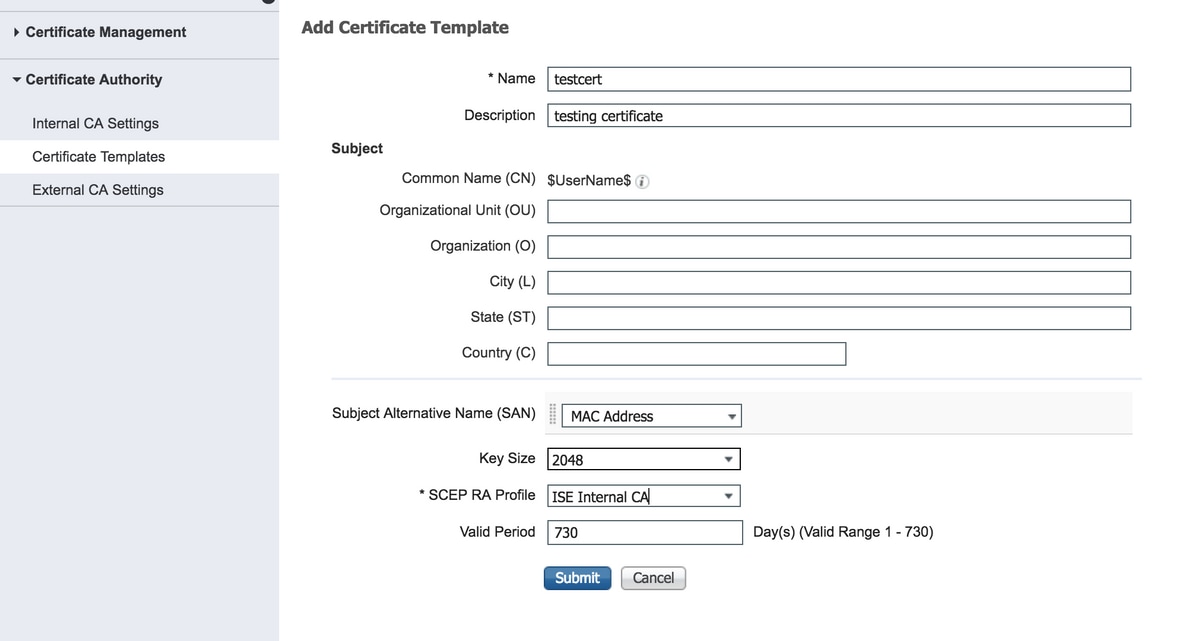
Step 2. Create certificate templates under Administration > System > Certificates > Certificate Templates > Add.
Enter the details as per the requirement and click Submit, as shown in this image.
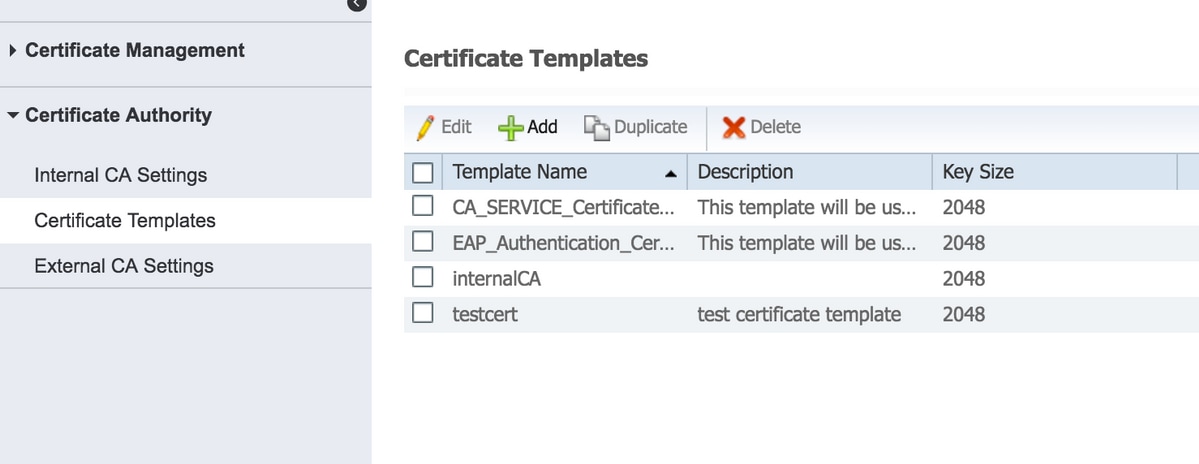
Note: You can see the list of created certificate templates under Administration > System > Certificates > Certificate Templates as shown in this image.
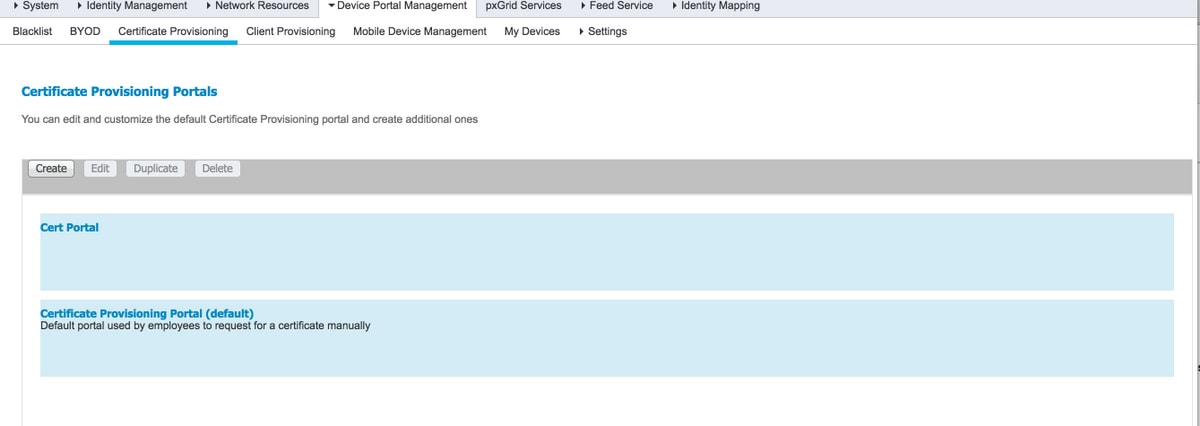
Step 3. In order to configure ISE certificate provisioning portal, navigate to Administration > Device Portal Management > Certificate Provisioning > Create, as shown in the image:
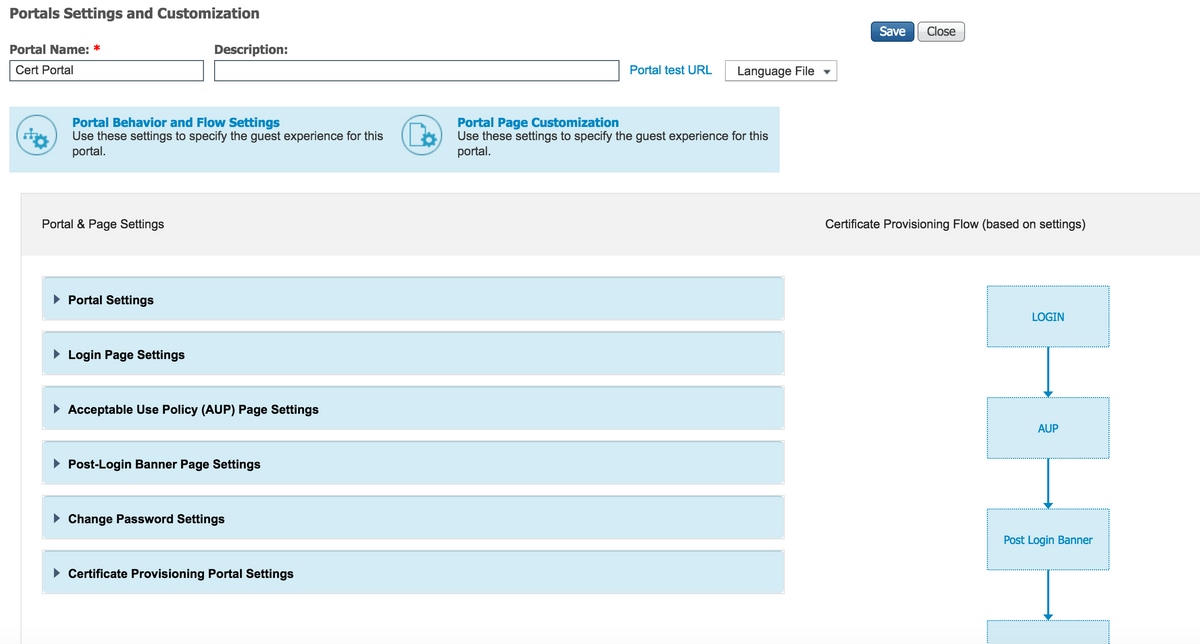
Step 4. On the new certificate portal, expand the portal settings, as shown in the image.
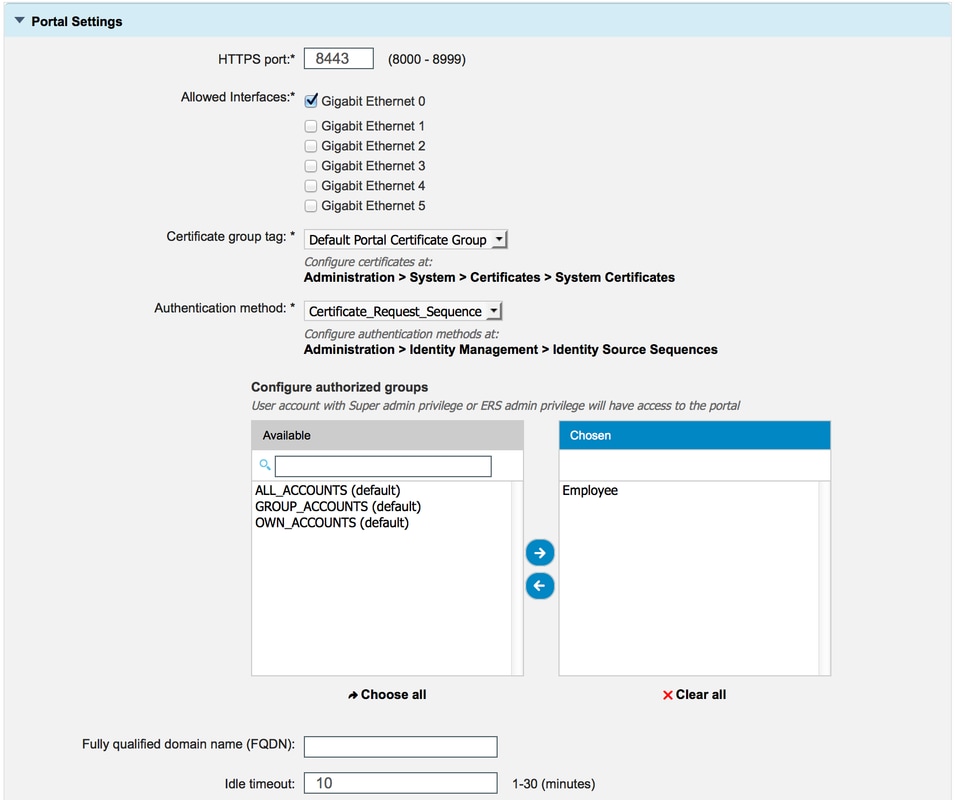
| HTTPS port |
Port which should be used by the certificate provisioning portal for HTTPS. |
| Allowed Interfaces |
The interfaces on which ISE should listen for this portal. |
| Certificate group Tag |
The certificate tag to be used for Certificate provisioning portal which indicates the system certificate to be used for this portal. |
| Authentication Method |
Select the identity store sequence that authenticates login to this portal. By default the certificate_request_sequence is in use. |
| Authorized Groups |
The set of users that can access the certificate provisioning portal can be controlled by moving a specific set of AD groups and internal user groups to the chosen table. Only the users that are part of chosen group has access to the portal. |
| Fully Qualified Domanin Name (FQDN) |
You can also give specific FQDN to this portal. Users browsing to the FQDN using http/https is redirected to ths portal. The FQDN should be unique and not shared with any other portal. |
| Idle timeout |
The value defines the idle timeout for the portal. |
Note: The configuration of the Identity source can be checked under Administration > Identity Management > Identity Source Sequence.
Step 5. Configure Login Page settings.

Step 6.Configure AUP Page settings.

Step 7. You can also add post login Banner.
Step 8. Under Certificate Provisioning portal settings, specify the certificate templates that are permitted.

Step 9. Scroll to the top of the page and click Save to save the changes.
Additionally, the portal can be further customized by navigating to Portal page customization tab where the AUP text, post login banner text and other messages can be changed as per the requirements.
Verify
Use this section in order to confirm that your configuration works properly.
If ISE is configured correctly for certificate provisioning, a certificate can be requested/downloaded from the ISE certificate provisioning portal with these steps.
Step 1. Open the browser and browse to certificate provisioning portal FQDN as configured above or the certificate provisioning test URL. You are redirected to the portal, as shown in this image:
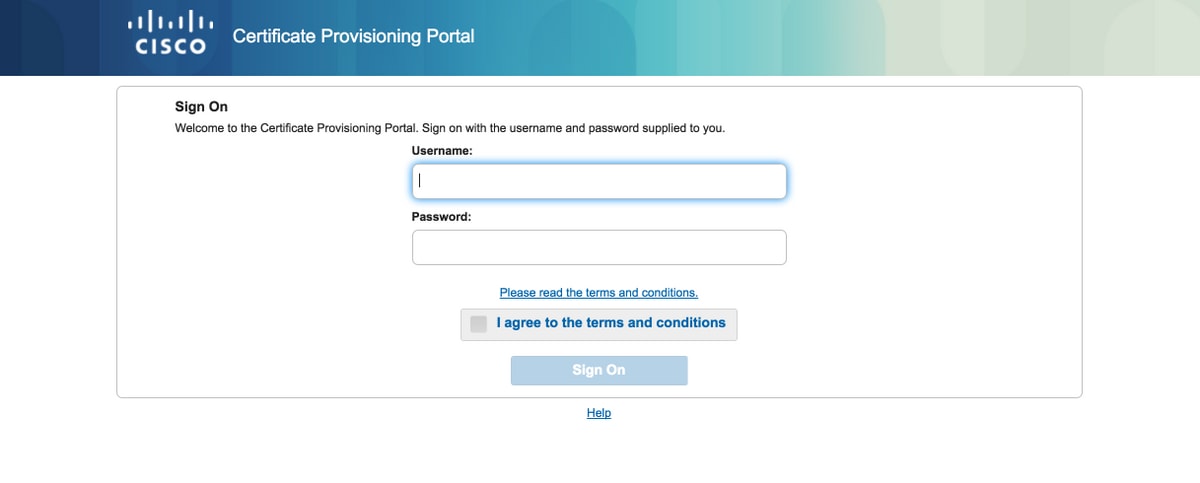
Step 2. Log in with username and password.
Step 3. After successful authentication, accept AUP and it lands to the certificate provisioning page.
Step 4. The certificate provisioning page provides the functionality to download certificates in three ways:
- Single certificate (without certificate signing request)
- Single certificate (with certificate signing request)
- Bulk certificates
Generate Single Certificate without Certificate Signing Request
- In order to generate a single certificate without CSR, select the Generate single certificate (without certificate signing request) option.
- Enter Common Name (CN).
Note: The given CN must match the requester's username. The requester refers to the username used to log in to the portal. Only Admin users can create a certificate for a different CN.
- Enter MAC address of the device for which the certificate is being generated.
- Choose the appropriate certificate template.
- Choose the desired format in which the certificate should be downloaded.
- Enter a certificate password and click Generate.
- A single certificate is generated and downloaded successfully.
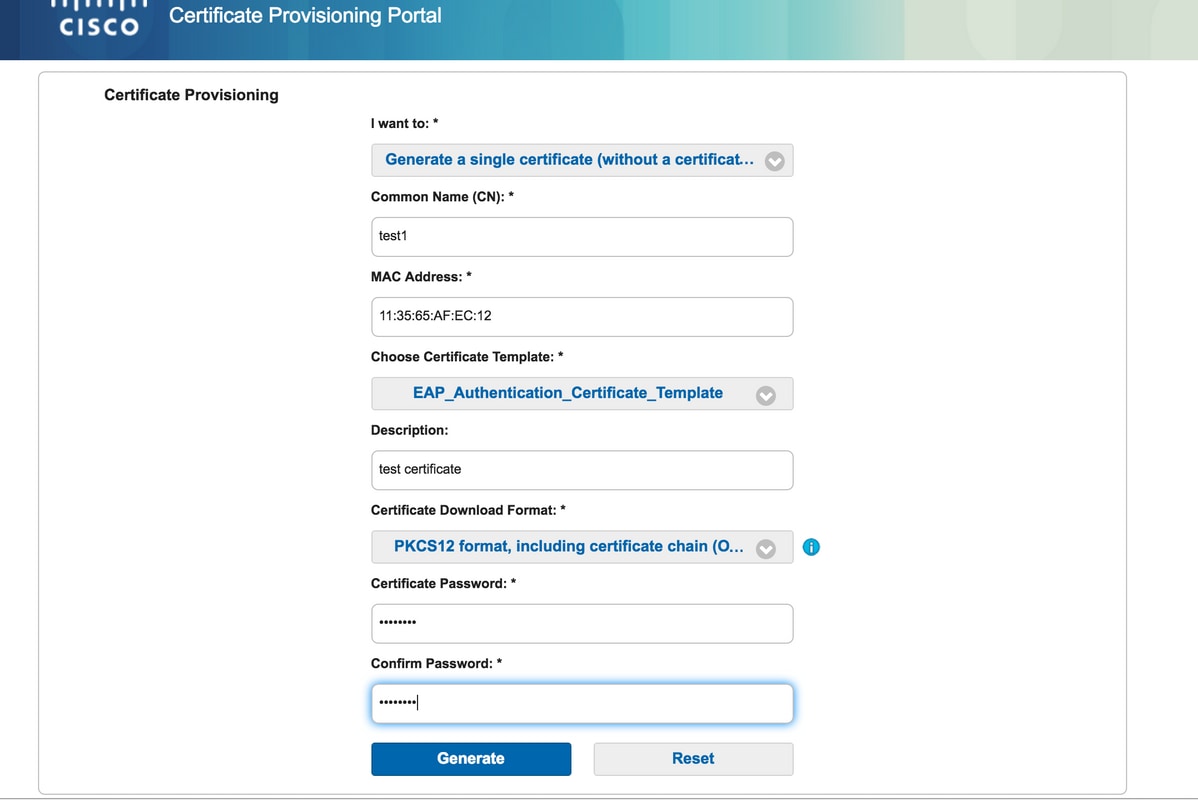
Generate Single Certificate with Certificate Signing Request
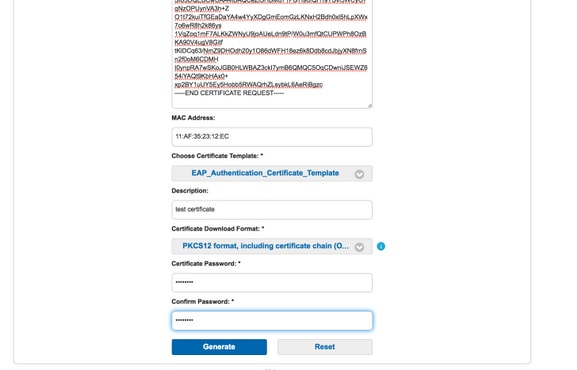
- In order to generate a single certificate without CSR, select the Generate single certificate (withcertificate signing request) option.
- Copy and paste the CSR content from notepad file under Certificate Signing Request Details.
- Enter MAC address of the device for which the certificate is being generated.
- Choose the appropriate certificate template.
- Choose the desired format in which the certificate should be downloaded.
- Enter a certificate password and click Generate.
- A single certificate will be generated and downloaded successfully.
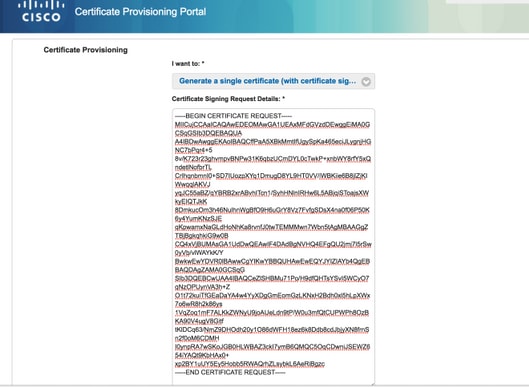
Generate Bulk Certificates
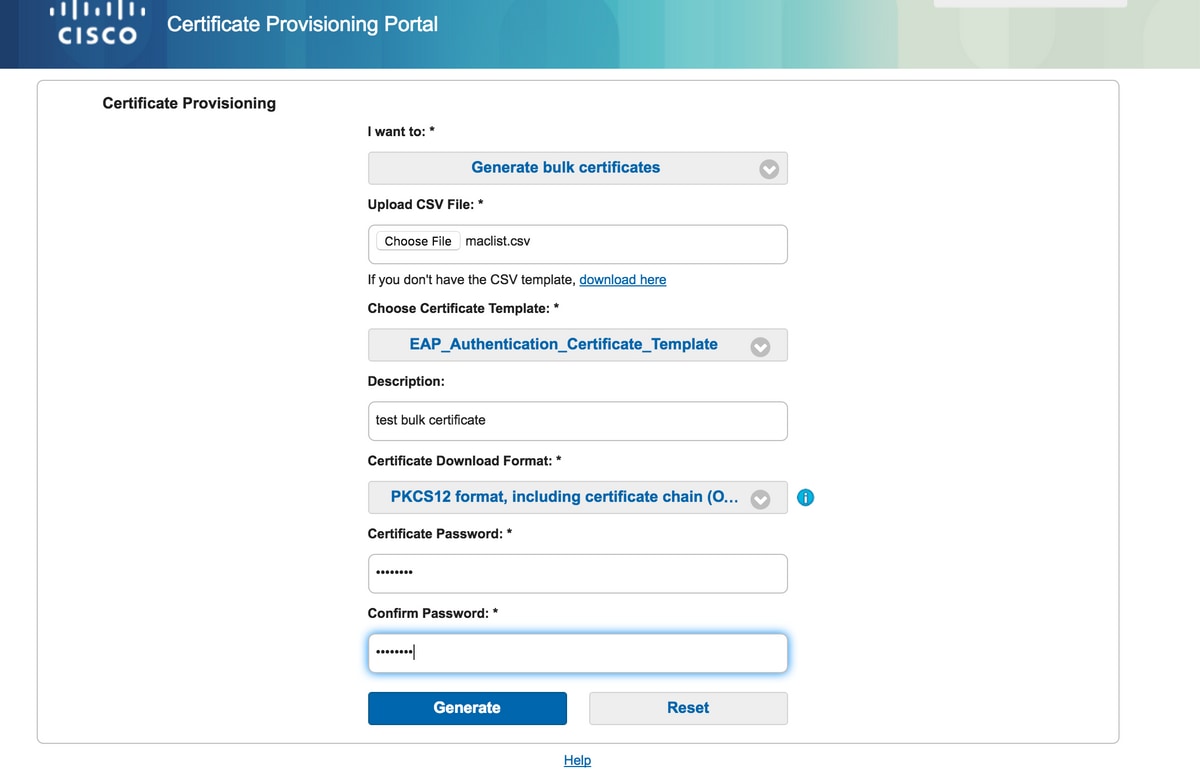
You can generate bulk certificates for multiple MAC addresses if you upload CSV files which contains CN and MAC address field.
Note: The given CN must match the requester's username. The requester refers to the username used to log in to the portal. Only Admin users can create a certificate for a different CN.
- In order to generate a single certificate without CSR, select the Generate single certificate (with certificate signing request) option.
- Upload the csv file for bulk request.
- Choose the appropriate certificate template.
- Choose the desired format in which the certificate should be downloaded.
- Enter a certificate password and click Generate.
- A bulk certificate zip file is generated and downloaded.
Troubleshoot
There is currently no specific troubleshooting information available for this configuration.
