Introduction
This document describes how to renew two certificates that are used for Simple Certificate Enrollment Protocol (SCEP): Exchange Enrollment Agent and CEP Encryption certificate on Microsoft Active Directory 2012.
Prerequisites
Requirements
Cisco recommends that you have knowledge of these topics:
- Basic knowledge of Microsoft Active Directory configuration
- Basic knowledge of Public Key Infrastracture (PKI)
- Basic knowledge of Identity Services Engine (ISE)
Components Used
The information in this document is based on these software and hardware versions:
- Cisco Identity Services Engine version 2.0
- Microsoft Active Directory 2012 R2
Problem
Cisco ISE uses SCEP protocol to support personal device registration (BYOD onboarding). When using an external SCEP CA, this CA is defined by a SCEP RA profile on ISE. When a SCEP RA Profile is created, two certificates are automatically added to the Trusted Certificates Store:
- CA root certificate,
- RA (Registration Authority) certificate which is signed by the CA.
RA is responsible for receiving and validating the request from the registering device, and forwarding it to the CA that issues the client certificate.
When the RA certificate expires, it is not renewed automatically on the CA side (Windows Server 2012 in this example). That should be manually done by the Active Directory/CA administartor.
Here is the example how to achive that on Windows Server 2012 R2.
Initial SCEP certificates visible on ISE:
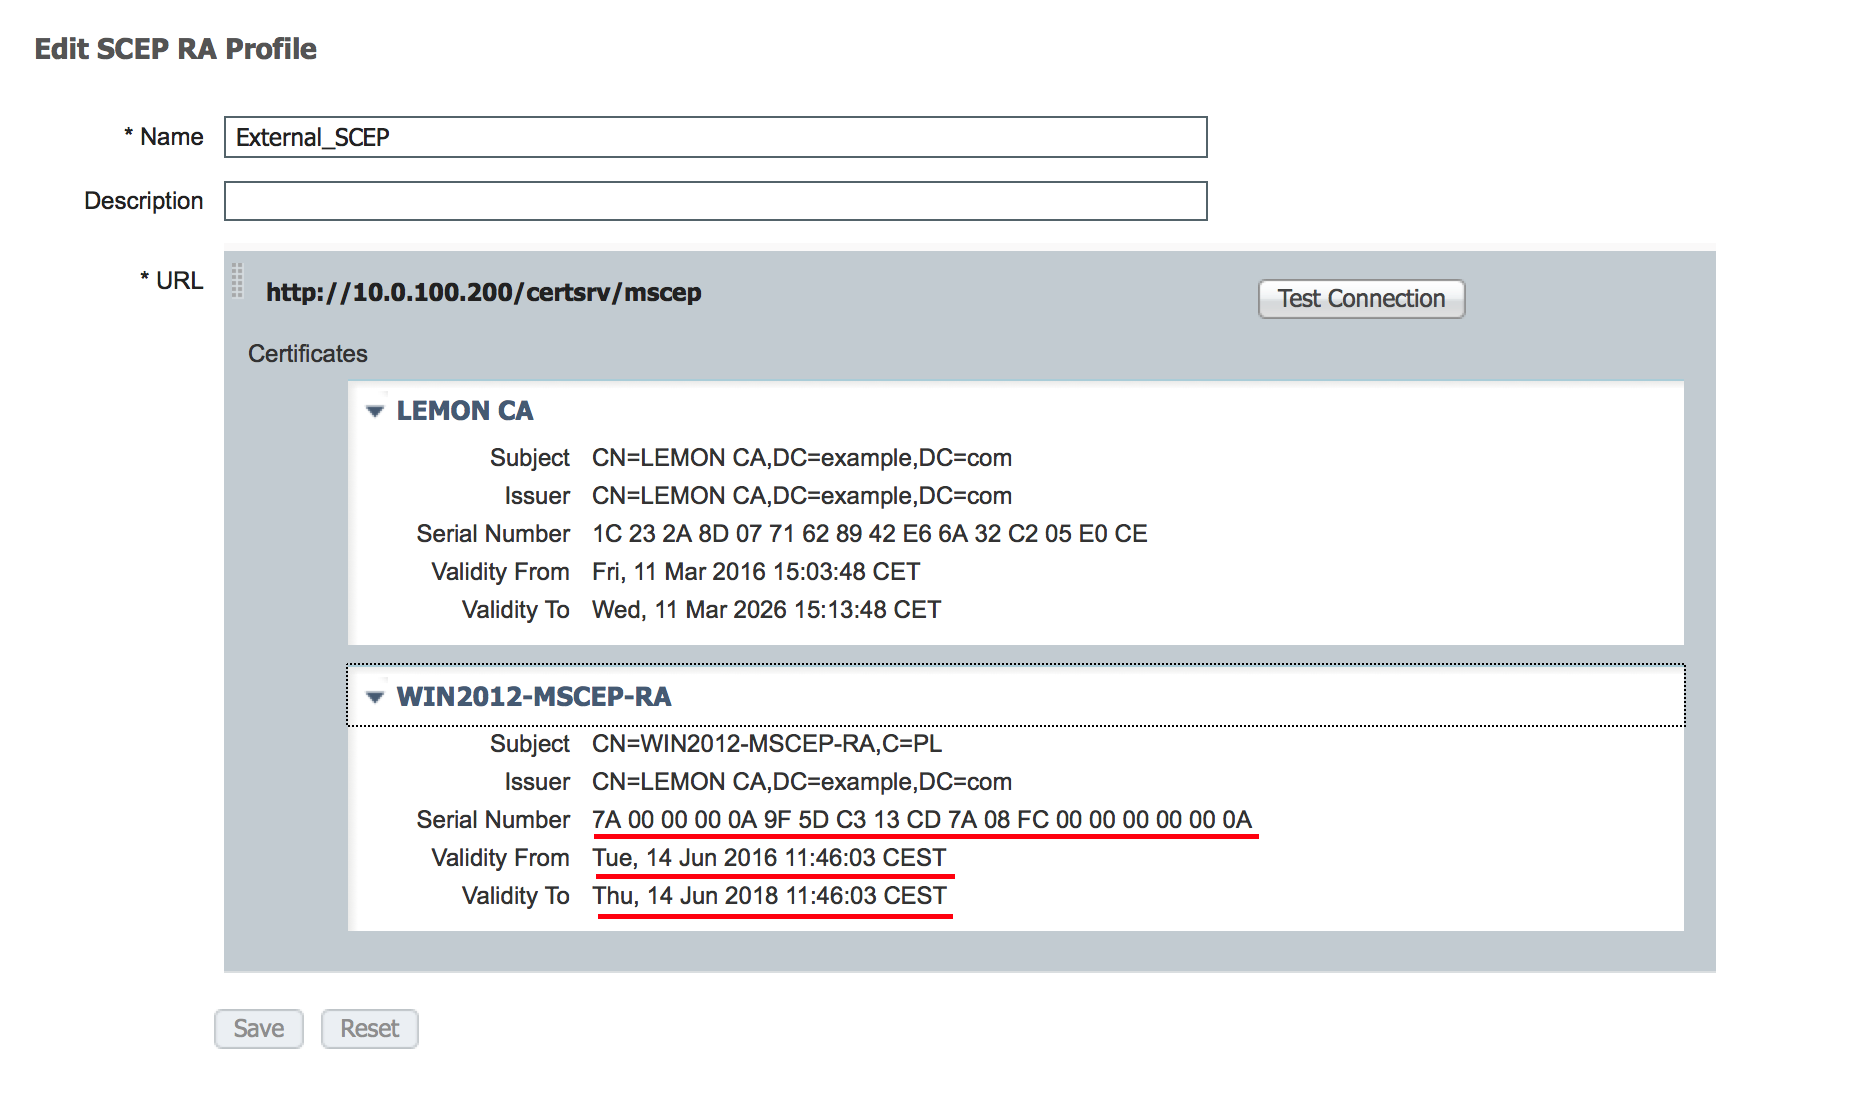 Assumption is that MSCEP-RA CERTIFICATE is expired and has to be renewed.
Solution
Caution: Any changes on Windows Server should be consulted with its administrator first.
1. Identify old private keys
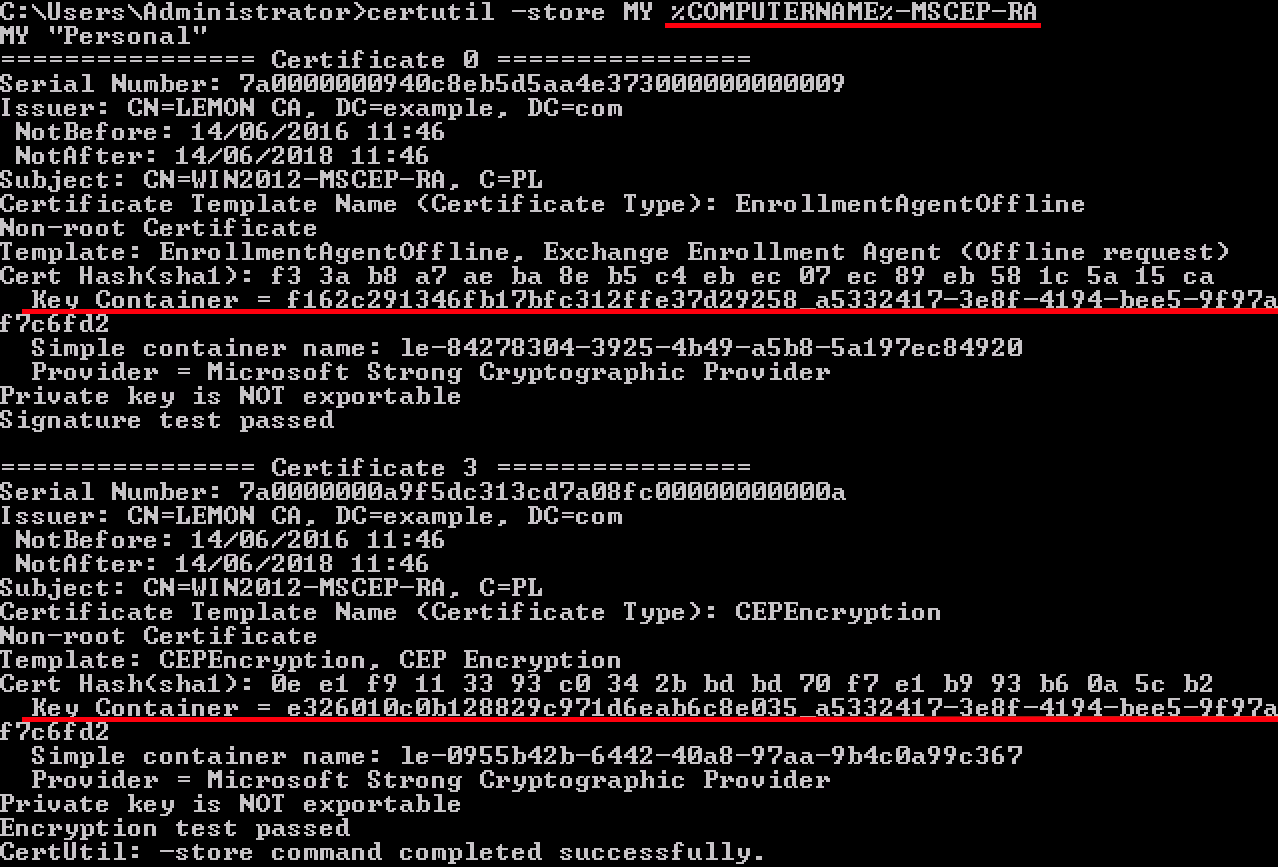
Find privite keys associated with the RA certificates on the Active Directory using certutil tool. After that locate Key Container.
certutil -store MY %COMPUTERNAME%-MSCEP-RA
Please note that if the name of your initial MSCEP-RA certificate is different then it should be adjusted in this request. However, by default it should contain the computer name.
2. Delete old private keys
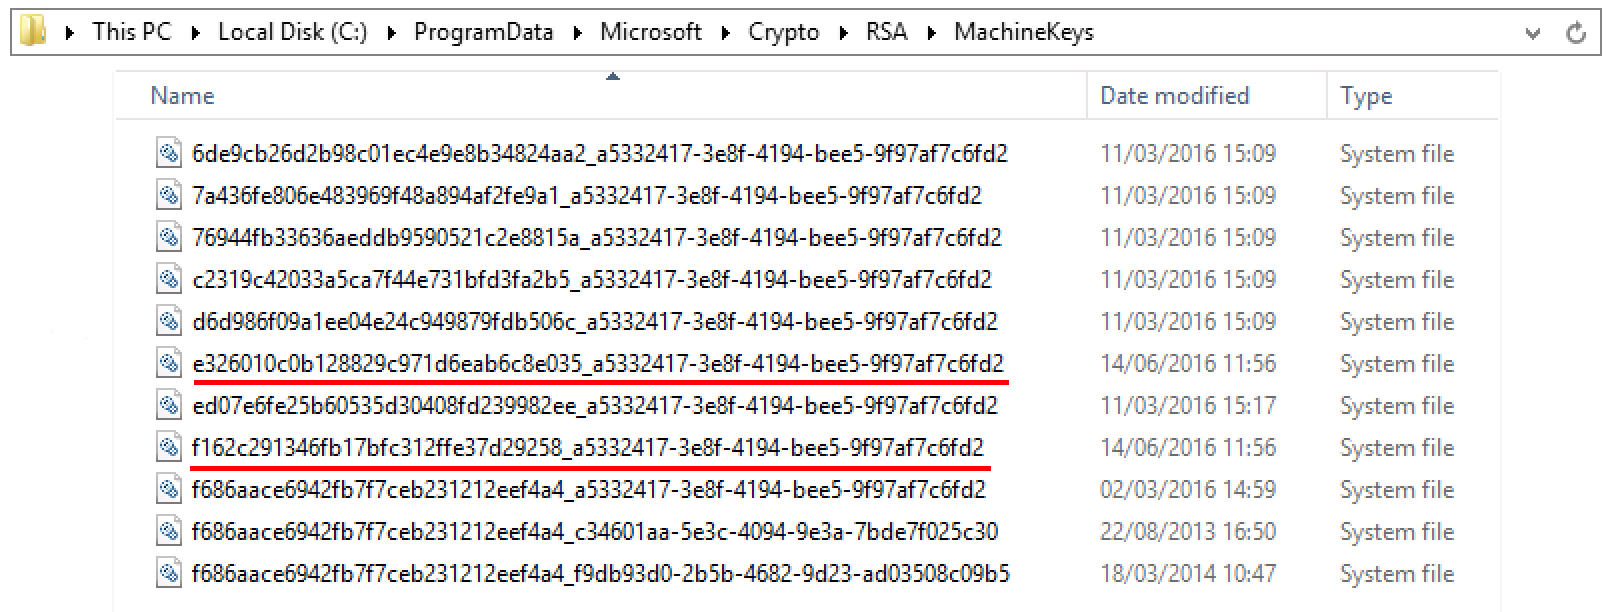
Delete referring keys manually from the folder below:
C:\ProgramData\Microsoft\Crypto\RSA\MachineKeys
3. Delete old MSCEP-RA ceritificates
After deleting the private keys, remove MSCEP-RA ceritificates from the MMC console.
MMC > File > Add/Remove Snap-in... > Add "Ceritificates" > Computer account > Local computer

4. Generate new certificates for SCEP
4.1. Generate the Exchange Enrollment Certificate
4.1.1. Create a file cisco_ndes_sign.inf with the content below. This information is used later by the certreq.exe tool in order to generate the Certificate Signing Request (CSR):
[NewRequest]
Subject = “CN=NEW-MSCEP-RA,OU=Cisco,O=Systems,L=Krakow,S=Malopolskie,C=PL”
Exportable = TRUE
KeyLength = 2048
KeySpec = 2
KeyUsage = 0x80
MachineKeySet = TRUE
ProviderName = “Microsoft Enhanced Cryptographic Provider v1.0″
ProviderType = 1

[EnhancedKeyUsageExtension]
OID = 1.3.6.1.4.1.311.20.2.1

[RequestAttributes]
CertificateTemplate = EnrollmentAgentOffline
Tip: If you copy this file template, make sure to adjust it as per your requirements and check if all characters are properly copied (including quotation marks).
4.1.2. Create CSR based on the .INF file with this command:
certreq -f -new cisco_ndes_sign.inf cisco_ndes_sign.req
If warning dialog User context template conflicts with machine context pops up, click OK. This warning can be ignored.

4.1.3. Submit the CSR with this command:
certreq -submit cisco_ndes_sign.req cisco_ndes_sign.cer
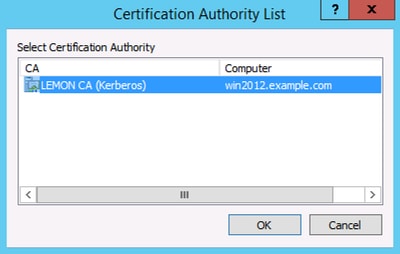
During this procedure a window pops up and proper CA has to be chosen.

4.1.4 Accept the certificate issued at the previous step. As a result of this command, the new certificate is imported and moved to the Local Computer Personal store:
certreq -accept cisco_ndes_sign.cer

4.2. Generate the CEP Encryption Certificate
4.2.1. Create a new file cisco_ndes_xchg.inf:
[NewRequest]
Subject = "CN=NEW-MSCEP-RA,OU=Cisco,O=Systems,L=Krakow,S=Malopolskie,C=PL"

Exportable = TRUE
KeyLength = 2048
KeySpec = 1
KeyUsage = 0x20
MachineKeySet = TRUE
ProviderName = “Microsoft RSA Schannel Cryptographic Provider”
ProviderType = 12

[EnhancedKeyUsageExtension]
OID = 1.3.6.1.4.1.311.20.2.1

[RequestAttributes]
CertificateTemplate = CEPEncryption
Follow the same steps as described in 4.1.
4.2.2. Generate a CSR based on the new .INF file:
certreq -f -new cisco_ndes_xchg.inf cisco_ndes_xchg.req
4.2.3. Submit the request:
certreq -submit cisco_ndes_xchg.req cisco_ndes_xchg.cer
4.2.4: Accept the new certificate by moving it into the Local Computer Personal store:
certreq -accept cisco_ndes_xchg.cer
5. Verify
After completing step 4, two new MSCEP-RA certificates will appear in the Local Computer Personal Store:

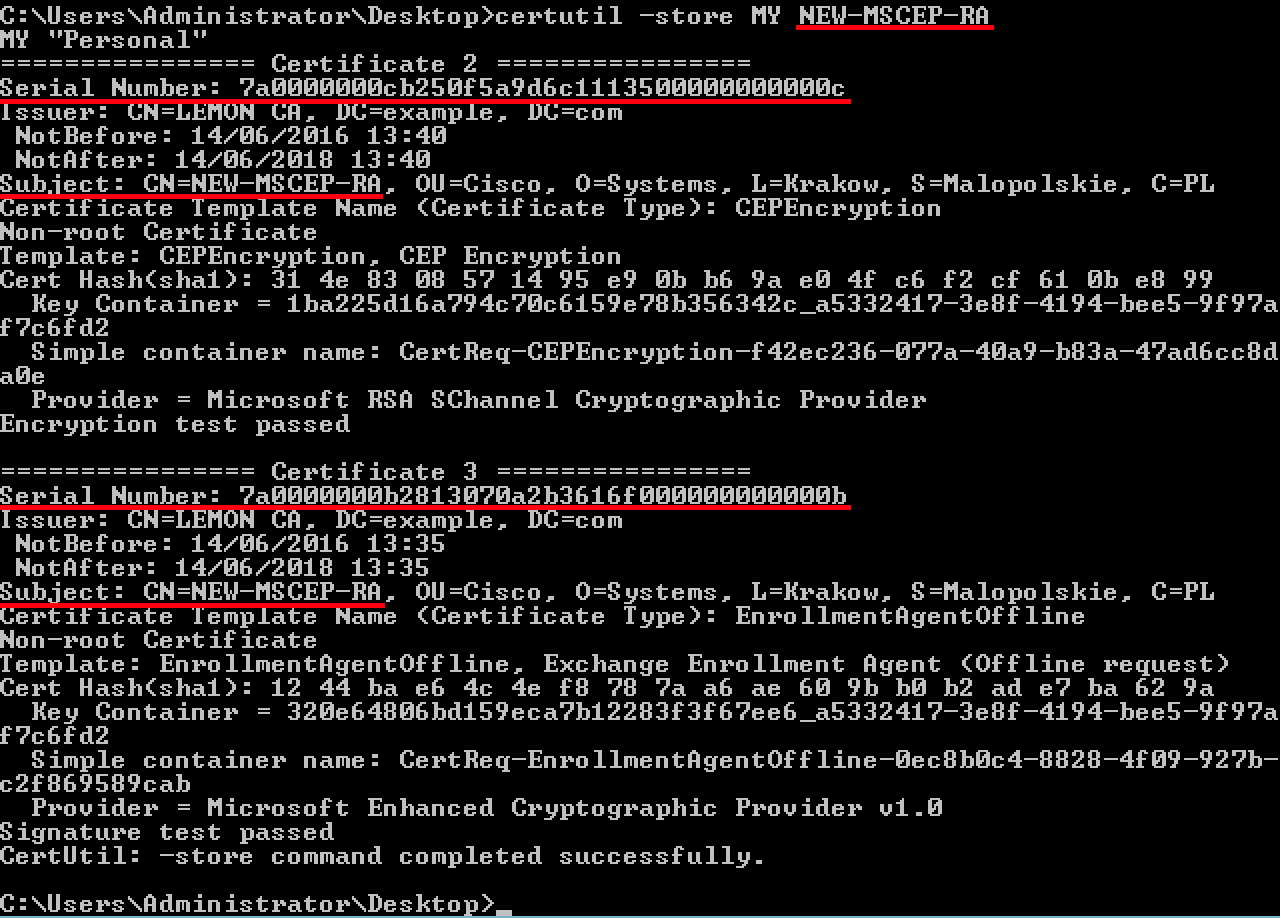
Also you can verify the certificates with certutil.exe tool (make sure you use the correct new certificate name). MSCEP-RA certificates with new Common Names and new Serial Numbers should be displayed:
certutil -store MY NEW-MSCEP-RA
6. Restart IIS
Restart Internet Information Services (IIS) server in order to apply the changes:
iisreset.exe

7. Create new SCEP RA profile
On ISE create a new SCEP RA profile (with the same server URL as the old one), so new certificates are downloaded and added to the Trusted Certificates Store:

8. Modify certificate template
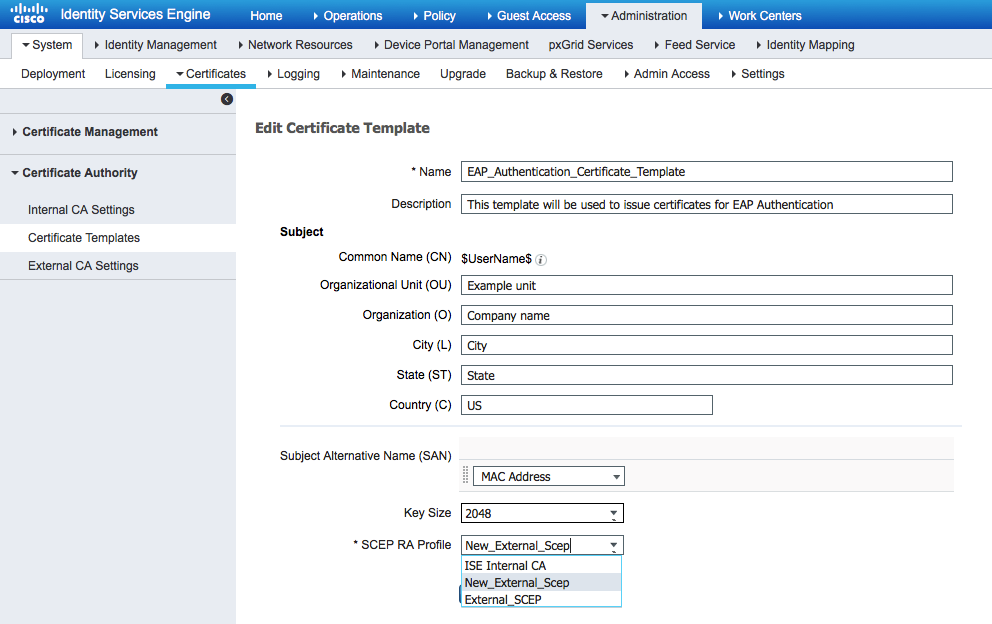
Make sure the new SCEP RA profile is specified in the Certificate template used by BYOD (you can check it in Administration > System > Certificates > Certificate Authority > Certificates Templates):
References
1. Microsoft Technet zone article
2. Cisco ISE configuration guides

 Assumption is that MSCEP-RA CERTIFICATE is expired and has to be renewed.


 Feedback