Configure ISE Posture with FlexVPN
Available Languages
Bias-Free Language
The documentation set for this product strives to use bias-free language. For the purposes of this documentation set, bias-free is defined as language that does not imply discrimination based on age, disability, gender, racial identity, ethnic identity, sexual orientation, socioeconomic status, and intersectionality. Exceptions may be present in the documentation due to language that is hardcoded in the user interfaces of the product software, language used based on RFP documentation, or language that is used by a referenced third-party product. Learn more about how Cisco is using Inclusive Language.
Contents
Introduction
This document provides an example of how to configure an IOS XE headend for remote access with posture using AnyConnect IKEv2 and EAP-Message Digest 5 (EAP-MD5) authentication method.
Prerequisites
Requirements
Cisco recommends that you have knowledge of these topics:
- FlexVPN Remote Access (RA) VPN configuration on IOS XE
- AnyConnect (AC) client confiugration
- Posture flow on Identity Service Engine (ISE) 2.2 and later
- Configuration of posture components on ISE
- Configuration of DNS Server on Windows Server 2008 R2
Components Used
The information in this document is based on these software and hardware versions:
- Cisco CSR1000V running IOS XE 16.8 [Fuji]
- AnyConnect client version 4.5.03040 running on Windows 7
- Cisco ISE 2.3
- Windows 2008 R2 server
The information in this document was created from the devices in a specific lab environment. All of the devices used in this document started with a cleared (default) configuration. If your network is live, make sure that you understand the potential impact of any command.
Background Information
To ensure that the imposed network security measures remain relevant and effective, Cisco ISE enables you to validate and maintain security capabilities on any client machine that accesses the protected network. By employing posture policies that are designed to ensure that the most up-to-date security settings or applications are available on client machines, the Cisco ISE administrator can ensure that any client machine that accesses the network meets, and continues to meet, the defined security standards for enterprise network access. Posture compliance reports provide Cisco ISE with a snapshot of the compliance level of the client machine at the time of user login, as well as any time a periodic reassessment occurs.
Posture can be represented by three main elements:
- ISE as a policy configuration distribution and decision point. From the administrator perspective on ISE you configure posture policies (what exact conditions should be met to mark device as a corporate compliant), client provisioning policies (what agent software should be installed on what kind of devices) and authorization policies (what kind of permissions should be assigned to, depends upon their posture status).
- Network access device (NAD) as a policy enforcement point. On the NAD side actual authorization restrictions are applied at time of user authentication. ISE as a policy point provides authorization parameters like Access Control List (ACL).Traditionally, in order for posture to happen, NADs are required to support Change of Authorization (CoA) to reauthenticate the user after posture status of the endpoint is determined. Starting from ISE 2.2 NADs are not required to support redirection.
Note: Routers running IOS XE do not support redirection.
Note: IOS XE software must have fixes for the following defects to have CoA with ISE fully operational:
CSCve16269 IKEv2 CoA does not work with ISE
CSCvi90729 IKEv2 CoA does not work with ISE (coa-push=TRUE instead of true) - Agent software as point of data collection and interaction with end user. Agent receives information about posture requirements from the ISE and provides report to the ISE regarding requirments status. This document is based on Anyconnect ISE Posture Module which is the only one that supports posture fully without redirection.
Posture flow without redirection is very well documented in article "ISE Posture Style Comparison for Pre and Post 2.2", section "Posture flow in ISE 2.2".
Anyconnect ISE Posture Module provisioning with FlexVPN can be done by 2 different ways:
- Manual - the module is installed manually on the client's worksation from the Anyconnect package available on the Cisco Software Download portal: https://software.cisco.com/download/home/283000185.
The following conditions must be satisfied for posture work with manual ISE Posture Module provisioning:
1. Domain Name Server (DNS) must resolve Fully Qualified Domain Name (FQDN) enroll.cisco.com to Policy Service Nodes (PSNs) IPs. During the first connection attempt the posture module does not have any information about available PSNs. It is sending discovery probes to find availabe PSNs. FQDN enroll.cisco.com is used in one of these probes.
2. TCP port 8905 must be permitted for PSNs IPs. The posture is going via TCP port 8905 in this scenario.
3. Admin certificate on the PSN nodes must have enroll.cisco.com in SAN field. Connection between the VPN user and PSN node via TCP 8905 is protected via Admin certificate and user will get a certificate warning if there is no such name "enroll.cisco.com" in the Admin certificate of PSN node.
Note: According to RFC6125 certificate CNs should be ignored if there are SAN values specified. It means we also need to add CNs of Admin certificate in SAN field.
- Automatic provisioning via Client Provisioning Portal (CPP) - the module is downloded and installed from the ISE by accessing CPP directly via portal FQDN.
The following conditions must be satisfied for posture work with automatic ISE Posture Module provisioning:
1. DNS must resolve FQDN of CPP to Policy Service Nodes (PSNs) IPs.
2. TCP ports 80, 443 and port of CPP (8443 by default) must be permitted for PSNs IPs. Client needs to open CPP FQDN directly via HTTP (will be redirected to HTTPS ) or HTTPS, this request will be redirected to the port of CPP (8443 by default) and then the posture is going via that port.
3. Admin and CPP certificates on the PSN nodes must have CPP FQDN in SAN field. Connection between the VPN user and PSN node via TCP 443 is protected by Admin certificate and connection on CPP port is protected by the CPP certificate.
Note: According to RFC6125 certificate CNs should be ignored if there are SAN values specified. It means we also need to add CNs of Admin and CPP certificates in SAN field of corresponding certificates.
Note: If ISE software doesn't contain a fix for CSCvj76466 then posture or client provisioning will work only if posure or client provisioning are done on the same PSN on which the client was authenticated.
In case of posture with FlexVPN the flow includes these steps:
1. User connects to the FlexVPN hub using Anyconnect client.
2. ISE sends Access-Accept to the FlexVPN Hub with the name of ACL needs to be applied for restricting access.
3a. First connection with Manual provisioning - ISE posture module starts to discover policy server sending the probe to enroll.cisco.com via TCP port 8905. As a successfull result the posture module downloads configured posture profile and updates Compliance module on the client side.
During next connection attempts the ISE posture module will also use Names and IPs specified in Call Home List of the posture profile for policy server detection.
3b. First connection with Automatic provisioning - Client opens CPP via FQDN. As a successfull result Network Setup Assistant is downloaded on the client's workstation, and then it downloads and installs ISE Posture module, ISE Compliance module and posture profile.
During next connection attempts the ISE posture module will use Names and IPs specified in Call Home List of the posture profile for policy server detection.
4. Posture module starts checks of compliance and sends the results of checking to the ISE.
5. If the client's status is Compliant then ISE sends Access-Accept to the FlexVPN Hub with the name of ACL needs to be applied for compliant client.
6, Client gets access to the network.
More details about posture process you can find in document "ISE Posture Style Comparison for Pre and Post 2.2".
Configure
Network Diagram

VPN user will get access to Server (10.0.0.10) only if he has compliant status.
DNS server configuration
In this document Windows Server 2008 R2 is used as DNS Server.
Step 1. Add Host (A) record for enroll.cisco.com pointing to PSN's IP:

Step 2. Add Host (A) record for CPP FQDN (cpp.example.com used in this example) pointing to PSN's IP:

IOS XE Initial Configuration
Configure Identity certificate
The router will use certificate in order to authenticate itself to the Anyconnect client. The router certificate should be trusted by the operating system of the user in order to avoid certificate warning during connection establishment phase.
The identity certificate can be provided in one of the following ways:
Note: Using Self-signed certificates is not supported with IKEv2 FlexVPN.
Option 1 - Configure certification authority (CA) server on the router
Note: CA server can be created on the same IOS router or another router. In this article CA is created on the same router.
Note: You need to synchronize time to NTP server before CA server can be enabled.
Note: Please note that the user will not be able to verify authenticity of this certificate, thus the user data will not be protected against man-in-the-middle attacks unless the CA certificate is manually verified and imported into user's machine prior to establishing the connection.
Step 1. Generate RSA keys for the CA server:
FlexVPN-HUB(config)# crypto key generate rsa label ROOT-CA modulus 2048
Step 2. Generate RSA keys for identity certificate:
FlexVPN-HUB(config)# crypto key generate rsa label FLEX-1 modulus 2048
Verification:
FlexVPN-HUB# show crypto key mypubkey rsa

 ---- output truncated -----

Key name: ROOT-CA
Key type: RSA KEYS
 Storage Device: private-config
 Usage: General Purpose Key
 Key is not exportable. Redundancy enabled.
 Key Data:
  30820122 300D0609 2A864886 F70D0101 01050003 82010F00 3082010A 02820101
  00C01F04 E0AF3AB8 97CED516 3B31152A 5C3678A0 829A0D0D 2F46D86C 2CBC9175

----- output truncated ------

----- output truncated ------

Key name: FLEX-1
Key type: RSA KEYS
 Storage Device: private-config
 Usage: General Purpose Key
 Key is not exportable. Redundancy enabled.
 Key Data:
  30820122 300D0609 2A864886 F70D0101 01050003 82010F00 3082010A 02820101
  009091AE 4185DC96 4F561F7E 506D56E8 240606D0 CC16CC5E E4E24EEB 1664E42C

----- output truncated ------
Step 3. Configure the CA:
ip http server
crypto pki server ROOT-CA
 issuer-name cn=ROOT-CA.example.com
 hash sha256
 lifetime certificate 1095
 lifetime ca-certificate 3650
 eku server-auth
 no shutdown
Verification:
FlexVPN-HUB# show crypto pki server

Certificate Server ROOT-CA:
    Status: enabled
    State: enabled
    Server's configuration is locked  (enter "shut" to unlock it)
    Issuer name: cn=ROOT-CA.example.com
    CA cert fingerprint: A5522AAB 1410E645 667F0D70 49AADA45
    Granting mode is: auto
    Last certificate issued serial number (hex): 3
    CA certificate expiration timer: 18:12:07 UTC Mar 26 2021
    CRL NextUpdate timer: 21:52:55 UTC May 21 2018
    Current primary storage dir: nvram:
    Database Level: Minimum - no cert data written to storage
Step 4. Configure the trustpoint:
interface loopback 0
ip address 10.10.10.10 255.255.255.255
crypto pki trustpoint FLEX-TP-1
 enrollment url http://10.10.10.10:80
 fqdn none
 subject-name cn=flexvpn-hub.example.com
 revocation-check none
 rsakeypair FLEX-1
Step 5. Authenticate the CA:
FlexVPN-HUB(config)#crypto pki authenticate FLEX-TP-1
Certificate has the following attributes:
       Fingerprint MD5: A5522AAB 1410E645 667F0D70 49AADA45
      Fingerprint SHA1: F52EAB1A D39642E7 D8EAB804 0EB30973 7647A860

% Do you accept this certificate? [yes/no]: yes
Trustpoint CA certificate accepted.
Step 6. Enroll Router to the CA:
FlexVPN-HUB(config)#crypto pki enroll FLEX-TP-1
%
% Start certificate enrollment ..
% Create a challenge password. You will need to verbally provide this
   password to the CA Administrator in order to revoke your certificate.
   For security reasons your password will not be saved in the configuration.
   Please make a note of it.

Password:
Re-enter password:

% The subject name in the certificate will include: cn=flexvpn-hub.example.com
% The fully-qualified domain name will not be included in the certificate
% Include the router serial number in the subject name? [yes/no]: no
% Include an IP address in the subject name? [no]: no
Request certificate from CA? [yes/no]: yes
% Certificate request sent to Certificate Authority
% The 'show crypto pki certificate verbose FLEX-TP-1' commandwill show the fingerprint.

May 21 16:16:55.922: CRYPTO_PKI:  Certificate Request Fingerprint MD5: 80B1FAFD 35346D0F D23F6648 F83F039B
May 21 16:16:55.924: CRYPTO_PKI:  Certificate Request Fingerprint SHA1: A8401EDE 35EE4AF8 46C4D619 8D653BFD 079C44F7
Check pending certificate requests on the CA and verify that the fingerprint matches:
FlexVPN-HUB#show crypto pki server ROOT-CA requests
Enrollment Request Database:

Subordinate CA certificate requests:
ReqID  State      Fingerprint                      SubjectName
--------------------------------------------------------------

RA certificate requests:
ReqID  State      Fingerprint                      SubjectName
--------------------------------------------------------------

Router certificates requests:
ReqID  State      Fingerprint                      SubjectName
--------------------------------------------------------------
1      pending    80B1FAFD35346D0FD23F6648F83F039B cn=flexvpn-hub.example.com
Step 7. Grant the certificate using proper ReqID:
FlexVPN-HUB#crypto pki server ROOT-CA grant 1
Wait until router requests for the certificate again ( according to this configuration it will check 10 times once per minute). Look for syslog message:
May 21 16:18:56.375: %PKI-6-CERTRET: Certificate received from Certificate Authority
Verify that the certificate is installed:
FlexVPN-HUB#show crypto pki certificates FLEX-TP-1
Certificate
  Status: Available
  Certificate Serial Number (hex): 04
  Certificate Usage: General Purpose
  Issuer:
    cn=ROOT-CA.example.com
  Subject:
    Name: flexvpn-hub.example.com
    cn=flexvpn-hub.example.com
  Validity Date:
    start date: 16:18:16 UTC May 21 2018
    end   date: 18:12:07 UTC Mar 26 2021
  Associated Trustpoints: FLEX-TP-1

CA Certificate
  Status: Available
  Certificate Serial Number (hex): 01
  Certificate Usage: Signature
  Issuer:
    cn=ROOT-CA.example.com
  Subject:
    cn=ROOT-CA.example.com
  Validity Date:
    start date: 18:12:07 UTC Mar 27 2018
    end   date: 18:12:07 UTC Mar 26 2021
  Associated Trustpoints: FLEX-TP-1 ROOT-CA
  Storage: nvram:ROOT-CAexamp#1CA.cer
Option 2 - Import externally signed certficate
FlexVPN-HUB(config)# crypto pki import FLEX-TP-2 pkcs12 ftp://cisco:cisco@10.48.30.130/ password cisco123
% Importing pkcs12...
Address or name of remote host [10.48.30.130]?
Source filename [FLEX-TP-2]? flexvpn-hub.example.com.p12
Reading file from ftp://cisco@10.48.30.130/flexvpn-hub.example.com.p12!
[OK - 4416/4096 bytes]
% The CA cert is not self-signed.
% Do you also want to create trustpoints for CAs higher in
% the hierarchy? [yes/no]:
May 21 16:55:26.344: %CRYPTO_ENGINE-5-KEY_ADDITION: A key named FLEX-TP-2 has been generated or imported
yes
CRYPTO_PKI: Imported PKCS12 file successfully.
FlexVPN-HUB(config)#
May 21 16:55:34.396: %PKI-6-PKCS12IMPORT_SUCCESS: PKCS #12 Successfully Imported.
FlexVPN-HUB(config)#
Configure IKEv2
Step 1. Configure RADIUS server and CoA:
aaa group server radius FlexVPN-AuthC-Server-Group-1
 server-private 10.48.30.127 key Cisco123
 server-private 10.48.30.128 key Cisco123
aaa server radius dynamic-author
 client 10.48.30.127 server-key Cisco123
 client 10.48.30.128 server-key Cisco123
 server-key Cisco123
 auth-type any
Step 2. Configure authentication and authorization lists:
aaa new-model
aaa authentication login FlexVPN-AuthC-List-1 group FlexVPN-AuthC-Server-Group-1
aaa authorization network FlexVPN-AuthZ-List-1 local
aaa accounting update newinfo
aaa accounting network FlexVPN-Accounting-List-1 start-stop group FlexVPN-AuthC-Server-Group-1
Step 3. Create ikev2 authorization policy:
crypto ikev2 authorization policy FlexVPN-Local-Policy-1
 pool FlexVPN-Pool-1
 dns 10.48.30.104
 netmask 255.255.255.0
 def-domain example.com
Step 4. Create IKEv2 profile:
crypto ikev2 profile FlexVPN-IKEv2-Profile-1
 match identity remote key-id example.com
 identity local dn
 authentication local rsa-sig
 authentication remote eap query-identity
 pki trustpoint FLEX-TP-2
 dpd 60 2 on-demand
 aaa authentication eap FlexVPN-AuthC-List-1
 aaa authorization group eap list FlexVPN-AuthZ-List-1 FlexVPN-Local-Policy-1
 aaa authorization user eap cached
 aaa accounting eap FlexVPN-Accounting-List-1
 virtual-template 10
Step 5. Create transform set and ipsec profile:
crypto ipsec transform-set FlexVPN-TS-1 esp-aes esp-sha-hmac
 mode tunnel
crypto ipsec profile FlexVPN-IPsec-Profile-1
 set transform-set FlexVPN-TS-1
 set ikev2-profile FlexVPN-IKEv2-Profile-1
Step 6. Create virtual template interface:
interface Virtual-Template10 type tunnel
 ip unnumbered GigabitEthernet3
 tunnel mode ipsec ipv4
 tunnel protection ipsec profile FlexVPN-IPsec-Profile-1
Step 7. Create local pool:
ip local pool FlexVPN-Pool-1 10.20.30.100 10.20.30.200
Step 8. Create ACL to restrict access for non-compliant clients. During unknown posture state at least those permissions should be provided:
- DNS traffic
- Traffic to ISE PSNs via ports 80, 443 and 8905
- Traffic to ISE PSNs to which CPP portal FQDN points out
- Traffic to remediation servers if needed
This is an example of ACL without remediation servers, explicit deny for 10.0.0.0/24 network is added for visibility, implicit "deny ip any any" exists in the end of ACL:
ip access-list extended DENY_SERVER
 permit udp any any eq domain
 permit tcp any host 10.48.30.127 eq 80
 permit tcp any host 10.48.30.127 eq 443
 permit tcp any host 10.48.30.127 eq 8443
 permit tcp any host 10.48.30.127 eq 8905
 permit tcp any host 10.48.30.128 eq 80
 permit tcp any host 10.48.30.128 eq 443
 permit tcp any host 10.48.30.128 eq 8443
 permit tcp any host 10.48.30.128 eq 8905
 deny   ip any 10.0.0.0 0.0.0.255
Step 9. Create ACL to permit access for compliant clients:
ip access-list extended PERMIT_ALL
 permit ip any any
Step 10. Split tunnel configuration (optional)
By default, all traffic will be directed over VPN. In order to tunnel traffic only to the specified networks, you can specify them in the ikev2 authorization policy section. It is possible to add multiple statements or use standard access-list.
crypto ikev2 authorization policy FlexVPN-Local-Policy-1
     route set remote ipv4 10.0.0.0 255.0.0.0
Step 11. Internet access for remote clients (optional)
In order for the outbound connections from the remote access clients to the hosts in the internet to be NAT-ed to the global IP addres of the router, configure the NAT translation:
ip access-list extended NAT
 permit ip 10.20.30.0 0.0.0.255 any

ip nat inside source list NAT interface GigabitEthernet1 overload extended

interface GigabitEthernet1
 ip nat outside

interface Virtual-Template 10
 ip nat inside
Anyconnect client profile configuration
Configure the client profile using the AnyConnect Profile Editor. Profiles of Anyconnect Security Mobile Client on Windows 7 and 10 are saved in %ProgramData%\Cisco\Cisco AnyConnect Secure Mobility Client\Profile.
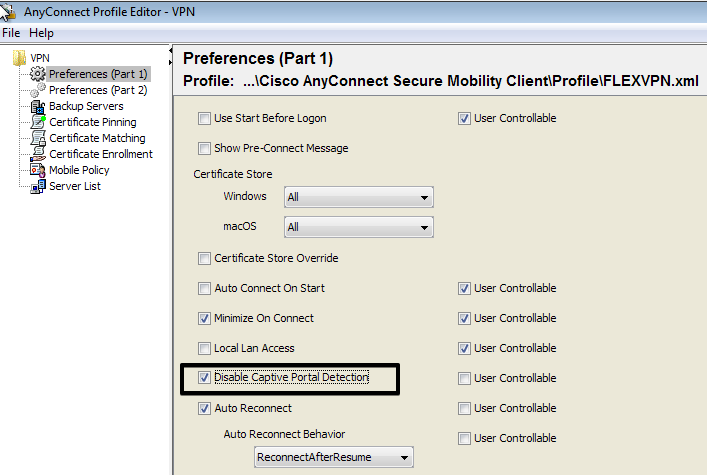
Step 1. Disable Captive Portal Detection feature. If the http server is not disabled on the FlexVPN Hub, AnyConnect captive portal detection feature will cause the connection to fail. Please note that CA server will not work without HTTP server.
Step 2. Configure Server List:

- Enter Display Name.
- Enter FQDN or IP address of the FlexVPN Hub.
- Select IPsec as Primary Protocol.
- Uncheck "ASA gateway" checkbox and specify EAP-MD5 as Auth Method. Enter IKE Identity exactly the same as in the IKEv2 profile configuration on the FlexVPN Hub (in this example the IKEv2 profile is configured with "match identity remote key-id example.com" command, so we need to use example.com as IKE Identity).
Step 3. Save the profile to %ProgramData%\Cisco\Cisco AnyConnect Secure Mobility Client\Profile and restart the AC.
The XML equivalent of the profile:
<?xml version="1.0" encoding="UTF-8"?>
<AnyConnectProfile xmlns="http://schemas.xmlsoap.org/encoding/" xmlns:xsi="http://www.w3.org/2001/XMLSchema-instance" xsi:schemaLocation="http://schemas.xmlsoap.org/encoding/ AnyConnectProfile.xsd">
    <ClientInitialization>
        <UseStartBeforeLogon UserControllable="true">false</UseStartBeforeLogon>
        <AutomaticCertSelection UserControllable="true">true</AutomaticCertSelection>
        <ShowPreConnectMessage>false</ShowPreConnectMessage>
        <CertificateStore>All</CertificateStore>
        <CertificateStoreMac>All</CertificateStoreMac>
        <CertificateStoreOverride>false</CertificateStoreOverride>
        <ProxySettings>Native</ProxySettings>
        <AllowLocalProxyConnections>false</AllowLocalProxyConnections>
        <AuthenticationTimeout>12</AuthenticationTimeout>
        <AutoConnectOnStart UserControllable="true">false</AutoConnectOnStart>
        <MinimizeOnConnect UserControllable="true">true</MinimizeOnConnect>
        <LocalLanAccess UserControllable="true">false</LocalLanAccess>
        <DisableCaptivePortalDetection UserControllable="false">true</DisableCaptivePortalDetection>
        <ClearSmartcardPin UserControllable="true">false</ClearSmartcardPin>
        <IPProtocolSupport>IPv4,IPv6</IPProtocolSupport>
        <AutoReconnect UserControllable="false">true
            <AutoReconnectBehavior UserControllable="false">ReconnectAfterResume</AutoReconnectBehavior>
        </AutoReconnect>
        <AutoUpdate UserControllable="false">true</AutoUpdate>
        <RSASecurIDIntegration UserControllable="false">Automatic</RSASecurIDIntegration>
        <WindowsLogonEnforcement>SingleLocalLogon</WindowsLogonEnforcement>
        <WindowsVPNEstablishment>LocalUsersOnly</WindowsVPNEstablishment>
        <AutomaticVPNPolicy>false</AutomaticVPNPolicy>
        <PPPExclusion UserControllable="false">Automatic
            <PPPExclusionServerIP UserControllable="false"></PPPExclusionServerIP>
        </PPPExclusion>
        <EnableScripting UserControllable="false">false</EnableScripting>
        <EnableAutomaticServerSelection UserControllable="true">false
            <AutoServerSelectionImprovement>20</AutoServerSelectionImprovement>
            <AutoServerSelectionSuspendTime>4</AutoServerSelectionSuspendTime>
        </EnableAutomaticServerSelection>
        <RetainVpnOnLogoff>false
        </RetainVpnOnLogoff>
        <AllowManualHostInput>true</AllowManualHostInput>
    </ClientInitialization>
    <ServerList>
        <HostEntry>
            <HostName>FLEXVPN</HostName>
            <HostAddress>flexvpn-hub.example.com</HostAddress>
            <PrimaryProtocol>IPsec
                <StandardAuthenticationOnly>true
                    <AuthMethodDuringIKENegotiation>EAP-MD5</AuthMethodDuringIKENegotiation>
                    <IKEIdentity>example.com</IKEIdentity>
                </StandardAuthenticationOnly>
            </PrimaryProtocol>
        </HostEntry>
    </ServerList>
</AnyConnectProfile>
ISE configuration
Admin and CPP certificates configuration
Note: Changing Admin certificate will restart the node on which the certificate has been changed.
Step 1. Go to Administration -> System -> Certificates -> Certificate Signing Requests, click on Generate Certificate Signing Requests (CSR):

Step 2. On the opened page select necessary PSN node, fill necessary fields and add FQDN of the node, enroll.cisco.com, cpp.example.com and IP address of the node in SAN fields and click Generate:
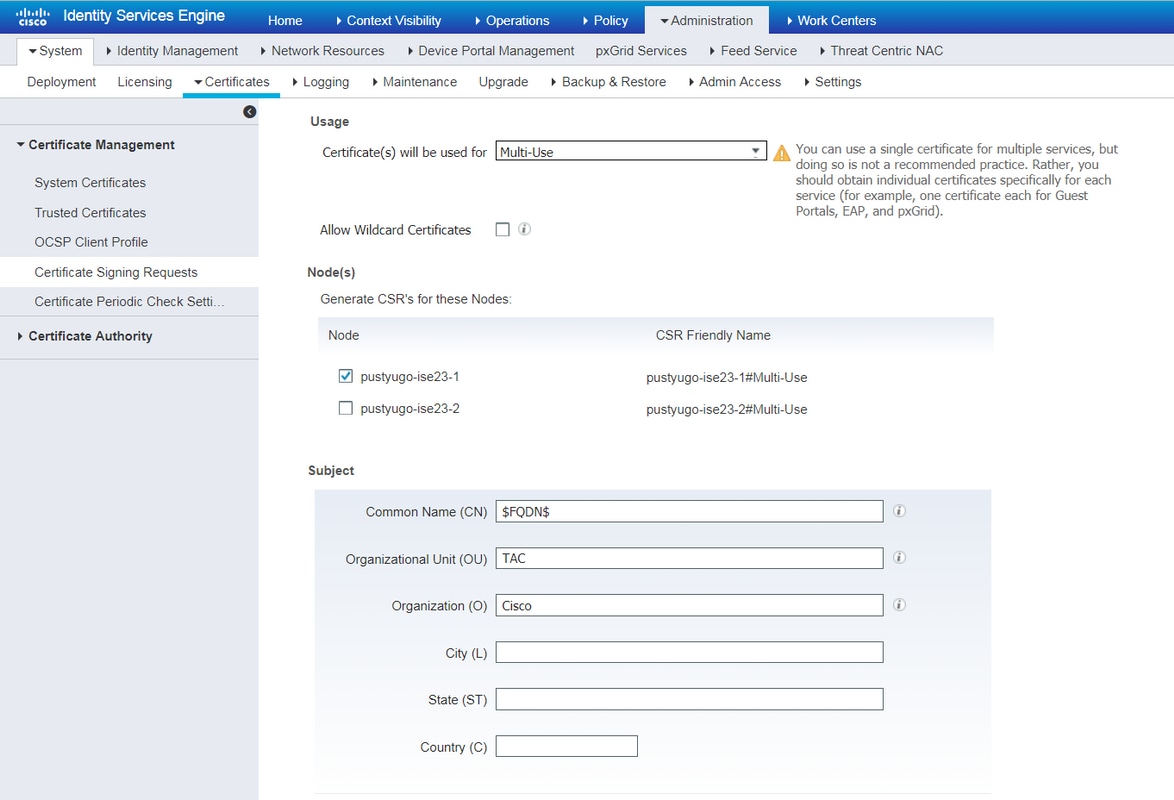
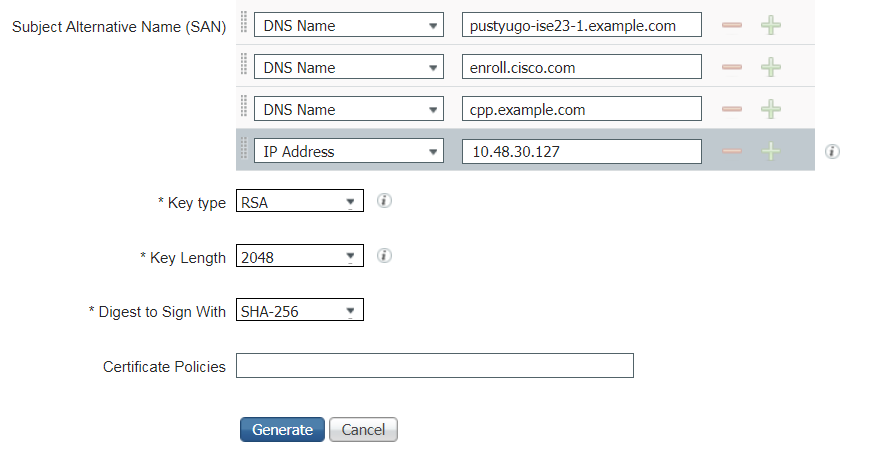
Note: If you select Multi-Use on this step you can use the same certificate for Portal as well.
In the appeared window click Export to save the CSR in pem format to the local workstation:

Step 3. Sing the CSR with trusted CA and get the certificate file from the CA as well as the full chain of CA certificates (Root and Intermediate).
Step 4. Go to Administration -> System -> Certificates -> Trusted Certificates, click Import. On the next screen click Choose file and select Root CA certificate file, fill Friendly name and Description if needed, select necessary Trusted For options and click Submit:

Repeat this step for all intermediate certificates in the chain if there is any.
Step 5. Return to Administration -> System -> Certificates -> Certificate Signing Requests, select necessary CSR and click Bind Certificate:

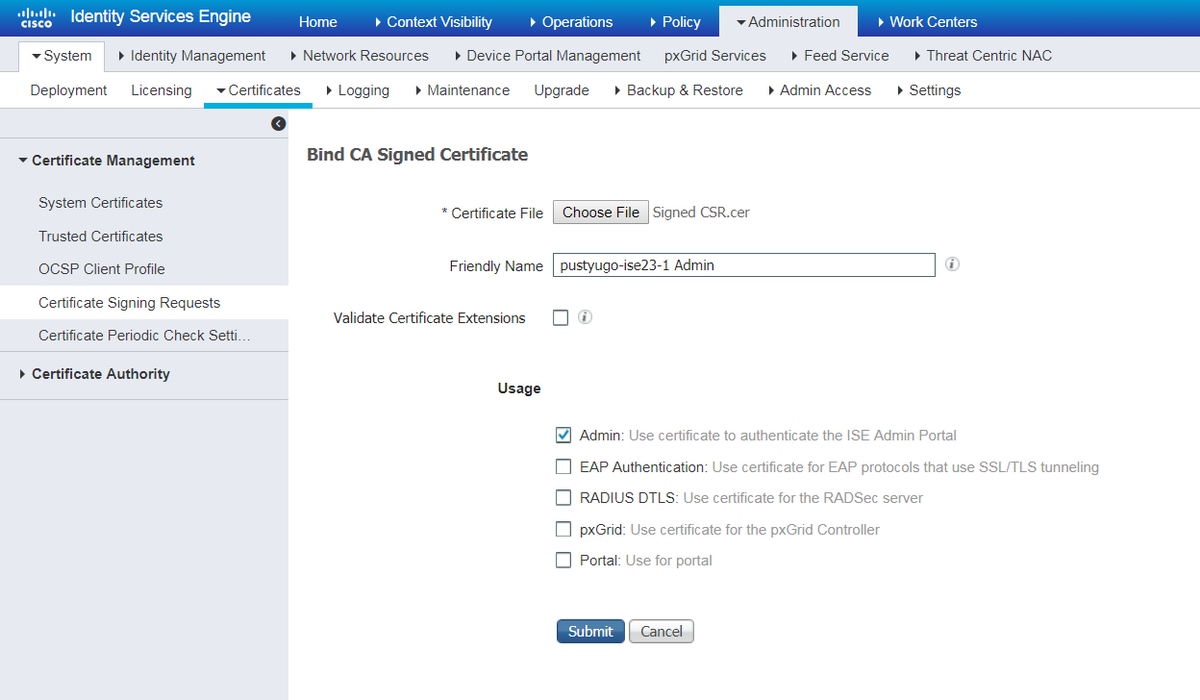
Step 6. On the opened page click Choose File, select the certificate file received from the CA, then enter Friendly Name if needed, then select Usage: Admin (Usage: Portal also can be selected here if the CSR was created with Multi-Use) and click Submit:
Step 7. In the warning pop-up click Yes to finish the import. The node affected by Admin certificate changing will be restarted:

Repeat the steps for changing CPP certificate if you decided to use separate certificate for portal. On Step 6 select Usage: Portal and click Submit:

Repeat the steps for all PSNs in ISE deployment.
Create a local user on ISE
Note: With EAP-MD5 method, only local users are supported on ISE.
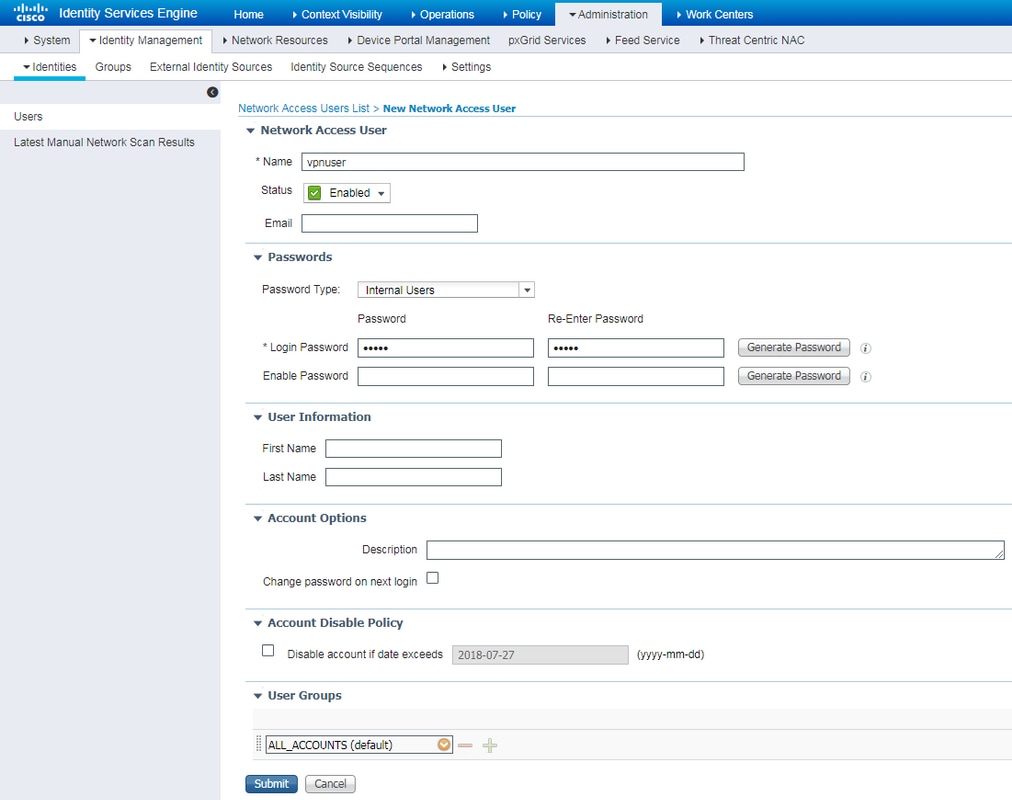
Step 1. Go to Administration -> Indentity Management -> Identities -> Users, click Add.

Step 2. On the opened page enter username, password and other necessary information and click Submit.
Add the FlexVPN HUB as a Radius Client
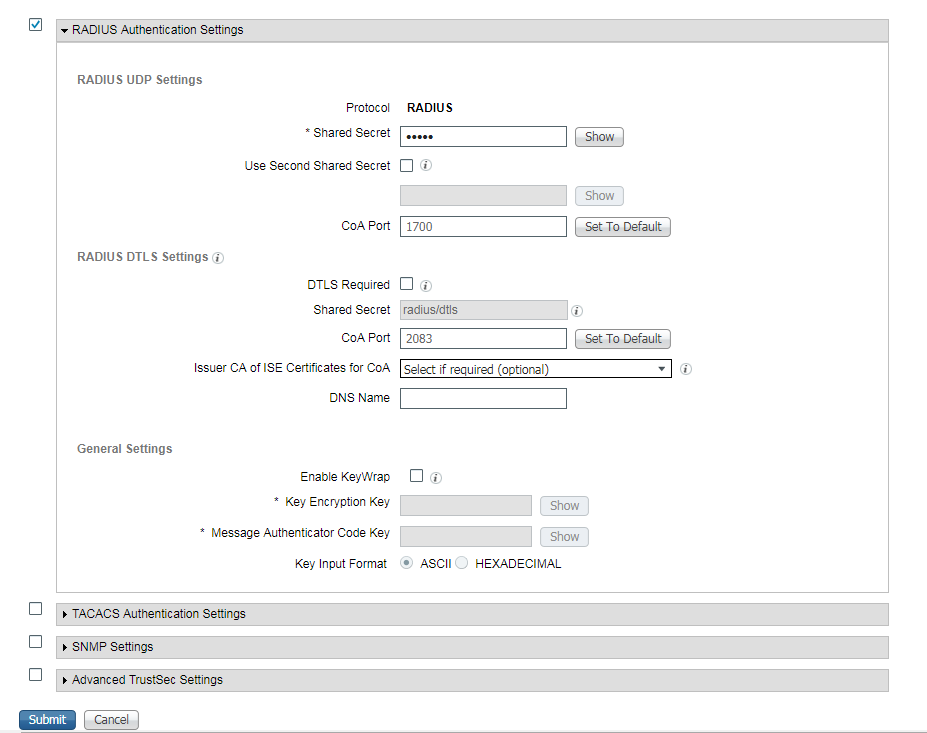
Step 1. Go to Work Centers -> Posture -> Network Devices, click Add.

Ster 2. On the opened page enter Device Name, IP address, other necessary information, check the check-box "RADIUS Authentication settings", enter Shared Secret and click Submit on the bottom of the page.

Client Provisioning Configuration
These are the steps to prepare Anyconnect configuration.
Step 1. Anyconnect package download. Anyconnect package itself is not available for direct download from ISE so before you begin, ensure that AC is available on your PC. This link can be used for AC download - http://cisco.com/go/anyconnect. In this document anyconnect-win-4.5.05030-webdeploy-k9.pkg package is used.
Step 2. In order to upload AC package to ISE, navigate to Work Centers -> Posture -> Client Provisioning -> Resourcesand click Add. Choose Agent resources from local disk. In the new window choose Cisco Provided Packages, click Choose File and select AC package on your PC.

Click Submit to finish import. Verify the pacage's hash and press Confirm.
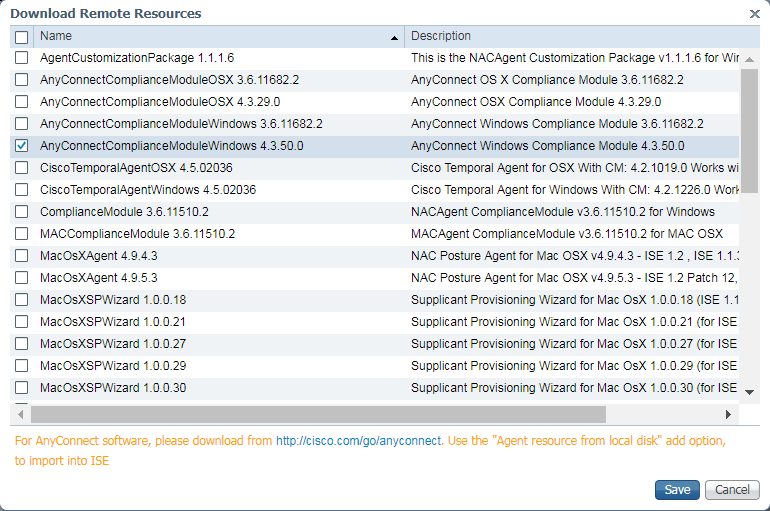
Step 3. Compliance module has to be uploaded to ISE. On the same page (Work Centers -> Posture -> Client Provisioning -> Resources) click Add and choose Agent resources from Cisco site. In resource list you should check a compliance module and click Save. For this document AnyConnectComplianceModuleWindows 4.3.50.0 compliance module is used.
Step 4. Now AC posture profile has to be created. Click Add and choose NAC agent or Anyconnect posture profile.
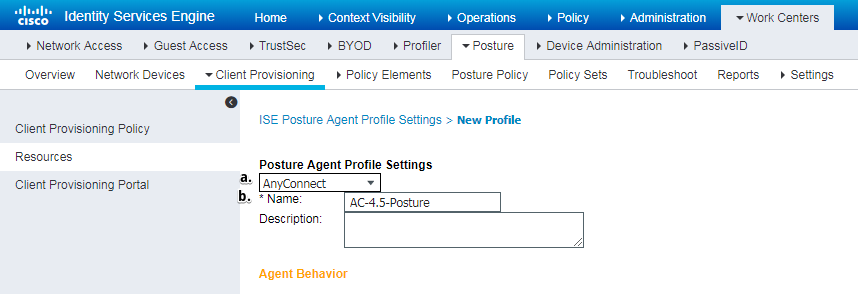
- Choose type of the profile. AnyConnect should to be used for this scenario.
- Specify profile name. Navigate to Posture Protocol section of profile

- Specify Server Name Rules, this field cannot be empty. Field can contain FQDN with wildcard which restricts AC posture module connection to PSNs from appropriate namespace. Put star if any FQDN should be allowed.
- Names and IPs specified here are in use during stage 2 of posture discovery (see Step 14 of "Posture flow in ISE 2.2" section). You can separate names by coma as well port number can be added after FQDN/IP using colon.
Step 5.Create AC configuration. Navigate to Work Centers -> Posture -> Client Provisioning -> Resources and click Add, then select AnyConnect Configuration.

- Select AC package.
- Provide AC configuration name.
- Choose compliance module version.
- Select AC posture configuration profile from drop-down list.
Step 6. Configure client provisioning policy. Navigate to Work Centers -> Posture -> Client Provisioning. In case of initial configuration you can fill empty values in policy presented with defaults. In you need to add policy to existing posture configuration, navigate to policy which can be reused and choose Duplicate Above or Duplicate Below. Brand new policy can also be created.
This is the example of the policy used in the document.

Choose your AC configuration in result section.
Posture Policies and Conditions
Simple posture check is used. ISE is configured to check existance of file C:\TEST.txt on the end device side. Real life scenarios can be much more complicated but general configuration steps are the same.
Step 1. Create posture condition. Posture conditions are located in Work Centers -> Posture -> Policy Elements -> Conditions. Choose type of posture condition and click Add. Specify necessary information and click Save. Below you can find an example of Service condition which should check if file C:\TEST.txt exists.

Step 2.Posture requirements configuration. Navigate to Work Centers -> Posture -> Policy Elements -> Requirements. This is an example for file TEST.txt existance:

Choose your posture condition in a new requirement and specify a remediation action.
Step 3. Posture policy configuration. Navigate to Work Centers -> Posture -> Posture Policy. Below you can find example of policy used for this document. Policy has "File Existance" requirement assigned as mandatory and does not have any other conditions assigned.

Configure Client Provisioning Portal
For posture without redirection, configuration of client provisioning portal has to be edited. Navigate to Work Centers -> Posture -> Client Provisioning -> Client Provisioning Portal You can either use default portal or create your own.
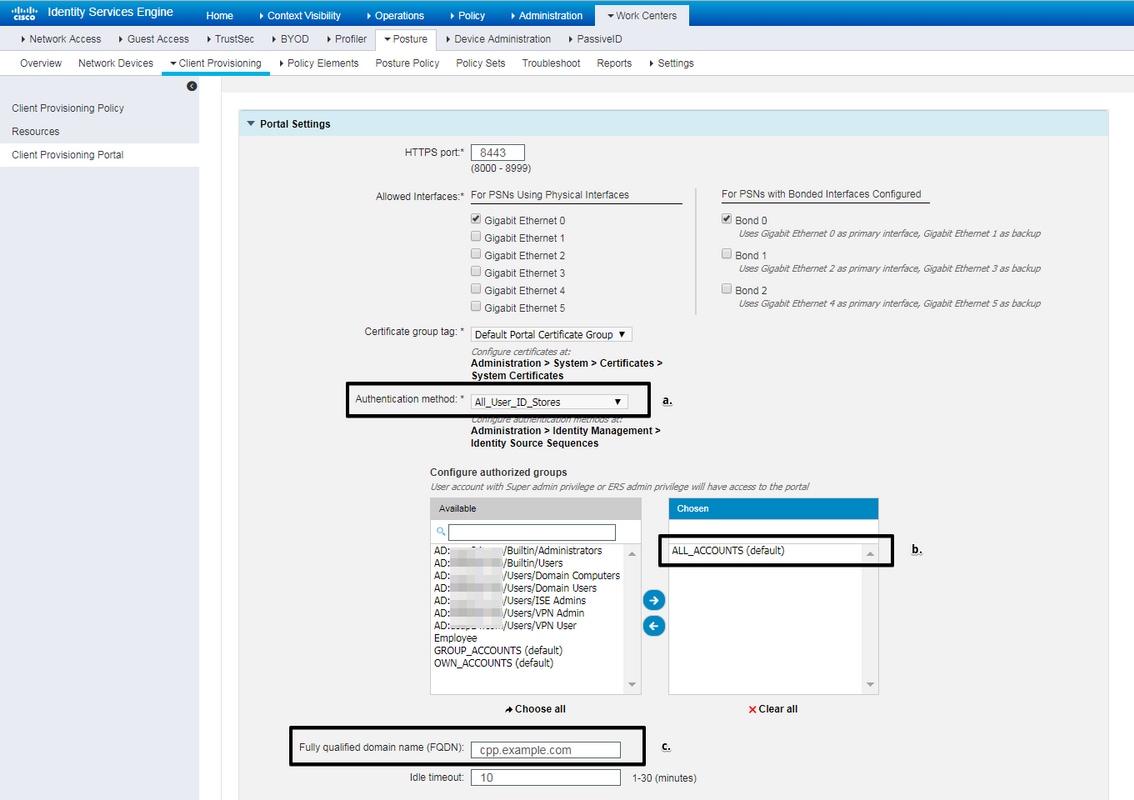
Those settings should be edited in portal configuration for non-redirection scenario:
- In Authentication, specify Identity Source Sequence which should be used if SSO cannot locate session for the user.
- According to selected Identity Source Sequence list of available groups is populated. At this point you need to select groups which are authorized for portal login.
- FQDN of client provisioning portal has to be specified. This FQDN should be resolvable to ISE PSNs IPs. Users should be instructed to specify the FQDN in the web browser during first connection attempt.
Configure Authorization Profiles and Policies
Initial access for client when posture status is not available needs to be restricted. This could be achieved in multiple ways:
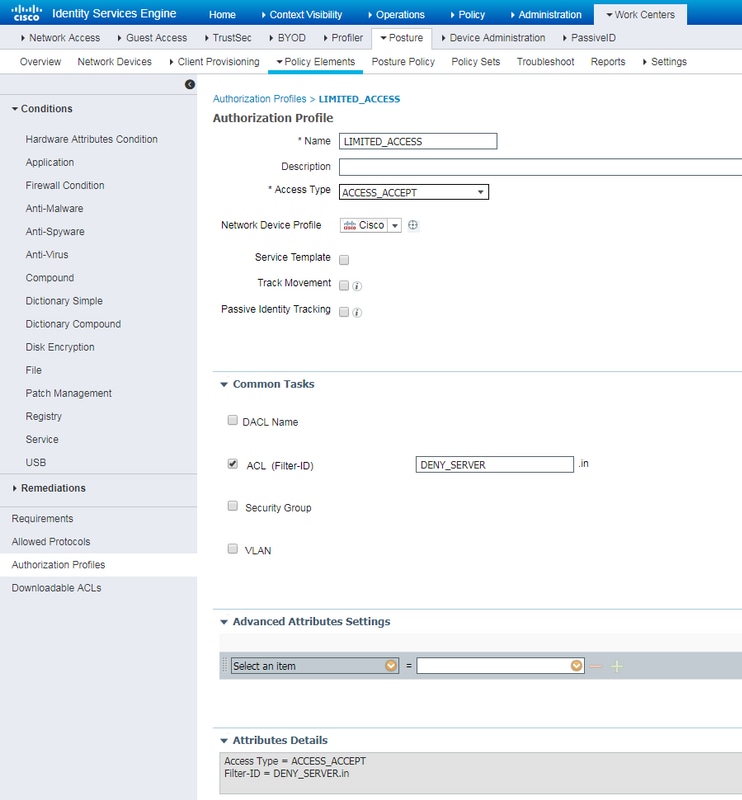
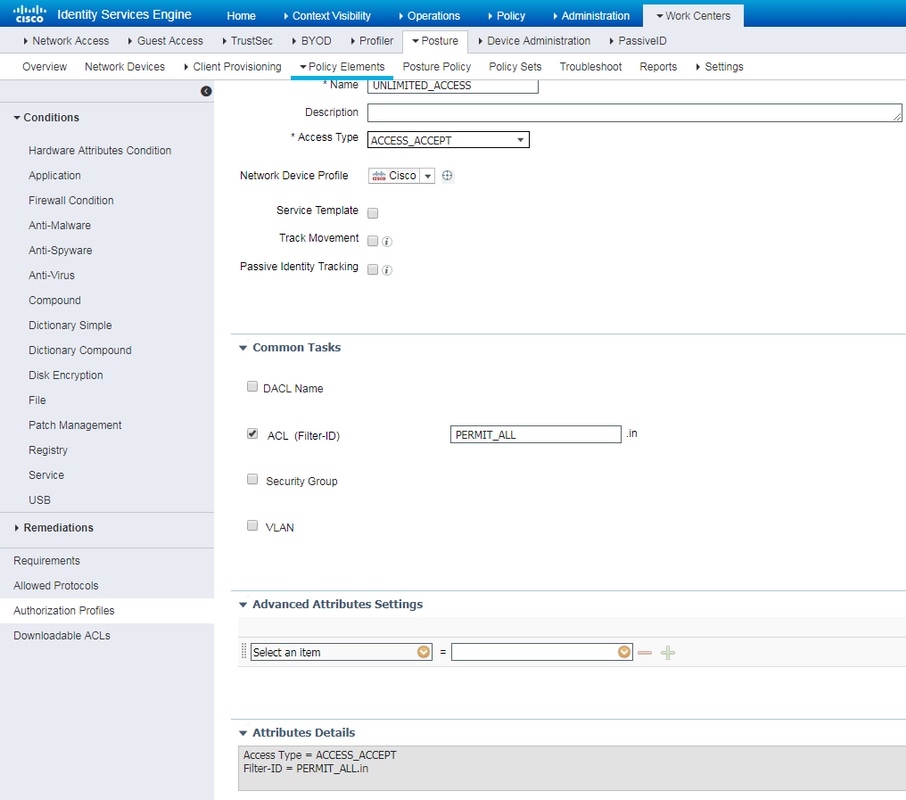
- Radius Filter-Id - with this attribute, ACL locally defined on NAD can be assigned to the user with unknown posture status. As this is a standard RFC attribute, this approach should work well for all NAD vendors.
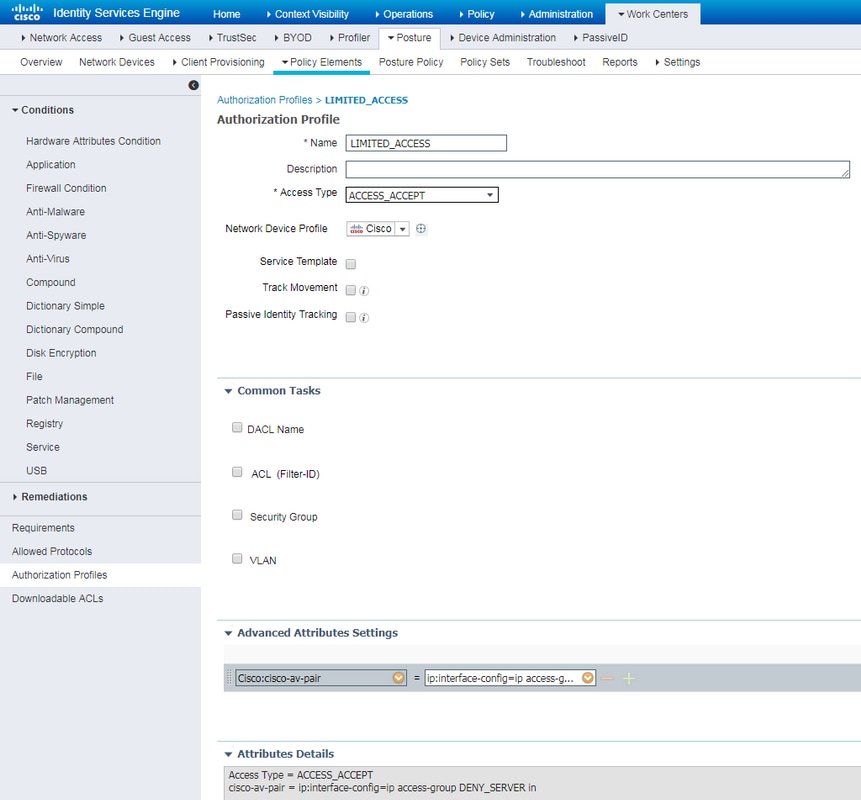
- Cisco:cisco-av-pair = ip:interface-config - very similar to Radius Filter-Id, ACL locally defined on NAD can be assigned to the user with unknown posture status. Example of configuration:
cisco-av-pair = ip:interface-config=ip access-group DENY_SERVER in
Step 1. Configure authorization profile.
As usual for posture two authorization profiles are required. First one should contain any kind of network access restrictions. This profile can be applied to the authentications for which posture status is not equal to compliant. Second authorization profile might contain just permit acces and can be applied for session with posture status equals to compliant.
To create authorization profile navigate to Work Centers -> Posture -> Policy Elements -> Authorization Profiles.
Example of restricted access profile with Radius Filter-Id:
Example of restricted access profile with cisco-av-pair:
Example of unlimited access profile with Radius Filter-Id:
Example of unlimited access profile with cisco-av-pair:

Step 2. Configure authorization policy. During this step two authorization policies should be created. One to match initial authentication request with unknown posture status and second one to assign full access after successful posture process.
It is an example of simple authorization policies for this case:

Configuration of Authentication policy is not a part of this document but you should keep in mind that authentication needs to be successful before authorization policy processing begins.
Verify
Basic verification of the flow may consist of three main steps:
Step 1. RA VPN session verification on the FlexVPN HUB:
show crypto session username vpnuser detail
Crypto session current status

Code: C - IKE Configuration mode, D - Dead Peer Detection
K - Keepalives, N - NAT-traversal, T - cTCP encapsulation
X - IKE Extended Authentication, F - IKE Fragmentation
R - IKE Auto Reconnect, U - IKE Dynamic Route Update

Interface: Virtual-Access1
Profile: FlexVPN-IKEv2-Profile-1
Uptime: 00:04:40
Session status: UP-ACTIVE
Peer: 7.7.7.7 port 60644 fvrf: (none) ivrf: (none)
      Phase1_id: example.com
      Desc: (none)
  Session ID: 20
  IKEv2 SA: local 5.5.5.5/4500 remote 7.7.7.7/60644 Active
          Capabilities:DNX connid:1 lifetime:23:55:20
  IPSEC FLOW: permit ip 0.0.0.0/0.0.0.0 host 10.20.30.107
        Active SAs: 2, origin: crypto map
        Inbound:  #pkts dec'ed 499 drop 0 life (KB/Sec) 4607933/3320
        Outbound: #pkts enc'ed 185 drop 0 life (KB/Sec) 4607945/3320

show crypto ikev2 sa detail
 IPv4 Crypto IKEv2  SA

Tunnel-id Local                 Remote                fvrf/ivrf            Status
1         5.5.5.5/4500          7.7.7.7/60644         none/none            READY
      Encr: AES-CBC, keysize: 256, PRF: SHA512, Hash: SHA512, DH Grp:5, Auth sign: RSA, Auth verify: EAP
      Life/Active Time: 86400/393 sec
      CE id: 1010, Session-id: 8
      Status Description: Negotiation done
      Local spi: 54EC006180B502D8       Remote spi: C3B92D79A86B0DF8
      Local id: cn=flexvpn-hub.example.com
      Remote id: example.com
      Remote EAP id: vpnuser
      Local req msg id:  0              Remote req msg id:  19
      Local next msg id: 0              Remote next msg id: 19
      Local req queued:  0              Remote req queued:  19
      Local window:      5              Remote window:      1
      DPD configured for 60 seconds, retry 2
      Fragmentation not  configured.
      Dynamic Route Update: disabled
      Extended Authentication configured.
      NAT-T is detected  outside
      Cisco Trust Security SGT is disabled
      Assigned host addr: 10.20.30.107
      Initiator of SA : No

 IPv6 Crypto IKEv2  SA
Step 2. Authentication flow verification (Radius Live Logs):
- Initial authentication. For this step you may be interested in validation which authorization profile has been applied. If unexpected authorization profile has been applied please investigate detailed authentication report. You can open this report by clicking on magnifying glass in Details column. You can compare attributes in detailed authentication report with condition in authorization policy which you expect to match.
- Session data change, in this particular example session state has changed from NotApplicable to Compliant.
- COA to network access device. This COA should be successful to push new authentication from the NAD side and new authorization policy assignment on ISE side. If COA has failed you can open detailed report to investigate the reason. Most common issues with COA can be:
- COA timeout - in such case either PSN which has sent request is not configured as a COA client on the NAD side, or COA request has been dropped somewhere on the way.
- COA negative ACK - indicate that COA has been received by NAD but due to some reason COA operation cannot be confirmed. For this scenario detailed report should contain more detailed explanation.
As IOS XE based router has been used as a NAD for this example, you can see no subsequent authentication request for the user. This happens due to the fact that ISE uses COA push for IOS XE which avoids VPN service interuption. In such scenario, COA itself contains new authorization parameters, so reauthentication is not needed.
Step 3.Posture report verification - Navigate to Operations -> Reports -> Reports -> Endpoint and Users -> Posture Assessment by Endpoint.

You can open detailed report from here for each particular event to check for example to which session ID this report belongs, which exact posture requirements were selected by ISE for the endpoint and as well status for each requirement.
Troubleshoot
This section provides information you can use in order to troubleshoot your configuration.
- IKEv2 debugs to collect from the headend:
debug crypto ikev2
debug crypto ikev2 packet
debug crypto ikev2 internal
debug crypto ikev2 error - AAA debugs to see assignment of local and/or remote attributes:
debug aaa authorization
debug aaa authentication
debug aaa accounting
debug aaa coa
debug radius authentication
debug radius accounting - DART from the AnyConnect client.
-
For posture process troubleshooting, those ISE components have to be enabled in debug on the ISE nodes where posture process can happen:
- client-webapp - component responsible for agent provisioning. Target log files guest.log and ise-psc.log.
- guestacess - component responsible for client provisioning portal component and session owner lookup (when request comes to wrong PSN). Target log file - guest.log.
- provisioning - component responsible for client provisioning policy processing. Target log file - guest.log.
- posture - all posture related events. Target log file - ise-psc.log
-
For the client side troubleshooting you can use:
- AnyConnect.txt - This file can be found in the DART bundle and used for VPN troubleshooting.
- acisensa.log -In case of client provisioning failure on the client side this file is created in the same folder to which NSA has been downloaded (Downloads directory for Windows normally),
- AnyConnect_ISEPosture.txt - This file can be found in the DART bundle in directory Cisco AnyConnect ISE Posture Module. All information about ISE PSN discovery and general steps of posture flow are logged into this file.
Contributed by Cisco Engineers
- Pavel Ustyugov
Contact Cisco
- Open a Support Case

- (Requires a Cisco Service Contract)
 Feedback