Introduction
This document describes the various features and use-cases under the Reports section of the Cisco Identity Services Engine (ISE). These reports are used to monitor and troubleshoot the various features on ISE and analyze trends of the network activities from a centralized admin node.
Requirements
Cisco recommends that you have the knowledge of ISE.
Components Used
The information in this document is based on Cisco ISE, Release 2.6.
The information in this document was created from the devices in a specific lab environment. All of the devices used in this document started with a cleared (default) configuration. If your network is live, make sure that you understand the potential impact of any command.
Background Information
Operational data is the ISE DB with the contextual and session information of all the endpoints and users authenticated, audits of backups in process, registration of a node and similar internode transactions, admin logins, TACACS, and portal logins, purge operations, etc. This information is stored exclusively on both the MNTs and retrieved on-demand in the form of reports onto the Primary Admin node. The reports are classified and organized for ease of diagnosis.
Note: It is recommended to host the Primary Admin and Primary MNT personas on different nodes, in order to avoid an overload of admin-http-pool and cpm-mnt threads on the same node.

Navigation between Reports
Under Operations, navigate to Reports >ISE Reports, the left pane has a list of the report categories, each of which is further branched into sub-categories, as shown in this image.

Each report has an info icon i, as shown in this image, which holds the description and logging categories required.

Most of the reports run automatically for the default filter today when accessed.
Certain reports like Health Summary require server selection, click Go to run, and view the report.

Filters
ISE allows you to customize the view of each report. The two filters available on ISE Reports are:
- Quick Filter
- Advanced Filter
Quick Filter
Quick Filter is available for all the single-section reports. Enter the search text in the fields under each column, the quick filter uses conditions such as contains, starts with, ends with, starts with or ends with, and multiple values with OR operator to get the required logs. Any combination of strings and asterisk is allowed in these fields. Further, the settings option on the right corner allows the admin to select specific columns to view in the reports.

Advanced Filter
As the name suggests, Advanced Filter allows the admin to create logical and customized filters and save the templates. In the Match rule drop-down, choose either All(AND operation-match all criteria) or Any(OR operation-match any one criteria). Click filter to run the report and view the results, as shown in this image.

Save to My Reports
This section in the Reports tab, allows the admin to save the frequently visited reports for easy access. It reduces the effort in search of the categories each time and these reports can be accessed from My Reports. In addition to the default view, one can customize the same report in several ways and add each iteration to this section for easy access.

Report Exports
The export option expands to three choices, as shown in this image.

A maximum of 5000 records can be exported to .csv excel file(can be saved locally or exported to a preconfigured repository) and up to 1000 records to a PDF file. These reports can only be exported as PDFs:
- Authentication Summary
- Health Summary
- Role-Based Access Control List (RBACL) Drop Summary(available only with the Cisco Catalyst 6500 series switches)
- Guest Sponsor summary
- Endpoint Profile Changes
- Network Device Session Status
Note: Ensure that UTF-8 encoding is enabled on Microsoft Excel to view non-English characters in the exported .csv files.
Export Summary:

Scheduled Reports
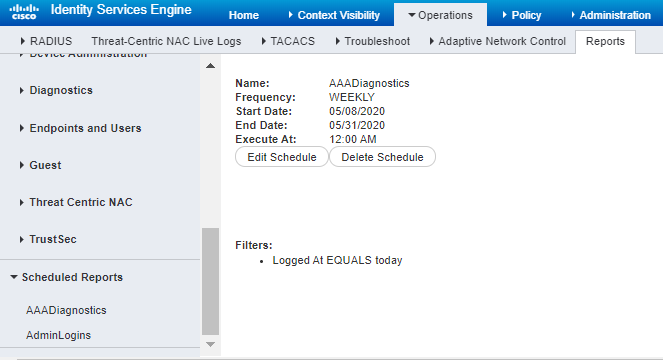
ISE reports allow you to customize, save, run the reports at timed intervals, and export to a remote repository. Email IDs can be added for notifications of successfully exported scheduled reports if the ISE is integrated with an SMTP Server(navigate to Administration > System > Settings).

Scheduled reports can be accessed later to edit the settings, as shown in this image.

For more information on how to monitor and troubleshoot ISE, refer toAdmin Guide.


 Feedback