Introduction
This document describes the compilation of attributes that various Cisco and non-Cisco products expect to receive from an AAA server like a Cisco ISE.
Background Information
Cisco and non-Cisco products expect to receive a compilation of attributes from an authentication, authorization, and accounting (AAA) server. In this case, the server is a Cisco ISE and the ISE would return these attributes along with an Access-Accept as a part of an authorization profile (RADIUS).
This document provides step-by-step instructions on how to add custom attribute authorization profiles and also contains a list of devices and the RADIUS attributes that the devices expect to see returned from the AAA server. All topics include examples.
The list of attributes provided in this document is neither exhaustive nor authoritative and can change at any time without an update to this document.
Device Administration of a network device is generally achieved with TACACS+ protocol but if the network device does not support TACACS+ or if ISE does not have a device administration license, it can be achieved with RADIUS as well if the network device supports RADIUS device administration. Some devices support both of the protocols and it is up to the users to decide which protocol to use but TACACS+ can be favorable as it has features such as command authorization and command accounting.
Prerequisites
Requirements
Cisco recommends you have the knowledge of these:
- Cisco ISE as a Radius server on the network of interest
- The workflow of the Radius protocol - RFC2865
The ISE deployment will require at least as many Essential licenses as the number of concurrent RADIUS sessions used for device administration managed via RADIUS.
Components Used
The information in this document is based on Cisco Identity Services Engine (ISE) 3.x and higher versions of ISE.
The information in this document was created from the devices in a specific lab environment. All of the devices used in this document started with a cleared (default) configuration. If your network is live, ensure that you understand the potential impact of any command.
Configure
Step 1. Create the Vendor-Specific Attributes (VSA).
There can be various dictionaries created for each of the vendors, and attributes can be added to each of these dictionaries. Each dictionary can have multiple attributes that can be used in the authorization profiles. Each attribute, in general, defines the different role of device administration a user could get when he logs in to the network device. However, the attribute can be intended for different purposes of operation or configuration on the network device.
ISE comes with pre-defined attributes for a few vendors. If the vendor is not listed, it can be added as a dictionary with attributes. For some network devices, the attributes are configurable and can be changed for various types of access, if that is the case, ISE has to be configured with attributes the network device expects for different types of access.
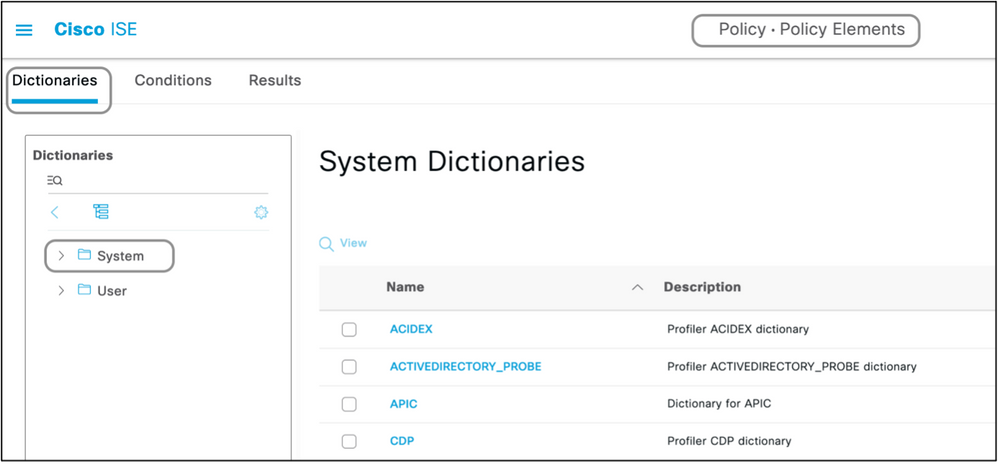
The attributes which are expected to be sent with a Radius Access-Accept are defined as here:
- Navigate to Policy > Policy Elements > Dictionaries > System > Radius > Radius Vendors > Add.
- The name and the Vendor IDs are to be entered and saved.
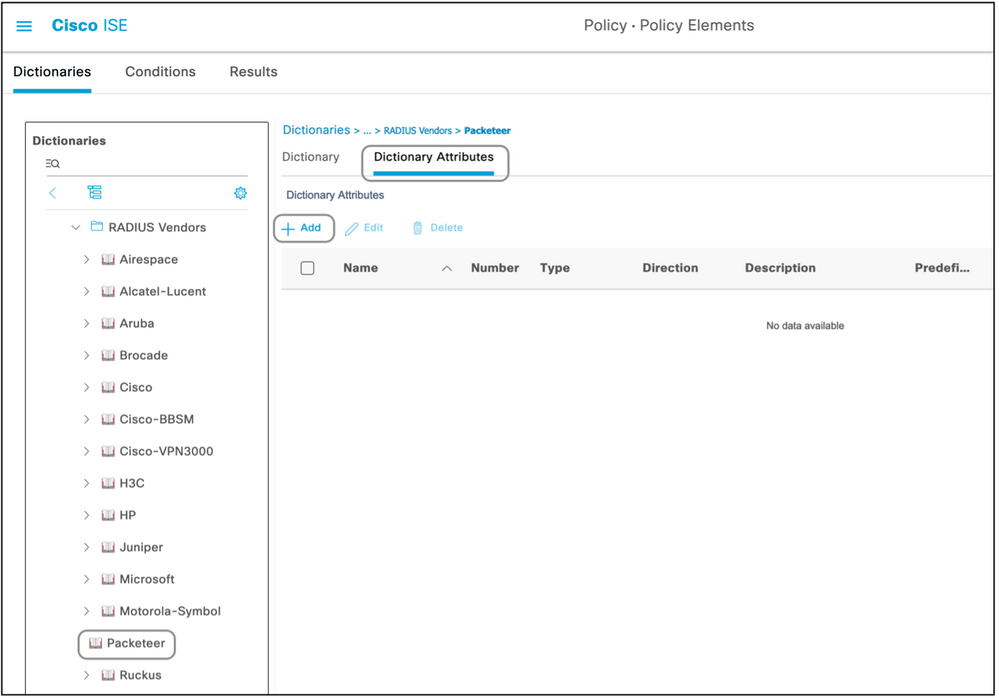
- Click the saved Radius Vendor and navigate to Dictionary Attributes.
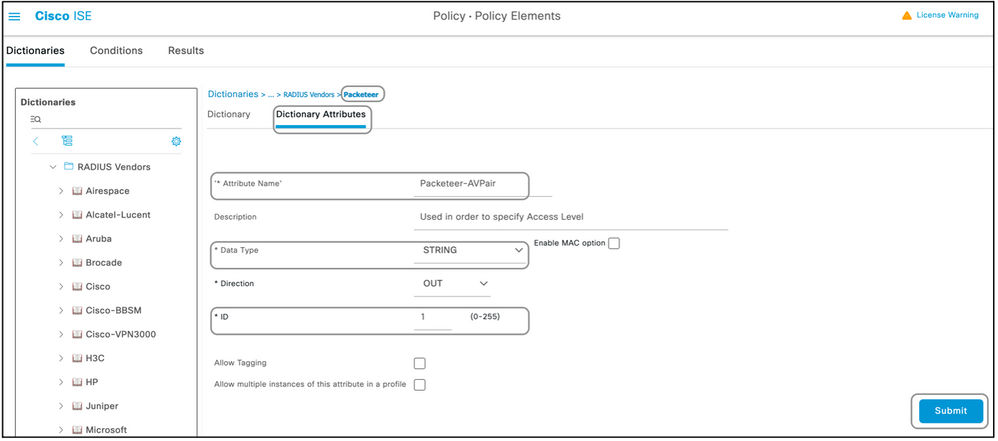
- Click Add and fill out the case sensitive Attribute Name, Data Type, Direction, and ID.
- Save the attribute.
- Add other Attributes on the same page if there are multiple Attributes to be added to the same Dictionary.
Note: Each of the fields entered as values in this section are to be provided by the vendor themselves. The vendor websites can be visited or vendor support can be contacted in case these are not known.


Note: Not all of the vendors require a specific dictionary to be added. If the vendor can use the radius attributes defined by IETF, which exist on ISE already, this step can be skipped.
Step 2. Create a Network Device Profile.
This section is not mandatory. A network device profile helps segregate the type of network device which is added and create appropriate authorization profiles for them. Just like radius dictionaries, ISE does have a few pre-defined profiles which can be used. If not already present, a new device profile can be created.
This is the procedure to add a network profile :
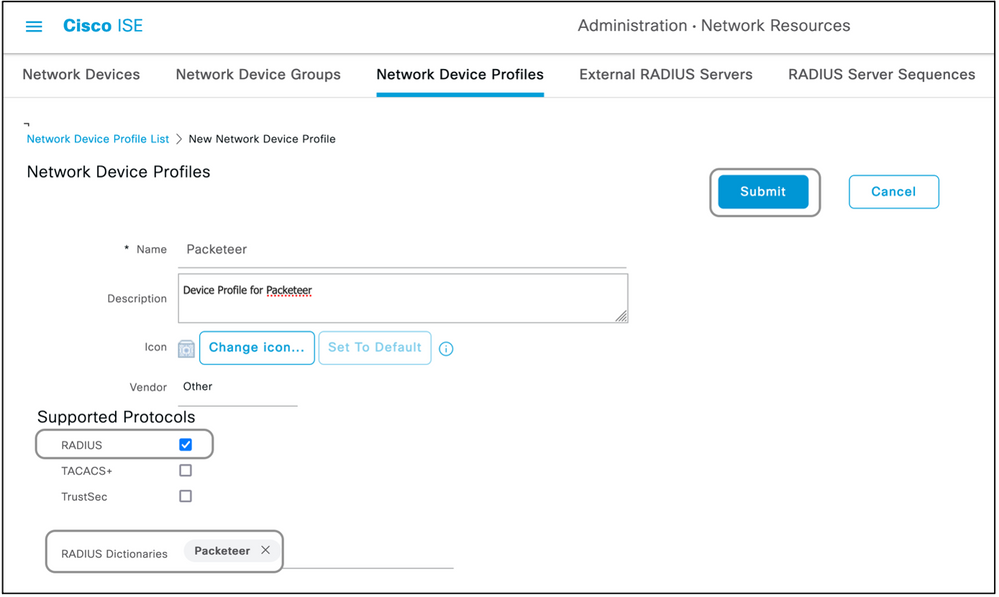
- Navigate to Administration > Network Resources > Network Device Profiles > Add.
- Give a name and check the box for RADIUS.
- Under the RADIUS Dictionaries, select the dictionary created in the previous section.
- If multiple dictionaries were created for the same type of device, all of them can be selected under RADIUS Dictionaries.
- Save the profile.

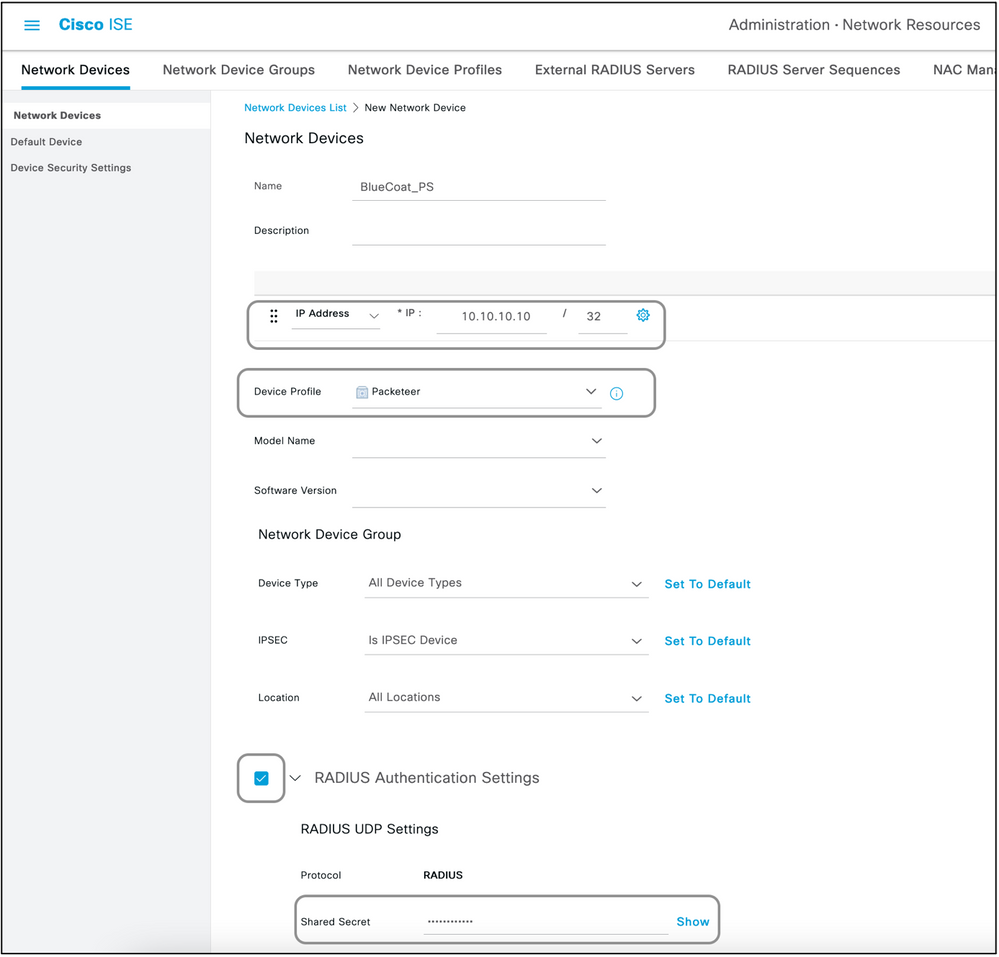
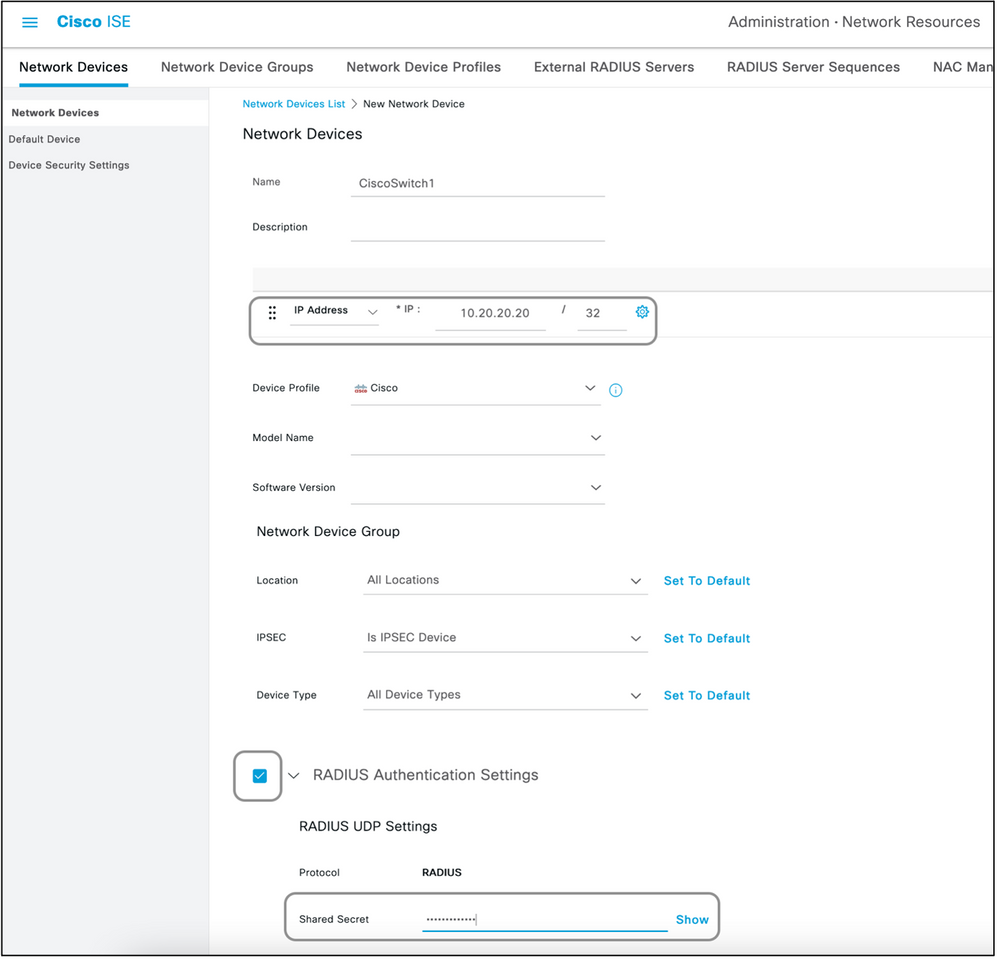
Step 3. Add the Network Device on ISE.
The network device on which device administration is achieved has to be added on ISE along with a key that is defined on the network device. On the network device, ISE is added as a radius AAA server with this key.
This is the procedure to add a device on ISE:
- Navigate to Administration > Network Resources > Network Devices > Add.
- Give a name and the IP address.
- The Device Profile can be chosen from the dropdown list to be the one defined in the previous section. If a profile was not created, the default Cisco can be used as it is.
- Check Radius Authentication Settings.
- Enter the Shared Secret Key and save the device.

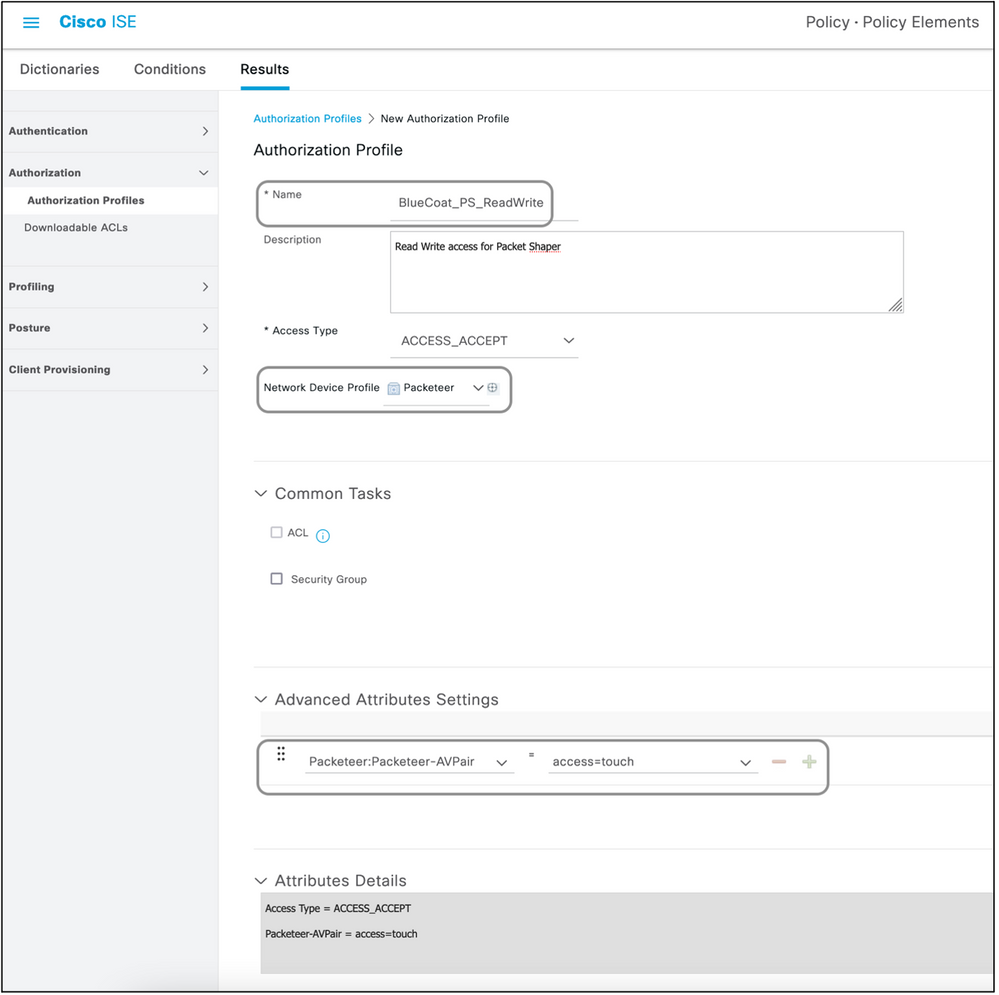
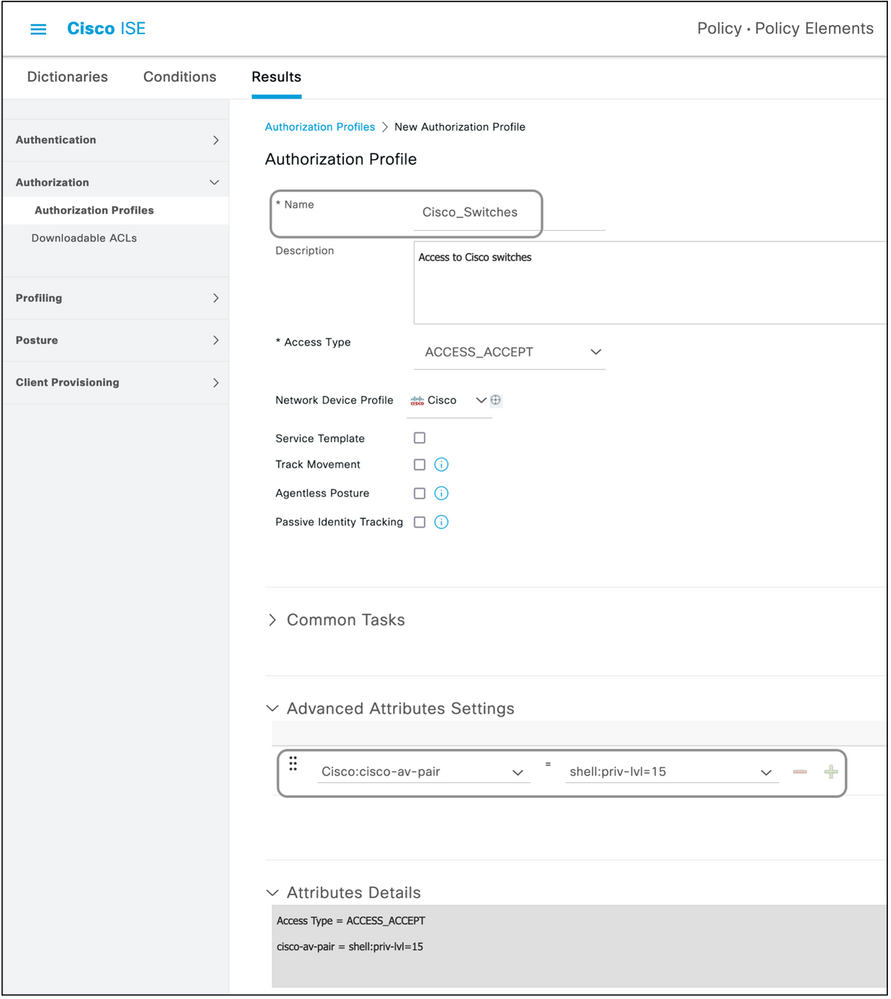
Step 4. Create Authorization Profiles.
The final result that is pushed from ISE as an Access-Accept or Access-Reject is defined in an authorization profile. Each authorization profile can push additional attributes that the network device expects.
This is the procedure to create an authorization profile:
- Navigate to Policy > Policy Elements > Results > Authorization > Authorization Profiles.
- Under the Standard Authorization Profiles, click Add.

The types of profiles that can be added are Access-Accept and Access-Reject.
Create an Access-Accept Profile
This profile is used for some kind of access to the network device. This profile can have multiple attributes passed along with it. Here are the steps:
- Give a sensible name and choose Access Type to be Access-Accept.
- Choose the network device profile which was created in one of the previous sections. If no profile was created, the default Cisco can be used.
- With different types of profiles chosen, the page here limits the options of configuration.
- Under Advanced Attributes Settings, choose the dictionary and the applicable attribute (LHS).
- Assign a value (RHS) to the attribute either from the dropdown if available or type out the value expected.
- If there are more attributes to be sent as part of the same result, click the + icon and repeat steps 4 and 5.
Create multiple Authorization Profiles for each of the results/roles/authorizations ISE is expected to send.
Note: The consolidated attributes can be verified under the Attribute Details field.
Create an Access-Reject Profile
This profile is used to send a rejection for device administration but can still be used to send attributes along with it. This is used to send a Radius Access-Reject packet. The steps remain the same except step one where Access-Reject has to be chosen instead of Access-Accept for the Access Type.
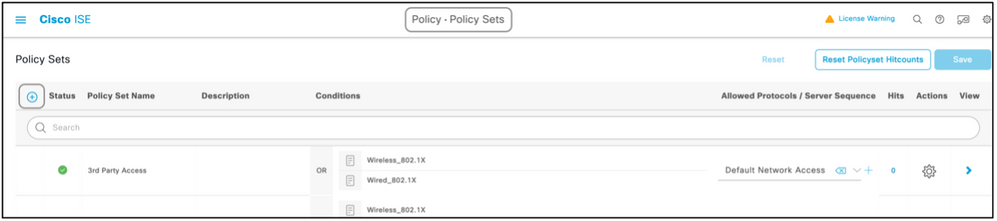
Step 5. Create a Policy Set.
Policy sets on ISE are evaluated top to down and the first one which satisfies the condition set in the policy sets is responsible for the ISE response to the Radius Access-Request packet sent by the network device. Cisco recommends a unique policy set for each type of device. The condition to evaluate the user authentication and authorization happen at evaluation. If ISE has external identity sources, it can be used for the type of authorization.
A typical policy set is created this way:
- Navigate to Policy > Policy Sets > +.
- Rename the New Policy Set 1.
- Set the condition to be unique for this device.
- Expand the Policy Set.
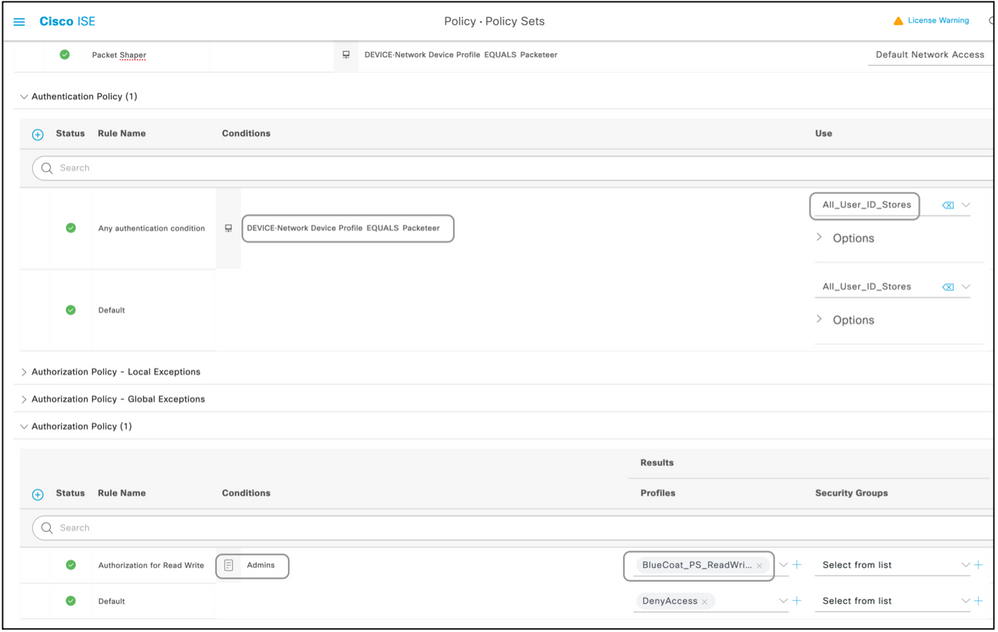
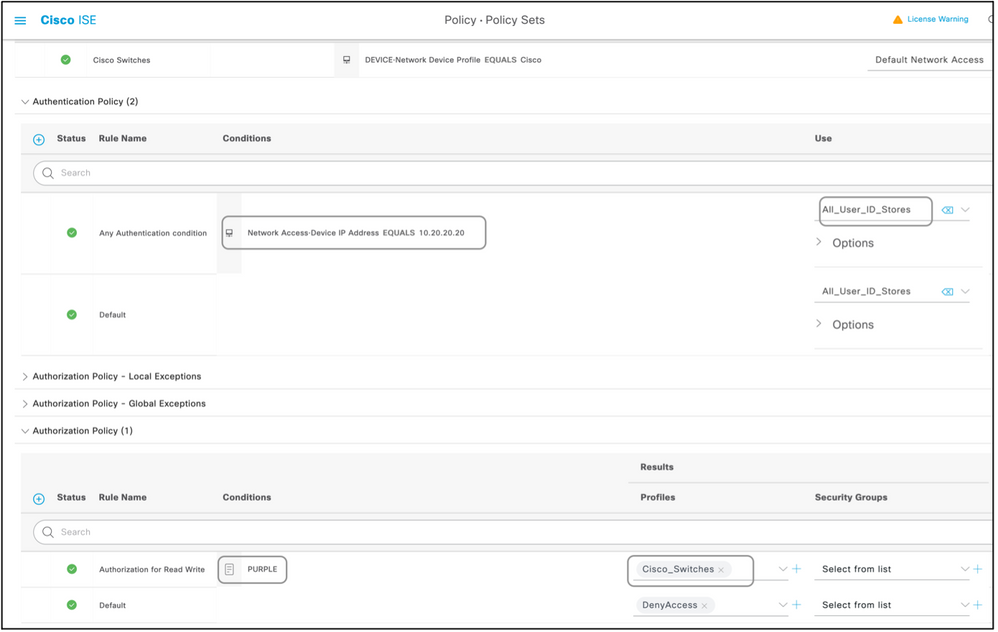
- Expand the Authentication Policy to set an authentication rule. The external source or the internal users are examples that can be used as an identity source sequence against which ISE would check for the user.
- The authentication policy is all set. The policy can be saved at this point.
- Expand the Authorization Policy to add the authorization conditions for the users. An example is to check for a particular AD group or ISE internal identity group. Name the rule likewise.
- The result for the authorization rule can be selected from the drop-down.
- Create multiple authorization rules for different types of access the vendor supports.


Device List
Any device that supports device administration with Radius can be added on ISE with a few modifications to all the steps mentioned in the previous section. Hence, this document has a list of devices that work with the information provided in this section. The list of attributes and values provided in this document is neither exhaustive nor authoritative and can change at any time without an update to this document. Please consult the vendor websites and vendor support for validation.
Aggregation Services Routers (ASR)
Separate dictionary and VSAs need not be created for this as it uses Cisco AV pairs which are already present on ISE.
Attribute(s): cisco-av-pair
Value(s): shell:tasks="#<role-name>,<permission>:<process>"
Usage:Set the values of<role-name>to the name of a role locally defined on the router. The role hierarchy can be described in terms of a tree, where the role#rootis at the top of the tree, and the role#leafadds additional commands. These two roles can be combined and passed back if:shell:tasks="#root,#leaf".
Permissions can also be passed back on an individual process basis, so that a user can be granted read, write, and execute privileges for certain processes. For example, in order to grant a user read and write privileges for the BGP process, set the value to:shell:tasks="#root,rw:bgp". The order of the attributes does not matter; the result is the same whether the value is set toshell:tasks="#root,rw:bgp"or toshell:tasks="rw:bgp,#root".
Example: Add the Attribute to an Authorization Profile.
| Dictionary Type |
RADIUS Attribute |
Attribute Type |
Attribute Value |
| RADIUS-Cisco |
cisco-av-pair |
String |
shell:tasks="#root,#leaf,rwx:bgp,r:ospf" |
Cisco Switches IOS® and Cisco IOS® XE
Separate dictionary and VSAs need not be created for this as it uses RADIUS attributes that are already present on ISE.
Attribute(s):cisco-av-pair
Value(s):shell:priv-lvl=<level>
Usage:Set the values of<level>to the numbers which are basically the number of privileges to be sent. Typically, if 15 is sent, it means read-write, if 7 is sent it means read-only.
Example: Add the Attribute to an Authorization Profile.
| Dictionary Type |
RADIUS Attribute |
Attribute Type |
Attribute Value |
| RADIUS-Cisco |
cisco-av-pair |
String |
shell:priv-lvl=15 |
BlueCoat Packet Shaper
Attribute(s):Packeteer-AVPair
Value(s):access=<level>
Usage:<level>is the level of access to grant. Touch access is equivalent to read-write, while look access is equivalent to read-only.
Create a Dictionary as shown in this document with these values:
- Name: Packeteer
- Vendor ID: 2334
- Vendor Length Field Size: 1
- Vendor Type Field Size: 1
Enter the details of the attribute:
- Attribute:Packeteer-AVPair
- Description: Used in order to specify the access level
- Vendor Attribute ID: 1
- Direction: OUT
- Multiple Allowed: False
- Allow Tagging: Unchecked
- Attribute Type: String
Example: Add the Attribute to an Authorization Profile (for read-only access).
| Dictionary Type |
RADIUS Attribute |
Attribute Type |
Attribute Value |
| RADIUS-Packeteer |
Packeteer-AVPair |
String |
access=look |
Example: Add the Attribute to an Authorization Profile (for read-write access).
| Dictionary Type |
RADIUS Attribute |
Attribute Type |
Attribute Value |
| RADIUS-Packeteer |
Packeteer-AVPair |
String |
access=touch |
BlueCoat Proxy Server (AV/SG)
Attribute(s): Blue-Coat-Authorization
Value(s): <level>
Usage:<level>is the level of access to grant. 0 means no access, 1 means read-only access while 2 means read-write access. Blue-Coat-Authorization attribute is the one responsible for the level of access.
Create a Dictionary as shown in this document with these values:
- Name: BlueCoat
- Vendor ID: 14501
- Vendor Length Field Size: 1
- Vendor Type Field Size: 1
Enter the details of the attribute:
- Attribute: Blue-Coat-Group
- Vendor Attribute ID: 1
- Direction: BOTH
- Multiple Allowed: False
- Allow Tagging: Unchecked
- Attribute Type: Unsigned Integer 32 (UINT32)
Enter the details of the second attribute:
- Attribute: Blue-Coat-Authorization
- Description: Used in order to specify the access level
- Vendor Attribute ID: 2
- Direction: BOTH
- Multiple Allowed: False
- Allow Tagging: Unchecked
- Attribute Type: Unsigned Integer 32 (UINT32)
Example: Add the Attribute to an Authorization Profile (for no access).
| Dictionary Type |
RADIUS Attribute |
Attribute Type |
Attribute Value |
| RADIUS-BlueCoat |
Blue-Coat-Group |
UINT32 |
0 |
Example: Add the Attribute to an Authorization Profile (for read-only access).
| Dictionary Type |
RADIUS Attribute |
Attribute Type |
Attribute Value |
| RADIUS-BlueCoat |
Blue-Coat-Group |
UINT32 |
1 |
Example: Add the Attribute to an Authorization Profile (for read-write access).
| Dictionary Type |
RADIUS Attribute |
Attribute Type |
Attribute Value |
| RADIUS-BlueCoat |
Blue-Coat-Group |
UINT32 |
2 |
Brocade Switches
Separate dictionary and VSAs need not be created for this as it uses RADIUS attributes that are already present on ISE.
Attribute(s): Tunnel-Private-Group-ID
Value(s):U:<VLAN1>; T:<VLAN2>
Usage:Set<VLAN1>to the value of the data VLAN. Set<VLAN2>to the value of the voice VLAN. In this example, the data VLAN is VLAN 10, and the voice VLAN is VLAN 21.
Example: Add the Attribute to an Authorization Profile.
| Dictionary Type |
RADIUS Attribute |
Attribute Type |
Attribute Value |
| RADIUS-IETF |
Tunnel-Private-Group-ID |
Tagged String |
U:10;T:21 |
Infoblox
Attribute(s):Infoblox-Group-Info
Value(s):<group-name>
Usage:<group-name>is the name of the group with the privileges that the user is granted. This group must be configured on the Infoblox device. In this configuration example, the group name is MyGroup.
Create a Dictionary as shown in this document with these values:
- Name: Infoblox
- Vendor ID: 7779
- Vendor Length Field Size: 1
- Vendor Type Field Size: 1
Enter the details of the attribute:
- Attribute:Infoblox-Group-Info
- Vendor Attribute ID: 009
- Direction: OUT
- Multiple Allowed: False
- Allow Tagging: Unchecked
- Attribute Type: String
Example: Add the Attribute to an Authorization Profile.
| Dictionary Type |
RADIUS Attribute |
Attribute Type |
Attribute Value |
| RADIUS-Infoblox |
Infoblox-Group-Info |
String |
MyGroup |
Cisco Firepower Management Center
Separate dictionary and VSAs need not be created for this as it uses RADIUS attributes that are already present on ISE.
Attribute(s):cisco-av-pair
Value(s): Class–[25]=<role>
Usage:Set the values of<role>to the names of roles locally defined on the FMC. Create multiple roles such as admin and read-only user on the FMC and assign the values to the attributes on ISE to be received by the FMC likewise.
Example: Add the Attribute to an Authorization Profile.
| Dictionary Type |
RADIUS Attribute |
Attribute Type |
Attribute Value |
| RADIUS-Cisco |
cisco-av-pair |
String |
Class–[25]=NetAdmins |
Nexus Switches
Separate dictionary and VSAs need not be created for this as it uses RADIUS attributes that are already present on ISE.
Attribute(s):cisco-av-pair
Value(s):shell:roles="<role1> <role2>"
Usage:Set the values of<role1>and<role2>to the names of roles locally defined on the switch. When multiple roles are created, separate them with a space character. When multiple roles are passed back from the AAA server to the Nexus switch, the result is that the user has access to commands defined by the union of all three roles.
The built-in roles are defined inConfigure User Accounts and RBAC.
Example: Add the Attribute to an Authorization Profile.
| Dictionary Type |
RADIUS Attribute |
Attribute Type |
Attribute Value |
| RADIUS-Cisco |
cisco-av-pair |
String |
shell:roles="network-admin vdc-admin vdc-operator" |
Wireless LAN Controller (WLC)
Separate dictionary and VSAs need not be created for this as it uses RADIUS attributes that are already present on ISE.
Attribute(s):Service-Type
Value(s):Administrative (6) / NAS-Prompt (7)
Usage:In order to grant the user read/write access to the Wireless LAN Controller (WLC), the value must be Administrative; for read-only access, the value must be NAS-Prompt.
For details, seeRADIUS Server Authentication of Management Users on Wireless LAN Controller (WLC) Configuration Example
Example: Add the Attribute to an Authorization Profile (for read-only access).
| Dictionary Type |
RADIUS Attribute |
Attribute Type |
Attribute Value |
| RADIUS-IETF |
Service-Type |
Enumeration |
NAS-Prompt |
Example: Add the Attribute to an Authorization Profile (for read-write access).
| Dictionary Type |
RADIUS Attribute |
Attribute Type |
Attribute Value |
| RADIUS-IETF |
Service-Type |
Enumeration |
Administrative |
Data Center Network Manager (DCNM)
DCNM must be restarted after the authentication method is changed. Otherwise, it can assign network-operator privilege instead of network-admin.
Separate dictionary and VSAs need not be created for this as it uses RADIUS attributes that are already present on ISE.
Attribute(s):cisco-av-pair
Value(s):shell:roles=<role>
| DCNM Role |
RADIUS Cisco-AV-Pair |
| User |
shell:roles = "network-operator" |
| Administrator |
shell:roles = "network-admin" |
AudioCodes
Attribute(s): ACL-Auth-Level
Value(s): ACL-Auth-Level = "<integer>"
Usage:<integer>is the level of access to grant. A value of ACL-Auth-Level attribute with name ACL-Auth-UserLevel of 50 for the user, a value of ACL-Auth-Level attribute with name ACL-Auth-AdminLevel of value100 for admin and value of ACL-Auth-Level with name ACL-Auth-SecurityAdminLevel of value 200 for security admin. The names can be skipped and the values for attributes can be given directly as value for the authorization profile advanced AV pair.
Create a Dictionary as shown in this document with these values:
- Name: AudioCodes
- Vendor ID: 5003
- Vendor Length Field Size: 1
- Vendor Type Field Size: 1
Enter the details of the attribute:
- Attribute: ACL-Auth-Level
- Description: Used in order to specify the access level
- Vendor Attribute ID: 35
- Direction: OUT
- Multiple Allowed: False
- Allow Tagging: Unchecked
- Attribute Type: Integer
Example: Add the Attribute to an Authorization Profile (for user).
| Dictionary Type |
RADIUS Attribute |
Attribute Type |
Attribute Value |
| RADIUS-AudioCodes |
ACL-Auth-Level |
Integer |
50 |
Example: Add the Attribute to an Authorization Profile (for admin).
| Dictionary Type |
RADIUS Attribute |
Attribute Type |
Attribute Value |
| RADIUS-AudioCodes |
ACL-Auth-Level |
Integer |
100 |
Example: Add the Attribute to an Authorization Profile (for security admin).
| Dictionary Type |
RADIUS Attribute |
Attribute Type |
Attribute Value |
| RADIUS-AudioCodes |
ACL-Auth-Level |
Integer |
200 |
 Feedback