Introduction
This document describes how to configure NTP authentication on Cisco Identity Services Engine (ISE) and troubleshoot the NTP authentication issues.
Prerequisites
Requirements
It is recommended that you have knowledge of these topics:
- Cisco ISE CLI configuration
- Basic knowledge of Network Time Protocol (NTP)
Components Used
The information in this document is based on these software and hardware versions:
- ISE 2.7 standalone node
- CISCO2911/K9 Version 15.2(1)T2
The information in this document was created from the devices in a specific lab environment. All of the devices used in this document started with a cleared (default) configuration. If your network is live, ensure that you understand the potential impact of any command.
Configure
Network Diagram

Configurations
Before you Begin
You must have either the Super Admin or System Admin administrator role assigned for ISE access.
Ensure that the NTP port is not blocked in the transit path between ISE and NTP server(s).
It is assumed that you have your NTP servers configured on ISE. If you want to change your NTP server(s), navigate to Administration > System > Settings > System Time. For a short video, you can see ISE NTP Configuration
Note: In the case of distributed deployment, choose the same Network Time Protocol (NTP) server for all the nodes. To avoid timezone issues among the nodes, you must provide the same NTP server name while installation of each node. This ensures that the reports and logs from the various nodes in your deployment are always synchronized with timestamps.
Note: You cannot change the timezone from GUI. You can do that via CLI which requires ISE service restart for that particular node. It is recommended that you use the preferred time zone (default UTC) at the time of installation when the initial setup wizard prompts you for the time zones. Please see Cisco bug ID CSCvo49755  related to enable the CLI clock timezone command.
If you have both primary and secondary Cisco ISE nodes in your deployment, you must log in to the user interface of each node and configure the system time and Network Time Protocol (NTP) server settings.
You can configure the NTP authentication in ISE either from GUI or CLI.
GUI Steps
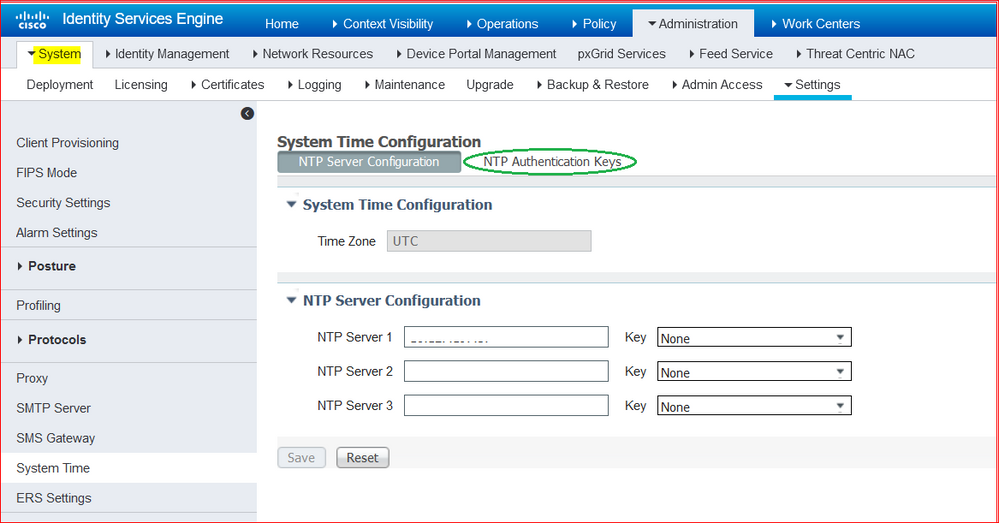
Step 1. Navigate to Administration > System > Settings > System Time and click NTP Authentication Keys, as shown in this image.

Step 2. Here you can add one or more authentication keys. Click Add, then you get a pop-up. Here, the Key ID field supports numeric values between 1 to 65535 and the Key Value field supports up to 15 alphanumeric characters. The Key Value is the actual NTP key that is used to authenticate ISE as the client to the NTP server. Also, the key ID must match with the one configured on the NTP server. Choose the required Hashed Message Authentication Code (HMAC) value from the HMAC drop-down list.

Step 3. Click OK and then Save Authentication Keys. You return to the NTP Server Configuration tab.
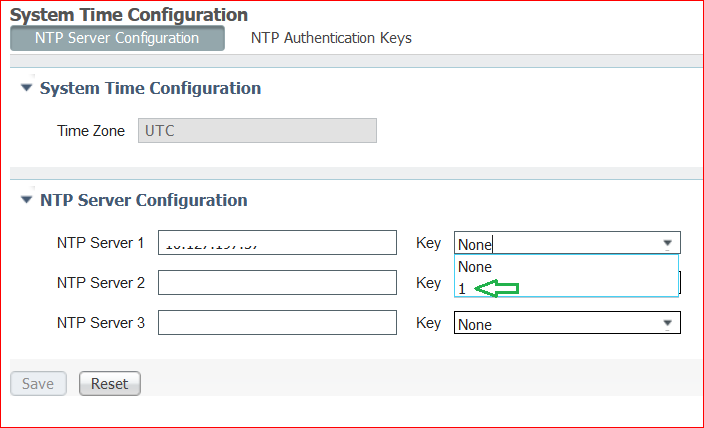
Step 4. Now in the key drop-down, you see the key ID which you configured in step 3. Click the respective key ID if you have multiple key IDs configured. Then, click Save.

CLI Steps
Step 1. Configure the NTP authentication key.
admin(config)# ntp authentication-key ?
<1-65535> Key number >>> This is the Key ID
admin(config)# ntp authentication-key 1 ? >>> Here you can choose the HMAC value
md5 MD5 authentication
sha1 SHA1 authentication
sha256 SHA256 authentication
sha512 SHA512 authentication
admin(config)# ntp authentication-key 1 md5 ? >>> You can choose either to paste the hash of the actual key or type the key in plain text.
hash Specifies an ENCRYPTED (hashed) key follows
plain Specifies an UNENCRYPTED plain text key follows

admin(config)# ntp authentication-key 1 md5 plain Ntp123 >>> Ensure there are no spaces given at the end of the key.
Step 2. Define the NTP server and associate the key ID configured in step 1.
admin(config)# ntp server IP/HOSTNAME ?
key Peer key number
<cr> Carriage return.

admin(config)# ntp serve IP/HOSTNAME key ?
<1-65535>

admin(config)# ntp serve IP/HOSTNAME key 1 ?
<cr> Carriage return.

admin(config)# ntp serve IP/HOSTNAME key 1
Configuration on Router
The router acts as an NTP server. Configure these commands to enable the router as an NTP server with NTP authentication.
ntp authentication-key 1 md5 Ntp123 >>> The same key that you configured on ISE
ntp authenticate
ntp master STRATUM
Verify
On ISE:
Use the show ntp command. If the NTP authentication is successful, you must see the ISE to be synchronized with the NTP server.
admin# sh ntp
Configured NTP Servers:
NTP_SERVER_IP

Reference ID : 0A6A23B1 (NTP_SERVER_IP)
Stratum : 3
Ref time (UTC) : Fri Mar 26 09:14:31 2021
System time : 0.000008235 seconds fast of NTP time
Last offset : +0.000003193 seconds
RMS offset : 0.000020295 seconds
Frequency : 10.472 ppm slow
Residual freq : +0.000 ppm
Skew : 0.018 ppm
Root delay : 0.000571255 seconds
Root dispersion : 0.000375993 seconds
Update interval : 519.3 seconds
Leap status : Normal >>> If there is any issue in NTP synchronization, it shows "Not synchronised".

210 Number of sources = 1
MS Name/IP address Stratum Poll Reach LastRx Last sample
===============================================================================
^* NTP_SERVER_IP 2 9 377 100 +3853ns[+7046ns] +/- 684us

M indicates the mode of the source.
^ server, = peer, # local reference clock.

S indicates the state of the sources.
* Current time source, + Candidate, x False ticker, ? Connectivity lost, ~ Too much variability

Warning: Output results can conflict at the time of changing synchronization.

admin#
Troubleshoot
This section provides the information you can use in order to troubleshoot your configuration.
- If the NTP authentication does not work, the first step to ensure is the reachability between ISE and NTP server.
- Ensure the key ID configuration matches on ISE and on the NTP server.
- Ensure the key ID is configured as trusted-key on the NTP server.
- The older versions of ISE like 2.4 and 2.6 support the ntp trusted-key command. So ensure that you have configured the NTP key as trusted-key on these ISE versions.
- ISE 2.7 introduces a change in behavior for NTP synchronization. While previous versions use ntpd, 2.7 and higher versions make use of chrony. Chrony has different requirements than ntpd. One of the most noticeable ones is that while ntpd synchronizes with servers that have a root dispersion of up to 10 seconds, chrony only synchronizes when the root dispersion is under 3 seconds. This causes the NTP servers that were able to synchronize pre-upgrade, to go out of sync on 2.7 without any evident reason.
Because of this change, NTP sync issues would be seen frequently if you use the Windows NTP server as they report very large root dispersion (3 or more seconds) and this causes the chrony to ignore the NTP server as too inaccurate.
Reference Defects
Cisco bug ID CSCvw78019
Cisco bug ID CSCvw03693
Related Information


 Feedback