Introduction
This document describes how to integrate Intune Mobile Device Management (MDM) with Cisco Identity Services Engine (ISE).
Prerequisites
Requirements
Cisco recommends that you have knowledge of these topics:
- Knowledge of MDM Services in Cisco ISE
- Knowledge of Microsoft Azure Intune Services
Components Used
The information in this document is based on these software and hardware versions:
- Cisco Identity Services Engine 3.0
- Microsoft Azure Intune Application
The information in this document was created from the devices in a specific lab environment. All of the devices used in this document started with a cleared (default) configuration. If your network is live, ensure that you understand the potential impact of any command.
Background Information
MDM servers secure, monitor, manage, and support mobile devices deployed across mobile operators, service providers, and enterprises. These servers act as the policy server that controls the use of some applications on a mobile device (for example, an email application) in the deployed environment. However, the network is the only entity that can provide granular access to endpoints based on Access Control Lists (ACLs). ISE queries the MDM servers for the necessary device attributes in order to create ACLs that provide network access control for those devices. Cisco ISE integrates with Microsoft Intune MDM Server in order to help organizations secure corporate data when devices try to access on-premises resources.
Configure
Network Diagram

Configure Microsoft Intune
Import the Certificates from the Intune Portal to the ISE Trusted Store
Log in to the Intune Admin Console or Azure Admin console, whichever site has your tenant. Use the browser in order to get the certificate details:
Step 1. Open the Microsoft Azure portal from a web browser.
Step 2. Click the lock symbol in the browser toolbar, then click View Certificates.
Step 3. In the Certificate window, click the Certification Path tab. An example is shown here:

Step 4. Find Baltimore Cyber Trust root, which is the usual Root CA. However, if there is any other different Root CA, click that Root CA certificate. On the Details tab of that Root CA certificate, you can copy it to the file and save it as BASE64 cert.
Step 5. In ISE, navigate to Administration > System > Certificates > Trusted Certificates, and import the root certificate that was just saved. Give the certificate a meaningful name, such as Azure MDM. Repeat the procedure for the intermediate CA certificates as well.
Deploy ISE as an Application in the Azure Portal
Step 1. Navigate to the Azure Active Directory and choose App registrations.

Step 2. In App registrations, create a new application registration with the ISE name. Click Create as shown in this image.
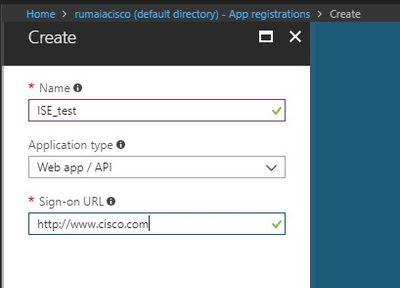
Step 3. Choose Settings in order to edit the application and add the required components.

Step 4. Under Settings, choose the required permissions, and apply these options:
- Microsoft Graph
- Delegated Permissions
- Read Microsoft Intune Device Configuration and Policies
- Read Microsoft Intune Configuration
- Sign users in
- Access the data of the user anytime
- Microsoft Intune API
- Get device state and compliance information from Microsoft Intune
- Windows Azure Active Directory
- Delegated Permissions
- Read directory data
- Sign in and read the user profile
The result of the configuration looks similar to what is shown here:

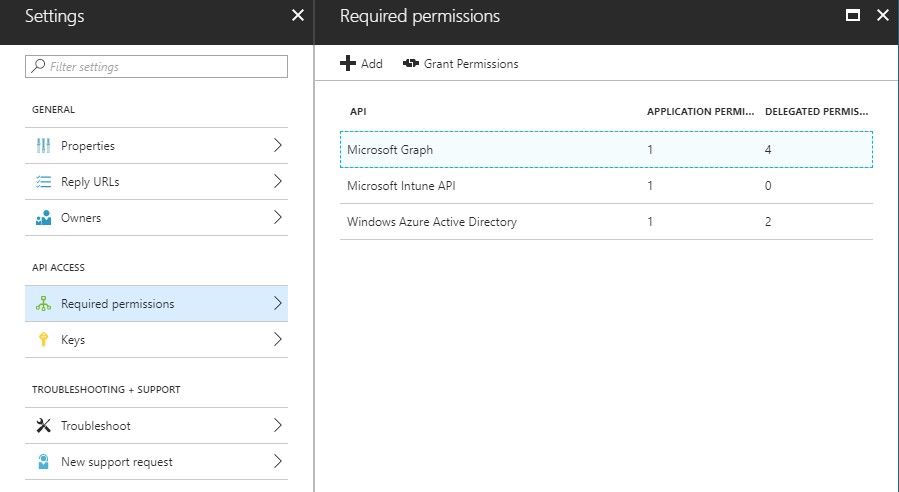
Step 5. Click Grant Permissions in order to confirm all the application permissions. This process takes 5-10 minutes to take effect. Edit the Azure Manifest file for the application created in order to import internal ISE CA certificates.
Import ISE Certificates to the Application in Azure
Step 1. Download the manifest file for the application.

Note: It is a file with a JSON extension. Do not edit the file name or the extension, otherwise, it fails.
Step 2. Export the ISE system certificate from all the nodes. On the PAN, navigate to Administration > System > Certificates > System Certificates, choose the Default self-signed server certificate, and click Export.. Choose Export Certificate Only(default), and choose a place to save it. Delete the BEGIN and END tags from the certificate and copy the rest of the text as a single line. This is applicable for versions before June 2020 described in the Legacy Option section.
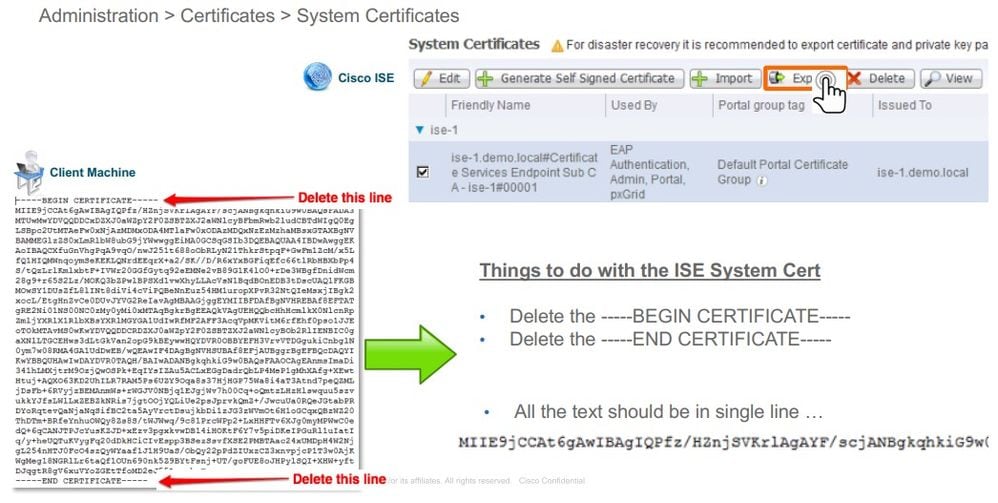
As of June 2020, The Portal allows you to upload certificates directly.

Legacy Option:
Step 1. Run a PowerShell procedure in order to turn the certificate to BASE64 and properly import it to the Azure JSON manifest file. Use the Windows PowerShell or Windows PowerShell ISE application from Windows. Use these commands:
$cer = New-Object System.Security.Cryptography.X509Certificates.X509Certificate2
$cer.Import(“mycer.cer”)
$bin = $cer.GetRawCertData()
$base64Value = [System.Convert]::ToBase64String($bin)

$bin = $cer.GetCertHash()
$base64Thumbprint = [System.Convert]::ToBase64String($bin)

$keyid = [System.Guid]::NewGuid().ToString()
Step 2. Keep the values for $base64Thumbprint, $base64Value, and $keyid, which are used in the next step. All these values are added to the JSON field keyCredentialssince by default, it looks like this:

In order to do so, ensure you use the values in this order:
"keyCredentials": [

  {

  “customKeyIdentifier“: “$base64Thumbprint_from_powerShell_for_PPAN”,

  “keyId“: “$keyid_from_above_PPAN“,

  "type": "AsymmetricX509Cert",

  "usage": "Verify",

  "value": "Base64 Encoded String of ISE PPAN cert"

  },

  {

  “customKeyIdentifier“: “$base64Thumbprint_from_powerShell_for_SPAN”,

  “keyId“: “$keyid_from_above_SPAN“,

  "type": "AsymmetricX509Cert",

  "usage": "Verify",

  "value": "Base64 Encoded String of ISE SPAN cert"

  }
],
Step 3. Upload the edited JSON file to Azure Portal in order to validate the keyCredentials from the certificates used on ISE.
It must look similar to this:

Step 4. Be aware that after the Upload, the value field under keyCredentials shows null since this is enforced by the Microsoft side to not allow these values to be seen after the first Upload.
The values required to add the MDM server in ISE can be copied from Microsoft Azure AD Graph API Endpoint and OAUTH 2.0 Token Endpoint.

These values must be entered in the ISE GUI. Navigate to Administration > Network Resources > External MDM and add a new server:
|
ISE
|
Intune
|
|
Auto Discovery URL
|
Endpoints > Microsoft Azure AD Graph API Endpoint
|
|
Client ID
|
{Registered-App-Name} > Application ID
|
|
Token Issuing URL
|
Endpoints > OAuth 2.0 Token Endpoint
|
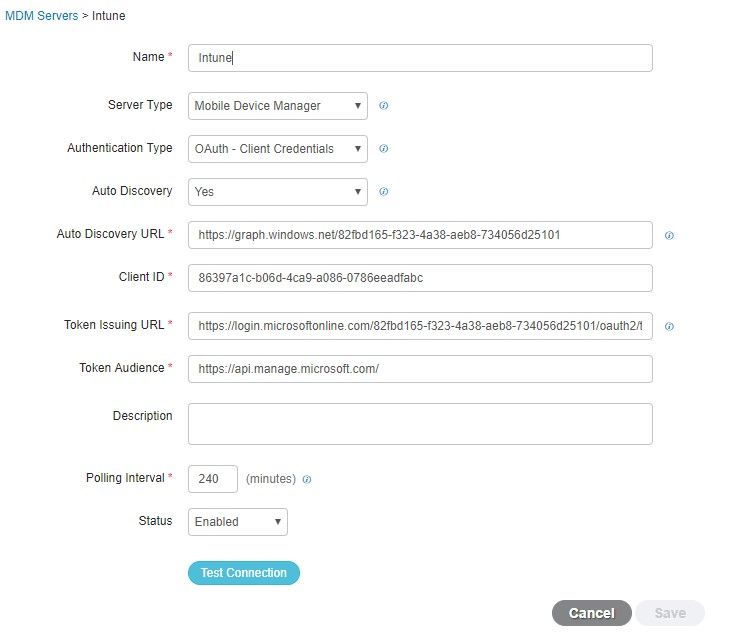
After the configuration is complete, the status shows enabled.

Verify and Troubleshoot
"Connection to the server failed" based on sun.security.validator.ValidatorException

Step 1. Collect the support bundle with these logs at the TRACE level:
portal (guest.log)mdmportal (ise-psc.log)external-mdm (ise-psc.log)
Step 2. Check ise-psc.log for these logs:
2016-10-17 12:45:52,158 DEBUG [admin-http-pool9300][] cisco.cpm.mdm.authtoken.MdmAzureActiveDirectoryClient -::::- ClientId - a46a6fd7-4a31-4471-9078-59cb2bb6a5ab, Token issuance endpoint - https://loginmicrosoftonline.com/273106dc-2878-42eb-b7c8-069dcf334687/oauth2/token, ResourceId/App Id uri - https://graph.windows.net2016-10-17 12:45:52,329 DEBUG [admin-http-pool9300][] cisco.cpm.mdm.authtoken.MdmCertAndKeyUtil -::::- Certificate Friendly Name -USMEM-AM01-ISE.Sncorp.smith-nephew.com#USMEM-AM01-ISE.Sncorp.smith-nephew.com#000032016-10-17 12:45:52,354 DEBUG [admin-http-pool9300][] cisco.cpm.mdm.authtoken.MdmCertAndKeyUtil -::::- Result of command invocation2016-10-17 12:45:52,363 DEBUG [admin-http-pool9300][] cisco.cpm.mdm.authtoken.MdmCertAndKeyUtil -::::- Result of command invocation2016-10-17 12:45:52,364 DEBUG [admin-http-pool9300][] cisco.cpm.mdm.authtoken.MdmCertAndKeyUtil -::::- Successfuly decrypted private key2016-10-17 12:45:52,794 ERROR [admin-http-pool9300][] cisco.cpm.mdm.authtoken.MdmAzureActiveDirectoryClient -::::- There is a problem with the Azure certificates or ISE trust store. sun.security.validator.ValidatorException: PKIX path building failed: sun.security.provider.certpath.SunCertPathBuilderException: unable to find valid certification path to requested target2016-10-17 12:45:52,794 ERROR [admin-http-pool9300][] cisco.cpm.mdm.authtoken.MdmAzureActiveDirectoryClient -::::- Unable to acquire access token from Azurejava.util.concurrent.ExecutionException: javax.net.ssl.SSLHandshakeException: sun.security.validator.ValidatorException: PKIX path building failed: sun.security.provider.certpath.SunCertPathBuilderException: unable to find valid certification path to requested target
This indicates that there is a need to import the graph.microsoft.com certificate, present on this page.

Step 3. Click the lockericon and check the certificate details.
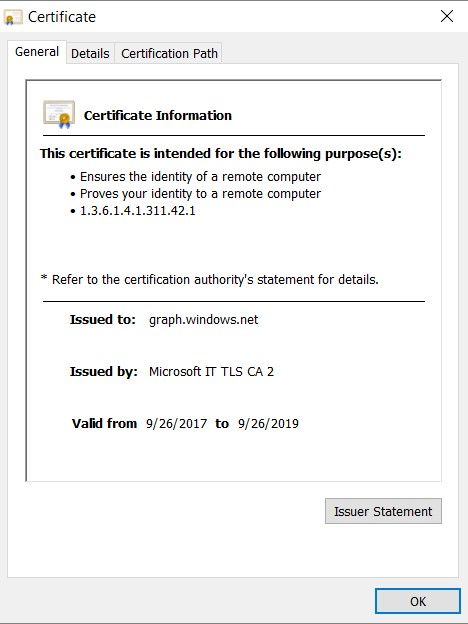
Step 4. Save it to a file in BASE64 format and import it to ISE Trusted Store. Ensure you import the full certificate chain. After this, test the connection to the MDM server again.
Failed to Acquire Auth Token from Azure AD
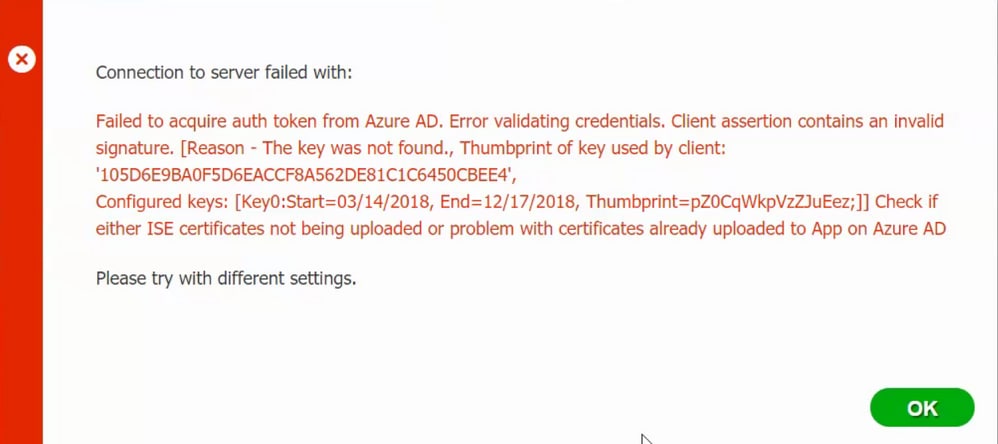
Usually, this error occurs when the manifest JSON file contains the wrong ISE certificate chain. Before you upload the manifest file to Azure, verify if at least this configuration is present:
"keyCredentials": [
  {
  “customKeyIdentifier“: “$base64Thumbprint_from_powerShell_for_PPAN”,
  “keyId“: “$keyid_from_above_PPAN“,
  "type": "AsymmetricX509Cert",
  "usage": "Verify",
  "value": "Base64 Encoded String of ISE PPAN cert"
  },
  {
  “customKeyIdentifier“: “$base64Thumbprint_from_powerShell_for_SPAN”,
  “keyId“: “$keyid_from_above_SPAN“,
  "type": "AsymmetricX509Cert",
  "usage": "Verify",
  "value": "Base64 Encoded String of ISE SPAN cert"
  }
}
],
The previous example is based on a scenario where there is a PAN and SAN. Run the scripts from PowerShell again and import the proper BASE64 values. Try to upload the manifest file and you must not face any errors.
$cer = New-Object System.Security.Cryptography.X509Certificates.X509Certificate2
$cer.Import(“mycer.cer”)
$bin = $cer.GetRawCertData()
$base64Value = [System.Convert]::ToBase64String($bin)

$bin = $cer.GetCertHash()
$base64Thumbprint = [System.Convert]::ToBase64String($bin)

$keyid = [System.Guid]::NewGuid().ToString()
Remember to apply the values for $base64Thumbprint, $base64Value and $keyid as mentioned in the steps in the Configure section.
Failed to Acquire Auth Token from Azure AD

Often this error occurs when the right permissions are not given to the Azure app in portal.azure.com. Verify that your app has the correct attributes and ensure that you click Grant Permissions after every change.
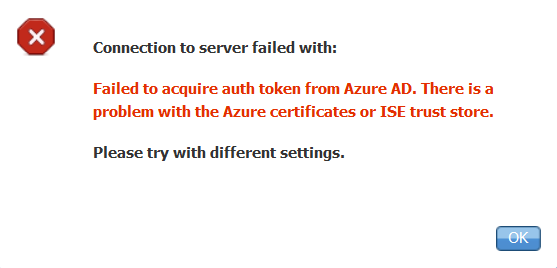
This message occurs when ISE tries to access the Token Issuing URL and it returns a certificate that the ISE does not. Ensure the full CA chain is in the ISE trust store. If the issue still persists after the correct certificate is installed in the trusted store of ISE, perform packet captures and test connectivity in order to see what is being sent.
Related Information


 Feedback