Introduction
This document describes the actions that you can take to troubleshoot upgrade failures with Cisco Identity Services Engine.
Prerequisites
Requirements
Cisco recommends that you have knowledge of these topics:
- Basic knowledge of Cisco Identity Service Engine
Components Used
This document is not restricted to specific software and hardware versions.
The information in this document was created from the devices in a specific lab environment. All of the devices used in this document started with a cleared (default) configuration. If your network is live, ensure that you understand the potential impact of any command.
Background Information
It is common practice to reimage as a last resort. However, the purpose is to enable you, along with Cisco TAC, with the knowledge to find the root cause..
Available Upgrade Methods:
-
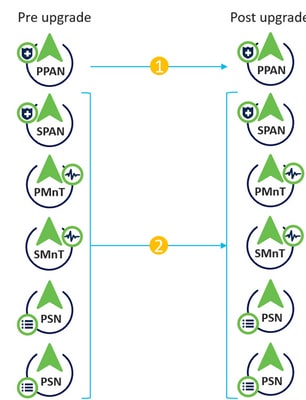
Full Upgrade: Full upgrade is a multi-step process that enables a complete upgrade of all the nodes in your Cisco ISE deployment at the same time. This method upgrades the deployment in less time than the split upgrade process. The application services are down during this upgrade process because all nodes are upgraded in parallell. Hence, this needs to be done during a maitenance window. This method was introduced in Cisco ISE 2.6 patch 10, Cisco ISE 2.7 and Cisco ISE 3.0 patch 3. This method can be used only via the GUI.
-
Legacy Split Upgrade: Split upgrade is a multi-step process that enables the upgrade of your Cisco ISE deployment while it allows services to remain available during the upgrade process. This upgrade method allows you to define a sequence for the nodes in the deployment to be upgraded. This allows the user to avoid impact on the services. When this method is used, the first node to be upgraded is always the Secondary Administration Node which becomes the Primary Administration Node of the new deployment. This method can be used via the CLI on any version or via the GUI in 3.2p3 or lower
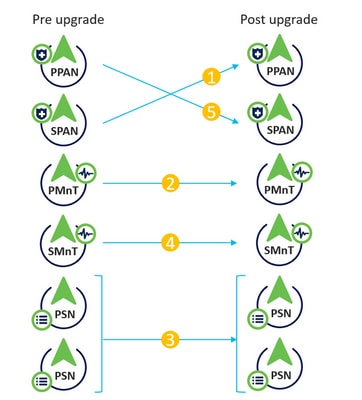
- New Split Upgrade: Split upgrade is a multi-step process that enables the upgrade of your Cisco ISE deployment to remain available during the upgrade process. In the new split upgrade workflow, a set of global pre-checks are run before the upgrade process starts. Then, during the upgrade process, each node has to pass local pre-check run specifically on the node being upgrade. One major change on this new mechanism is the introduction of "iterations". You can define which nodes are upgraded on each iteration and trigger iterations one by one until all nodes are upgraded. The first iteration needs to include Secondary Administration Node and one of the Monitoring nodes as a mandatory check. Another advantage is that you can monitor the progress of the upgrade of all nodes using Primary Administration Node GUI. At the end, when you upgrade the Old Primary Administration Node, you can monitor its progress using the new Upgraded PAN node. This method was introduced in 3.2p3 and can be used only via the GUI. If you upgrade via CLI legacy split upgrade machanism is used
- Backup and Restore: It is possible to take a backup from a lower ISE version and then restore it in a box with a higher version. To do this, make sure the higher version is within the supported upgrade range. For example, you can take a backup from a 2.7 box and restore it in 3.1 because the upgrade from 2.7 to 3.1 is valid. However, you cannot restore the 2.7 backup on a 3.3 box since this is not a valid upgrade path. This is the only method available to upgrade cloud deployments
Split Upgrade
 Split upgrade flow
Full Upgrade
 Full upgrade flow
Preparing the deployment for the upgrade

Note: Before starting the upgrade process, either run the ISE built-in pre-checks and make sure they are successful or install the URT bundle on secondary node and make sure this one is installed properly.
Requirements before upgrading
- Disable scheduled configuration and operational backups
- Disable PAN auto-failover
- Obtain AD credentials. Required to re-join the nodes post upgrading
- Create a bootable ISO ISE image with the version you are upgrading to in case a re-image is needed
- Take a configuration backup
- Backup the system certificates that have been signed by an external CA and that are in use
Troubleshooting issues at pre-checks or URT phase.
Before proceeding with the upgrade, it is important to run either URT bundle on the secondary node or to run the ISE built in pre-checks. This verifies that your node is ready for the upgrade process.
Both URT bundle or pre-checks do not have any impact on ISE services, so you can run them at any point of time.
For the backup/restore method, the previous information is also valid. The best way to make sure a healthy backup is generated is by installing either URT or by running pre-checks.
if any of the pre-checks fail, an error message is displayed (so you can take proper actions). If further information is needed, you can take a support bundle in the specific node throwing the error and check the next log files

Note: When you collect the Support Bundle, make sure to enable a full configuration database check to include configdb-upgrade logs.
For Pre-Check failures.
Refer to the ADE.log and ise-psc.log files of the specific node failing the pre-check.
You can use the next commands:
show logging system ade/ADE.log
show logging application ise-psc.log
For Configuration Data Upgrade Check failures.
Refer to ADE.log, configdb-upgrade-[timestamp].log and dbupgrade-data-global-[timestamp].log on secondary admin node.
You can use the next commands:
show logging system ade/ADE.log
show logging application configdb-upgrade-[timestamp].log
show logging application dbupgrade-data-global-[timestamp].log
For URT bundle installation failures.
If the URT bundle fails, you can select the option to export the log generated. You can review such logs to find the root cause of the failure.
If this fails, you can open a TAC case and upload the log generated by the URT bundle and a support bundle from the Secondary Administration Node to the case.
Take the support bundle selecting the next checkboxes and you can select only the day when URT or pre-checks were executed:
- Include debug logs
- Include local logs
- Include system logs

Note: In some cases, it can be useful to have a config backup of the deployment so TAC can restore it in the lab. For both URT logs and config backup, do not forget to include the encryption keys in the notes
Issue during the Upgrade Process
Sanity checks
- Is connectivity working between PAN and the rest of the nodes?
- Check if there is any firewall blocking the communication
- Check if there is MTU issues
- You can take simultaneous pcaps using root on both PAN and Remote node to verify connectivity
- Were pre-check or URT installation successful? - If not, then we need to make sure pre-checks or URT are successful first
- is the upgraded version a valid one? - As a rule of thumb, remember, we can jump maximum three versions.
Easy way to verify if remote node can send admin API calls to the PAN
Create the next file by using these next steps:
- login to root shell
- cd /localdisk
- viedit req.xml
- copy and paste the next:
<?xml version="1.0" encoding="UTF-8" standalone="yes"?><infraDeployBean><hostname>name_of_the_node_you_are_upgrading</hostname></infraDeployBean>
- use "escape" and then "wq!" to save the file
- Use the next command
curl -v -H "Content-Type: text/xml" -d @req.xml -X PUT https://<PAN_ip_address>/admin/API/Infra/Node/SyncStatus --user <super_admin_user>:<super_admin_password> -k
Full Upgrade
If the upgrade fails on the PAN or any of the secondary nodes.
Refer to ADE.log and ise-psc.log
show logging system ade/ADE.log
show logging application ise-psc.log
Additional logs:
monit.log

Note: Remember to always collect the Support Bundle before you perform any workaround.
Workaround
If the primary admin node upgrade fails, promote the secondary admin to the primary admin and then re-try the upgrade.
Split Upgrade
Upgrade failed in one of the nodes and cannot continue with rest of the deployment.
Refer to ADE.log and ise-psc.log
show logging system ade/ADE.log
show logging application ise-psc.log
Additional logs:
monit.log
Workaround
If the upgrade fails on any other node apart from primary admin, the node would have to be deregistered from the deployment. This node has to be upgraded individually or reimaged directly to the upgraded version and can be joined back to the deployment.
Known Scenarios
Upgrade Gets Stuck on One of the Nodes
There are scenarios where upgrade gets stuck for more than 5-6 hours.
None of the initial steps where services need to be stopped have a timeout configured, hence, it would be stuck indefinitely if something fails. On later stages, DB schema and schema upgrade do have timeout configured.
Proceed with Support Bundle collection. ADE logs shows at which step its blocked, more specific debugs are collected based on this information.
Workaround
The only option to take off the node from this state is a manual reload.
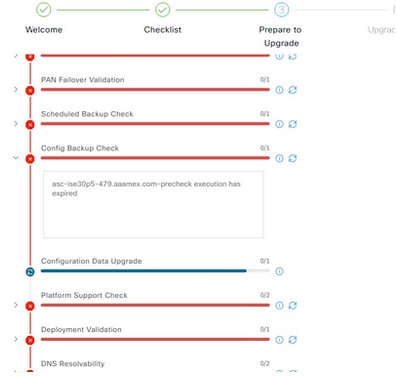
Pre-Checks Time Out Before Configuration Data Upgrade is Completed
 Pre-checks failure
Workaround
Hit refresh failed checks.
Known Upgrade Defects
Cisco bug ID CSCwa04370 - ISE 3.1 Defalt route removed or tied to wrong interface after upgrading.
Cisco bug ID CSCwa82553 - ISE 3.1 Default route is on the incorrect interface if bonding is configured.
Cisco bug ID CSCwa08018 - ISE 3.1 GUI does not work when IPV6 is disabled globally.
Related Information


 Feedback