Configure Secure Client IKEv2/ASA in ASDM with AAA & Cert Auth
Available Languages
Download Options
Bias-Free Language
The documentation set for this product strives to use bias-free language. For the purposes of this documentation set, bias-free is defined as language that does not imply discrimination based on age, disability, gender, racial identity, ethnic identity, sexual orientation, socioeconomic status, and intersectionality. Exceptions may be present in the documentation due to language that is hardcoded in the user interfaces of the product software, language used based on RFP documentation, or language that is used by a referenced third-party product. Learn more about how Cisco is using Inclusive Language.
Contents
Introduction
This document describes the steps necessary for configuring secure client over IKEv2 on ASA using ASDM with AAA and certificate authentication.
Prerequisites
Requirements
Cisco recommends that you have knowledge of these topics:
- Configuration of Cisco Identity Services Engine (ISE)
- Configuration of CiscoAdaptive Security Virtual Appliance(ASAv)
- Configuration of Cisco Adaptive Security Device Manager (ASDM)
- VPN Authentication Flow
Components Used
The information in this document is based on these software and hardware versions:
- Identity Services Engine Virtual 3.3 patch 1
- Adaptive Security Virtual Appliance 9.20(2)21
- Adaptive Security Device Manager 7.20(2)
- Cisco Secure Client 5.1.3.62
- Windows Server 2016
- Windows 10
The information in this document was created from the devices in a specific lab environment. All of the devices used in this document started with a cleared (default) configuration. If your network is live, ensure that you understand the potential impact of any command.
Network Diagram
This image shows the topology that is used for the example of this document.
The domain name configured on Windows Server 2016 is ad.rem-system.com, which is used as an example in this document.
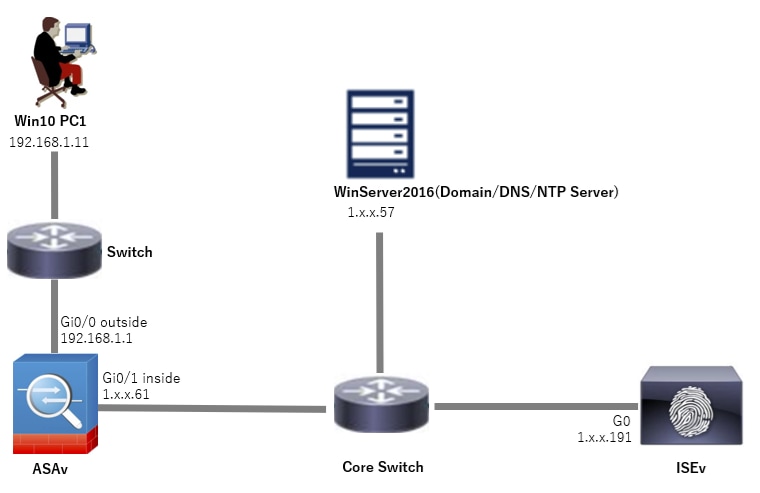 Network Diagram
Configurations
Configuration in ASDM
Step 1. Open VPN Wizards
Navigate to Wizards > VPN Wizards, click Secure Client VPN Wizard.
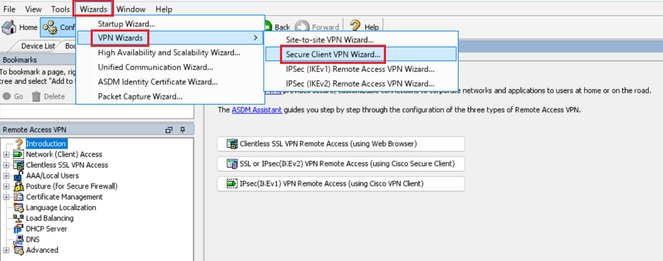 Open VPN Wizards
Click Next.
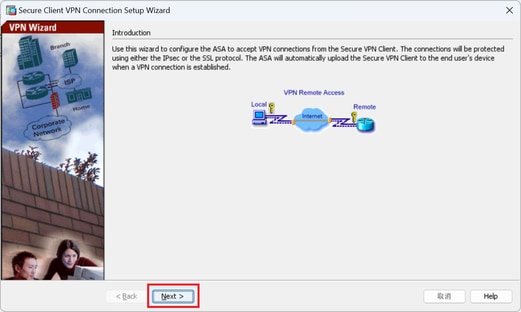 Click Next Button
Step 2. Connection Profile Identification
Input information for connection profile.
Connection Profile Name : vpn-ipsec-tunnel-grp
VPN Access Interface : outside
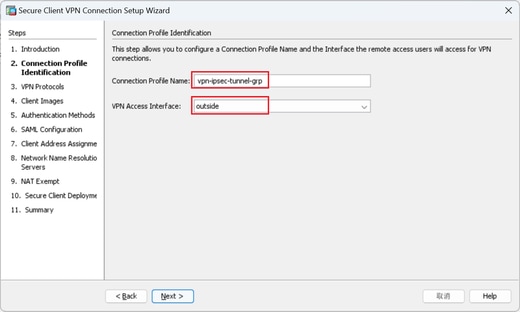 Connection Profile Identification
Step 3. VPN Protocols
Select IPsec, click Add button to add a new self-signed certificate.
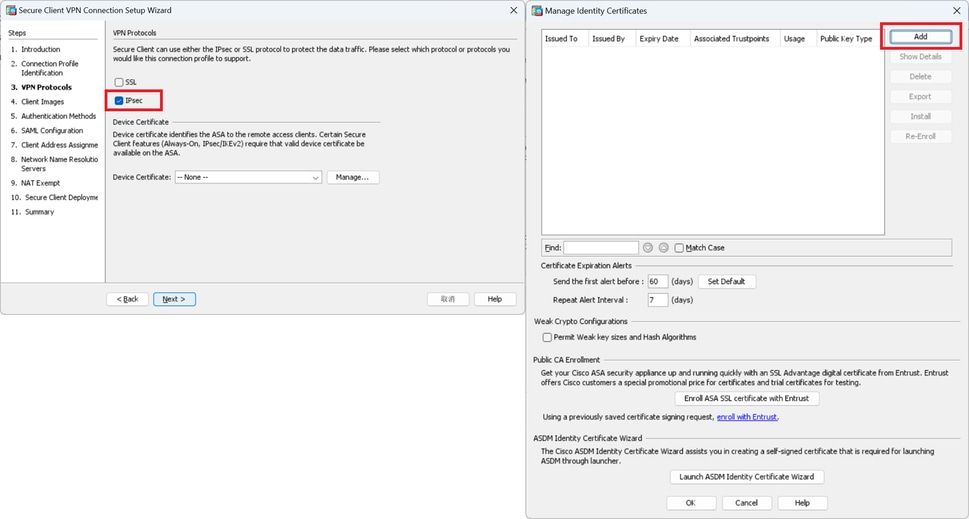 VPN Protocols
Input information for self-signed certificate.
Trustpoint Name : vpn-ipsec-trustpoint
Key Pair : ipsec-kp
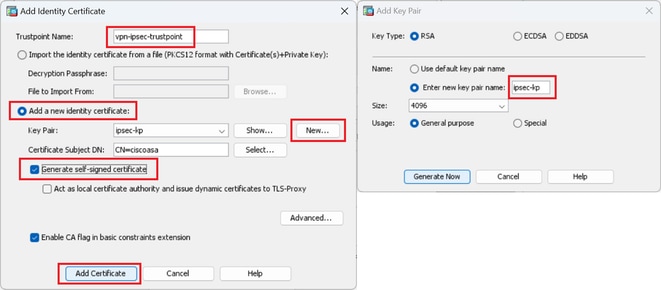 Detail of Self-Signed Certificate
Confirm the settings of VPN protocols, click Next button.
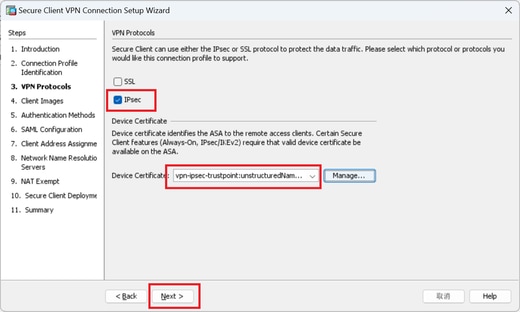 Confirm Settings of VPN Protocol
Step 4. Client Images
Click Add button to add secure client image, click Next button.
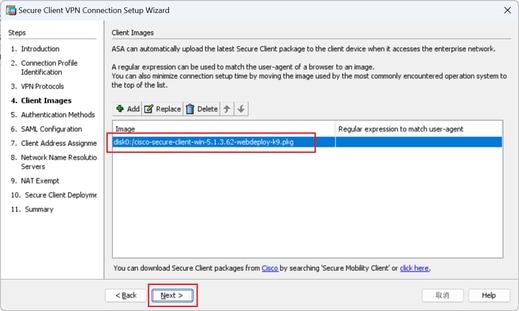 Client Images
Step 5. Authentication Methods
Click New button to add a new aaa server, click Next button.
Server Group Name : radius-grp
Authentication Protocol : RADIUS
Server IP Address : 1.x.x.191
Interface : inside
 Authentication Methods
Step 6. SAML Configuration
Click Next button.
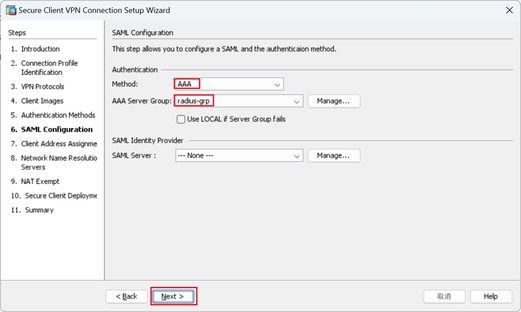 SAML Configuration
Step 7. Client Address Assignme
Click New button to add a new IPv4 pool, click Next button.
Name : vpn-ipsec-pool
Starting IP Address : 172.16.1.20
Ending IP Address : 172.16.1.30
Subnet Mask : 255.255.255.0
 Client Address Assign
Step 8. Network Name Resolution Servers
Input information for DNS and domain, click Next button.
DNS Servers : 1.x.x.57
Domain Name : ad.rem-system.com
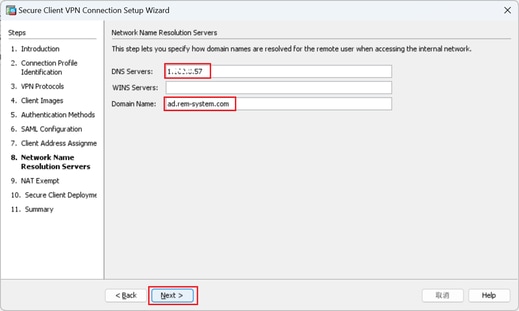 Network Name Resolution Servers
Step 9. NAT Exempt
Click Next button.
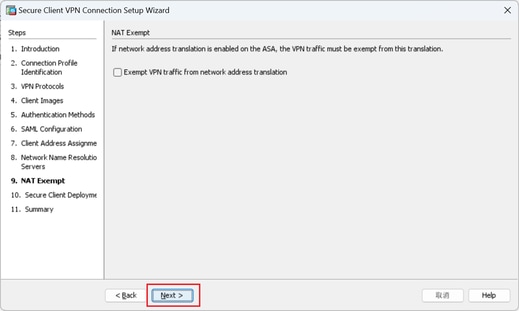 NAT Exempt
Step 10. Secure Client Deployment
Select Allow Web Launch, click Next button.
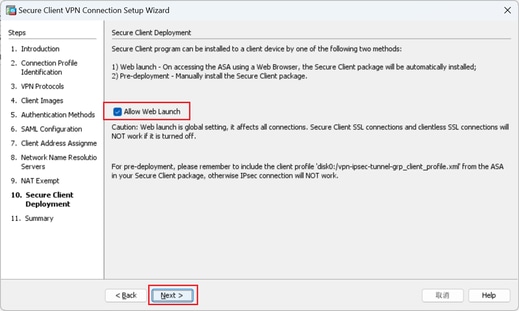 Secure Client Deployment
Step 11. Save Settings
Click Finish button and save the settings.
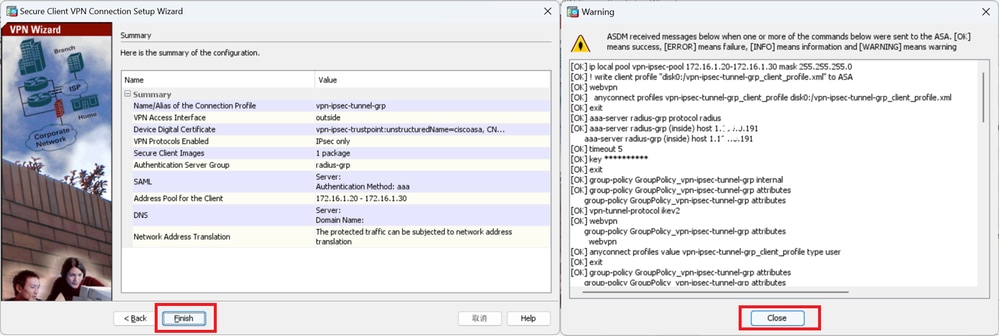 Save Settings
Step 12. Confirm and Export Secure Client Profile
Navigate to Configuration > Remote Access VPN > Network (Client) Access > Secure Client Profile, click Edit button.
 Edit Secure Client Profile
Confirm the detail of profile.
- Display Name (required) : ciscoasa (IPsec) IPv4
- FQDN or IP Address : 192.168.1.1
- Primary Protocol : IPsec
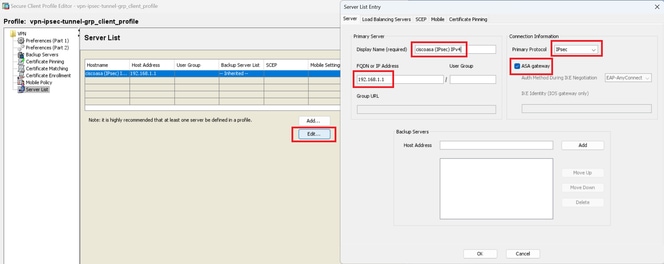 Confirm Secure Client Profile
Click Export button to export the profile to local PC.
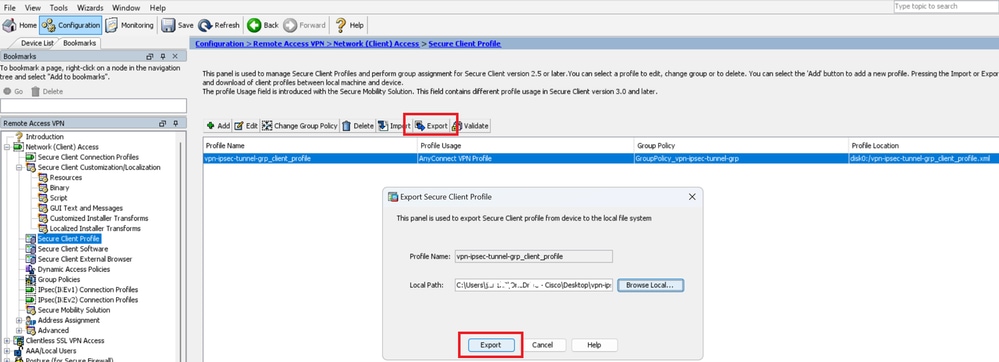 Export Secure Client Profile
Step 13. Confirm Detail of Secure Client Profile
Open Secure Client Profile by browser, confirm that the primary protocol for host is IPsec.
 Detail of Secure Client Profile
Step 14. Confirm Settings in ASA CLI
Confirm the IPsec settings created by ASDM in the ASA CLI.
// Defines a pool of addresses
ip local pool vpn-ipsec-pool 172.16.1.20-172.16.1.30 mask 255.255.255.0

// Defines radius server
aaa-server radius-grp protocol radius
aaa-server radius-grp (inside) host 1.x.x.191
timeout 5

// Define the transform sets that IKEv2 can use
crypto ipsec ikev2 ipsec-proposal AES256
protocol esp encryption aes-256
protocol esp integrity sha-256 sha-1
crypto ipsec ikev2 ipsec-proposal AES192
protocol esp encryption aes-192
protocol esp integrity sha-256 sha-1
crypto ipsec ikev2 ipsec-proposal AES
protocol esp encryption aes
protocol esp integrity sha-256 sha-1
crypto ipsec ikev2 ipsec-proposal 3DES
protocol esp encryption aes
protocol esp integrity sha-256 sha-1
crypto ipsec ikev2 ipsec-proposal DES
protocol esp encryption aes
protocol esp integrity sha-256 sha-1

// Configures the crypto map to use the IKEv2 transform-sets
crypto dynamic-map SYSTEM_DEFAULT_CRYPTO_MAP 65535 set ikev2 ipsec-proposal AES256 AES192 AES 3DES DES
crypto map outside_map 65535 ipsec-isakmp dynamic SYSTEM_DEFAULT_CRYPTO_MAP
crypto map outside_map interface outside

// Defines trustpoint
crypto ca trustpoint vpn-ipsec-trustpoint
enrollment self
subject-name CN=ciscoasa
keypair ipsec-kp
crl configure

// Defines self-signed certificate
crypto ca certificate chain vpn-ipsec-trustpoint
certificate 6651a2a2
308204ed 308202d5 a0030201 02020466 51a2a230 0d06092a 864886f7 0d01010b
......
ac76f984 efd41d13 073d0be6 f923a9c6 7b
quit

// IKEv2 Policies
crypto ikev2 policy 1
encryption aes-256
integrity sha256
group 5
prf sha256
lifetime seconds 86400
crypto ikev2 policy 10
encryption aes-192
integrity sha256
group 5
prf sha256
lifetime seconds 86400
crypto ikev2 policy 20
encryption aes
integrity sha256
group 5
prf sha256
lifetime seconds 86400
crypto ikev2 policy 40
encryption aes
integrity sha256
group 5
prf sha256
lifetime seconds 86400

// Enabling client-services on the outside interface
crypto ikev2 enable outside client-services port 443

// Specifiies the certificate the ASA uses for IKEv2
crypto ikev2 remote-access trustpoint vpn-ipsec-trustpoint

// Configures the ASA to allow Cisco Secure Client connections and the valid Cisco Secure Client images
webvpn
enable outside
enable
anyconnect image disk0:/cisco-secure-client-win-5.1.3.62-webdeploy-k9.pkg 1
anyconnect profiles vpn-ipsec-tunnel-grp_client_profile disk0:/vpn-ipsec-tunnel-grp_client_profile.xml
anyconnect enable
tunnel-group-list enable

// Configures the group-policy to allow IKEv2 connections and defines which Cisco Secure Client profile for the user
group-policy GroupPolicy_vpn-ipsec-tunnel-grp internal
group-policy GroupPolicy_vpn-ipsec-tunnel-grp attributes
wins-server none
dns-server value 1.x.x.57
vpn-tunnel-protocol ikev2
default-domain value ad.rem-system.com
webvpn
anyconnect profiles value vpn-ipsec-tunnel-grp_client_profile type user

// Ties the pool of addressess to the vpn connection
tunnel-group vpn-ipsec-tunnel-grp type remote-access
tunnel-group vpn-ipsec-tunnel-grp general-attributes
address-pool vpn-ipsec-pool
authentication-server-group radius-grp
default-group-policy GroupPolicy_vpn-ipsec-tunnel-grp
tunnel-group vpn-ipsec-tunnel-grp webvpn-attributes
group-alias vpn-ipsec-tunnel-grp enable
Step 15. Add Cryptographic Algorithm
In ASA CLI, add group 19 to IKEv2 Policy.

Note: For IKEv2/IPsec connections, Cisco Secure Client no longer supports Diffie-Hellman (DH) groups 2, 5, 14, and 24 as of version 4.9.00086. This change can result in connection failures due to cryptographic algorithm mismatches.
ciscoasa(config)# crypto ikev2 policy 1
ciscoasa(config-ikev2-policy)# group 19
ciscoasa(config-ikev2-policy)#
Configuration in Windows Server
You need to add a domain user for VPN connection. Navigate toActive Directory Users and Computers, clickUsers. Add vpnuser as domain user.
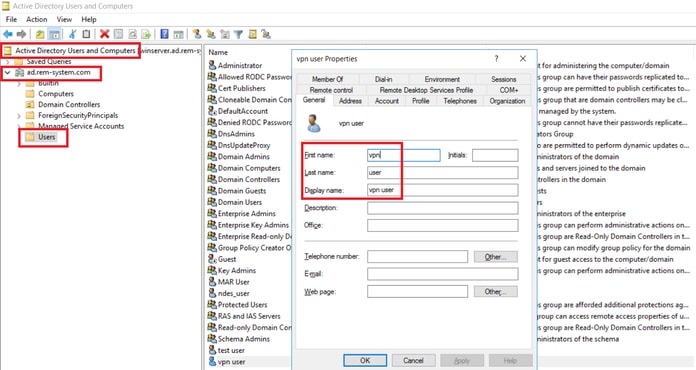 Add Domain User
Add the domain user to member of Domain Admins and Domain Users.
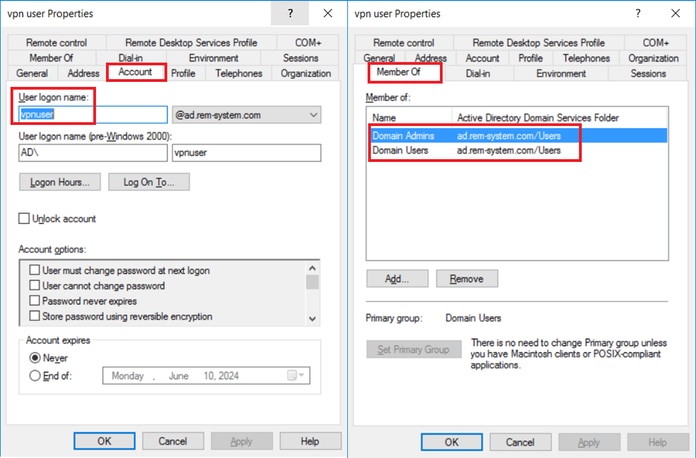 Domain Admins and Domain Users
Configuration in ISE
Step 1. Add Device
Navigate toAdministration > Network Devices, clickAddbutton to add ASAv device.
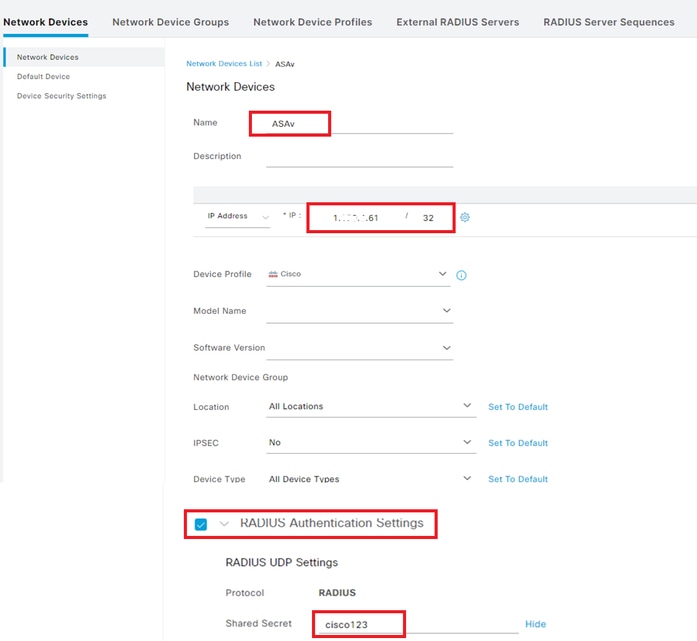 Add Device
Step 2. Add Active Directory
Navigate toAdministration > External Identity Sources > Active Directory, clickConnectiontab, add Active Directory to ISE.
- Join Point Name: AD_Join_Point
- Active Directory Domain: ad.rem-system.com
 Add Active Directory
Navigate to Groups tab, selectSelect Groups From Directoryfrom drop-down list. Select Groups from Directory
ClickRetrieve Groupsfrom drop-down list. Checkad.rem-system.com/Users/Domain Computersandad.rem-system.com/Users/Domain Usersand clickOK.
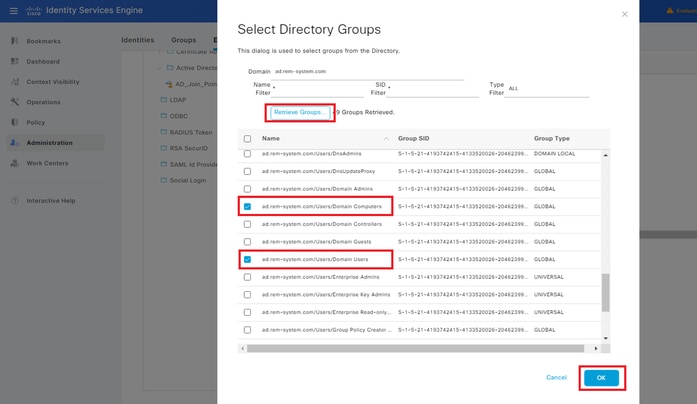 Add Domain Computers and Users
Step 3. Add Identity Source Sequesce
Navigate toAdministration > Identity Source Sequences, add an Identity Source Sequence.
- Name: Identity_AD
- Authentication Search List: AD_Join_Point
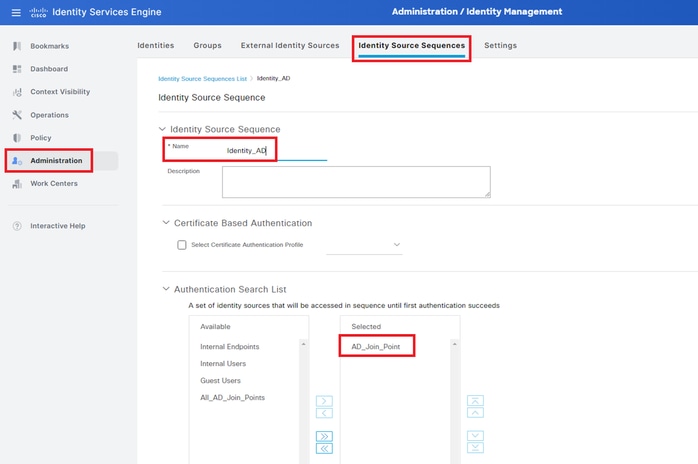 Add Identity Source Sequences
Step 4. Add Policy Set
Navigate to Policy > Policy Sets, click + to add a policy set.
- Policy Set Name : VPN_Test
- Conditions : DEVICE Device Type EQUALS All Device Types
- Allowed Protocols / Server Sequence : Default Network Access
 Add Policy Set
Step 5. Add Authentication Policy
Navigate to Policy Sets, click VPN_Test to add an authentication policy.
- Rule Name : VPN_Authentication
- Conditions : Network Access Device IP Address EQUALS 1.x.x.61
- Use : Identity_AD
 Add Authentication Policy
Step 6. Add Authorization Policy
Navigate to Policy Sets, click VPN_Test to add an authorization policy.
- Rule Name : VPN_Authorization
- Conditions : Network_Access_Authentication_Passed
- Results : PermitAccess
 Add Authorization policy
Verify
Step 1. Copy Secure Client Profile to Win10 PC1
Copy the secure client profile to the C:\ProgramData\Cisco\Cisco Secure Client\VPN\Profile directory.
 Copy Profile to PC
Step 2. Initiate VPN Connection
On the endpoint, run Cisco Secure Client and input the username and password, then confirm that Cisco Secure Client connects successfully.
 Connection Succeeded
Step 3. Confirm Syslog on ASA
In the syslog, confirm that the IKEv2 connection succeeded.
May 28 20xx 08:xx:20: %ASA-5-750006: Local:192.168.1.1:4500 Remote:192.168.1.11:50982 Username:vpnuser IKEv2 SA UP. Reason: New Connection Established
May 28 20xx 08:xx:20: %ASA-6-751026: Local:192.168.1.1:4500 Remote:192.168.1.11:50982 Username:vpnuser IKEv2 Client OS: Windows Client: AnyConnect 5.1.3.62
Step 4. Confirm IPsec Session on ASA
run show vpn-sessiondb detail anyconnect command to confirm the IKEv2/IPsec session on ASA.
ciscoasa# show vpn-sessiondb detail anyconnect

Session Type: AnyConnect Detailed

Username : vpnuser Index : 23
Assigned IP : 172.16.1.20 Public IP : 192.168.1.11
Protocol : IKEv2 IPsecOverNatT AnyConnect-Parent
License : AnyConnect Premium
Encryption : IKEv2: (1)AES256 IPsecOverNatT: (1)AES256 AnyConnect-Parent: (1)none
Hashing : IKEv2: (1)SHA256 IPsecOverNatT: (1)SHA256 AnyConnect-Parent: (1)none
Bytes Tx : 840 Bytes Rx : 52408
Pkts Tx : 21 Pkts Rx : 307
Pkts Tx Drop : 0 Pkts Rx Drop : 0
Group Policy : GroupPolicy_vpn-ipsec-tunnel-grp
Tunnel Group : vpn-ipsec-tunnel-grp
Login Time : 08:13:20 UTC Tue May 28 2024
Duration : 0h:10m:10s
Inactivity : 0h:00m:00s
VLAN Mapping : N/A VLAN : none
Audt Sess ID : 01aa003d0001700066559220
Security Grp : none

IKEv2 Tunnels: 1
IPsecOverNatT Tunnels: 1
AnyConnect-Parent Tunnels: 1

AnyConnect-Parent:
Tunnel ID : 23.1
Public IP : 192.168.1.11
Encryption : none Hashing : none
Auth Mode : userPassword
Idle Time Out: 30 Minutes Idle TO Left : 19 Minutes
Client OS : win
Client OS Ver: 10.0.15063
Client Type : AnyConnect
Client Ver : 5.1.3.62

IKEv2:
Tunnel ID : 23.2
UDP Src Port : 50982 UDP Dst Port : 4500
Rem Auth Mode: userPassword
Loc Auth Mode: rsaCertificate
Encryption : AES256 Hashing : SHA256
Rekey Int (T): 86400 Seconds Rekey Left(T): 85790 Seconds
PRF : SHA256 D/H Group : 19
Filter Name :
Client OS : Windows Client Type : AnyConnect

IPsecOverNatT:
Tunnel ID : 23.3
Local Addr : 0.0.0.0/0.0.0.0/0/0
Remote Addr : 172.16.1.20/255.255.255.255/0/0
Encryption : AES256 Hashing : SHA256
Encapsulation: Tunnel
Rekey Int (T): 28800 Seconds Rekey Left(T): 28190 Seconds
Idle Time Out: 30 Minutes Idle TO Left : 29 Minutes
Bytes Tx : 840 Bytes Rx : 52408
Pkts Tx : 21 Pkts Rx : 307
Step 5. Confirm Radius Live Log
Navigate to Operations > RADIUS > Live Logsin ISE GUI, confirm the live log for vpn authentication.
 Radius Live Log
Click Status to confirm the detail of live log.
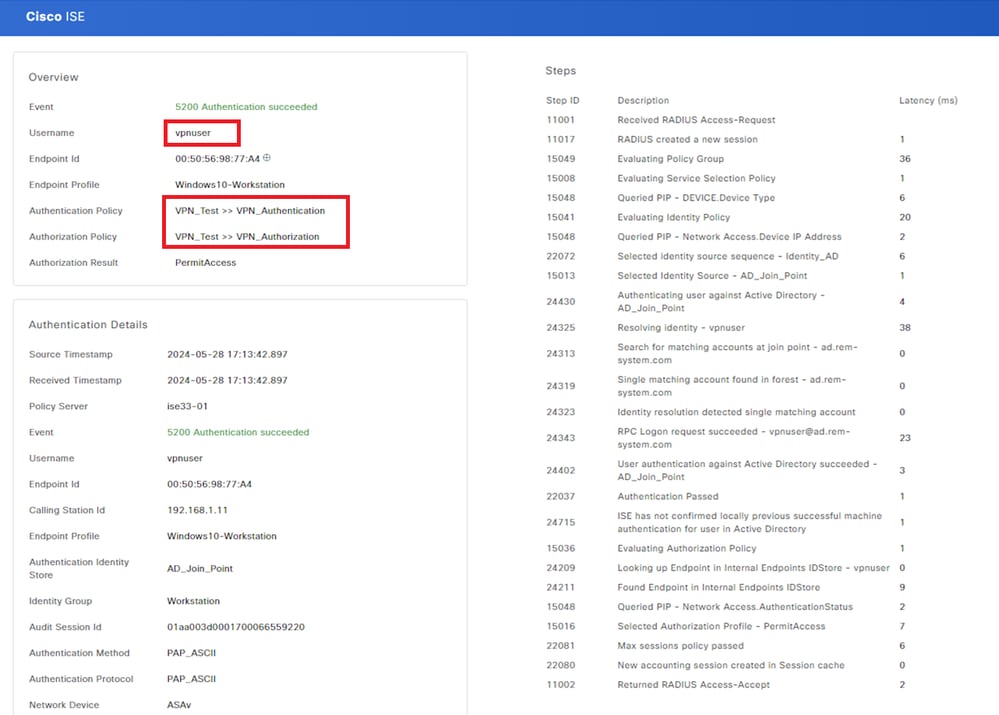 Detail of Live Log
Troubleshoot
The cryptographic algorithms mismatch can result in connection failures. This is an example of when an algorithms mismatch issue occurs. Executing Step 15 of section Configuration in ASDM can solve the issue.
Step 1. Initiate VPN Connection
On the endpoint, run the Cisco Secure Client and confirm that the connection failed due to a cryptographic algorithms mismatch.
The cryptographic algorithms required by the secure gateway do not match those supported by AnyConnect.Please contact your network administrator.
 Connection Failed
Step 2. Confirm Syslog in CLI
In the syslog, confirm that the IKEv2 negotiation failed.
May 28 20xx 08:xx:29: %ASA-5-750002: Local:192.168.1.1:500 Remote:192.168.1.11:57711 Username:Unknown IKEv2 Received a IKE_INIT_SA request
May 28 20xx 08:xx:29: %ASA-4-750003: Local:192.168.1.1:500 Remote:192.168.1.11:57711 Username:Unknown IKEv2 Negotiation aborted due to ERROR: Failed to find a matching policy
Reference
AnyConnect Over IKEv2 to ASA with AAA and Certificate Authentication
Revision History
| Revision | Publish Date | Comments |
|---|---|---|
1.0 |
18-Jul-2024 |
Initial Release |
Contributed by Cisco Engineers
- Jian ZhangTechnical Consulting Engineer
Contact Cisco
- Open a Support Case

- (Requires a Cisco Service Contract)
 Feedback